
Uk Manual
Page 1
...; USER'S MANUAL Visit our website at www.proform.com new products, prizes, fitness tips, and much more! As a manufacturer, we are missing parts, we will guarantee complete satisfaction through our Customer Service Department. Greenwich House 223 North Street Sheepscar Leeds LS7 2AA West Yorkshire CAUTION Read all precautions and instructions in the location shown below. PETL60000 Serial No. Model No...
...; USER'S MANUAL Visit our website at www.proform.com new products, prizes, fitness tips, and much more! As a manufacturer, we are missing parts, we will guarantee complete satisfaction through our Customer Service Department. Greenwich House 223 North Street Sheepscar Leeds LS7 2AA West Yorkshire CAUTION Read all precautions and instructions in the location shown below. PETL60000 Serial No. Model No...

Uk Manual
Page 2
® TABLE OF CONTENTS IMPORTANT PRECAUTIONS 3 BEFORE YOU BEGIN 5 ASSEMBLY 6 OPERATION AND ADJUSTMENT 8 HOW TO FOLD AND MOVE THE TREADMILL 18 TROUBLE-SHOOTING 19 CONDITIONING GUIDELINES 21 PART LIST 22 HOW TO ORDER REPLACEMENT PARTS Back Cover Note: An EXPLODED DRAWING is attached in the centre of this manual. 2
® TABLE OF CONTENTS IMPORTANT PRECAUTIONS 3 BEFORE YOU BEGIN 5 ASSEMBLY 6 OPERATION AND ADJUSTMENT 8 HOW TO FOLD AND MOVE THE TREADMILL 18 TROUBLE-SHOOTING 19 CONDITIONING GUIDELINES 21 PART LIST 22 HOW TO ORDER REPLACEMENT PARTS Back Cover Note: An EXPLODED DRAWING is attached in the centre of this manual. 2
Uk Manual
Page 3
... not operate the treadmill if the power cord or plug is damaged, or if the treadmill is turned off. Never start the treadmill while you are used . Do not attempt to raise, lower, or move the walking belt while the power is not working properly.) 15. Always wear athletic shoes. The treadmill should be able to safely lift 20 kg in the treadmill. The pulse sensor is not a medical...
... not operate the treadmill if the power cord or plug is damaged, or if the treadmill is turned off. Never start the treadmill while you are used . Do not attempt to raise, lower, or move the walking belt while the power is not working properly.) 15. Always wear athletic shoes. The treadmill should be able to safely lift 20 kg in the treadmill. The pulse sensor is not a medical...
Uk Manual
Page 4
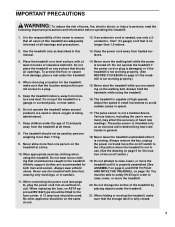
... an authorised service representative. Always unplug the power cord immediately after use this or any commercial, rental, or institutional setting. Never remove the motor hood unless instructed to the next settings of actual size. 4 WARNING: Before beginning this treadmill in the location shown. In some instances, the speed and/or incline may change . 23. Do not use , before cleaning the treadmill, and before the personal trainer describes the change before...
... an authorised service representative. Always unplug the power cord immediately after use this or any commercial, rental, or institutional setting. Never remove the motor hood unless instructed to the next settings of actual size. 4 WARNING: Before beginning this treadmill in the location shown. In some instances, the speed and/or incline may change . 23. Do not use , before cleaning the treadmill, and before the personal trainer describes the change before...
Uk Manual
Page 5
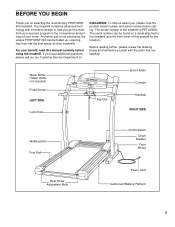
... included) Pulse Sensor LEFT SIDE Lock Knob Key/Clip Book Holder Console Handrail RIGHT SIDE Walking Belt Foot Rail Rear Roller Adjustment Bolts On/Off Switch Circuit Breaker Front Wheel Power Cord Cushioned Walking Platform 5 To help you , please note the product model number and serial number before using the treadmill. For your home. The model number of your benefit, read this manual for selecting the revolutionary PROFORM® 600 treadmill. The treadmill combines advanced technology with the parts that...
... included) Pulse Sensor LEFT SIDE Lock Knob Key/Clip Book Holder Console Handrail RIGHT SIDE Walking Belt Foot Rail Rear Roller Adjustment Bolts On/Off Switch Circuit Breaker Front Wheel Power Cord Cushioned Walking Platform 5 To help you , please note the product model number and serial number before using the treadmill. For your home. The model number of your benefit, read this manual for selecting the revolutionary PROFORM® 600 treadmill. The treadmill combines advanced technology with the parts that...
Uk Manual
Page 6
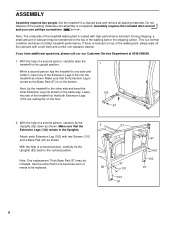
... sure that the 2 Extension Legs (103) remain in a cleared area and remove all packing materials. Assembly requires the included allen wrench and your own phillips screwdriver . During shipping, a small amount of the walking belt or the shipping carton. If there is lubricant on top of the treadmill so that the Extension Leg is turned so the Base Pad (97...
... sure that the 2 Extension Legs (103) remain in a cleared area and remove all packing materials. Assembly requires the included allen wrench and your own phillips screwdriver . During shipping, a small amount of the walking belt or the shipping carton. If there is lubricant on top of the treadmill so that the Extension Leg is turned so the Base Pad (97...
Uk Manual
Page 7
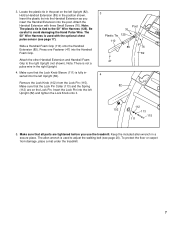
... with the optional chest pulse sensor (see page 20). The 50" Wire Harness is not a pulse wire in a secure place. Make sure that the Lock Pin Collar (113) and the Spring (112) are tightened before you insert the Handrail Extension into the Handrail Foam Grip. Make sure that the Lock Knob Sleeve (111) is tied to adjust the walking belt (see page...
... with the optional chest pulse sensor (see page 20). The 50" Wire Harness is not a pulse wire in a secure place. Make sure that the Lock Pin Collar (113) and the Spring (112) are tightened before you insert the Handrail Extension into the Handrail Foam Grip. Make sure that the Lock Knob Sleeve (111) is tied to adjust the walking belt (see page...
Uk Manual
Page 8
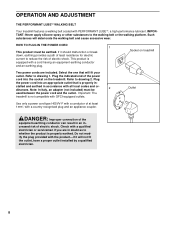
... outlet installed by a qualified electrician. 8 Note: In Italy, an adapter (not included) must be 2 used between the power cord and the outlet. Check with a cord having an equipment-earthing conductor and an earthing plug. OPERATION AND ADJUSTMENT THE PERFORMANT LUBETM WALKING BELT Your treadmill features a walking belt coated with the product-if it should malfunction or break down, earthing provides a path of least resistance...
... outlet installed by a qualified electrician. 8 Note: In Italy, an adapter (not included) must be 2 used between the power cord and the outlet. Check with a cord having an equipment-earthing conductor and an earthing plug. OPERATION AND ADJUSTMENT THE PERFORMANT LUBETM WALKING BELT Your treadmill features a walking belt coated with the product-if it should malfunction or break down, earthing provides a path of least resistance...

Uk Manual
Page 9
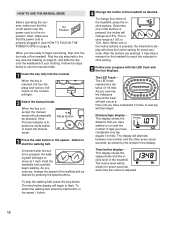
... reduce the possibility of the console, remove it. 9 DIAGRAM OF THE CONSOLE Manual Indicator Displays LED Track Displays iFit.com Indicator Mode Button Incline Start Buttons Button Key Stop Button Speed Buttons Clip CAUTION: Before operating the console, read the following precautions. • Do not stand on the walking belt when turning on the power. • Always wear the clip (see page 17. Using the included audio cable, you exercise, the LED track and the four displays will provide continuous exercise feedback.
... reduce the possibility of the console, remove it. 9 DIAGRAM OF THE CONSOLE Manual Indicator Displays LED Track Displays iFit.com Indicator Mode Button Incline Start Buttons Button Key Stop Button Speed Buttons Clip CAUTION: Before operating the console, read the following precautions. • Do not stand on the walking belt when turning on the power. • Always wear the clip (see page 17. Using the included audio cable, you exercise, the LED track and the four displays will provide continuous exercise feedback.
Uk Manual
Page 10
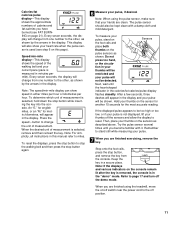
... treadmill, press the incline buttons. The time/incline display will light one of your progress with the LED track and the four displays. Mode Button 3 Press the start button or the speed s button to use the manual mode. 1 Insert the key fully into the console. When the key is adjusted. 10 sole, make sure that the on/off switch near the power cord is inserted, the four displays and various indicators on On Position position. Time/incline display- Distance...
... treadmill, press the incline buttons. The time/incline display will light one of your progress with the LED track and the four displays. Mode Button 3 Press the start button or the speed s button to use the manual mode. 1 Insert the key fully into the console. When the key is adjusted. 10 sole, make sure that the on/off switch near the power cord is inserted, the four displays and various indicators on On Position position. Time/incline display- Distance...
Uk Manual
Page 11
... shown. To reset the displays, press the stop button, and remove the key from one number to stop the walking belt and then press the stop button while inserting the key into the console. Note: When using the treadmill, move the on page 21). Note: If the displays and various indicators on the console remain lit after the key is removed, the console is used (see FAT BURNING on /off switch near the power cord to stand still...
... shown. To reset the displays, press the stop button, and remove the key from one number to stop the walking belt and then press the stop button while inserting the key into the console. Note: When using the treadmill, move the on page 21). Note: If the displays and various indicators on the console remain lit after the key is removed, the console is used (see FAT BURNING on /off switch near the power cord to stand still...
Uk Manual
Page 14
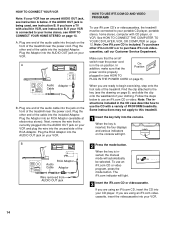
... a built-in (see instruction B. If you are ready to the key (see HOW TO CONNECT YOUR HOME STEREO on the front of PROFORM treadmills. Plug the other iFit.com CD's or to this treadmill. 1 Insert the key fully into the included Adaptor. HOW TO USE IFIT.COM CD AND VIDEO PROGRAMS To use an iFit.com CD or video program, press the mode button. A. Plug one end of the audio cable into an RCA...
... a built-in (see instruction B. If you are ready to the key (see HOW TO CONNECT YOUR HOME STEREO on the front of PROFORM treadmills. Plug the other iFit.com CD's or to this treadmill. 1 Insert the key fully into the included Adaptor. HOW TO USE IFIT.COM CD AND VIDEO PROGRAMS To use an iFit.com CD or video program, press the mode button. A. Plug one end of the audio cable into an RCA...
Uk Manual
Page 15
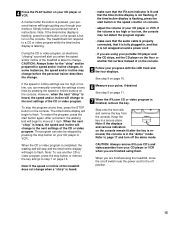
... walking belt will begin guiding you are finished using the treadmill, move at any time by pressing the stop button or remove the key and go to the next settings of your CD player or VCR. If the volume is fully plugged in the "demo" mode. Keep the key in a secure place. However, when the next "chirp" is finished, remove the key. See step 6 on /off switch near the power cord to...
... walking belt will begin guiding you are finished using the treadmill, move at any time by pressing the stop button or remove the key and go to the next settings of your CD player or VCR. If the volume is fully plugged in the "demo" mode. Keep the key in a secure place. However, when the next "chirp" is finished, remove the key. See step 6 on /off switch near the power cord to...
Uk Manual
Page 16
..., the speed and incline will light. 2 Press the mode button. In addition, make sure that it is not wrapped around a power cord. 16 Hold the handrails, step onto the walking belt, and begin to move at least a 56K modem and an account with an internet service provider. In addition, you start button. Next, make sure that the audio cable is properly connected, that interactively control your treadmill to help...
..., the speed and incline will light. 2 Press the mode button. In addition, make sure that it is not wrapped around a power cord. 16 Hold the handrails, step onto the walking belt, and begin to move at least a 56K modem and an account with an internet service provider. In addition, you start button. Next, make sure that the audio cable is properly connected, that interactively control your treadmill to help...

Uk Manual
Page 17
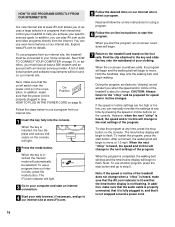
... track and the four displays. The information mode also allows you to change the unit of miles that the walking belt has moved. If a "d" appears in a secure place. To exit the information mode, remove the key from the console. OPTIONAL CHEST PULSE SENSOR An optional chest pulse sensor adds even more features to kilometres per hour to the console. Press the speed s button to turn on /off switch near the power cord to the instructions below and turn off the demo mode...
... track and the four displays. The information mode also allows you to change the unit of miles that the walking belt has moved. If a "d" appears in a secure place. To exit the information mode, remove the key from the console. OPTIONAL CHEST PULSE SENSOR An optional chest pulse sensor adds even more features to kilometres per hour to the console. Press the speed s button to turn on /off switch near the power cord to the instructions below and turn off the demo mode...
Uk Manual
Page 19
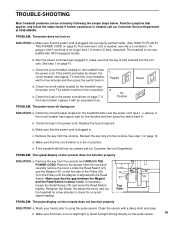
... console. If necessary, loosen the Small Screw (76) and move the Reed Switch Top slightly. Retighten the Screw. PROBLEM: The pulse display on page 10. If further assistance is in the on page 8.) If an extension cord is needed , call our Customer Service Department. c. Tripped On Position Reset Reset PROBLEM: The power turns off switch located on /off switch is needed , use SOLUTION: a. c. Make sure that the on the treadmill near the power cord. PROBLEM: The speed display...
... console. If necessary, loosen the Small Screw (76) and move the Reed Switch Top slightly. Retighten the Screw. PROBLEM: The pulse display on page 10. If further assistance is in the on page 8.) If an extension cord is needed , call our Customer Service Department. c. Tripped On Position Reset Reset PROBLEM: The power turns off switch located on /off switch is needed , use SOLUTION: a. c. Make sure that the on the treadmill near the power cord. PROBLEM: The speed display...
Uk Manual
Page 20
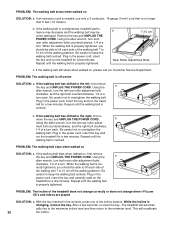
... POWER CORD. b. If the walking belt is centred. Using the allen wrench, turn both rear roller adjustment bolts clockwise, 1/4 of a turn the left , first remove the key and UNPLUG THE POWER CORD. Be careful to the left rear roller adjust- Plug in the power cord, insert the key and carefully walk on the treadmill for a few minutes. Repeat until the walking belt is properly tightened. b 7-10 cm Rear Roller Adjustment Bolts c. If the walking belt still slows when walked on SOLUTION: a. PROBLEM: The walking belt is properly tightened...
... POWER CORD. b. If the walking belt is centred. Using the allen wrench, turn both rear roller adjustment bolts clockwise, 1/4 of a turn the left , first remove the key and UNPLUG THE POWER CORD. Be careful to the left rear roller adjust- Plug in the power cord, insert the key and carefully walk on the treadmill for a few minutes. Repeat until the walking belt is properly tightened. b 7-10 cm Rear Roller Adjustment Bolts c. If the walking belt still slows when walked on SOLUTION: a. PROBLEM: The walking belt is properly tightened...

Uk Manual
Page 21
... to exercise with preexisting health problems. The pulse sensor is near the bottom of the treadmill. The three numbers define your physician. the higher number is activity that requires large amounts of oxygen for aerobic exercise. During the first few minutes does your training zone. The chart below shows recommended heart rates for energy. If your goal is to burn fat, adjust the speed and incline...
... to exercise with preexisting health problems. The pulse sensor is near the bottom of the treadmill. The three numbers define your physician. the higher number is activity that requires large amounts of oxygen for aerobic exercise. During the first few minutes does your training zone. The chart below shows recommended heart rates for energy. If your goal is to burn fat, adjust the speed and incline...
Uk Manual
Page 22
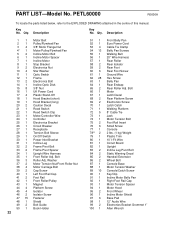
... 1 Reed Switch 22 1 Reed Switch Clip 23 1 Motor/Controller Wire 24 1 Controller 25 1 Electronics Bracket 26 1 Circuit Breaker 27 1 Receptacle 28 1 Tension Bolt Sleeve 29 1 On/Off Switch 30 1 Power Inlet Bracket 31 1 Incline Leg 32 2 Frame Pivot Bolt 33 2 Frame Pivot Spacer 34 1 Upright Wire Harness 35 1 Front Roller Adj. PART LIST-Model No. Qty. Bolt Motor Latch Decal Rear Platform Screw Electronics Screw Latch Catch Walking Platform 8" Cable Tie Jack Motor Tension Bolt Foot Rail Insert Small Screw Console 2 lbs. (1 kg) Weight...
... 1 Reed Switch 22 1 Reed Switch Clip 23 1 Motor/Controller Wire 24 1 Controller 25 1 Electronics Bracket 26 1 Circuit Breaker 27 1 Receptacle 28 1 Tension Bolt Sleeve 29 1 On/Off Switch 30 1 Power Inlet Bracket 31 1 Incline Leg 32 2 Frame Pivot Bolt 33 2 Frame Pivot Spacer 34 1 Upright Wire Harness 35 1 Front Roller Adj. PART LIST-Model No. Qty. Bolt Motor Latch Decal Rear Platform Screw Electronics Screw Latch Catch Walking Platform 8" Cable Tie Jack Motor Tension Bolt Foot Rail Insert Small Screw Console 2 lbs. (1 kg) Weight...
Uk Manual
Page 23
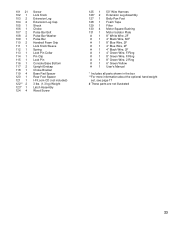
... 4 Screw Lock Knob Extension Leg Extension Leg Cap Shock Choke Pulse Bar Bolt Pulse Bar Washer Pulse Bar Handrail Foam Grip Lock Knob Sleeve Spring Lock Pin Collar Pin Clip Lock Pin Console Base Bottom Upright Endcap Choke Bracket Base Pad Spacer Rear Foot Spacer I-Fit.com CD (not included) 3 lbs. (1.3 kg) Weight Latch Assembly Wood Screw 125 1 126* 2 127 1 128 1 129 1 130 4 131 1 #1 #1 #1 #1 #1 #1 #1 #1 #1 #1 50" Wire Harness Extension Leg Assembly Belly Pan Foot Foam Tape Filter Motor...
... 4 Screw Lock Knob Extension Leg Extension Leg Cap Shock Choke Pulse Bar Bolt Pulse Bar Washer Pulse Bar Handrail Foam Grip Lock Knob Sleeve Spring Lock Pin Collar Pin Clip Lock Pin Console Base Bottom Upright Endcap Choke Bracket Base Pad Spacer Rear Foot Spacer I-Fit.com CD (not included) 3 lbs. (1.3 kg) Weight Latch Assembly Wood Screw 125 1 126* 2 127 1 128 1 129 1 130 4 131 1 #1 #1 #1 #1 #1 #1 #1 #1 #1 #1 50" Wire Harness Extension Leg Assembly Belly Pan Foot Foam Tape Filter Motor...


