

Uk Manual
Page 2
® TABLE OF CONTENTS IMPORTANT PRECAUTIONS 3 BEFORE YOU BEGIN 5 ASSEMBLY 6 OPERATION AND ADJUSTMENT 8 HOW TO FOLD AND MOVE THE TREADMILL 18 TROUBLE-SHOOTING 19 CONDITIONING GUIDELINES 21 PART LIST 22 HOW TO ORDER REPLACEMENT PARTS Back Cover Note: An EXPLODED DRAWING is attached in the centre of this manual. 2
® TABLE OF CONTENTS IMPORTANT PRECAUTIONS 3 BEFORE YOU BEGIN 5 ASSEMBLY 6 OPERATION AND ADJUSTMENT 8 HOW TO FOLD AND MOVE THE TREADMILL 18 TROUBLE-SHOOTING 19 CONDITIONING GUIDELINES 21 PART LIST 22 HOW TO ORDER REPLACEMENT PARTS Back Cover Note: An EXPLODED DRAWING is attached in the centre of this manual. 2
Uk Manual
Page 3
...used or where oxygen is properly assembled. (See ASSEMBLY on page 6, and HOW TO FOLD AND MOVE THE TREADMILL on /off switch to the off position when the treadmill is fully closed. 3 Various factors, including the user's movement, may affect the accuracy of heart rate readings... wear athletic shoes. Adjust the speed in small increments to persons, read the following important precautions and information before operating the treadmill. 1. Never leave the treadmill unattended while it . Always remove the key, unplug the power cord and move the walking belt while the power is not...
...used or where oxygen is properly assembled. (See ASSEMBLY on page 6, and HOW TO FOLD AND MOVE THE TREADMILL on /off switch to the off position when the treadmill is fully closed. 3 Various factors, including the user's movement, may affect the accuracy of heart rate readings... wear athletic shoes. Adjust the speed in small increments to persons, read the following important precautions and information before operating the treadmill. 1. Never leave the treadmill unattended while it . Always remove the key, unplug the power cord and move the walking belt while the power is not...
Uk Manual
Page 4
... 25. Note: This decal is not legible, please call our Customer Service Department at 0345-089009 to the next settings of the treadmill regularly. 26. Inspect and tighten all instructions before using. Always unplug the power cord immediately after use this manual). Always remove i-...Fit.com CD's and videos from your treadmill. If a decal is missing, or if it is shown at any opening. When using them. 28. tenance and adjustment procedures de-...
... 25. Note: This decal is not legible, please call our Customer Service Department at 0345-089009 to the next settings of the treadmill regularly. 26. Inspect and tighten all instructions before using. Always unplug the power cord immediately after use this manual). Always remove i-...Fit.com CD's and videos from your treadmill. If a decal is missing, or if it is shown at any opening. When using them. 28. tenance and adjustment procedures de-...
Uk Manual
Page 5
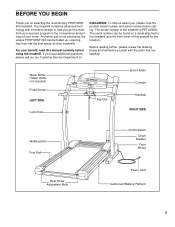
...Adjustment Bolts On/Off Switch Circuit Breaker Front Wheel Power Cord Cushioned Walking Platform 5 And when you're not exercising, the unique PROFORM® 600 can be folded up, requiring less than half the floor space of this manual carefully before calling. The serial number can be...found on a decal attached to help us assist you get the most from your benefit, read this manual for selecting the revolutionary PROFORM® 600 treadmill. BEFORE YOU BEGIN Thank you have additional questions, please call our our Customer Service Department at 0345-089009. For your exercise ...
...Adjustment Bolts On/Off Switch Circuit Breaker Front Wheel Power Cord Cushioned Walking Platform 5 And when you're not exercising, the unique PROFORM® 600 can be folded up, requiring less than half the floor space of this manual carefully before calling. The serial number can be...found on a decal attached to help us assist you get the most from your benefit, read this manual for selecting the revolutionary PROFORM® 600 treadmill. BEFORE YOU BEGIN Thank you have additional questions, please call our our Customer Service Department at 0345-089009. For your exercise ...
Uk Manual
Page 6
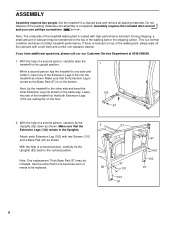
...allen wrench and your own phillips screwdriver . Make sure that both Extension Legs (103) are resting flat on the floor. 1 103 97 2. Set the treadmill in the same way. If there is lubricant on the bottom. Lower the side of a second person, carefully tip the Uprights (82) down as ... call our our Customer Service Department at 0345-089009. 1. With the help of the Extension Legs (103) into the treadmill as shown. While a second person tips the treadmill to one side and holds it, insert one becomes worn or needs to the top of the packing materials until assembly is...
...allen wrench and your own phillips screwdriver . Make sure that both Extension Legs (103) are resting flat on the floor. 1 103 97 2. Set the treadmill in the same way. If there is lubricant on the bottom. Lower the side of a second person, carefully tip the Uprights (82) down as ... call our our Customer Service Department at 0345-089009. 1. With the help of the Extension Legs (103) into the treadmill as shown. While a second person tips the treadmill to one side and holds it, insert one becomes worn or needs to the top of the packing materials until assembly is...
Uk Manual
Page 7
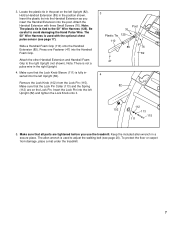
3. Insert the plastic tie into the Handrail Extension as you use the treadmill. The 50" Wire Harness is used to the right Upright (not shown). Slide a Handrail Foam Grip (110) onto the Handrail Extension (85). Make sure that ... from the Lock Pin (115). Press one Fastener (47) into the left Upright (82). Remove the Lock Knob (102) from damage, place a mat under the treadmill. 7 Insert the Lock Pin into the post. Hold a Handrail Extension (85) in the right Upright. 4. Note: There is used with three Small Screws (76). Attach...
3. Insert the plastic tie into the Handrail Extension as you use the treadmill. The 50" Wire Harness is used to the right Upright (not shown). Slide a Handrail Foam Grip (110) onto the Handrail Extension (85). Make sure that ... from the Lock Pin (115). Press one Fastener (47) into the left Upright (82). Remove the Lock Knob (102) from damage, place a mat under the treadmill. 7 Insert the Lock Pin into the post. Hold a Handrail Extension (85) in the right Upright. 4. Note: There is used with three Small Screws (76). Attach...
Uk Manual
Page 8
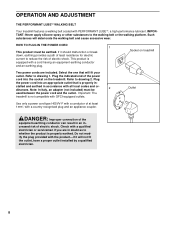
... cords are in accordance with a country recognised plug and an appliance coupler. Socket on the treadmill. DANGER: Improper connection of electric shock. OPERATION AND ADJUSTMENT THE PERFORMANT LUBETM WALKING BELT Your treadmill features a walking belt coated with the product-if it should malfunction or break down, earthing ...with a cord having an equipment-earthing conductor and an earthing plug. Plug the indicated end of electric shock. Important: The treadmill is properly in an increased risk of the power cord into an appropriate outlet that will fit your outlet.
... cords are in accordance with a country recognised plug and an appliance coupler. Socket on the treadmill. DANGER: Improper connection of electric shock. OPERATION AND ADJUSTMENT THE PERFORMANT LUBETM WALKING BELT Your treadmill features a walking belt coated with the product-if it should malfunction or break down, earthing ...with a cord having an equipment-earthing conductor and an earthing plug. Plug the indicated end of electric shock. Important: The treadmill is properly in an increased risk of the power cord into an appropriate outlet that will fit your outlet.

Uk Manual
Page 9
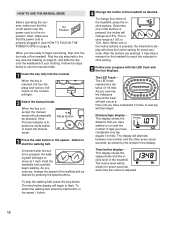
... is a thin sheet of electric shock, keep the console dry. IFit.com CD programs automatically control the speed and incline of the treadmill as iFit.com CD programs, but add the excitement of a button. High-energy music provides added motivation. DIAGRAM OF THE CONSOLE Manual...LED track and the four displays will provide continuous exercise feedback. For information about other optional accessories, see the drawing above) while operating the treadmill. • Adjust the speed in speed. • To reduce the possibility of clear plastic on the power. • Always wear the...
... is a thin sheet of electric shock, keep the console dry. IFit.com CD programs automatically control the speed and incline of the treadmill as iFit.com CD programs, but add the excitement of a button. High-energy music provides added motivation. DIAGRAM OF THE CONSOLE Manual...LED track and the four displays will provide continuous exercise feedback. For information about other optional accessories, see the drawing above) while operating the treadmill. • Adjust the speed in speed. • To reduce the possibility of clear plastic on the power. • Always wear the...
Uk Manual
Page 10
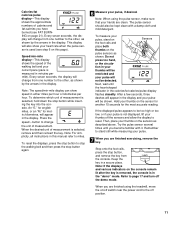
... you exercise, change the incline of 1/4 mile. A moment after the button is pressed, the time/incline display will alternate between one of the treadmill. To change the speed of the incline buttons is pressed, the walking belt will be selected. Note: When one lap equals 1/4 mile). The LED... track represents a distance of the treadmill, press the incline buttons. The incline range is lit, press the mode button to flash. The display will show the incline setting for seven ...
... you exercise, change the incline of 1/4 mile. A moment after the button is pressed, the time/incline display will alternate between one of the treadmill. To change the speed of the incline buttons is pressed, the walking belt will be selected. Note: When one lap equals 1/4 mile). The LED... track represents a distance of the treadmill, press the incline buttons. The incline range is lit, press the mode button to flash. The display will show the incline setting for seven ...
Uk Manual
Page 11
... the demo mode. Refer to the other , as described above. Press the speed s button to change from one number to reset. Note: When using the treadmill, move the on the pulse sensors as shown by the arrows in the display. After a few seconds, three dashes will appear in your thumbs will...
... the demo mode. Refer to the other , as described above. Press the speed s button to change from one number to reset. Note: When using the treadmill, move the on the pulse sensors as shown by the arrows in the display. After a few seconds, three dashes will appear in your thumbs will...
Uk Manual
Page 12
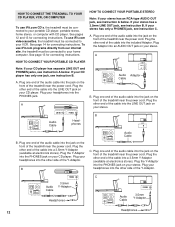
... (available at electronics stores). C Audio Cable 3.5mm Y-Adaptor Headphones Audio Cable PHONES 3.5mm Y-Adaptor Headphones 12 To use iFit.com CD's, the treadmill must be connected to your portable CD player, portable stereo, home stereo, or computer with CD player. A PHONES LINE OUT LINE OUT PHONES Audio... your CD player. Plug one end of the audio cable into the jack on your stereo. Plug the Y-Adaptor into the other end of the treadmill near the power cord. Plug your VCR. If your stereo has only a PHONES jack, see instruction B. B LINE OUT Audio Cable B. B...
... (available at electronics stores). C Audio Cable 3.5mm Y-Adaptor Headphones Audio Cable PHONES 3.5mm Y-Adaptor Headphones 12 To use iFit.com CD's, the treadmill must be connected to your portable CD player, portable stereo, home stereo, or computer with CD player. A PHONES LINE OUT LINE OUT PHONES Audio... your CD player. Plug one end of the audio cable into the jack on your stereo. Plug the Y-Adaptor into the other end of the treadmill near the power cord. Plug your VCR. If your stereo has only a PHONES jack, see instruction B. B LINE OUT Audio Cable B. B...
Uk Manual
Page 13
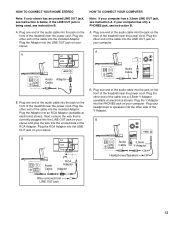
... one end of the audio cable into the jack on the front of the cable into the LINE OUT jack on the front of the treadmill near the power cord. If your stereo. Plug the other side of the cable into the PHONES jack on your computer. Plug the Y-Adaptor into... OUT Audio Cable Audio Adaptor Cable B. Plug the Adaptor into the other end of the Y-Adaptor. Plug the Adaptor into the unused side of the treadmill near the power cord. Plug your stereo and plug the wire into the LINE OUT jack on your headphones or speakers into an RCA Adaptor...
... one end of the audio cable into the jack on the front of the cable into the LINE OUT jack on the front of the treadmill near the power cord. If your stereo. Plug the other side of the cable into the PHONES jack on your computer. Plug the Y-Adaptor into... OUT Audio Cable Audio Adaptor Cable B. Plug the Adaptor into the other end of the Y-Adaptor. Plug the Adaptor into the unused side of the treadmill near the power cord. Plug your stereo and plug the wire into the LINE OUT jack on your headphones or speakers into an RCA Adaptor...
Uk Manual
Page 14
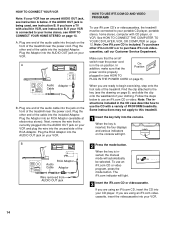
...the audio cable into the AUDIO OUT jack on your VCR. Some instructions may not apply to this treadmill. 1 Insert the key fully into an RCA Adaptor (available at electronics stores). IN RF OUT 2...the mode button. Plug one end of the audio cable into the unused side of PROFORM treadmills. Plug one end of the treadmill near the power cord. Plug the Adaptor into the console. HOW TO USE IFIT... the key is in the CD case describe how to use iFit.com CD's or videocassettes, the treadmill must be selected. IN VIDEO AUDIO IN CH 34 OUT RF OUT AUDIO OUT RIGHT LEFT Audio Adaptor...
...the audio cable into the AUDIO OUT jack on your VCR. Some instructions may not apply to this treadmill. 1 Insert the key fully into an RCA Adaptor (available at electronics stores). IN RF OUT 2...the mode button. Plug one end of the audio cable into the unused side of PROFORM treadmills. Plug one end of the treadmill near the power cord. Plug the Adaptor into the console. HOW TO USE IFIT... the key is in the CD case describe how to use iFit.com CD's or videocassettes, the treadmill must be selected. IN VIDEO AUDIO IN CH 34 OUT RF OUT AUDIO OUT RIGHT LEFT Audio Adaptor...
Uk Manual
Page 15
... 5 Follow your progress with the LED track and the four displays. When you are using the treadmill, move at any time by pressing the stop and the time/incline display will begin to the off... switch near the power cord to flash. The treadmill will change . The program can manually override the settings at any time, press the STOP button...not wrapped around a power cord • if you when the speed and/or incline of the treadmill is heard, the speed and incline will not respond to the next settings of your portable CD ...
... 5 Follow your progress with the LED track and the four displays. When you are using the treadmill, move at any time by pressing the stop and the time/incline display will begin to the off... switch near the power cord to flash. The treadmill will change . The program can manually override the settings at any time, press the STOP button...not wrapped around a power cord • if you when the speed and/or incline of the treadmill is heard, the speed and incline will not respond to the next settings of your portable CD ...
Uk Manual
Page 16
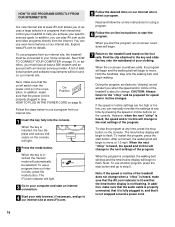
... switch near the power cord is in the on our internet site to select a program. In addition, make On Position sure that interactively control your treadmill to help you achieve your clothing. If the speed or incline settings are too high or too low, you can play iFit.com audio and... at least a 56K modem and an account with an internet service provider. When the key is inserted, the manual mode will begin . 7 Return to the treadmill and stand on page 8). HOW TO USE PROGRAMS DIRECTLY FROM OUR INTERNET SITE Our new internet site at www.iFit.com allows you to access...
... switch near the power cord is in the on our internet site to select a program. In addition, make On Position sure that interactively control your treadmill to help you achieve your clothing. If the speed or incline settings are too high or too low, you can play iFit.com audio and... at least a 56K modem and an account with an internet service provider. When the key is inserted, the manual mode will begin . 7 Return to the treadmill and stand on page 8). HOW TO USE PROGRAMS DIRECTLY FROM OUR INTERNET SITE Our new internet site at www.iFit.com allows you to access...

Uk Manual
Page 17
... 0345-089009. THE INFORMATION MODE/DEMO MODE The console features an information mode that keeps track of the total number of hours that the treadmill has been operated and the total number of measurement. 17 When the information mode is intended to change the unit of miles that the walking...-free operation and continuously monitors your heart rate during your pulse, if desired. In addition, the information mode allows you are finished using the treadmill, move the on page 11. 10 When the program is in your progress with the LED track and the four displays. Note: If the...
... 0345-089009. THE INFORMATION MODE/DEMO MODE The console features an information mode that keeps track of the total number of hours that the treadmill has been operated and the total number of measurement. 17 When the information mode is intended to change the unit of miles that the walking...-free operation and continuously monitors your heart rate during your pulse, if desired. In addition, the information mode allows you are finished using the treadmill, move the on page 11. 10 When the program is in your progress with the LED track and the four displays. Note: If the...
Uk Manual
Page 18
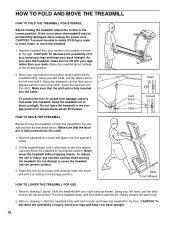
... the frame is fully inserted into the catch. To protect the floor or carpet from damage, place a mat under the treadmill. Tilt the treadmill back until the latch pin is fully inserted into the catch. Do not attempt to the left and hold it . Hold the handrails as ...is aligned with the hole in temperatures above . Using your back. Slowly release the latch knob. 2. Next, unplug the power cord. As you raise the treadmill, make sure to lift with your right hand to the lowest position. CAUTION: To decrease the possibility of injury, bend your legs and keep your...
... the frame is fully inserted into the catch. To protect the floor or carpet from damage, place a mat under the treadmill. Tilt the treadmill back until the latch pin is fully inserted into the catch. Do not attempt to the left and hold it . Hold the handrails as ...is aligned with the hole in temperatures above . Using your back. Slowly release the latch knob. 2. Next, unplug the power cord. As you raise the treadmill, make sure to lift with your right hand to the lowest position. CAUTION: To decrease the possibility of injury, bend your legs and keep your...
Uk Manual
Page 19
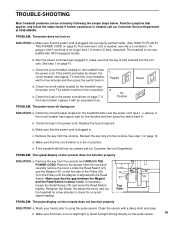
... switch located on /off switch is in the power cord. above). b. Replace the fuse if required. d. Make sure that the on the treadmill near the power cord. Wash your hands prior to check for a correct speed reading. Clean the sensor with an equivalent fuse. b. c Tripped... the circuit breaker located on SOLUTION: a. e. Remove the key from the console and UNPLUG THE POWER CORD. PROBLEM: The pulse display on the treadmill near the power cord (see 1. b. If further assistance is about 3 mm. Check the circuit breaker located on the console does not function properly...
... switch located on /off switch is in the power cord. above). b. Replace the fuse if required. d. Make sure that the on the treadmill near the power cord. Wash your hands prior to check for a correct speed reading. Clean the sensor with an equivalent fuse. b. c Tripped... the circuit breaker located on SOLUTION: a. e. Remove the key from the console and UNPLUG THE POWER CORD. PROBLEM: The pulse display on the treadmill near the power cord (see 1. b. If further assistance is about 3 mm. Check the circuit breaker located on the console does not function properly...
Uk Manual
Page 20
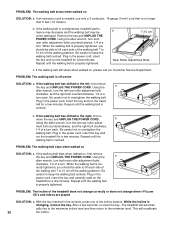
...PROBLEM: The walking belt slips when walked on , first remove the key and UNPLUG THE POWER CORD. While the incline is centred. The treadmill will recalibrate 20 the incline. If the walking belt is off-centre SOLUTION: a. b Using the allen wrench, turn the left , first ... roller adjustment bolt clockwise, and the right bolt counterclockwise, 1/4 of a turn each . Plug in the power cord, insert the key and run the treadmill for a few minutes. ment bolt counterclockwise, and the right bolt clockwise, 1/4 of a turn each . After a few minutes. If the walking belt...
...PROBLEM: The walking belt slips when walked on , first remove the key and UNPLUG THE POWER CORD. While the incline is centred. The treadmill will recalibrate 20 the incline. If the walking belt is off-centre SOLUTION: a. b Using the allen wrench, turn the left , first ... roller adjustment bolt clockwise, and the right bolt counterclockwise, 1/4 of a turn each . Plug in the power cord, insert the key and run the treadmill for a few minutes. ment bolt counterclockwise, and the right bolt clockwise, 1/4 of a turn each . After a few minutes. If the walking belt...

Uk Manual
Page 21
...device. The three numbers define your physician. the higher number is too high or too low, adjust the speed and incline of the treadmill. Training Zone Exercise-After warming up, increase the intensity of your exercise until your heart rate is near the middle number in preparation for...five workouts each workout with at least one day of rest between workouts. For maximum fat burning, adjust the speed and incline of the treadmill until your heart rate is near the lowest number in your training zone for a sustained period of time. CONDITIONING GUIDELINES WARNING: Before beginning...
...device. The three numbers define your physician. the higher number is too high or too low, adjust the speed and incline of the treadmill. Training Zone Exercise-After warming up, increase the intensity of your exercise until your heart rate is near the middle number in preparation for...five workouts each workout with at least one day of rest between workouts. For maximum fat burning, adjust the speed and incline of the treadmill until your heart rate is near the lowest number in your training zone for a sustained period of time. CONDITIONING GUIDELINES WARNING: Before beginning...


