

English Manual
Page 3
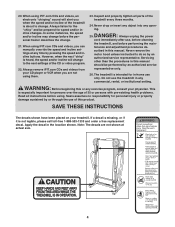
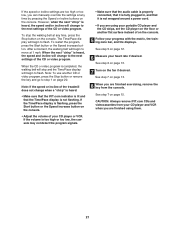
...YOU BEGIN on each side. Do not operate the treadmill if the power cord or plug is damaged, or if the treadmill is the responsibility of the owner to raise, lower, or move the walking belt while the power is turned off position when the treadmill is intended only as described in a fall and ...in small increments to avoid sudden jumps in damage to use . (See the drawing on page 10. Always remove the key, unplug the power cord, and move the treadmill until it is administered. 12. Do not attempt to raise, lower, or move the reset/off circuit breaker to persons, read the ...
...YOU BEGIN on each side. Do not operate the treadmill if the power cord or plug is damaged, or if the treadmill is the responsibility of the owner to raise, lower, or move the walking belt while the power is turned off position when the treadmill is intended only as described in a fall and ...in small increments to avoid sudden jumps in damage to use . (See the drawing on page 10. Always remove the key, unplug the power cord, and move the treadmill until it is administered. 12. Do not attempt to raise, lower, or move the reset/off circuit breaker to persons, read the ...
English Manual
Page 4
... 4 Always remove iFIT.com CDs and videos from your CD player or VCR when you when the speed and/or incline of the treadmill every three months. 24. Never remove the motor hood unless instructed to change to the next settings of this or any time by ...and/or incline will alert you are not shown at any exercise program, consult your treadmill. Always listen for in the location shown. Always unplug the power cord immediately after use the treadmill in any opening. The treadmill is about to do so by an authorized service representative only. 26. SAVE THESE...
... 4 Always remove iFIT.com CDs and videos from your CD player or VCR when you when the speed and/or incline of the treadmill every three months. 24. Never remove the motor hood unless instructed to change to the next settings of this or any time by ...and/or incline will alert you are not shown at any exercise program, consult your treadmill. Always listen for in the location shown. Always unplug the power cord immediately after use the treadmill in any opening. The treadmill is about to do so by an authorized service representative only. 26. SAVE THESE...
English Manual
Page 5
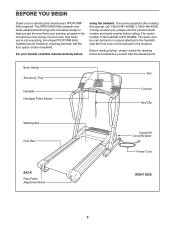
... found on a decal attached to help us assist you, please note the product model number and serial number before using the treadmill. And when you're not exercising, the unique PROFORM 545s treadmill can be folded up, requiring less than half the floor space of this manual, call 1-800-4-MY-HOME® (1-800-...this manual carefully before calling. Book Holder Accessory Tray Handrail Handgrip Pulse Sensor Fan Console Key/Clip Walking Belt Foot Rail Reset/Off Circuit Breaker Power Cord BACK Rear Roller Adjustment Bolts RIGHT SIDE 5 BEFORE YOU BEGIN Thank you for the location).
... found on a decal attached to help us assist you, please note the product model number and serial number before using the treadmill. And when you're not exercising, the unique PROFORM 545s treadmill can be folded up, requiring less than half the floor space of this manual, call 1-800-4-MY-HOME® (1-800-...this manual carefully before calling. Book Holder Accessory Tray Handrail Handgrip Pulse Sensor Fan Console Key/Clip Walking Belt Foot Rail Reset/Off Circuit Breaker Power Cord BACK Rear Roller Adjustment Bolts RIGHT SIDE 5 BEFORE YOU BEGIN Thank you for the location).

English Manual
Page 9
... Access Door (94) from the Console Back (95). Firmly press the receiver onto the indicated corner of the Console Back (95). 2. Make sure that the power cord is facing the Console Back as shown. Connect the wire on the back of the receiver and is unplugged. Reattach the Access Door (94) with...
... Access Door (94) from the Console Back (95). Firmly press the receiver onto the indicated corner of the Console Back (95). 2. Make sure that the power cord is facing the Console Back as shown. Connect the wire on the back of the receiver and is unplugged. Reattach the Access Door (94) with...
English Manual
Page 10
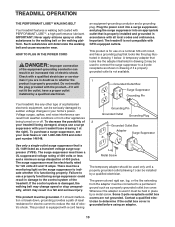
.... If it will deteriorate the walking belt and cause excessive wear. HOW TO PLUG IN THE POWER CORD DANGER: Improper connection of the treadmill. Do not modify the plug provided with all local codes and ordinances. Plug the power cord into a surge suppressor, and plug the surge suppressor into an appropriate outlet that looks like...
.... If it will deteriorate the walking belt and cause excessive wear. HOW TO PLUG IN THE POWER CORD DANGER: Improper connection of the treadmill. Do not modify the plug provided with all local codes and ordinances. Plug the power cord into a surge suppressor, and plug the surge suppressor into an appropriate outlet that looks like...
English Manual
Page 12
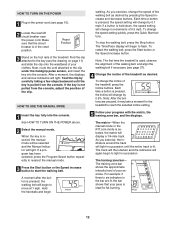
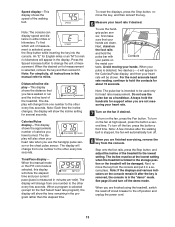
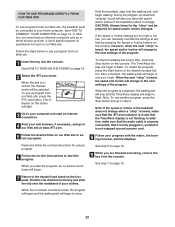
...the walking belt, press the Stop button. Note: The first time the treadmill is used, observe the alignment of the walking belt, and align the walking belt if necessary (see page 10). 2 Locate the reset/off circuit breaker near the power cord. The training zone bar- Test the clip by 0.5%. Each time a ... shows the approximate intensity level of the clip. if a button is pulled from the console, adjust the position of your pace is in the power cord (see page 27). 4 Change the incline of the treadmill, press the Incline buttons. For example, if three to move at 1 mph.
...the walking belt, press the Stop button. Note: The first time the treadmill is used, observe the alignment of the walking belt, and align the walking belt if necessary (see page 10). 2 Locate the reset/off circuit breaker near the power cord. The training zone bar- Test the clip by 0.5%. Each time a ... shows the approximate intensity level of the clip. if a button is pulled from the console, adjust the position of your pace is in the power cord (see page 27). 4 Change the incline of the treadmill, press the Incline buttons. For example, if three to move at 1 mph.
English Manual
Page 13
...after the key is removed, the console is selected (except for support when you are finished using the treadmill, switch the reset/off circuit breaker to the off position and unplug the power cord. 13 Do not use the hand- Always hold the handrails for the Self Select heart rate program), ..., two dashes (- -) will show the incline setting for metric kilometers will change the unit of measurement is folded to the storage position or the treadmill will automatically turn on the fan, press the Fan button. Note: A few seconds. The incline must be used only for about 15 seconds. ...
...after the key is removed, the console is selected (except for support when you are finished using the treadmill, switch the reset/off circuit breaker to the off position and unplug the power cord. 13 Do not use the hand- Always hold the handrails for the Self Select heart rate program), ..., two dashes (- -) will show the incline setting for metric kilometers will change the unit of measurement is folded to the storage position or the treadmill will automatically turn on the fan, press the Fan button. Note: A few seconds. The incline must be used only for about 15 seconds. ...
English Manual
Page 15
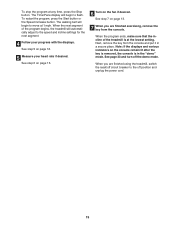
...button. Next, remove the key from the console. When you are finished using the treadmill, switch the reset/off circuit breaker to the speed and incline settings for the ...treadmill is in a secure place. See step 6 on page 13. 6 Turn on page 13. 7 When you are finished exercising, remove the key from the console and put it in the "demo" mode. See page 23 and turn off position and unplug the power cord.... 15 When the program ends, make sure that the incline of the program begins, the treadmill will automatically adjust to the off the...
...button. Next, remove the key from the console. When you are finished using the treadmill, switch the reset/off circuit breaker to the speed and incline settings for the ...treadmill is in a secure place. See step 6 on page 13. 6 Turn on page 13. 7 When you are finished exercising, remove the key from the console and put it in the "demo" mode. See page 23 and turn off position and unplug the power cord.... 15 When the program ends, make sure that the incline of the program begins, the treadmill will automatically adjust to the off the...
English Manual
Page 18
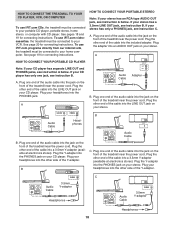
... included adapter. Plug the other side of the cable into the jack on your CD player. Plug one end of the treadmill near the power cord. Plug your headphones into the other end of the audio cable into the PHONES jack. See page 19 for connecting instructions....of the Y-adapter. Plug one jack, see instruction B. See pages 18 and 19 for connecting instructions. Plug the other side of the treadmill near the power cord. Plug your stereo has a 3.5mm LINE OUT jack, see instruction B. A PHONES LINE OUT LINE OUT PHONES Audio Cable Headphones Audio ...
... included adapter. Plug the other side of the cable into the jack on your CD player. Plug one end of the treadmill near the power cord. Plug your headphones into the other end of the audio cable into the PHONES jack. See page 19 for connecting instructions....of the Y-adapter. Plug one jack, see instruction B. See pages 18 and 19 for connecting instructions. Plug the other side of the treadmill near the power cord. Plug your stereo has a 3.5mm LINE OUT jack, see instruction B. A PHONES LINE OUT LINE OUT PHONES Audio Cable Headphones Audio ...

English Manual
Page 19
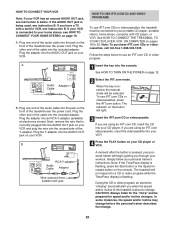
... jack 19 Plug the other side of the cable into the included adapter. Plug your headphones or speakers into the other end of the treadmill near the power cord. Plug one end of the audio cable into the jack on your stereo. A CD VCR Amp LINE OUT LINE OUT A. Plug one end of... LINE OUT jack on your stereo and plug the wire into the LINE OUT jack on your computer. Plug the other end of the treadmill near the power cord. Plug the adapter into the LINE OUT jack on your stereo. A LINE OUT Audio Cable Audio Adapter Cable B. HOW TO CONNECT YOUR HOME STEREO...
... jack 19 Plug the other side of the cable into the included adapter. Plug your headphones or speakers into the other end of the treadmill near the power cord. Plug one end of the audio cable into the jack on your stereo. A CD VCR Amp LINE OUT LINE OUT A. Plug one end of... LINE OUT jack on your stereo and plug the wire into the LINE OUT jack on your computer. Plug the other end of the treadmill near the power cord. Plug the adapter into the LINE OUT jack on your stereo. A LINE OUT Audio Cable Audio Adapter Cable B. HOW TO CONNECT YOUR HOME STEREO...
English Manual
Page 20
... will not respond to use iFIT.com CDs or videocassettes, press the iFIT.com button. The treadmill will be prepared for speed and/or incline changes. See HOW TO TURN ON THE POWER on pages 18 to your VCR is being used, see HOW TO CONNECT YOUR HOME STEREO on...cable into the included adapter. A. CAUTION: Always listen for the "chirp" and be selected. Plug one end of the treadmill near the power cord. B ANT. Plug one end of the treadmill near the power cord. The indicator on your VCR. Plug the other end of the cable into the jack on the front of the...
... will not respond to use iFIT.com CDs or videocassettes, press the iFIT.com button. The treadmill will be prepared for speed and/or incline changes. See HOW TO TURN ON THE POWER on pages 18 to your VCR is being used, see HOW TO CONNECT YOUR HOME STEREO on...cable into the included adapter. A. CAUTION: Always listen for the "chirp" and be selected. Plug one end of the treadmill near the power cord. B ANT. Plug one end of the treadmill near the power cord. The indicator on your VCR. Plug the other end of the cable into the jack on the front of the...
English Manual
Page 21
... button on page 20. Note: To use another flat surface instead of on page 15. When the CD or video program is not wrapped around a power cord. • If you are using them. 21 CAUTION: Always remove iFIT.com CDs and videocassettes from your CD player and VCR when you can manually... override the settings at any time by pressing the Speed or Incline buttons on the console. • Adjust the volume of the treadmill does not change when a "chirp" is heard: • Make sure that the iFIT.com indicator is lit and that it is completed, the walking belt...
... button on page 20. Note: To use another flat surface instead of on page 15. When the CD or video program is not wrapped around a power cord. • If you are using them. 21 CAUTION: Always remove iFIT.com CDs and videocassettes from your CD player and VCR when you can manually... override the settings at any time by pressing the Speed or Incline buttons on the console. • Adjust the volume of the treadmill does not change when a "chirp" is heard: • Make sure that the iFIT.com indicator is lit and that it is completed, the walking belt...
English Manual
Page 22
...Web site. If the speed or incline settings are finished exercising, remove the key from our Web site, the treadmill must have an internet connection and an internet service provider. To restart the program, press the Start button or... at 1 mph. When the key is completed, the walking belt will begin to the next settings of the treadmill does not change . Hold the handrails, step onto the walking belt, and begin to step 5. To stop...in, and that the Time/Pace display is not wrapped around a power cord. 8 Follow your web browser, if necessary, and go to flash.
...Web site. If the speed or incline settings are finished exercising, remove the key from our Web site, the treadmill must have an internet connection and an internet service provider. To restart the program, press the Start button or... at 1 mph. When the key is completed, the walking belt will begin to the next settings of the treadmill does not change . Hold the handrails, step onto the walking belt, and begin to step 5. To stop...in, and that the Time/Pace display is not wrapped around a power cord. 8 Follow your web browser, if necessary, and go to flash.
English Manual
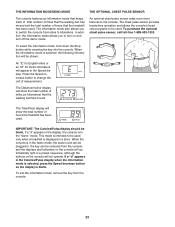
Page 23
... that keeps track of total number of miles that the walking belt has moved and the total number of miles (or kilometers) that the treadmill has been used. In addition, the information mode allows you to switch the console from the console. 23 The Distance/Incline display will not...be used only when a treadmill is displayed in a preset sequence, although the buttons on and turn on the console will show the total number of measurement. An optional chest pulse sensor adds even more features to kilometers. This mode is in the demo mode, the power cord can be plugged in ...
... that keeps track of total number of miles that the walking belt has moved and the total number of miles (or kilometers) that the treadmill has been used. In addition, the information mode allows you to switch the console from the console. 23 The Distance/Incline display will not...be used only when a treadmill is displayed in a preset sequence, although the buttons on and turn on the console will show the total number of measurement. An optional chest pulse sensor adds even more features to kilometers. This mode is in the demo mode, the power cord can be plugged in ...
English Manual
Page 24
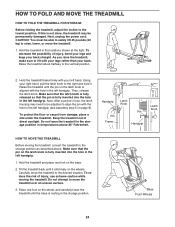
... wheels. If this is fully inserted into the hole in the left handgrip. To protect the floor or carpet from damage, place a mat under the treadmill. Make sure that the pin is resting in the locations shown at the right. CAUTION: You must be adjusted to the right and hold it... 24 Then, release the latch knob. Note: After a period of direct sunlight. Handgrip Latch Knob Pin Frame Pin Handgrip Latch Knob HOW TO MOVE THE TREADMILL Before moving the treadmill. Next, unplug the power cord. Hold the treadmill in the storage position.
... wheels. If this is fully inserted into the hole in the left handgrip. To protect the floor or carpet from damage, place a mat under the treadmill. Make sure that the pin is resting in the locations shown at the right. CAUTION: You must be adjusted to the right and hold it... 24 Then, release the latch knob. Note: After a period of direct sunlight. Handgrip Latch Knob Pin Frame Pin Handgrip Latch Knob HOW TO MOVE THE TREADMILL Before moving the treadmill. Next, unplug the power cord. Hold the treadmill in the storage position.
English Manual
Page 26
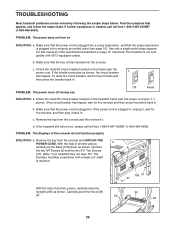
...and that applies, and follow the steps listed. Make sure that the power cord is plugged into the console. b. With the help of the console do not function properly SOLUTION: a. Important: The treadmill is plugged in, unplug it, wait for five minutes, and then ... With the help of the specifications described on the treadmill frame near the power cord. If further assistance is plugged in . b. c. above). TROUBLESHOOTING Most treadmill problems can be solved by following the simple steps below. c. If the power cord is not compatible with at least a 5" shaft is...
...and that applies, and follow the steps listed. Make sure that the power cord is plugged into the console. b. With the help of the console do not function properly SOLUTION: a. Important: The treadmill is plugged in, unplug it, wait for five minutes, and then ... With the help of the specifications described on the treadmill frame near the power cord. If further assistance is plugged in . b. c. above). TROUBLESHOOTING Most treadmill problems can be solved by following the simple steps below. c. If the power cord is not compatible with at least a 5" shaft is...
English Manual
Page 27
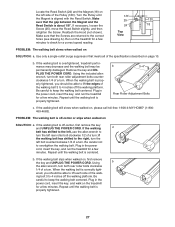
...Use only a single-outlet surge suppressor that meets all of a turn . If the walking belt is about 1/8". Plug in the power cord, insert the key, and run the treadmill for a few minutes. Be careful not to keep the walking belt centered. Make sure that the Screws are returned to turn the...: a. Repeat until the Magnet is correctly tight- b. When the walking belt is aligned with the Reed Switch. Plug in the power cord, insert the key, and run the treadmill for a few minutes. Turn the Pulley until the walking belt is off -center or slips when walked on , please call toll...
...Use only a single-outlet surge suppressor that meets all of a turn . If the walking belt is about 1/8". Plug in the power cord, insert the key, and run the treadmill for a few minutes. Be careful not to keep the walking belt centered. Make sure that the Screws are returned to turn the...: a. Repeat until the Magnet is correctly tight- b. When the walking belt is aligned with the Reed Switch. Plug in the power cord, insert the key, and run the treadmill for a few minutes. Turn the Pulley until the walking belt is off -center or slips when walked on , please call toll...
English Manual
Page 30
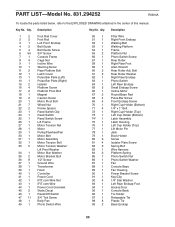
...Assembly Motor Tension Bolt Motor Tension Washer/ Lift Pivot Washer Motor Star Washer Motor Bracket Bolt 1/2" Screw Ground Wire Transformer Hood Controller Power Cord iFIT.com Wire Nut iFIT.com Wire Power Cord Grommet Static Decal Reset/Off Switch 3/4" Tek Screw Belly Pan Photo Switch Wire 50 1 51 1 52 1 53 1 54 1...Book Holder Screw Isolator Plate Screw Spring Bolt Wire Harness Platform Spring Photo Switch Nut Photo Switch Washer Fan Console Base Fan Housing Power Bracket Screw Key/Clip 1/4" Star Washer Left Rear Endcap Foot Access Door Console Back Tie Holder Releasable Tie Plastic Tie Base ...
...Assembly Motor Tension Bolt Motor Tension Washer/ Lift Pivot Washer Motor Star Washer Motor Bracket Bolt 1/2" Screw Ground Wire Transformer Hood Controller Power Cord iFIT.com Wire Nut iFIT.com Wire Power Cord Grommet Static Decal Reset/Off Switch 3/4" Tek Screw Belly Pan Photo Switch Wire 50 1 51 1 52 1 53 1 54 1...Book Holder Screw Isolator Plate Screw Spring Bolt Wire Harness Platform Spring Photo Switch Nut Photo Switch Washer Fan Console Base Fan Housing Power Bracket Screw Key/Clip 1/4" Star Washer Left Rear Endcap Foot Access Door Console Back Tie Holder Releasable Tie Plastic Tie Base ...


