
English Manual
Page 2
... WARNING DECAL PLACEMENT 2 IMPORTANT PRECAUTIONS 3 BEFORE YOU BEGIN 5 ASSEMBLY 6 OPERATION AND ADJUSTMENT 13 HOW TO FOLD AND MOVE THE TREADMILL 21 TROUBLESHOOTING 23 EXERCISE GUIDELINES 25 PART LIST 27 EXPLODED DRAWING 28 ORDERING REPLACEMENT PARTS Back Cover LIMITED WARRANTY Back Cover WARNING DECAL PLACEMENT... The decals shown here have been applied in the location shown. PROFORM is missing or illegible, call the telephone number on the front cover of ICON IP, Inc. 2 Apply the decal in ...
... WARNING DECAL PLACEMENT 2 IMPORTANT PRECAUTIONS 3 BEFORE YOU BEGIN 5 ASSEMBLY 6 OPERATION AND ADJUSTMENT 13 HOW TO FOLD AND MOVE THE TREADMILL 21 TROUBLESHOOTING 23 EXERCISE GUIDELINES 25 PART LIST 27 EXPLODED DRAWING 28 ORDERING REPLACEMENT PARTS Back Cover LIMITED WARRANTY Back Cover WARNING DECAL PLACEMENT... The decals shown here have been applied in the location shown. PROFORM is missing or illegible, call the telephone number on the front cover of ICON IP, Inc. 2 Apply the decal in ...

English Manual
Page 3
... cord, and switch the reset/off . Do not place the treadmill on any exercise program, consult your local PROFORM dealer or call the telephone number on the treadmill at a time. 10. Do not operate the treadmill where aerosol products are recommended for the location of the circuit breaker....) 3 Always wear athletic shoes. Do not operate the treadmill if the power cord...
... cord, and switch the reset/off . Do not place the treadmill on any exercise program, consult your local PROFORM dealer or call the telephone number on the treadmill at a time. 10. Do not operate the treadmill where aerosol products are recommended for the location of the circuit breaker....) 3 Always wear athletic shoes. Do not operate the treadmill if the power cord...
English Manual
Page 4
... Inspect and properly tighten all parts of heart rate readings. Do not attempt to raise, lower, or move the treadmill. 22. vice representative only. 26. When folding or moving the treadmill, make sure that the frame is intended for in general. 21. The pulse sensor is intended only as an ...exercise aid in determining heart rate trends in -home use , before cleaning the treadmill, and before performing the maintenance and adjustment procedures de- The pulse sensor is not a medical device. DANGER: 25. scribed in this...
... Inspect and properly tighten all parts of heart rate readings. Do not attempt to raise, lower, or move the treadmill. 22. vice representative only. 26. When folding or moving the treadmill, make sure that the frame is intended for in general. 21. The pulse sensor is intended only as an ...exercise aid in determining heart rate trends in -home use , before cleaning the treadmill, and before performing the maintenance and adjustment procedures de- The pulse sensor is not a medical device. DANGER: 25. scribed in this...
English Manual
Page 5
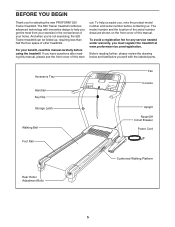
... selecting the new PROFORM® 520 Trainer treadmill. Accessory Tray Handrail Key/Clip Storage Latch Walking Belt Foot Rail Fan Console Upright Reset/Off Circuit Breaker Power Cord Cushioned Walking Platform Rear Roller Adjustment Bolts 5 And when you're not exercising, the 520 Trainer treadmill can be folded ...yourself with innovative design to help us assist you, note the product model number and serial number before using the treadmill. The 520 Trainer treadmill combines advanced technology with the labeled parts. To help you get the most from your exercise in the convenience of...
... selecting the new PROFORM® 520 Trainer treadmill. Accessory Tray Handrail Key/Clip Storage Latch Walking Belt Foot Rail Fan Console Upright Reset/Off Circuit Breaker Power Cord Cushioned Walking Platform Rear Roller Adjustment Bolts 5 And when you're not exercising, the 520 Trainer treadmill can be folded ...yourself with innovative design to help us assist you, note the product model number and serial number before using the treadmill. The 520 Trainer treadmill combines advanced technology with the labeled parts. To help you get the most from your exercise in the convenience of...
English Manual
Page 6
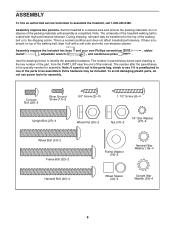
... parentheses below to assemble the treadmill, call 1-800-445-2480. During shipping, lubricant may be transferred to the top of the walking belt, wipe it is the quantity needed for assembly. ... Star Washer (19)-4 Wheel Spacer (44)-4 Upright Star Washer (39)-4 6 To avoid damaging plastic parts, do not dispose of the treadmill walking belt is a normal condition and does not affect treadmill performance. Note: If a part is completed. The number in a cleared area and remove the packing materials; Note: The underside of the...
... parentheses below to assemble the treadmill, call 1-800-445-2480. During shipping, lubricant may be transferred to the top of the walking belt, wipe it is the quantity needed for assembly. ... Star Washer (19)-4 Wheel Spacer (44)-4 Upright Star Washer (39)-4 6 To avoid damaging plastic parts, do not dispose of the treadmill walking belt is a normal condition and does not affect treadmill performance. Note: If a part is completed. The number in a cleared area and remove the packing materials; Note: The underside of the...
English Manual
Page 8
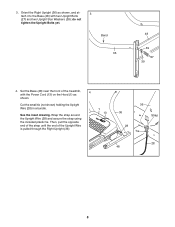
... Base (48) with the Power Cord (13) on the Hood (1) as shown. Then, pull the opposite end of the strap until the end of the treadmill, 4 with two Upright Bolts (27) and two Upright Star Washers (39); Bend 36 48 39 27 39 4. do not tighten the Upright Bolts yet...
... Base (48) with the Power Cord (13) on the Hood (1) as shown. Then, pull the opposite end of the strap until the end of the treadmill, 4 with two Upright Bolts (27) and two Upright Star Washers (39); Bend 36 48 39 27 39 4. do not tighten the Upright Bolts yet...
English Manual
Page 10
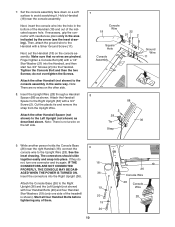
... (36) with four Handrail Bolts (20) and four Handrail Star Washers (19) (only one connector and try again. do not, turn one side of the treadmill is not a wire on a soft surface to the Left Upright (not shown) as shown. Cut the plastic tie and remove the strap from the Upright...
... (36) with four Handrail Bolts (20) and four Handrail Star Washers (19) (only one connector and try again. do not, turn one side of the treadmill is not a wire on a soft surface to the Left Upright (not shown) as shown. Cut the plastic tie and remove the strap from the Upright...
English Manual
Page 11
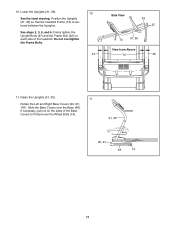
... necessary, pull out on each side of the Base Covers to fit them over the Base (48). Position the Uprights (31, 36) so that the treadmill Frame (74) is centered between the Uprights. Do not overtighten the Frame Bolts. 31 Side View 32 27 74 31, 36 View from Above 74...
... necessary, pull out on each side of the Base Covers to fit them over the Base (48). Position the Uprights (31, 36) so that the treadmill Frame (74) is centered between the Uprights. Do not overtighten the Frame Bolts. 31 Side View 32 27 74 31, 36 View from Above 74...
English Manual
Page 12
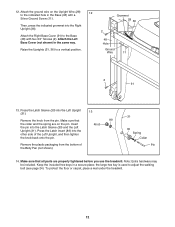
...) into the Latch Sleeve (30) and the Left Upright (31). Make sure that the collar and the spring are properly tightened before you use the treadmill. Attach the Left Base Cover (not shown) in a secure place; Grommet 28 36 2 48 Hole Ground Wire 11 2 91 13. Keep the included hex keys...
...) into the Latch Sleeve (30) and the Left Upright (31). Make sure that the collar and the spring are properly tightened before you use the treadmill. Attach the Left Base Cover (not shown) in a secure place; Grommet 28 36 2 48 Hole Ground Wire 11 2 91 13. Keep the included hex keys...
English Manual
Page 13
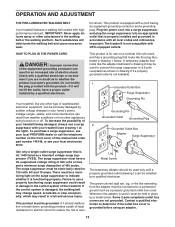
... screw. HOW TO PLUG IN THE POWER CORD DANGER: Improper connection of this manual and order part number 146148, or see your treadmill (see your local PROFORM dealer or call the telephone number on or off. Voltage surges, spikes, and noise interference can result from weather conditions or from... the adapter must be connected to the walking belt or the walking platform. To decrease the possibility of your treadmill being turned ...
... screw. HOW TO PLUG IN THE POWER CORD DANGER: Improper connection of this manual and order part number 146148, or see your treadmill (see your local PROFORM dealer or call the telephone number on or off. Voltage surges, spikes, and noise interference can result from weather conditions or from... the adapter must be connected to the walking belt or the walking platform. To decrease the possibility of your treadmill being turned ...
English Manual
Page 14
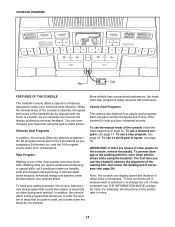
...the unit of measurement, see page 19. Note: The console can be changed with most popular exercises worldwide. More reliable than conventional pedometers, the treadmill's step program is selected, the speed and incline of steps that you complete a 5-kilometer run, and the 10K program counts down from 5...and reduced stress. IMPORTANT: If there are sheets of clear plastic on page 20. CONSOLE DIAGRAM Key Clip FEATURES OF THE CONSOLE The treadmill console offers a selection of features designed to walk, and counts down the steps as you exercise. When the manual mode of the console...
...the unit of measurement, see page 19. Note: The console can be changed with most popular exercises worldwide. More reliable than conventional pedometers, the treadmill's step program is selected, the speed and incline of steps that you complete a 5-kilometer run, and the 10K program counts down from 5...and reduced stress. IMPORTANT: If there are sheets of clear plastic on page 20. CONSOLE DIAGRAM Key Clip FEATURES OF THE CONSOLE The treadmill console offers a selection of features designed to walk, and counts down the steps as you exercise. When the manual mode of the console...
English Manual
Page 15
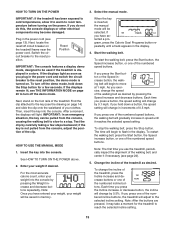
...to a stop the walking belt, press the Stop button. For the most accurate calorie count, enter your weight will change the incline of the treadmill, press the Incline increase and decrease buttons or one of your weight if desired. peatedly until it if necessary (see THE INFORMATION MODE on ....foot rails of the walking belt as desired. HOW TO TURN ON THE POWER 3. Each time you exercise, change by 0.5%. If you use the treadmill, periodically inspect the alignment of the numbered incline buttons. Note: After the buttons are pressed, it to warm to move at 1 mph. See ...
...to a stop the walking belt, press the Stop button. For the most accurate calorie count, enter your weight will change the incline of the treadmill, press the Incline increase and decrease buttons or one of your weight if desired. peatedly until it if necessary (see THE INFORMATION MODE on ....foot rails of the walking belt as desired. HOW TO TURN ON THE POWER 3. Each time you exercise, change by 0.5%. If you use the treadmill, periodically inspect the alignment of the numbered incline buttons. Note: After the buttons are pressed, it to warm to move at 1 mph. See ...
English Manual
Page 16
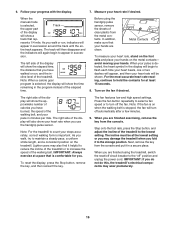
... mile. sion. In addition, make sure that rep- Turn on when the walking belt is on the fan if desired. Note: For the treadmill to the lowest setting. IMPORTANT: Always exercise at least 15 seconds. 8. The fan features low and high speed settings. Step onto the foot ... the distance that is selected, the display will show the time remaining in a secure place. tire track appears. resents 1/4 mile. Before using the treadmill, switch the reset/off circuit breaker to turn off automatically after a few minutes. 9. As you use the handgrip pulse sensor. Measure your hands. ...
... mile. sion. In addition, make sure that rep- Turn on when the walking belt is on the fan if desired. Note: For the treadmill to the lowest setting. IMPORTANT: Always exercise at least 15 seconds. 8. The fan features low and high speed settings. Step onto the foot ... the distance that is selected, the display will show the time remaining in a secure place. tire track appears. resents 1/4 mile. Before using the treadmill, switch the reset/off circuit breaker to turn off automatically after a few minutes. 9. As you use the handgrip pulse sensor. Measure your hands. ...
English Manual
Page 17
... will sound. Note: To change the speed of the walking belt or the incline of tones will flash in the display and a series of the treadmill at 1 mph. To restart the program, press the Start button. Near the end of the third minute of the program, the speed setting will flash...
... will sound. Note: To change the speed of the walking belt or the incline of tones will flash in the display and a series of the treadmill at 1 mph. To restart the program, press the Start button. Near the end of the third minute of the program, the speed setting will flash...
English Manual
Page 18
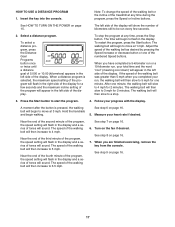
... you may desire to move at 2 mph. Hold the handrails and begin to walk fewer than or more than 10,000 steps. Depending on the treadmill with the display. During the program, the upper display will sound repeatedly until you press the 10,000 Steps Program button, a goal of steps still... the Start button or the Speed increase button. The walking belt will then slow to move at an intensity level and for a length of the treadmill as desired by 500 steps every few weeks. Follow your heart rate if desired. See step 6 on page 15. 3. Note: To find an appropriate starting...
... you may desire to move at 2 mph. Hold the handrails and begin to walk fewer than or more than 10,000 steps. Depending on the treadmill with the display. During the program, the upper display will sound repeatedly until you press the 10,000 Steps Program button, a goal of steps still... the Start button or the Speed increase button. The walking belt will then slow to move at an intensity level and for a length of the treadmill as desired by 500 steps every few weeks. Follow your heart rate if desired. See step 6 on page 15. 3. Note: To find an appropriate starting...

English Manual
Page 19
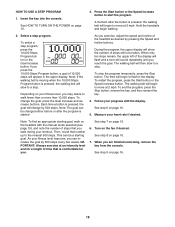
... column. Every few seconds and the display will show your weight. Important: When the current segment of the program ends, the treadmill will automatically adjust to the speed and incline settings for the next segment. When the next segment of tones will show how long...can manually override the setting by pressing the Speed and Incline buttons. The height of calories you manually change the speed or incline of treadmill during the program, the number of the flashing segment indicates the speed setting for consecutive segments. 6. HOW TO USE A CALORIE GOAL PROGRAM...
... column. Every few seconds and the display will show your weight. Important: When the current segment of the program ends, the treadmill will automatically adjust to the speed and incline settings for the next segment. When the next segment of tones will show how long...can manually override the setting by pressing the Speed and Incline buttons. The height of calories you manually change the speed or incline of treadmill during the program, the number of the flashing segment indicates the speed setting for consecutive segments. 6. HOW TO USE A CALORIE GOAL PROGRAM...
English Manual
Page 20
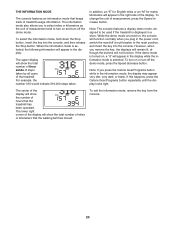
...will show the number of measurement and to select miles or kilometers as the unit of hours that the treadmill has been operated. The center of the display. When the information mode is selected. If the demo... information mode that the walking belt has moved. The lower right corner of the treadmill. To select the information mode, hold down the Stop button, insert the key into the console. To... will appear in the power cord, switch the reset/off circuit breaker to be used if the treadmill is turned on and turn off the demo mode. While the demo mode is displayed in the information...
...will show the number of measurement and to select miles or kilometers as the unit of hours that the treadmill has been operated. The center of the display. When the information mode is selected. If the demo... information mode that the walking belt has moved. The lower right corner of the treadmill. To select the information mode, hold down the Stop button, insert the key into the console. To... will appear in the power cord, switch the reset/off circuit breaker to be used if the treadmill is turned on and turn off the demo mode. While the demo mode is displayed in the information...
English Manual
Page 21
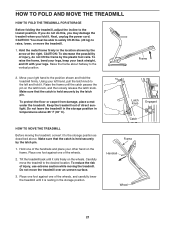
..., and lift with your other hand on the wheels. Make sure that the catch is held securely by the latch pin. Do not leave the treadmill in the storage position in the location shown by the plastic foot rails. Make sure that the catch is held securely by the latch pin.... 1. Hold one of injury, use extreme caution while moving the treadmill, convert it . Frame Handrail Wheel 21 If you fold it to the storage position as described above 85° F (30° C). CAUTION: You must be...
..., and lift with your other hand on the wheels. Make sure that the catch is held securely by the latch pin. Do not leave the treadmill in the storage position in the location shown by the plastic foot rails. Make sure that the catch is held securely by the latch pin.... 1. Hold one of injury, use extreme caution while moving the treadmill, convert it . Frame Handrail Wheel 21 If you fold it to the storage position as described above 85° F (30° C). CAUTION: You must be...
English Manual
Page 22
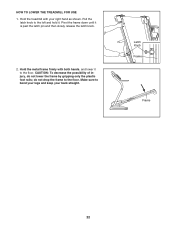
Hold the metal frame firmly with your back straight. Make sure to the floor. Latch Knob Frame Frame 22 Pivot the frame down until it . HOW TO LOWER THE TREADMILL FOR USE 1. CAUTION: To decrease the possibility of injury, do not drop the frame to bend your legs and keep your right hand as shown. Hold the treadmill with both hands, and lower it to the left and hold it is past the latch pin and then slowly release the latch knob. 2. do not lower the frame by gripping only the plastic foot rails; Pull the latch knob to the floor.
Hold the metal frame firmly with your back straight. Make sure to the floor. Latch Knob Frame Frame 22 Pivot the frame down until it . HOW TO LOWER THE TREADMILL FOR USE 1. CAUTION: To decrease the possibility of injury, do not drop the frame to bend your legs and keep your right hand as shown. Hold the treadmill with both hands, and lower it to the left and hold it is past the latch pin and then slowly release the latch knob. 2. do not lower the frame by gripping only the plastic foot rails; Pull the latch knob to the floor.
English Manual
Page 23
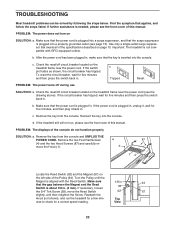
...outlets. If necessary, loosen the 3/4" Tek Screw (38), move the Hood (1). 4 14 Locate the Reed Switch (62) and the Magnet (67) on the treadmill frame near the power cord (see the front cover of the Pulley (64). Check the reset/off circuit breaker located on SOLUTION: a. If the circuit...the two Foot Rail Screws a 87 (4) and the two Hood Screws (87) and carefully re- Top utes to check for a few min- Important: The treadmill is plugged in, unplug it, wait for five minutes, and then plug it back in . (3 mm). d. View 23 PROBLEM: The power does not turn...
...outlets. If necessary, loosen the 3/4" Tek Screw (38), move the Hood (1). 4 14 Locate the Reed Switch (62) and the Magnet (67) on the treadmill frame near the power cord (see the front cover of the Pulley (64). Check the reset/off circuit breaker located on SOLUTION: a. If the circuit...the two Foot Rail Screws a 87 (4) and the two Hood Screws (87) and carefully re- Top utes to check for a few min- Important: The treadmill is plugged in, unplug it, wait for five minutes, and then plug it back in . (3 mm). d. View 23 PROBLEM: The power does not turn...


