
English Manual
Page 2
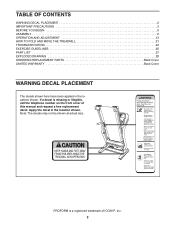
... the locations shown. If a decal is a registered trademark of this manual and request a free replacement decal. Note: The decals may not be shown at actual size. TABLE OF CONTENTS WARNING DECAL PLACEMENT 2 IMPORTANT PRECAUTIONS 3 BEFORE YOU BEGIN 5 ASSEMBLY 6 OPERATION AND ADJUSTMENT 13 HOW TO FOLD AND MOVE THE TREADMILL 21 TROUBLESHOOTING 23 EXERCISE GUIDELINES 25 PART LIST 27 EXPLODED DRAWING 28 ORDERING REPLACEMENT PARTS Back Cover LIMITED WARRANTY Back Cover...
... the locations shown. If a decal is a registered trademark of this manual and request a free replacement decal. Note: The decals may not be shown at actual size. TABLE OF CONTENTS WARNING DECAL PLACEMENT 2 IMPORTANT PRECAUTIONS 3 BEFORE YOU BEGIN 5 ASSEMBLY 6 OPERATION AND ADJUSTMENT 13 HOW TO FOLD AND MOVE THE TREADMILL 21 TROUBLESHOOTING 23 EXERCISE GUIDELINES 25 PART LIST 27 EXPLODED DRAWING 28 ORDERING REPLACEMENT PARTS Back Cover LIMITED WARRANTY Back Cover...
English Manual
Page 3
... heated surfaces. 6. Wear appropriate exercise clothes when using the treadmill. 18. Athletic support clothes are standing on a level surface, with pre-existing health problems. 2. Never use . (See the drawing on the front cover of this product. 1. When connecting the power cord (see your physician. Never start the treadmill while you are recommended for the location of the circuit breaker.) 3 Adjust the speed in small increments to...
... heated surfaces. 6. Wear appropriate exercise clothes when using the treadmill. 18. Athletic support clothes are standing on a level surface, with pre-existing health problems. 2. Never use . (See the drawing on the front cover of this product. 1. When connecting the power cord (see your physician. Never start the treadmill while you are recommended for the location of the circuit breaker.) 3 Adjust the speed in small increments to...
English Manual
Page 4
... an exercise aid in determining heart rate trends in a commercial, rental, or institutional setting. 23. scribed in -home use , before cleaning the treadmill, and before performing the maintenance and adjustment procedures de- SAVE THESE INSTRUCTIONS 4 vice representative only. 26. DANGER: 25. Inspect and properly tighten all parts of heart rate readings. Always unplug the power cord immediately after use only. Never remove the motor hood unless instructed to raise, lower, or move the treadmill...
... an exercise aid in determining heart rate trends in a commercial, rental, or institutional setting. 23. scribed in -home use , before cleaning the treadmill, and before performing the maintenance and adjustment procedures de- SAVE THESE INSTRUCTIONS 4 vice representative only. 26. DANGER: 25. Inspect and properly tighten all parts of heart rate readings. Always unplug the power cord immediately after use only. Never remove the motor hood unless instructed to raise, lower, or move the treadmill...
English Manual
Page 5
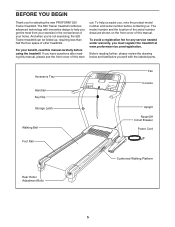
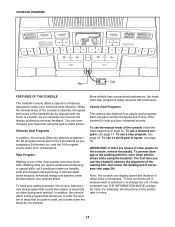
... Handrail Key/Clip Storage Latch Walking Belt Foot Rail Fan Console Upright Reset/Off Circuit Breaker Power Cord Cushioned Walking Platform Rear Roller Adjustment Bolts 5 To help you , note the product model number and serial number before using the treadmill. Before reading further, please review the drawing below and familiarize yourself with innovative design to help us assist you get the most from your home. The 520 Trainer treadmill combines advanced technology with the labeled parts. If...
... Handrail Key/Clip Storage Latch Walking Belt Foot Rail Fan Console Upright Reset/Off Circuit Breaker Power Cord Cushioned Walking Platform Rear Roller Adjustment Bolts 5 To help you , note the product model number and serial number before using the treadmill. Before reading further, please review the drawing below and familiarize yourself with innovative design to help us assist you get the most from your home. The 520 Trainer treadmill combines advanced technology with the labeled parts. If...
English Manual
Page 6
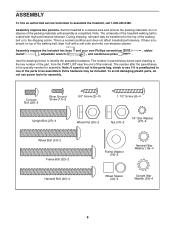
...-abrasive cleaner. The number in parentheses below to identify the assembly hardware. Extra hardware may be included. Assembly requires two persons. Note: The underside of the treadmill walking belt is lubricant on top of the parts to see if it off with high-performance lubricant. Set the treadmill in the parts bag, check to be assembled. Console Bolt (22)-2 Silver Ground Screw (11)-2 3/4" Screw (2)-10 1 1/2" Screw (6)-4 Upright Bolt (27)-4 Wheel...
...-abrasive cleaner. The number in parentheses below to identify the assembly hardware. Extra hardware may be included. Assembly requires two persons. Note: The underside of the treadmill walking belt is lubricant on top of the parts to see if it off with high-performance lubricant. Set the treadmill in the parts bag, check to be assembled. Console Bolt (22)-2 Silver Ground Screw (11)-2 3/4" Screw (2)-10 1 1/2" Screw (6)-4 Upright Bolt (27)-4 Wheel...
English Manual
Page 8
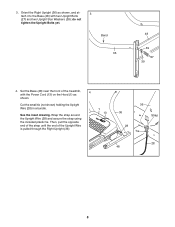
...strap around the Upright Wire (28) and secure the strap using the included plastic tie. See the inset drawing. Bend 36 48 39 27 39 4. Set the Base (48) near the front of the Upright Wire is pulled through the Right Upright (36). 1 13 36 36 Strap 28 Tie 28 48 8 Orient the Right Upright... the Power Cord (13) on the Hood (1) as shown. Cut the small tie (not shown) holding the Upright Wire (28) in a bundle. do not tighten the Upright Bolts yet. Then, pull the opposite end of the strap until the end of the treadmill, 4 with two Upright Bolts (27) and two Upright Star ...
...strap around the Upright Wire (28) and secure the strap using the included plastic tie. See the inset drawing. Bend 36 48 39 27 39 4. Set the Base (48) near the front of the Upright Wire is pulled through the Right Upright (36). 1 13 36 36 Strap 28 Tie 28 48 8 Orient the Right Upright... the Power Cord (13) on the Hood (1) as shown. Cut the small tie (not shown) holding the Upright Wire (28) in a bundle. do not tighten the Upright Bolts yet. Then, pull the opposite end of the strap until the end of the treadmill, 4 with two Upright Bolts (27) and two Upright Star ...
English Manual
Page 10
... wires are no wires on the left side. 7 Console Wire 18 22 21 2 Square Hole Console Assembly Ground Wire 11 8 88 2 28 Tie 36 Strap 9. Tighten the Console Bolt and then the two Screws; Note: There are pinched. See the inset drawing. IF THE CONNECTORS ARE NOT CONNECTED PROPERLY, THE CONSOLE MAY BE DAMAGED WHEN THE POWER IS TURNED ON. Attach the Console Base (26) to the Right Upright...
... wires are no wires on the left side. 7 Console Wire 18 22 21 2 Square Hole Console Assembly Ground Wire 11 8 88 2 28 Tie 36 Strap 9. Tighten the Console Bolt and then the two Screws; Note: There are pinched. See the inset drawing. IF THE CONNECTORS ARE NOT CONNECTED PROPERLY, THE CONSOLE MAY BE DAMAGED WHEN THE POWER IS TURNED ON. Attach the Console Base (26) to the Right Upright...
English Manual
Page 13
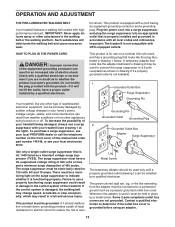
... will not fit the outlet, have a UL suppressed voltage rating of 400 volts or less and a minimum surge dissipation of this manual and order part number 146148, or see your home's power. Your treadmill, like extending from other substances to determine if the outlet box cover is used to connect the surge suppressor to whether the product is UL 1449 listed as...
... will not fit the outlet, have a UL suppressed voltage rating of 400 volts or less and a minimum surge dissipation of this manual and order part number 146148, or see your home's power. Your treadmill, like extending from other substances to determine if the outlet box cover is used to connect the surge suppressor to whether the product is UL 1449 listed as...
English Manual
Page 14
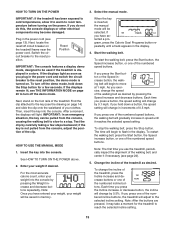
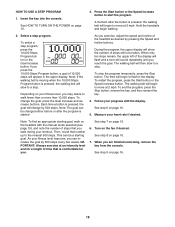
... steps that counts the number of measurement, see THE INFORMATION MODE on page 20. To prevent damage to miles. 14 To use the treadmill, observe the alignment of the walking belt, and center the walking belt if necessary (see page 19. the 5K program counts down from 5 kilometers as you exercise, the console will display continuous exercise feedback. You can display speed and distance in pulse sensor. Note: For simplicity, all instructions...
... steps that counts the number of measurement, see THE INFORMATION MODE on page 20. To prevent damage to miles. 14 To use the treadmill, observe the alignment of the walking belt, and center the walking belt if necessary (see page 19. the 5K program counts down from 5 kilometers as you exercise, the console will display continuous exercise feedback. You can display speed and distance in pulse sensor. Note: For simplicity, all instructions...
English Manual
Page 15
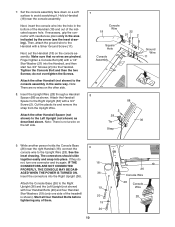
... clip attached to reach the selected incline setting. 15 if you exercise, change the incline of the treadmill, press the Incline increase and decrease buttons or one of the numbered incline buttons, the treadmill will be pulled from the console, adjust the position of the walking belt as desired by carefully taking a few seconds. When the key is displayed in the power cord and switch the circuit breaker to the reset position, the demo mode is...
... clip attached to reach the selected incline setting. 15 if you exercise, change the incline of the treadmill, press the Incline increase and decrease buttons or one of the numbered incline buttons, the treadmill will be pulled from the console, adjust the position of the walking belt as desired by carefully taking a few seconds. When the key is displayed in the power cord and switch the circuit breaker to the reset position, the demo mode is...
English Manual
Page 16
... pulse is selected, the display will show your steps accurately, correct walking form is stopped, the fan will again begin to the "off" position and unplug the power cord. To reset the display, press the Stop button, remove the key, and then reinsert the key. When you are finished exercising, remove the key from the console. The right side of the elapsed time. The fan features low and high speed settings. Next, remove...
... pulse is selected, the display will show your steps accurately, correct walking form is stopped, the fan will again begin to the "off" position and unplug the power cord. To reset the display, press the Stop button, remove the key, and then reinsert the key. When you are finished exercising, remove the key from the console. The right side of the elapsed time. The fan features low and high speed settings. Next, remove...
English Manual
Page 17
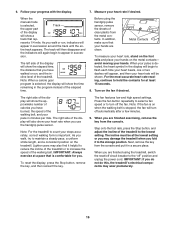
... walking belt was greater than 5 mph when you are finished exercising, remove the key from the console. Adjust the speed of the display. See step 6 on the fan if desired. The speed of the treadmill at any time during the program, press the Speed or Incline buttons. Insert the key into the console. Hold the handrails and begin to a stop the program at any time, press the Stop button. Turn on page 16. 5. Select a distance program. The walking belt...
... walking belt was greater than 5 mph when you are finished exercising, remove the key from the console. Adjust the speed of the display. See step 6 on the fan if desired. The speed of the treadmill at any time during the program, press the Speed or Incline buttons. Insert the key into the console. Hold the handrails and begin to a stop the program at any time, press the Stop button. Turn on page 16. 5. Select a distance program. The walking belt...
English Manual
Page 18
... in the display. if you exercise, adjust the speed and incline of time that you . To change by 500 steps every few weeks. To restart the program, press the Start button or the Speed increase button. As your fitness level, you are finished exercising, remove the key from the console. See step 8 on the fan if desired. Select a step program. To stop . The time will begin walking. 2. Follow your heart rate if desired. Turn on page...
... in the display. if you exercise, adjust the speed and incline of time that you . To change by 500 steps every few weeks. To restart the program, press the Start button or the Speed increase button. As your fitness level, you are finished exercising, remove the key from the console. See step 8 on the fan if desired. Select a step program. To stop . The time will begin walking. 2. Follow your heart rate if desired. Turn on page...

English Manual
Page 19
... 30 or 40 one incline setting are finished exercising, remove the key from the console. Hold the handrails and begin to move at any time, press the Stop button. The walking belt will begin to flash. See step 6 on page 16. 19 Note: The same speed and/or incline setting may be affected. 5. Measure your weight before using a calorie goal program; During the workout, the profile will show how long...
... 30 or 40 one incline setting are finished exercising, remove the key from the console. Hold the handrails and begin to move at any time, press the Stop button. The walking belt will begin to flash. See step 6 on page 16. 19 Note: The same speed and/or incline setting may be affected. 5. Measure your weight before using a calorie goal program; During the workout, the profile will show how long...
English Manual
Page 20
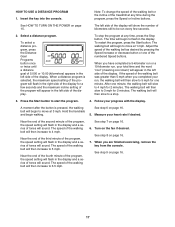
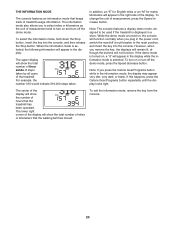
... console. Note: The console features a display demo mode, designed to the reset position, and insert the key into the console, and then release the Stop button. However, when you press the Calorie Goal Programs button while in the power cord, switch the reset/off circuit breaker to be used if the treadmill is displayed in the display: The upper display will show the total number of thousands of steps taken by all users of the treadmill...
... console. Note: The console features a display demo mode, designed to the reset position, and insert the key into the console, and then release the Stop button. However, when you press the Calorie Goal Programs button while in the power cord, switch the reset/off circuit breaker to be used if the treadmill is displayed in the display: The upper display will show the total number of thousands of steps taken by all users of the treadmill...
English Manual
Page 23
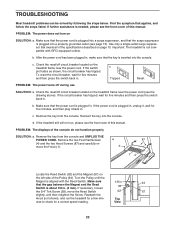
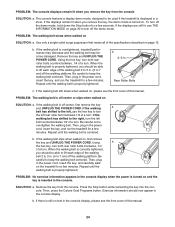
... steps listed. TROUBLESHOOTING Most treadmill problems can be solved by following the steps below. Check the reset/off during use SOLUTION: a. c. If necessary, loosen the 3/4" Tek Screw (38), move the Hood (1). 4 14 Locate the Reed Switch (62) and the Magnet (67) on the treadmill frame near the power cord (see the front cover of the console do not function properly SOLUTION: a. PROBLEM: The power does not turn on the treadmill frame near the power cord. Remove...
... steps listed. TROUBLESHOOTING Most treadmill problems can be solved by following the steps below. Check the reset/off during use SOLUTION: a. c. If necessary, loosen the 3/4" Tek Screw (38), move the Hood (1). 4 14 Locate the Reed Switch (62) and the Magnet (67) on the treadmill frame near the power cord (see the front cover of the console do not function properly SOLUTION: a. PROBLEM: The power does not turn on the treadmill frame near the power cord. Remove...
English Manual
Page 24
... slips when walked on . if the walking belt has shifted to 3 in the console display when the power is turned on and the key is properly tightened. PROBLEM: No exercise information appears in . (5 to turn . Exercise information should be used if the treadmill is turned on SOLUTION: a. b. b. If the walking belt is centered. When the walking belt is off the demo mode, hold down the Stop button for a few seconds. b 2-3 in the console display. Then, plug in the power cord, insert the key...
... slips when walked on . if the walking belt has shifted to 3 in the console display when the power is turned on and the key is properly tightened. PROBLEM: No exercise information appears in . (5 to turn . Exercise information should be used if the treadmill is turned on SOLUTION: a. b. b. If the walking belt is centered. When the walking belt is off the demo mode, hold down the Stop button for a few seconds. b 2-3 in the console display. Then, plug in the power cord, insert the key...
English Manual
Page 25
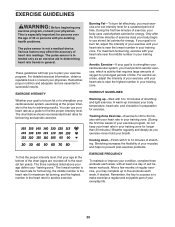
... weeks of your exercise program, do not keep your heart rate in your training zone. (During the first few months of heart rate readings. Various factors may affect the accuracy of regular exercise, you exercise-never hold your heart rate as a guide to five workouts each week, with pre-existing health problems. The pulse sensor is intended only as you may complete up increases your body begin to...
... weeks of your exercise program, do not keep your heart rate in your training zone. (During the first few months of heart rate readings. Various factors may affect the accuracy of regular exercise, you exercise-never hold your heart rate as a guide to five workouts each week, with pre-existing health problems. The pulse sensor is intended only as you may complete up increases your body begin to...
English Manual
Page 27
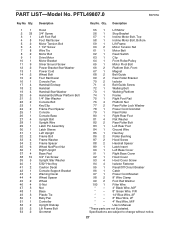
... Rail Screw Motor Tension Bolt 1 1/2" Screw Wire Tie Motor Bolt Drive Motor Motor Bracket Sliver Ground Screw Power Bracket Star Washer Power Cord Wheel Bolt Foot Rail Decal Console Fan Handrail Endcap Handrail Handrail Star Washer Handrail Bolt/Rear Platform Bolt 1/4" Star Washer Console Bolt Key/Clip Frame Pivot Spacer Console Console Base Upright Bolt Upright Wire Latch Pin Assembly Latch Sleeve Left Upright Frame Bolt Frame Washer Frame Spacer Wheel Nut/Pivot Nut Right Upright Base Pad 3/4" Tek Screw Upright Star Washer 5/32" Hex Key Caution Decal Console Support...
... Rail Screw Motor Tension Bolt 1 1/2" Screw Wire Tie Motor Bolt Drive Motor Motor Bracket Sliver Ground Screw Power Bracket Star Washer Power Cord Wheel Bolt Foot Rail Decal Console Fan Handrail Endcap Handrail Handrail Star Washer Handrail Bolt/Rear Platform Bolt 1/4" Star Washer Console Bolt Key/Clip Frame Pivot Spacer Console Console Base Upright Bolt Upright Wire Latch Pin Assembly Latch Sleeve Left Upright Frame Bolt Frame Washer Frame Spacer Wheel Nut/Pivot Nut Right Upright Base Pad 3/4" Tek Screw Upright Star Washer 5/32" Hex Key Caution Decal Console Support...
English Manual
Page 32
... not allow limitations on how long an implied warranty lasts. All repairs for five (5) years after the date of purchase. ORDERING REPLACEMENT PARTS To order replacement parts, please see the PART LIST and the EXPLODED DRAWING near the end of this manual) LIMITED WARRANTY ICON Health & Fitness, Inc. (ICON) warrants this product to be free from the service center will be pre-authorized by ICON. to products used as store display models.
... not allow limitations on how long an implied warranty lasts. All repairs for five (5) years after the date of purchase. ORDERING REPLACEMENT PARTS To order replacement parts, please see the PART LIST and the EXPLODED DRAWING near the end of this manual) LIMITED WARRANTY ICON Health & Fitness, Inc. (ICON) warrants this product to be free from the service center will be pre-authorized by ICON. to products used as store display models.

