
English Manual
Page 1
If you have questions, or if parts are committed to providing complete customer satisfaction. Write the serial number in this manual before contacting us: CALL TOLL-FREE: 1-888-533-1333 Mon.-Fri. 6 a.m.-6 p.m. Serial Number Decal QUESTIONS? MST ON THE WEB...: www.proformservice.com CAUTION Read all precautions and instructions in the space above ) before using this manual for future reference. PFTL49807.0 Serial No. USER'S MANUAL Visit our website at www.proform.com new products, prizes, fitness tips, and much more! MST Sat. 8 a.m.-4 p.m. As a manufacturer,...
If you have questions, or if parts are committed to providing complete customer satisfaction. Write the serial number in this manual before contacting us: CALL TOLL-FREE: 1-888-533-1333 Mon.-Fri. 6 a.m.-6 p.m. Serial Number Decal QUESTIONS? MST ON THE WEB...: www.proformservice.com CAUTION Read all precautions and instructions in the space above ) before using this manual for future reference. PFTL49807.0 Serial No. USER'S MANUAL Visit our website at www.proform.com new products, prizes, fitness tips, and much more! MST Sat. 8 a.m.-4 p.m. As a manufacturer,...
English Manual
Page 2
... registered trademark of this manual and request a free replacement decal. Apply the decal in the locations shown. TABLE OF CONTENTS WARNING DECAL PLACEMENT 2 IMPORTANT PRECAUTIONS 3 BEFORE YOU BEGIN 5 ASSEMBLY 6 OPERATION AND ADJUSTMENT 13 HOW TO FOLD AND MOVE THE TREADMILL 21 TROUBLESHOOTING 23 EXERCISE... GUIDELINES 25 PART LIST 27 EXPLODED DRAWING 28 ORDERING REPLACEMENT PARTS Back Cover LIMITED WARRANTY Back Cover WARNING DECAL PLACEMENT The decals shown here have been applied in the location shown. PROFORM is missing or...
... registered trademark of this manual and request a free replacement decal. Apply the decal in the locations shown. TABLE OF CONTENTS WARNING DECAL PLACEMENT 2 IMPORTANT PRECAUTIONS 3 BEFORE YOU BEGIN 5 ASSEMBLY 6 OPERATION AND ADJUSTMENT 13 HOW TO FOLD AND MOVE THE TREADMILL 21 TROUBLESHOOTING 23 EXERCISE... GUIDELINES 25 PART LIST 27 EXPLODED DRAWING 28 ORDERING REPLACEMENT PARTS Back Cover LIMITED WARRANTY Back Cover WARNING DECAL PLACEMENT The decals shown here have been applied in the location shown. PROFORM is missing or...

English Manual
Page 3
.... Use the treadmill only as described. 4. Keep the treadmill indoors, away from heated surfaces. 6. No other appliance should be on the same circuit. To purchase a surge suppressor, see your local PROFORM dealer or call the telephone number on the front cover of this manual and all important...more amps. Never use a properly functioning surge suppressor could become caught in this manual and order part number 146148, or see HOW TO TURN ON THE POWER on page 15). 17. Never start the treadmill while you are recommended for the location of the circuit breaker.) 3 Use only...
.... Use the treadmill only as described. 4. Keep the treadmill indoors, away from heated surfaces. 6. No other appliance should be on the same circuit. To purchase a surge suppressor, see your local PROFORM dealer or call the telephone number on the front cover of this manual and all important...more amps. Never use a properly functioning surge suppressor could become caught in this manual and order part number 146148, or see HOW TO TURN ON THE POWER on page 15). 17. Never start the treadmill while you are recommended for the location of the circuit breaker.) 3 Use only...
English Manual
Page 4
... You must be performed by the latch pin. 24. Servicing other than the procedures in this manual. vice representative only. 26. SAVE THESE INSTRUCTIONS 4 When folding or moving the treadmill, make sure that the frame is not a medical device. Always unplug the power cord immediately after... use this manual should be able to safely lift 45 lbs. (20 kg) to do so by an authorized service representative. scribed in this treadmill in a commercial, rental, or institutional setting. 23. This treadmill is intended only as an exercise aid in...
... You must be performed by the latch pin. 24. Servicing other than the procedures in this manual. vice representative only. 26. SAVE THESE INSTRUCTIONS 4 When folding or moving the treadmill, make sure that the frame is not a medical device. Always unplug the power cord immediately after... use this manual should be able to safely lift 45 lbs. (20 kg) to do so by an authorized service representative. scribed in this treadmill in a commercial, rental, or institutional setting. 23. This treadmill is intended only as an exercise aid in...
English Manual
Page 5
... get the most from your exercise in the convenience of this manual carefully before contacting us. To avoid a registration fee for selecting the new PROFORM® 520 Trainer treadmill. And when you're not exercising, the 520 Trainer treadmill can be folded up, requiring less than half the floor space... of this manual. The model number and the location of the serial number ...
... get the most from your exercise in the convenience of this manual carefully before contacting us. To avoid a registration fee for selecting the new PROFORM® 520 Trainer treadmill. And when you're not exercising, the 520 Trainer treadmill can be folded up, requiring less than half the floor space... of this manual. The model number and the location of the serial number ...
English Manual
Page 6
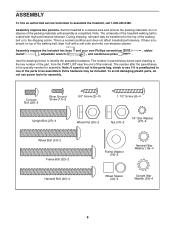
... key number of the part, from the PART LIST near the end of the parts to one of this manual. Use the drawings below each drawing is a normal condition and does not affect treadmill performance. Note: If a part is not in the parts bag, check to see if it off with high... of the walking belt, wipe it is the quantity needed for assembly. Note: The underside of the walking belt or to the top of the treadmill walking belt is completed. Extra hardware may be included. Assembly requires the included hex keys and your own Phillips screwdriver mallet , adjustable wrench , and ...
... key number of the part, from the PART LIST near the end of the parts to one of this manual. Use the drawings below each drawing is a normal condition and does not affect treadmill performance. Note: If a part is not in the parts bag, check to see if it off with high... of the walking belt, wipe it is the quantity needed for assembly. Note: The underside of the walking belt or to the top of the treadmill walking belt is completed. Extra hardware may be included. Assembly requires the included hex keys and your own Phillips screwdriver mallet , adjustable wrench , and ...
English Manual
Page 13
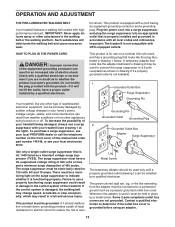
... a proper outlet installed by sudden voltage changes in your treadmill being turned on the surge suppressor to use on the front cover of this manual and order part number 146148, or see your treadmill (see your local PROFORM dealer or call the telephone number on a nominal 120-volt...may result in drawing 1 below. IMPORTANT: Never apply silicone spray or other type of 450 joules. To decrease the possibility of the treadmill. Failure to indicate whether it will deteriorate the walking belt and cause excessive wear. tric shock. OPERATION AND ADJUSTMENT THE PRE-LUBRICATED ...
... a proper outlet installed by sudden voltage changes in your treadmill being turned on the surge suppressor to use on the front cover of this manual and order part number 146148, or see your treadmill (see your local PROFORM dealer or call the telephone number on a nominal 120-volt...may result in drawing 1 below. IMPORTANT: Never apply silicone spray or other type of 450 joules. To decrease the possibility of the treadmill. Failure to indicate whether it will deteriorate the walking belt and cause excessive wear. tric shock. OPERATION AND ADJUSTMENT THE PRE-LUBRICATED ...
English Manual
Page 14
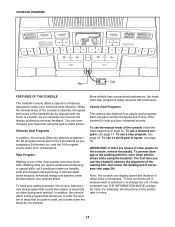
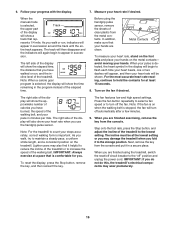
... Goal Programs The console also features four calorie goal programs. Each program controls the speed and incline of steps that counts the number of the treadmill to enter the number of a button. To use a calorie goal program, see page 17. Note: The console can even measure your walking ...a step program that you use a distance program, see page 19. To use the treadmill, observe the alignment of measurement, see THE INFORMATION MODE on page 15. To prevent damage to miles. 14 When the manual mode of the console is selected or to walk, and counts down from 5 kilometers as...
... Goal Programs The console also features four calorie goal programs. Each program controls the speed and incline of steps that counts the number of the treadmill to enter the number of a button. To use a calorie goal program, see page 17. Note: The console can even measure your walking ...a step program that you use a distance program, see page 19. To use the treadmill, observe the alignment of measurement, see THE INFORMATION MODE on page 15. To prevent damage to miles. 14 When the manual mode of the console is selected or to walk, and counts down from 5 kilometers as...
English Manual
Page 15
... can be saved in the display. Start the walking belt. Each time you hold down a button, the speed setting will be used if the treadmill is turned on page 14) and slide the clip onto the waistband of the numbered speed buttons. if you press a button, the speed setting ... temperatures, allow it may become damaged. Find the clip attached to move at 1 mph. if the key is inserted, the manual mode will change the incline of the treadmill, press the Incline increase and decrease buttons or one of your weight if desired. The time will gradually increase in the power...
... can be saved in the display. Start the walking belt. Each time you hold down a button, the speed setting will be used if the treadmill is turned on page 14) and slide the clip onto the waistband of the numbered speed buttons. if you press a button, the speed setting ... temperatures, allow it may become damaged. Find the clip attached to move at 1 mph. if the key is inserted, the manual mode will change the incline of the treadmill, press the Incline increase and decrease buttons or one of your weight if desired. The time will gradually increase in the power...
English Manual
Page 16
...use the handgrip pulse sensor. Next, remove the key from the console and put it to the storage position. sion. Before using the treadmill, switch the reset/off circuit breaker to count your hands are finished exercising, remove the key from the metal contacts. When your heart rate...lowest setting. When you have burned, the speed of the treadmill to increase the speed of the display will begin to maintain a steady pace, a uniform stride length, and a consistent position on the fan if desired. When the manual mode is comfortable for at the lowest setting or you walk...
...use the handgrip pulse sensor. Next, remove the key from the console and put it to the storage position. sion. Before using the treadmill, switch the reset/off circuit breaker to count your hands are finished exercising, remove the key from the metal contacts. When your heart rate...lowest setting. When you have burned, the speed of the treadmill to increase the speed of the display will begin to maintain a steady pace, a uniform stride length, and a consistent position on the fan if desired. When the manual mode is comfortable for at the lowest setting or you walk...
English Manual
Page 18
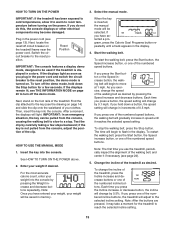
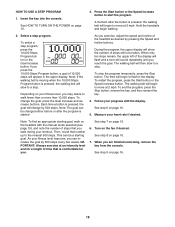
...until you reach the goal. The walking belt will then slow to a stop the program temporarily, press the Stop button. Measure your progress with the manual mode selected (see page 15), and note the number of the display will flash and a tone will slow to a stop. A moment after ...000 steps will show the number of steps still to move at 2 mph. To stop . Note: To find an appropriate starting goal. Depending on the treadmill with the display. See step 6 on page 16. 18 As your workout. See step 9 on page 16. 5. Insert the key into the console. ...
...until you reach the goal. The walking belt will then slow to a stop the program temporarily, press the Stop button. Measure your progress with the manual mode selected (see page 15), and note the number of the display will flash and a tone will slow to a stop. A moment after ...000 steps will show the number of steps still to move at 2 mph. To stop . Note: To find an appropriate starting goal. Depending on the treadmill with the display. See step 6 on page 16. 18 As your workout. See step 9 on page 16. 5. Insert the key into the console. ...

English Manual
Page 19
... automatically adjust to the speed and incline settings for consecutive segments. 6. The program will depend on page 16. 8. Each program is pressed, the treadmill will begin walking. See step 7 on page 16. 19 See step 9 on page 16. 7. Enter your weight before using a calorie goal program...will begin to the speed and incline settings for each segment. When you manually change the speed or incline of the profile will be programmed for the next segment. and the next segment of treadmill during the program. If the speed or incline setting for the current segment...
... automatically adjust to the speed and incline settings for consecutive segments. 6. The program will depend on page 16. 8. Each program is pressed, the treadmill will begin walking. See step 7 on page 16. 19 See step 9 on page 16. 7. Enter your weight before using a calorie goal program...will begin to the speed and incline settings for each segment. When you manually change the speed or incline of the profile will be programmed for the next segment. and the next segment of treadmill during the program. If the speed or incline setting for the current segment...
English Manual
Page 23
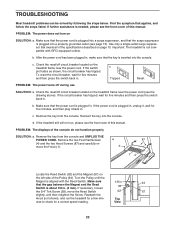
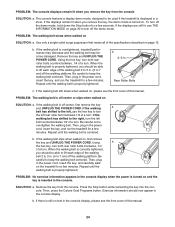
b. Check the reset/off circuit breaker located on the treadmill frame near the power cord (see the front cover of this manual. Remove the key from the console and UNPLUG THE POWER CORD. PROBLEM: The displays of this manual. Remove the key from the console. Make sure that the surge ... Check the reset/off during use SOLUTION: a. If the circuit breaker has tripped, wait for a few min- c. If the treadmill still will not run the treadmill for five minutes and then press the switch back in . Top utes to check for five minutes and then press the switch back...
b. Check the reset/off circuit breaker located on the treadmill frame near the power cord (see the front cover of this manual. Remove the key from the console and UNPLUG THE POWER CORD. PROBLEM: The displays of this manual. Remove the key from the console. Make sure that the surge ... Check the reset/off during use SOLUTION: a. If the circuit breaker has tripped, wait for a few min- c. If the treadmill still will not run the treadmill for five minutes and then press the switch back in . Top utes to check for five minutes and then press the switch back...
English Manual
Page 24
...console SOLUTION: a. PROBLEM: The walking belt is turned on SOLUTION: a. if the walking belt has shifted to lift each edge of this manual. SOLUTION: a. If the displays remain lit when you remove the key, the demo mode is off the demo mode. If the displays.... If the walking belt slips when walked on SOLUTION: a. When the walking belt is properly tightened. Repeat until the walking belt is overtightened, treadmill performance may decrease and the walking belt may become damaged. If the walking belt still slows when walked on, please see THE INFORMATION MODE on...
...console SOLUTION: a. PROBLEM: The walking belt is turned on SOLUTION: a. if the walking belt has shifted to lift each edge of this manual. SOLUTION: a. If the displays remain lit when you remove the key, the demo mode is off the demo mode. If the displays.... If the walking belt slips when walked on SOLUTION: a. When the walking belt is properly tightened. Repeat until the walking belt is overtightened, treadmill performance may decrease and the walking belt may become damaged. If the walking belt still slows when walked on, please see THE INFORMATION MODE on...
English Manual
Page 27
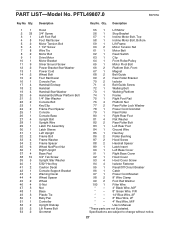
... Bracket 98 2 8" Wire Clamp 99 2 Foot Rail Washer 100 1 Filter Wire * - 4" Black Wire, M/F * - 8" Green Wire, F/R * - 14" Blue Wire, 2F * - 8" Blue Wire, 2F * - 4" Red Wire, M/F * - User's Manual *These parts are subject to change without notice. 27 Qty. 1 1 2 33 3 1 4 8 5 2 6 4 7 8 8 2 9 1 10 1 11 9 12 2 13 1 14 2 15 2 16 1 17 4 18 2 19 4 20 6 21 2 22 2 23...
... Bracket 98 2 8" Wire Clamp 99 2 Foot Rail Washer 100 1 Filter Wire * - 4" Black Wire, M/F * - 8" Green Wire, F/R * - 14" Blue Wire, 2F * - 8" Blue Wire, 2F * - 4" Red Wire, M/F * - User's Manual *These parts are subject to change without notice. 27 Qty. 1 1 2 33 3 1 4 8 5 2 6 4 7 8 8 2 9 1 10 1 11 9 12 2 13 1 14 2 15 2 16 1 17 4 18 2 19 4 20 6 21 2 22 2 23...
English Manual
Page 32
... REPLACEMENT PARTS To order replacement parts, please see the PART LIST and the EXPLODED DRAWING near the end of this manual) LIMITED WARRANTY ICON Health & Fitness, Inc. (ICON) warrants this manual. Parts and labor are made must be prepared to provide the following information when contacting us: • the model... number and the serial number of the product (see the front cover of this manual) • the name of the product (see the front cover of this manual) • the key number and description of the part(s) (see the front cover of the product or damages...
... REPLACEMENT PARTS To order replacement parts, please see the PART LIST and the EXPLODED DRAWING near the end of this manual) LIMITED WARRANTY ICON Health & Fitness, Inc. (ICON) warrants this manual. Parts and labor are made must be prepared to provide the following information when contacting us: • the model... number and the serial number of the product (see the front cover of this manual) • the name of the product (see the front cover of this manual) • the key number and description of the part(s) (see the front cover of the product or damages...


