

English Manual
Page 3
... and tighten all instructions before performing the maintenance and adjustment procedures described in -home use of the treadmill every three months. 15. Always remove the key and unplug the power cord when the treadmill is especially important for personal injury or property damage sustained by an autho- DANGER: 22. SEARS assumes...
... and tighten all instructions before performing the maintenance and adjustment procedures described in -home use of the treadmill every three months. 15. Always remove the key and unplug the power cord when the treadmill is especially important for personal injury or property damage sustained by an autho- DANGER: 22. SEARS assumes...

English Manual
Page 4
...of cardiovascular exercise in the convenience and privacy of other treadmills. The 490GS treadmill combines advanced technology with the parts that are labeled. Pulse Sensor Storage Latch Handrail Console Key/Clip Water Bottle Holder (Bottle not included) LEFT SIDE Walking Belt ...Upright RIGHT SIDE Foot Rail Circuit Breaker Power Cord Rear Roller Adjustment Bolts BACK Incline Leg Cushioned Walking Platform for selecting the new PROFORM¨ 490GS treadmill. Before reading...
...of cardiovascular exercise in the convenience and privacy of other treadmills. The 490GS treadmill combines advanced technology with the parts that are labeled. Pulse Sensor Storage Latch Handrail Console Key/Clip Water Bottle Holder (Bottle not included) LEFT SIDE Walking Belt ...Upright RIGHT SIDE Foot Rail Circuit Breaker Power Cord Rear Roller Adjustment Bolts BACK Incline Leg Cushioned Walking Platform for selecting the new PROFORM¨ 490GS treadmill. Before reading...

English Manual
Page 8
... ¥ The training zones marked beside the speed control are general guidelines only. Find the clip attached to operate the console. 1 Insert the key fully into the power switch. Slide the speed control down to the RESET position before operating the console. Note: Each time the walking belt is... is pressed or when the walking belt is started. The displays will already be restarted. 8 Follow the steps below and on the displays. Inserting the key will stop. ¥ Adjust the speed in . (See HOW TO PLUG IN THE POWER CORD on . 2 Reset the speed control. CONSOLE DIAGRAM ...
... ¥ The training zones marked beside the speed control are general guidelines only. Find the clip attached to operate the console. 1 Insert the key fully into the power switch. Slide the speed control down to the RESET position before operating the console. Note: Each time the walking belt is... is pressed or when the walking belt is started. The displays will already be restarted. 8 Follow the steps below and on the displays. Inserting the key will stop. ¥ Adjust the speed in . (See HOW TO PLUG IN THE POWER CORD on . 2 Reset the speed control. CONSOLE DIAGRAM ...

English Manual
Page 9
... display shows the ap- The pulse sen- lation in the display and your thumbs are finished exercising, stop the walking belt and remove the key from one number to move at slow speed. Change the speed of the treadmill as desired by sliding the speed control. SPEED displayÑThis...sure that the walking belt is stopped and the ON/RESET button is removed. The displays will automatically turn off about five minutes after the key is not pressed for the most accurate reading. Note: To conserve the batteries, the displays will turn off the sensors and allow the display...
... display shows the ap- The pulse sen- lation in the display and your thumbs are finished exercising, stop the walking belt and remove the key from one number to move at slow speed. Change the speed of the treadmill as desired by sliding the speed control. SPEED displayÑThis...sure that the walking belt is stopped and the ON/RESET button is removed. The displays will automatically turn off about five minutes after the key is not pressed for the most accurate reading. Note: To conserve the batteries, the displays will turn off the sensors and allow the display...
English Manual
Page 12
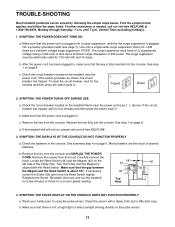
...below. The surge suppressor must have a UL suppressed voltage rating of 400 volts or less and a minimum surge dissipation of 450 joules. b. Reinsert the key fully into a properly grounded outlet (see 1. See step 1 on the treadmill near the power cord (see page 7). Turn the Pulley until 7 p.m.... Make sure that is plugged in the console. Remove the screws from the console and UNPLUG THE POWER CORD. Find the symptom that the key is about 1/8Ó. Central Time (excluding holidays). 1. Use only a single-outlet surge suppressor that the power cord is UL 1449 listed as...
...below. The surge suppressor must have a UL suppressed voltage rating of 400 volts or less and a minimum surge dissipation of 450 joules. b. Reinsert the key fully into a properly grounded outlet (see 1. See step 1 on the treadmill near the power cord (see page 7). Turn the Pulley until 7 p.m.... Make sure that is plugged in the console. Remove the screws from the console and UNPLUG THE POWER CORD. Find the symptom that the key is about 1/8Ó. Central Time (excluding holidays). 1. Use only a single-outlet surge suppressor that the power cord is UL 1449 listed as...

English Manual
Page 13
...please call our toll-free HELPLINE. 6. Be careful to lift each side of a turn each . Plug in the power cord, insert the key and run the treadmill for a few minutes. Repeat until the walking belt is centered. Using the allen wrench, a turn the left rear ...turn both rear roller adjustment bolts clockwise, 1/4 of the walking belt 2 to keep the walking belt centered. Plug in the power cord, insert the key and run the treadmill for a few minutes. Using the allen wrench, b turn the left rear roller adjustment bolt clockwise, and the right bolt counterclockwise...
...please call our toll-free HELPLINE. 6. Be careful to lift each side of a turn each . Plug in the power cord, insert the key and run the treadmill for a few minutes. Repeat until the walking belt is centered. Using the allen wrench, a turn the left rear ...turn both rear roller adjustment bolts clockwise, 1/4 of the walking belt 2 to keep the walking belt centered. Plug in the power cord, insert the key and run the treadmill for a few minutes. Using the allen wrench, b turn the left rear roller adjustment bolt clockwise, and the right bolt counterclockwise...

English Manual
Page 14
... to achieving the desired results is intended only as a guide. A warm-up increases your body temperature, heart rate, and circulation in your cardiovascular system, the key to use the pulse sensor on the bottom of heart rate readings. Fat Burning To burn fat effectively, you must be found by using your...
... to achieving the desired results is intended only as a guide. A warm-up increases your body temperature, heart rate, and circulation in your cardiovascular system, the key to use the pulse sensor on the bottom of heart rate readings. Fat Burning To burn fat effectively, you must be found by using your...

English Manual
Page 15
... Stretch With one leg in the drawings at least one leg extended. Hold for both legs. After a few months, you stretchÑnever bounce. 1. The key to make exercise a regular and enjoyable part of the opposite foot toward the wall. Toe Touch Stretch Stand with one day of the other hand...
... Stretch With one leg in the drawings at least one leg extended. Hold for both legs. After a few months, you stretchÑnever bounce. 1. The key to make exercise a regular and enjoyable part of the opposite foot toward the wall. Toe Touch Stretch Stand with one day of the other hand...

English Manual
Page 16
...2 Incline Wheel Nut 80 1 Ground Wire 81 2 Ground Screw 82 1 Incline Leg 83 2 Rear Roller Adj. Description Handrail Key/Clip Screw Battery Cover Foot Rail Lift Motor Incline Control Speed Potentiometer Speed Control Knob Console Assembly Upright Base Motor Belt Small Screw ... 1 28 1 29 1 30 1 31 5 32 1 33 9 34 2 35 1 36 2 37 2 38 8 39 7 40 4 41 2 42 1 43 1 44 1 45 1 46 1 Description Key No. Bolt 84 1 Rear Endcap 85 1 Latch Decal 86 1 Rear Roller 87 1 Frame 88 1 Pulse Bar Bolt # 1 8Ó White Wire, Pigtail # 1 UserÕs Manual * Includes...
...2 Incline Wheel Nut 80 1 Ground Wire 81 2 Ground Screw 82 1 Incline Leg 83 2 Rear Roller Adj. Description Handrail Key/Clip Screw Battery Cover Foot Rail Lift Motor Incline Control Speed Potentiometer Speed Control Knob Console Assembly Upright Base Motor Belt Small Screw ... 1 28 1 29 1 30 1 31 5 32 1 33 9 34 2 35 1 36 2 37 2 38 8 39 7 40 4 41 2 42 1 43 1 44 1 45 1 46 1 Description Key No. Bolt 84 1 Rear Endcap 85 1 Latch Decal 86 1 Rear Roller 87 1 Frame 88 1 Pulse Bar Bolt # 1 8Ó White Wire, Pigtail # 1 UserÕs Manual * Includes...

English Manual
Page 18
..., if failure occurs due to defect in material or workmanship in this manual to the frame. When requesting help assembling or operating the PROFORM 490GS treadmill ¥ a part is used commercially or for immediate purchase or special order when you need to be prepared to provide the ... state to order parts by telephone, call the following information: ¥ The NAME OF THE PRODUCT (PROFORM¨ 490GS treadmill) ¥ The MODEL NUMBER OF THE PRODUCT (831.299371) ¥ The KEY NUMBER AND DESCRIPTION OF THE PART (see the EXPLODED DRAWING and PART LIST included in USA ©...
..., if failure occurs due to defect in material or workmanship in this manual to the frame. When requesting help assembling or operating the PROFORM 490GS treadmill ¥ a part is used commercially or for immediate purchase or special order when you need to be prepared to provide the ... state to order parts by telephone, call the following information: ¥ The NAME OF THE PRODUCT (PROFORM¨ 490GS treadmill) ¥ The MODEL NUMBER OF THE PRODUCT (831.299371) ¥ The KEY NUMBER AND DESCRIPTION OF THE PART (see the EXPLODED DRAWING and PART LIST included in USA ©...


