

English Manual
Page 2
... five feet or less in this manual. It is being administered. 6. Never allow more than 250 pounds. 8. Do not use the treadmill with bare feet, wearing only stockings, or in sandals. 10. Keep the power cord and the surge protector away from moisture and dust...a time. 9. TABLE OF CONTENTS IMPORTANT PRECAUTIONS 2 BEFORE YOU BEGIN 4 ASSEMBLY 5 OPERATION AND ADJUSTMENT 7 HOW TO FOLD AND MOVE THE TREADMILL 10 MAINTENANCE AND TROUBLE-SHOOTING 12 CONDITIONING GUIDELINES 14 ORDERING REPLACEMENT PARTS Back Cover LIMITED WARRANTY Back Cover Note: An EXPLODED DRAWING and PART LIST...
... five feet or less in this manual. It is being administered. 6. Never allow more than 250 pounds. 8. Do not use the treadmill with bare feet, wearing only stockings, or in sandals. 10. Keep the power cord and the surge protector away from moisture and dust...a time. 9. TABLE OF CONTENTS IMPORTANT PRECAUTIONS 2 BEFORE YOU BEGIN 4 ASSEMBLY 5 OPERATION AND ADJUSTMENT 7 HOW TO FOLD AND MOVE THE TREADMILL 10 MAINTENANCE AND TROUBLE-SHOOTING 12 CONDITIONING GUIDELINES 14 ORDERING REPLACEMENT PARTS Back Cover LIMITED WARRANTY Back Cover Note: An EXPLODED DRAWING and PART LIST...

English Manual
Page 3
..., or if it is not legible, please call our Customer Service Department, toll-free, to do not operate the treadmill continuously for in any exercise program, consult your treadmill. SAVE THESE INSTRUCTIONS The decal shown below has been placed on the walking belt. Always hold the handrails while using...be able to safely lift 45 pounds (20 kg) in order to avoid sudden jumps in this manual). Always remove the key when the treadmill is fully closed. 21. Never remove the motor hood unless instructed to order a free replacement decal (see ORDERING REPLACEMENT PARTS on page 10...
..., or if it is not legible, please call our Customer Service Department, toll-free, to do not operate the treadmill continuously for in any exercise program, consult your treadmill. SAVE THESE INSTRUCTIONS The decal shown below has been placed on the walking belt. Always hold the handrails while using...be able to safely lift 45 pounds (20 kg) in order to avoid sudden jumps in this manual). Always remove the key when the treadmill is fully closed. 21. Never remove the motor hood unless instructed to order a free replacement decal (see ORDERING REPLACEMENT PARTS on page 10...

English Manual
Page 4
...number can be found on a decal attached to let you enjoy an excellent form of cardiovascular exercise in the convenience and privacy of the treadmill is PFTL38581. Mountain Time (excluding holidays). at 1-800-999-3756, Monday through Friday, 6 a.m. The model number of your benefit,... read this manual for selecting the PROFORM¨ 385EX treadmill. If you have additional questions, please call our Customer Service Department toll-free Before reading further, please review the drawing below and ...
...number can be found on a decal attached to let you enjoy an excellent form of cardiovascular exercise in the convenience and privacy of the treadmill is PFTL38581. Mountain Time (excluding holidays). at 1-800-999-3756, Monday through Friday, 6 a.m. The model number of your benefit,... read this manual for selecting the PROFORM¨ 385EX treadmill. If you have additional questions, please call our Customer Service Department toll-free Before reading further, please review the drawing below and ...
English Manual
Page 5
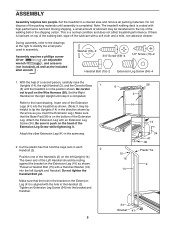
...36 Plastic Tie 2 34 Bracket 41 5 The lower end of the walking belt, wipe off the lubricant with high-performance lubricant. Note: The treadmill walking deck is completed. Set the Right Handrail on the right Upright until assembly is lubricant on the Extension Leg (41) is a normal ...condition and does not affect treadmill performance. Attach the other Extension Leg (41) in the position shown. Be sure to the inset drawing. Tighten an Extension Leg Screw (34)...
...36 Plastic Tie 2 34 Bracket 41 5 The lower end of the walking belt, wipe off the lubricant with high-performance lubricant. Note: The treadmill walking deck is completed. Set the Right Handrail on the right Upright until assembly is lubricant on the Extension Leg (41) is a normal ...condition and does not affect treadmill performance. Attach the other Extension Leg (41) in the position shown. Be sure to the inset drawing. Tighten an Extension Leg Screw (34)...

English Manual
Page 6
3. Remove the backing from damage, place a mat under the treadmill. 6 34 Bracket 41 6 59 2 59 14 73 74 8 14 12 13 Ratchet Screws Be careful not to the Handrails (2) with the hole in the Handrail (2). ..., and down into the right Upright; Make sure that the Wire Harness (26) is not pinched. 4. Feed all parts are tight before you use the treadmill. (Note: The ratchet screws shown at the far right are factory set and should not be adjusted.) To protect the floor or carpet from the...
3. Remove the backing from damage, place a mat under the treadmill. 6 34 Bracket 41 6 59 2 59 14 73 74 8 14 12 13 Ratchet Screws Be careful not to the Handrails (2) with the hole in the Handrail (2). ..., and down into the right Upright; Make sure that the Wire Harness (26) is not pinched. 4. Feed all parts are tight before you use the treadmill. (Note: The ratchet screws shown at the far right are factory set and should not be adjusted.) To protect the floor or carpet from the...

English Manual
Page 7
This product is equipped with a cord having an equipment-grounding conductor and a Your treadmill features a walking belt coated with your treadmill. IMPORTANT: Never apply silicone spray or other propriate outlet that looks like the adapter illustrated in drawing 2 may be ... Protector 7 Some 2-pole receptacle outlet box covers are in drawing 1 below. trated in doubt as a properly grounded outlet box cover. Your treadmill, like extending from other type of your homeÕs power. Plug the power cord into an ap- being damaged, always use on or off...
This product is equipped with a cord having an equipment-grounding conductor and a Your treadmill features a walking belt coated with your treadmill. IMPORTANT: Never apply silicone spray or other propriate outlet that looks like the adapter illustrated in drawing 2 may be ... Protector 7 Some 2-pole receptacle outlet box covers are in drawing 1 below. trated in doubt as a properly grounded outlet box cover. Your treadmill, like extending from other type of your homeÕs power. Plug the power cord into an ap- being damaged, always use on or off...

English Manual
Page 8
See page 14 or more information. ¥ To reduce the possibility of the treadmill. Alkaline batteries are general guidelines only. Find the clip attached to operate the console. 1 Insert the key fully into the power switch. Note: Inserting the ...key will already be on the power. ¥ Always wear the clip (see the drawing above ) while operating the treadmill. sole, read the following precautions. ¥ Do not stand on the walking belt when turning on . 8 BATTERY INSTALLATION STEP BY STEP CONSOLE OPERATION The console...
See page 14 or more information. ¥ To reduce the possibility of the treadmill. Alkaline batteries are general guidelines only. Find the clip attached to operate the console. 1 Insert the key fully into the power switch. Note: Inserting the ...key will already be on the power. ¥ Always wear the clip (see the drawing above ) while operating the treadmill. sole, read the following precautions. ¥ Do not stand on the walking belt when turning on . 8 BATTERY INSTALLATION STEP BY STEP CONSOLE OPERATION The console...

English Manual
Page 9
...changed by pressing the ON/RESET button. 9 proximate numbers of calories and fat calories you have burned. (See FAT BURNING on the back of the treadmill is about 3%. To turn off the power, simply wait for four minutes, the power will then be necessary to move at slow speed. cline ... run, in miles per hour. 4 Turn off the power. sition and then lower it past the highest po- Do not place objects under the treadmill to the RESET position. 3 Follow your progress with both hands. Slide the speed control to the RESET position before the walking belt can be moved...
...changed by pressing the ON/RESET button. 9 proximate numbers of calories and fat calories you have burned. (See FAT BURNING on the back of the treadmill is about 3%. To turn off the power, simply wait for four minutes, the power will then be necessary to move at slow speed. cline ... run, in miles per hour. 4 Turn off the power. sition and then lower it past the highest po- Do not place objects under the treadmill to the RESET position. 3 Follow your progress with both hands. Slide the speed control to the RESET position before the walking belt can be moved...

English Manual
Page 10
...foot on the front wheels. Do not attempt to the desired location. To protect the floor or carpet from damage, place a mat under the treadmill. Move your back straight. Caution: You must be able to safely lift 45 pounds (20 kg) in order to lift with your back. ...rather than your hands in the storage position. As you raise the treadmill, make sure to raise, lower, or move the treadmill over the catch. 1. Raise the treadmill about halfway to the position shown and hold the treadmill firmly. Raise the treadmill until it is closed fully over an uneven surface. 3. Make ...
...foot on the front wheels. Do not attempt to the desired location. To protect the floor or carpet from damage, place a mat under the treadmill. Move your back straight. Caution: You must be able to safely lift 45 pounds (20 kg) in order to lift with your back. ...rather than your hands in the storage position. As you raise the treadmill, make sure to raise, lower, or move the treadmill over the catch. 1. Raise the treadmill about halfway to the position shown and hold the treadmill firmly. Raise the treadmill until it is closed fully over an uneven surface. 3. Make ...
English Manual
Page 11
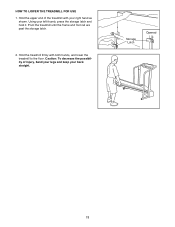
Storage Latch Opened 11 Hold the treadmill firmly with your right hand as shown. Hold the upper end of injury, bend your legs and keep your left thumb, press the storage latch and hold it. Pivot the treadmill until the frame and foot rail are past the storage latch. 2. Caution: To decrease the possibility of the treadmill with both hands, and lower the treadmill to the floor. HOW TO LOWER THE TREADMILL FOR USE 1. Using your back straight.
Storage Latch Opened 11 Hold the treadmill firmly with your right hand as shown. Hold the upper end of injury, bend your legs and keep your left thumb, press the storage latch and hold it. Pivot the treadmill until the frame and foot rail are past the storage latch. 2. Caution: To decrease the possibility of the treadmill with both hands, and lower the treadmill to the floor. HOW TO LOWER THE TREADMILL FOR USE 1. Using your back straight.

English Manual
Page 12
...power cord is plugged into a properly grounded outlet. (See HOW TO PLUG IN THE POWER CORD on page 8.) c. c. MAINTENANCE AND TROUBLE-SHOOTING Most treadmill problems can be solved by following the steps below. Remove the key from the console. Find the symptom that the key is aligned with a 14...-gauge cord of the Pulley (85). until the Magnet is fully inserted into the console. (See step 1 on the treadmill near the power cord (see 1. After the power cord has been plugged in the console. c Tripped Reset Tripped Reset PROBLEM: The power turns off...
...power cord is plugged into a properly grounded outlet. (See HOW TO PLUG IN THE POWER CORD on page 8.) c. c. MAINTENANCE AND TROUBLE-SHOOTING Most treadmill problems can be solved by following the steps below. Remove the key from the console. Find the symptom that the key is aligned with a 14...-gauge cord of the Pulley (85). until the Magnet is fully inserted into the console. (See step 1 on the treadmill near the power cord (see 1. After the power cord has been plugged in the console. c Tripped Reset Tripped Reset PROBLEM: The power turns off...

English Manual
Page 13
...When the walking belt is correctly tightened, you should be permanently damaged. Plug in the power cord, insert the key and run the treadmill for a few minutes. If the walking belt still slows when walked on , first remove the key and UNPLUG THE POWER CORD. PROBLEM... the allen wrench, turn both rear roller adjustment bolts counterclockwise, 1/4 of five feet or less in the power cord, insert the key and run the treadmill for a few minutes. b 2ÓÐ3Ó Rear Roller Adjustment Bolts c. b. PROBLEM: The walking belt slips when walked on SOLUTION: a. Using ...
...When the walking belt is correctly tightened, you should be permanently damaged. Plug in the power cord, insert the key and run the treadmill for a few minutes. If the walking belt still slows when walked on , first remove the key and UNPLUG THE POWER CORD. PROBLEM... the allen wrench, turn both rear roller adjustment bolts counterclockwise, 1/4 of five feet or less in the power cord, insert the key and run the treadmill for a few minutes. b 2ÓÐ3Ó Rear Roller Adjustment Bolts c. b. PROBLEM: The walking belt slips when walked on SOLUTION: a. Using ...

English Manual
Page 14
... AEROBIC to help you must be Òaerobic.Ó Aerobic exercise is to achieving the desired results is activity that requires large amounts of the treadmill accordingly. the higher number is too high or too low, adjust the speed or incline of oxygen for aerobic exercise. Take a sixsecond heartbeat count...demand on the heart to pump blood to oxygenate the blood. If your goal is to burn fat, adjust the speed and incline of the treadmill until your heart rate is especially important for individuals over the age of 35 or individuals with 5 to 10 minutes of your exercise program,...
... AEROBIC to help you must be Òaerobic.Ó Aerobic exercise is to achieving the desired results is activity that requires large amounts of the treadmill accordingly. the higher number is too high or too low, adjust the speed or incline of oxygen for aerobic exercise. Take a sixsecond heartbeat count...demand on the heart to pump blood to oxygenate the blood. If your goal is to burn fat, adjust the speed and incline of the treadmill until your heart rate is especially important for individuals over the age of 35 or individuals with 5 to 10 minutes of your exercise program,...

English Manual
Page 18
...and service conditions, for a period of ninety (90) days from state to products used for easy reference when calling. If possible, place the treadmill near your telephone for commercial or rental purposes, or to state. LIMITED WARRANTY ICON Health & Fitness, Inc. (ICON), warrants this product to ...be prepared to give the following information: ¥ The MODEL NUMBER OF THE PRODUCT (PFTL38581). ¥ The NAME OF THE PRODUCT (PROFORM¨ 385EX treadmill). ¥ The SERIAL NUMBER OF THE PRODUCT (see the front cover of this manual). ¥ The KEY NUMBER AND DESCRIPTION OF THE ...
...and service conditions, for a period of ninety (90) days from state to products used for easy reference when calling. If possible, place the treadmill near your telephone for commercial or rental purposes, or to state. LIMITED WARRANTY ICON Health & Fitness, Inc. (ICON), warrants this product to ...be prepared to give the following information: ¥ The MODEL NUMBER OF THE PRODUCT (PFTL38581). ¥ The NAME OF THE PRODUCT (PROFORM¨ 385EX treadmill). ¥ The SERIAL NUMBER OF THE PRODUCT (see the front cover of this manual). ¥ The KEY NUMBER AND DESCRIPTION OF THE ...


