

English Manual
Page 2
... cord. 11. Please save them for both men and women. To protect the floor or carpet from moisture and dust. The treadmill should be used or where oxygen is turned off. No other appliance should not be on the same circuit. Use only a ...4 ASSEMBLY 5 OPERATION AND ADJUSTMENT 7 HOW TO FOLD AND MOVE THE TREADMILL 10 MAINTENANCE AND TROUBLE-SHOOTING 12 CONDITIONING GUIDELINES 14 ORDERING REPLACEMENT PARTS Back Cover LIMITED WARRANTY Back Cover Note: An EXPLODED DRAWING and PART LIST are attached to persons, read the following important precautions and information ...
... cord. 11. Please save them for both men and women. To protect the floor or carpet from moisture and dust. The treadmill should be used or where oxygen is turned off. No other appliance should not be on the same circuit. Use only a ...4 ASSEMBLY 5 OPERATION AND ADJUSTMENT 7 HOW TO FOLD AND MOVE THE TREADMILL 10 MAINTENANCE AND TROUBLE-SHOOTING 12 CONDITIONING GUIDELINES 14 ORDERING REPLACEMENT PARTS Back Cover LIMITED WARRANTY Back Cover Note: An EXPLODED DRAWING and PART LIST are attached to persons, read the following important precautions and information ...

English Manual
Page 3
...hood unless instructed to avoid sudden jumps in order to order a free replacement decal (see ORDERING REPLACEMENT PARTS on page 10.) You must be performed by placing objects under the treadmill. If the decal is missing, or if it is properly assembled. (See ASSEMBLY on page 5,...health problems. Read all parts of this manual. Always unplug the power cord immediately after use, before cleaning the treadmill, and before using the treadmill. 15. Do not use of the treadmill regularly. 22. The treadmill is fully closed. 21. When folding or moving the treadmill, make sure that the...
...hood unless instructed to avoid sudden jumps in order to order a free replacement decal (see ORDERING REPLACEMENT PARTS on page 10.) You must be performed by placing objects under the treadmill. If the decal is missing, or if it is properly assembled. (See ASSEMBLY on page 5,...health problems. Read all parts of this manual. Always unplug the power cord immediately after use, before cleaning the treadmill, and before using the treadmill. 15. Do not use of the treadmill regularly. 22. The treadmill is fully closed. 21. When folding or moving the treadmill, make sure that the...

English Manual
Page 4
...enjoy an excellent form of cardiovascular exercise in the convenience and privacy of your benefit, read this manual for selecting the PROFORM¨ 385EX treadmill. For your home. Mountain Time (excluding holidays). BEFORE YOU BEGIN Thank you have additional questions, please call our ...free Before reading further, please review the drawing below and familiarize yourself with innovative design to the treadmill (see the front cover of this manual carefully before calling. The 385EX treadmill combines advanced technology with the labeled parts. If you for the location).
...enjoy an excellent form of cardiovascular exercise in the convenience and privacy of your benefit, read this manual for selecting the PROFORM¨ 385EX treadmill. For your home. Mountain Time (excluding holidays). BEFORE YOU BEGIN Thank you have additional questions, please call our ...free Before reading further, please review the drawing below and familiarize yourself with innovative design to the treadmill (see the front cover of this manual carefully before calling. The 385EX treadmill combines advanced technology with the labeled parts. If you for the location).
English Manual
Page 5
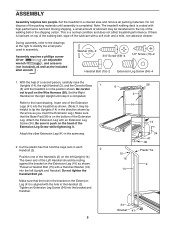
...Screw while tightening it. Be sure to tip the Uprights (14) in the position shown. Tighten an Extension Leg Screw (34) into the treadmill as shown. (Note: It may be resting against the bracket on the Wire Harness (26). ASSEMBLY Assembly requires two people. This is ...208;2 Extension Leg Screw (34)Ð4 1. driver , an adjustable wrench , and scissors (not included), as well as shown. Refer to identify the small parts used in the Handrail (2). Thread a Handrail Bolt (15) with a soft cloth and a mild, non-abrasive cleaner. Do not dispose of the Left Handrail...
...Screw while tightening it. Be sure to tip the Uprights (14) in the position shown. Tighten an Extension Leg Screw (34) into the treadmill as shown. (Note: It may be resting against the bracket on the Wire Harness (26). ASSEMBLY Assembly requires two people. This is ...208;2 Extension Leg Screw (34)Ð4 1. driver , an adjustable wrench , and scissors (not included), as well as shown. Refer to identify the small parts used in the Handrail (2). Thread a Handrail Bolt (15) with a soft cloth and a mild, non-abrasive cleaner. Do not dispose of the Left Handrail...

English Manual
Page 6
...the right Handrail (2) off the right Handrail (2). Make sure that the hole in 6 the indicated location. Remove the backing from damage, place a mat under the treadmill. 6 34 Bracket 41 6 59 2 59 14 73 74 8 14 12 13 Ratchet Screws Attach the Storage Latch (12) to overtighten the Screws. 8. 3....6 Bracket 2 Plastic Tie 26 14 4 15 16 2 14 5. Make sure that the Wire Harness is in the position shown. Feed all parts are tight before you use the treadmill. (Note: The ratchet screws shown at the far right are factory set and should not be adjusted.) To protect the floor or...
...the right Handrail (2) off the right Handrail (2). Make sure that the hole in 6 the indicated location. Remove the backing from damage, place a mat under the treadmill. 6 34 Bracket 41 6 59 2 59 14 73 74 8 14 12 13 Ratchet Screws Attach the Storage Latch (12) to overtighten the Screws. 8. 3....6 Bracket 2 Plastic Tie 26 14 4 15 16 2 14 5. Make sure that the Wire Harness is in the position shown. Feed all parts are tight before you use the treadmill. (Note: The ratchet screws shown at the far right are factory set and should not be adjusted.) To protect the floor or...

English Manual
Page 14
... lower two numbers in your cardiovascular system, the key to the nearest ten years). Only after the first few minutes of the treadmill accordingly. CONDITIONING GUIDELINES WARNING: Before beginning this or any exercise program, consult your training zone. WORKOUT GUIDELINES Fat Burning To burn ...large amounts of oxygen for individuals over the age of 35 or individuals with pre-existing health problems. The following three important parts: A Warm-up increases your age. RememberÑthese are recommended heart rates for energy. The chart below shows recommended heart...
... lower two numbers in your cardiovascular system, the key to the nearest ten years). Only after the first few minutes of the treadmill accordingly. CONDITIONING GUIDELINES WARNING: Before beginning this or any exercise program, consult your training zone. WORKOUT GUIDELINES Fat Burning To burn ...large amounts of oxygen for individuals over the age of 35 or individuals with pre-existing health problems. The following three important parts: A Warm-up increases your age. RememberÑthese are recommended heart rates for energy. The chart below shows recommended heart...

English Manual
Page 18
... to give the following information: ¥ The MODEL NUMBER OF THE PRODUCT (PFTL38581). ¥ The NAME OF THE PRODUCT (PROFORM¨ 385EX treadmill). ¥ The SERIAL NUMBER OF THE PRODUCT (see the front cover of this manual). ¥ The KEY NUMBER AND DESCRIPTION OF...its authorized service centers. This warranty does not extend to products used for a particular purpose is limited in lieu of purchase. When ordering parts, please be pre-authorized by an ICON authorized service center, to products used as store display models. LIMITED WARRANTY ICON Health & Fitness,...
... to give the following information: ¥ The MODEL NUMBER OF THE PRODUCT (PFTL38581). ¥ The NAME OF THE PRODUCT (PROFORM¨ 385EX treadmill). ¥ The SERIAL NUMBER OF THE PRODUCT (see the front cover of this manual). ¥ The KEY NUMBER AND DESCRIPTION OF...its authorized service centers. This warranty does not extend to products used for a particular purpose is limited in lieu of purchase. When ordering parts, please be pre-authorized by an ICON authorized service center, to products used as store display models. LIMITED WARRANTY ICON Health & Fitness,...


