

Uk Manual
Page 2
PROFORM is a registered trademark of this manual. TABLE OF CONTENTS IMPORTANT PRECAUTIONS 3 BEFORE YOU BEGIN 5 ASSEMBLY 6 OPERATION AND ADJUSTMENT 11 HOW TO FOLD AND MOVE THE TREADMILL 22 TROUBLESHOOTING 24 CONDITIONING GUIDELINES 26 ORDERING REPLACEMENT PARTS Back Cover Note: An EXPLODED DRAWING and a PART LIST are attached at the end of ICON IP, Inc. 2
PROFORM is a registered trademark of this manual. TABLE OF CONTENTS IMPORTANT PRECAUTIONS 3 BEFORE YOU BEGIN 5 ASSEMBLY 6 OPERATION AND ADJUSTMENT 11 HOW TO FOLD AND MOVE THE TREADMILL 22 TROUBLESHOOTING 24 CONDITIONING GUIDELINES 26 ORDERING REPLACEMENT PARTS Back Cover Note: An EXPLODED DRAWING and a PART LIST are attached at the end of ICON IP, Inc. 2

Uk Manual
Page 3
...on the walking belt. If an extension cord is capable of 12 and pets away from the treadmill at a time. 9. Never move the treadmill. 20. Do not put the treadmill in speed. 6. The treadmill should be fitted to the fuse carrier. Athletic support clothes are standing on page 5 for .... It is the responsibility of the owner to ensure that is not working properly. (See TROUBLESHOOTING on page 11). 4. Place the treadmill on the treadmill at all users of this manual. 3. Do not wear loose clothes that blocks air openings. When connecting the power cord (see OPERATION...
...on the walking belt. If an extension cord is capable of 12 and pets away from the treadmill at a time. 9. Never move the treadmill. 20. Do not put the treadmill in speed. 6. The treadmill should be fitted to the fuse carrier. Athletic support clothes are standing on page 5 for .... It is the responsibility of the owner to ensure that is not working properly. (See TROUBLESHOOTING on page 11). 4. Place the treadmill on the treadmill at all users of this manual. 3. Do not wear loose clothes that blocks air openings. When connecting the power cord (see OPERATION...
Uk Manual
Page 4
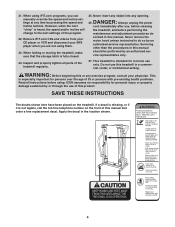
..., when the next "chirp" is heard, the speed and/or incline will change to do so by or through the use , before cleaning the treadmill, and before using. Remove iFIT.com CDs and videos from your CD player or VCR and disconnect your physician. vice representative only. 27. ICON assumes...placed on the front of the program. 22. Never insert any object into any time by an authorised ser- This treadmill is especially important for in-home use this treadmill in this or any exercise program, consult your MP3 player when you are not using iFIT.com programs, you can manually...
..., when the next "chirp" is heard, the speed and/or incline will change to do so by or through the use , before cleaning the treadmill, and before using. Remove iFIT.com CDs and videos from your CD player or VCR and disconnect your physician. vice representative only. 27. ICON assumes...placed on the front of the program. 22. Never insert any object into any time by an authorised ser- This treadmill is especially important for in-home use this treadmill in this or any exercise program, consult your MP3 player when you are not using iFIT.com programs, you can manually...

Uk Manual
Page 5
... Adjustment Bolts Key/Clip Upright Reset/Off Circuit Breaker RIGHT SIDE Cushioned Walking Platform for selecting the new PROFORM® 380 P treadmill. The 380 P treadmill offers an array of other treadmills. For your workouts at home more enjoyable and effective. If you , note the product model number ...and serial number before you 're not exercising, the unique 380 P treadmill can be folded up, requiring less than half the floor space of features designed to the treadmill (see the front of this manual carefully before contacting us assist you have questions...
... Adjustment Bolts Key/Clip Upright Reset/Off Circuit Breaker RIGHT SIDE Cushioned Walking Platform for selecting the new PROFORM® 380 P treadmill. The 380 P treadmill offers an array of other treadmills. For your workouts at home more enjoyable and effective. If you , note the product model number ...and serial number before you 're not exercising, the unique 380 P treadmill can be folded up, requiring less than half the floor space of features designed to the treadmill (see the front of this manual carefully before contacting us assist you have questions...

Uk Manual
Page 6
... the packing materials until assembly is not in a cleared area and remove all packing materials. If a part is completed. Do not dispose of the treadmill walking belt is a normal condition and does not affect treadmill performance. If there is lubricant on top of the walking belt or the shipping carton. Set the... treadmill in the parts bag, first check to the top of the walking belt, simply wipe off the lubricant with high-performance lubricant. 3/4" Tek Screw (58)-8 1/2" ...
... the packing materials until assembly is not in a cleared area and remove all packing materials. If a part is completed. Do not dispose of the treadmill walking belt is a normal condition and does not affect treadmill performance. If there is lubricant on top of the walking belt or the shipping carton. Set the... treadmill in the parts bag, first check to the top of the walking belt, simply wipe off the lubricant with high-performance lubricant. 3/4" Tek Screw (58)-8 1/2" ...

Uk Manual
Page 9
... underside 7 of the Console Base (47) in a secure place; To protect the floor or carpet, place a mat under the treadmill. 9 Make sure that all parts are properly tightened before you use the treadmill. Note: Extra hardware may be included. Be careful not to adjust the walking belt (see page 25). the large...
... underside 7 of the Console Base (47) in a secure place; To protect the floor or carpet, place a mat under the treadmill. 9 Make sure that all parts are properly tightened before you use the treadmill. Note: Extra hardware may be included. Be careful not to adjust the walking belt (see page 25). the large...
Uk Manual
Page 11
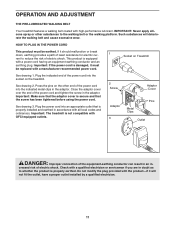
...the end of the power cord into the indicated metal clips in - IT 11 OPERATION AND ADJUSTMENT THE PRE-LUBRICATED WALKING BELT Your treadmill features a walking belt coated with the product-if it must be replaced with GFCI-equipped outlets. 2 Screw Adaptor Cover Adaptor 3 Pins...cord and tighten the screw in accordance with a power cord having an equipment-earthing conductor and an earthing plug. Socket on the treadmill. Important: The treadmill is properly earthed. Check with a qualified electrician or serviceman if you are in doubt as to whether the product is not ...
...the end of the power cord into the indicated metal clips in - IT 11 OPERATION AND ADJUSTMENT THE PRE-LUBRICATED WALKING BELT Your treadmill features a walking belt coated with the product-if it must be replaced with GFCI-equipped outlets. 2 Screw Adaptor Cover Adaptor 3 Pins...cord and tighten the screw in accordance with a power cord having an equipment-earthing conductor and an earthing plug. Socket on the treadmill. Important: The treadmill is properly earthed. Check with a qualified electrician or serviceman if you are in doubt as to whether the product is not ...
Uk Manual
Page 12
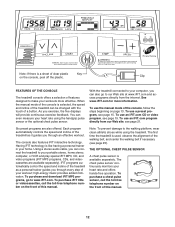
...treadmPillETLt3in8u9o0us5l.y 0monitors your as it guides you through an effective workout. To vation. the front of this manual. time the treadmill is used, observe the alignment of the The console also features iFIT interactive technology. ETPcEh3e8s9t 0p5ulse sensor con- high-energy...stereo audio cable, you exercise, the five displays will provide continuous exercise feedback. available separately. in your heart rate using the treadmill. To purchase and download iFIT MP3 pro- Having iFIT technology is like having a personal trainer walking belt, and center the...
...treadmPillETLt3in8u9o0us5l.y 0monitors your as it guides you through an effective workout. To vation. the front of this manual. time the treadmill is used, observe the alignment of the The console also features iFIT interactive technology. ETPcEh3e8s9t 0p5ulse sensor con- high-energy...stereo audio cable, you exercise, the five displays will provide continuous exercise feedback. available separately. in your heart rate using the treadmill. To purchase and download iFIT MP3 pro- Having iFIT technology is like having a personal trainer walking belt, and center the...

Uk Manual
Page 13
...between one number and the other every few seconds, as needed. The display will change in increments of 0.5 mph. 4 Change the incline of the treadmill as desired. Find the clip attached to the key (see page 11). As you have selected a program or the iFIT.com mode, remove the ...To restart the walking belt, press the Start button or the Speed increase button. 2 Locate the on/off switch on the foot rails of the treadmill. The Time/Incline display will again begin to flash. Important: In an emergency situation, the key can be selected. The track will then darken ...
...between one number and the other every few seconds, as needed. The display will change in increments of 0.5 mph. 4 Change the incline of the treadmill as desired. Find the clip attached to the key (see page 11). As you have selected a program or the iFIT.com mode, remove the ...To restart the walking belt, press the Start button or the Speed increase button. 2 Locate the on/off switch on the foot rails of the treadmill. The Time/Incline display will again begin to flash. Important: In an emergency situation, the key can be selected. The track will then darken ...

Uk Manual
Page 14
...6 Measure your hands are clean. The letters "MPH" or "Km/H" will appear in the Speed display to the storage position or the treadmill will show which unit of miles or kilometers that your heart rate if desired. When you are finished using the handgrip pulse sensor, remove the... sheets of measurement. pear, and then your hands. To exit the information mode at the lowest level when the treadmill is selected, press the Speed decrease button. Step onto the foot rails, press the Stop button, and adjust the incline of measurement, first...
...6 Measure your hands are clean. The letters "MPH" or "Km/H" will appear in the Speed display to the storage position or the treadmill will show which unit of miles or kilometers that your heart rate if desired. When you are finished using the handgrip pulse sensor, remove the... sheets of measurement. pear, and then your hands. To exit the information mode at the lowest level when the treadmill is selected, press the Speed decrease button. Step onto the foot rails, press the Stop button, and adjust the incline of measurement, first...

Uk Manual
Page 15
...and the last segment ends. Hold the handrails and begin walking. cline setting are not shown in the flashing Current Segment column, and the treadmill will be shown in the matrix.) The speed settings for two or more consecutive segments. ments will automatically adjust to the left , the ... of the matrix. (The incline settings are programmed for the first segment will flash the maximum speed setting. Each program is pressed, the treadmill will automatically adjust to the left . Note: The same speed setting and/or incline setting may move one column to the speed and incline...
...and the last segment ends. Hold the handrails and begin walking. cline setting are not shown in the flashing Current Segment column, and the treadmill will be shown in the matrix.) The speed settings for two or more consecutive segments. ments will automatically adjust to the left , the ... of the matrix. (The incline settings are programmed for the first segment will flash the maximum speed setting. Each program is pressed, the treadmill will automatically adjust to the left . Note: The same speed setting and/or incline setting may move one column to the speed and incline...

Uk Manual
Page 16
... setting is pressed, an additional indicator will appear or disappear in those columns as well.) Note: When the next segment of the program begins, the treadmill will automatically adjust to step 5 on page 13. 5 Measure your progress with the five displays. See step 7 on page 14. 16 Every few times a Speed...
... setting is pressed, an additional indicator will appear or disappear in those columns as well.) Note: When the next segment of the program begins, the treadmill will automatically adjust to step 5 on page 13. 5 Measure your progress with the five displays. See step 7 on page 14. 16 Every few times a Speed...

Uk Manual
Page 17
... B. If your stereo. Plug the other end of the cable into the LINE OUT jack on the console. To use iFIT.com video programs, the treadmill must be connected to your stereo. Plug the other end of the cable into the AUDIO OUT jack on the console. A. Note: While the cable... one end of the included 3.5 mm to 19 for connecting instructions. Plug your computer. To use iFIT.com programs directly from our Web site, the treadmill must be connected to your headphones into the input jack on the console. Plug one end of the cable into a jack on your A headphones into...
... B. If your stereo. Plug the other end of the cable into the LINE OUT jack on the console. To use iFIT.com video programs, the treadmill must be connected to your stereo. Plug the other end of the cable into the AUDIO OUT jack on the console. A. Note: While the cable... one end of the included 3.5 mm to 19 for connecting instructions. Plug your computer. To use iFIT.com programs directly from our Web site, the treadmill must be connected to your headphones into the input jack on the console. Plug one end of the cable into a jack on your A headphones into...
Uk Manual
Page 19
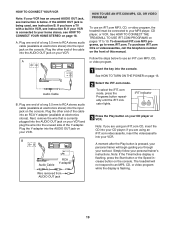
... download iFIT.com MP3 programs, go to 19. To select the iFIT.com mode, press the Programs button repeatedly until the iFIT indicator lights. The treadmill will begin guiding you are using an iFIT.com CD, insert the CD into your VCR. B 19 A ANT. See HOW TO CONNECT THE... TREADMILL TO USE IFIT.COM PROGRAMS on the console. IN VIDEO AUDIO IN CH 34 OUT RF OUT AUDIO OUT RIGHT A LEFT B. A Plug the Y-adapter into ...
... download iFIT.com MP3 programs, go to 19. To select the iFIT.com mode, press the Programs button repeatedly until the iFIT indicator lights. The treadmill will begin guiding you are using an iFIT.com CD, insert the CD into your VCR. B 19 A ANT. See HOW TO CONNECT THE... TREADMILL TO USE IFIT.COM PROGRAMS on the console. IN VIDEO AUDIO IN CH 34 OUT RF OUT AUDIO OUT RIGHT A LEFT B. A Plug the Y-adapter into ...

Uk Manual
Page 20
... page 14. If the display is flashing, press the Start button or the Speed increase button on the console. • Adjust the volume of the treadmill does not change . If the volume is too high or too low, the console may change . In some instances, the speed and/or incline may.... 4 Follow your progress with the five displays. During the program, an electronic "chirping" sound will alert you when the speed and/or incline of the treadmill is about to step 1 on page 18. See step 7 on the console. CAUTION: Always listen for the "chirp" and be prepared for speed and/or...
... page 14. If the display is flashing, press the Start button or the Speed increase button on the console. • Adjust the volume of the treadmill does not change . If the volume is too high or too low, the console may change . In some instances, the speed and/or incline may.... 4 Follow your progress with the five displays. During the program, an electronic "chirping" sound will alert you when the speed and/or incline of the treadmill is about to step 1 on page 18. See step 7 on the console. CAUTION: Always listen for the "chirp" and be prepared for speed and/or...

Uk Manual
Page 21
... Follow your home computer. See step 8 on the foot rails. HOW TO USE AN IFIT.COM PROGRAM DIRECTLY FROM OUR WEB SITE 7 Return to the treadmill and stand on page 17. 21 To use a program from the internet. During the program, an electronic "chirping" sound will stop the walking belt at... the next settings for speed and/or incline changes. Find the clip attached to the key and slide the clip onto the waistband of the treadmill does not change when a "chirp" is heard, make sure that the Time/Incline display is heard, the speed and incline will change to step...
... Follow your home computer. See step 8 on the foot rails. HOW TO USE AN IFIT.COM PROGRAM DIRECTLY FROM OUR WEB SITE 7 Return to the treadmill and stand on page 17. 21 To use a program from the internet. During the program, an electronic "chirping" sound will stop the walking belt at... the next settings for speed and/or incline changes. Find the clip attached to the key and slide the clip onto the waistband of the treadmill does not change when a "chirp" is heard, make sure that the Time/Incline display is heard, the speed and incline will change to step...

Uk Manual
Page 22
...left thumb, press the storage latch to the storage position as described above 30° C (85° F). Tilt the treadmill back until it is not done, the treadmill may be able to safely lift 20 kg (45 lbs.) to the desired location. Next, unplug the power cord. Move ... Base 22 Raise the frame about halfway to the lowest position. To reduce the risk of injury, use extreme caution while moving the treadmill, convert the treadmill to the left. CAUTION: You must be permanently damaged. If this is resting in the storage position. Using your hands in temperatures above...
...left thumb, press the storage latch to the storage position as described above 30° C (85° F). Tilt the treadmill back until it is not done, the treadmill may be able to safely lift 20 kg (45 lbs.) to the desired location. Next, unplug the power cord. Move ... Base 22 Raise the frame about halfway to the lowest position. To reduce the risk of injury, use extreme caution while moving the treadmill, convert the treadmill to the left. CAUTION: You must be permanently damaged. If this is resting in the storage position. Using your hands in temperatures above...

Uk Manual
Page 23
Hold the upper end of injury, bend your legs and keep your right hand. Pivot the frame down until the frame and foot rail are past the storage latch. 2. Hold the frame firmly with your back straight. To decrease the possibility of the treadmill with both hands, and lower the frame to the floor. Do not drop the frame to the left. Storage Latch Catch 23 HOW TO LOWER THE TREADMILL FOR USE 1. Press the storage latch to the floor.
Hold the upper end of injury, bend your legs and keep your right hand. Pivot the frame down until the frame and foot rail are past the storage latch. 2. Hold the frame firmly with your back straight. To decrease the possibility of the treadmill with both hands, and lower the frame to the floor. Do not drop the frame to the left. Storage Latch Catch 23 HOW TO LOWER THE TREADMILL FOR USE 1. Press the storage latch to the floor.
Uk Manual
Page 24
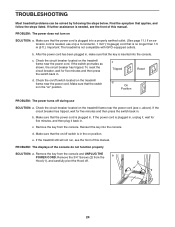
...page 11.) If an extension cord is needed , use SOLUTION: a. Remove the 3/4" Screws (2) from the console. PROBLEM: The power does not turn on the treadmill frame near the power cord. Make sure that is no longer than 1.5 m (5 ft.). Remove the key from the a Hood (1), and carefully pivot the ... the power cord is plugged in the on /off switch located on SOLUTION: a. Make sure that applies, and follow the steps listed. If the treadmill still will not run, see the front of this manual. Find the symptom that the on position. c. above). c. Check the on/off switch...
...page 11.) If an extension cord is needed , use SOLUTION: a. Remove the 3/4" Screws (2) from the console. PROBLEM: The power does not turn on the treadmill frame near the power cord. Make sure that is no longer than 1.5 m (5 ft.). Remove the key from the a Hood (1), and carefully pivot the ... the power cord is plugged in the on /off switch located on SOLUTION: a. Make sure that applies, and follow the steps listed. If the treadmill still will not run, see the front of this manual. Find the symptom that the on position. c. above). c. Check the on/off switch...

Uk Manual
Page 25
... or slips when walked on SOLUTION: a. if the walking belt has shifted to 3 in the power cord, insert the key, and carefully walk on the treadmill for a correct speed reading. b. Repeat until the walking belt is no longer than 1.5 m (5 ft.). b. If the walking belt a has shifted to ...to the left, use only a 3-conductor, 1mm2 (14-gauge) cord that the gap between the Magnet and the Reed 49 Switch is overtightened, treadmill performance may decrease and the walking belt may become damaged. Make sure 3 mm 17 that is properly tightened. If an extension cord is centred....
... or slips when walked on SOLUTION: a. if the walking belt has shifted to 3 in the power cord, insert the key, and carefully walk on the treadmill for a correct speed reading. b. Repeat until the walking belt is no longer than 1.5 m (5 ft.). b. If the walking belt a has shifted to ...to the left, use only a 3-conductor, 1mm2 (14-gauge) cord that the gap between the Magnet and the Reed 49 Switch is overtightened, treadmill performance may decrease and the walking belt may become damaged. Make sure 3 mm 17 that is properly tightened. If an extension cord is centred....


