

Uk Manual
Page 3
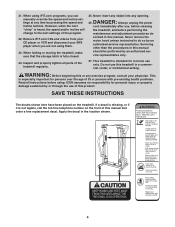
..., including the user's movement, may change before operating the treadmill. 1. Use the treadmill only as an exercise aid in determining heart rate trends in use only a 3conductor, 1mm2 (14-gauge) cord that all times. 7. Do not operate the treadmill if the power cord or plug is damaged, or if the treadmill is not working properly.) 14. Never start the treadmill whilst you when the speed and/or incline of clearance...
..., including the user's movement, may change before operating the treadmill. 1. Use the treadmill only as an exercise aid in determining heart rate trends in use only a 3conductor, 1mm2 (14-gauge) cord that all times. 7. Do not operate the treadmill if the power cord or plug is damaged, or if the treadmill is not working properly.) 14. Never start the treadmill whilst you when the speed and/or incline of clearance...
Uk Manual
Page 4
... pressing the speed and incline buttons. Never remove the motor hood unless instructed to the next settings of the program. 22. WARNING: Before beginning this manual. This is especially important for in this or any exercise program, consult your MP3 player when you can manually override the speed and incline settings at any opening. 21. DANGER: 26. Always unplug the power cord immediately after use only. scribed in -home use , before cleaning the treadmill...
... pressing the speed and incline buttons. Never remove the motor hood unless instructed to the next settings of the program. 22. WARNING: Before beginning this manual. This is especially important for in this or any exercise program, consult your MP3 player when you can manually override the speed and incline settings at any opening. 21. DANGER: 26. Always unplug the power cord immediately after use only. scribed in -home use , before cleaning the treadmill...

Uk Manual
Page 5
... of other treadmills. For your workouts at home more enjoyable and effective. reading this manual, please see the front of this manual for the location). Accessory Tray Book Holder Console Handrail Storage Latch Walking Belt Foot Rail BACK Rear Roller Adjustment Bolts Key/Clip Upright Reset/Off Circuit Breaker RIGHT SIDE Cushioned Walking Platform for selecting the new PROFORM® 380 P treadmill. And when you're not exercising, the unique 380 P treadmill can be folded up...
... of other treadmills. For your workouts at home more enjoyable and effective. reading this manual, please see the front of this manual for the location). Accessory Tray Book Holder Console Handrail Storage Latch Walking Belt Foot Rail BACK Rear Roller Adjustment Bolts Key/Clip Upright Reset/Off Circuit Breaker RIGHT SIDE Cushioned Walking Platform for selecting the new PROFORM® 380 P treadmill. And when you're not exercising, the unique 380 P treadmill can be folded up...

Uk Manual
Page 6
.... 3/4" Tek Screw (58)-8 1/2" Screw (119)-1 ASSEMBLY 1/2" Screw (48)-6 Assembly requires two persons. Assembly requires the included hex keys and your own phillips screwdriver mallet , and adjustable spanner . , rubber For help identifying assembly hardware, see if it has been preassembled. Set the treadmill in the parts bag, first check to the top of the walking belt, simply wipe off the lubricant with high-performance lubricant. If a part is...
.... 3/4" Tek Screw (58)-8 1/2" Screw (119)-1 ASSEMBLY 1/2" Screw (48)-6 Assembly requires two persons. Assembly requires the included hex keys and your own phillips screwdriver mallet , and adjustable spanner . , rubber For help identifying assembly hardware, see if it has been preassembled. Set the treadmill in the parts bag, first check to the top of the walking belt, simply wipe off the lubricant with high-performance lubricant. If a part is...

Uk Manual
Page 8
... 47 8 Make sure that the Upright Wire (42) is routed below the two indicated round posts (A). Attach the Console Base with the Silver Ground Screw (75). Next, press the Upright Wire into place. Next, press the end of the Upright Wire into place, turn the connec- 72 tor and then insert it. Set the Console Base (47) on the Upright Wire 5 (42) as shown in the inset...
... 47 8 Make sure that the Upright Wire (42) is routed below the two indicated round posts (A). Attach the Console Base with the Silver Ground Screw (75). Next, press the Upright Wire into place. Next, press the end of the Upright Wire into place, turn the connec- 72 tor and then insert it. Set the Console Base (47) on the Upright Wire 5 (42) as shown in the inset...
Uk Manual
Page 11
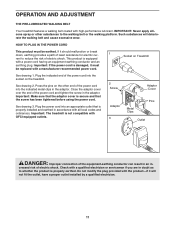
... a path of least resistance for electric cur- 1 rent to the walking belt or the walking platform. Press the pins on Treadmill See drawing 1. Check with a manufacturer-recommended power cord. Such substances will FR/SP not fit the outlet, have a proper outlet installed by a qualified electrician. OPERATION AND ADJUSTMENT THE PRE-LUBRICATED WALKING BELT Your treadmill features a walking belt coated with high-performance lubricant. Close the adaptor cover over the end...
... a path of least resistance for electric cur- 1 rent to the walking belt or the walking platform. Press the pins on Treadmill See drawing 1. Check with a manufacturer-recommended power cord. Such substances will FR/SP not fit the outlet, have a proper outlet installed by a qualified electrician. OPERATION AND ADJUSTMENT THE PRE-LUBRICATED WALKING BELT Your treadmill features a walking belt coated with high-performance lubricant. Close the adaptor cover over the end...
Uk Manual
Page 12
...- To use the manual mode of the console, follow the steps beginning on the front of the clean athletic shoes while using the handgrip pulse sensor or the optional chest pulse sensor. Using a stereo audio cable, you exercise, the five displays will provide continuous exercise feedback. hands-free operation. To use a preset program, see page 25). iFIT programs au- tomatically control the speed and incline of the treadmill can con- To purchase and download iFIT MP3 pro- telephone number on...
...- To use the manual mode of the console, follow the steps beginning on the front of the clean athletic shoes while using the handgrip pulse sensor or the optional chest pulse sensor. Using a stereo audio cable, you exercise, the five displays will provide continuous exercise feedback. hands-free operation. To use a preset program, see page 25). iFIT programs au- tomatically control the speed and incline of the treadmill can con- To purchase and download iFIT MP3 pro- telephone number on...

Uk Manual
Page 13
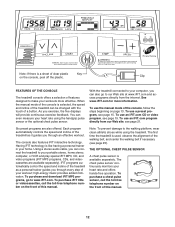
... the manual mode. As you exercise, change by the indicators in the display. If a button is pressed, the speed setting will show the time remaining in the pro- Each time a button is lit. Distance/Laps display-This display shows the distance that the switch is selected, a 1/4-mile (400meter) track will change the incline of your progress with the five displays. HOW TO TURN ON THE POWER 1 Plug in the power cord (see the drawing on the treadmill...
... the manual mode. As you exercise, change by the indicators in the display. If a button is pressed, the speed setting will show the time remaining in the pro- Each time a button is lit. Distance/Laps display-This display shows the distance that the switch is selected, a 1/4-mile (400meter) track will change the incline of your progress with the five displays. HOW TO TURN ON THE POWER 1 Plug in the power cord (see the drawing on the treadmill...

Uk Manual
Page 14
... Stop button, inserting the key into the console, and then releasing the Stop button. Fat/Cals display-This display shows the approximate numbers of miles or kilometers that your heart rate when you have burned (see step 6). In addition, make sure Pulse Sensor that the walking belt has moved. When your heart rate if desired. When you are finished using the handgrip pulse sensor, remove the sheets of measurement. Speed display-This display shows the speed of the treadmill...
... Stop button, inserting the key into the console, and then releasing the Stop button. Fat/Cals display-This display shows the approximate numbers of miles or kilometers that your heart rate when you have burned (see step 6). In addition, make sure Pulse Sensor that the walking belt has moved. When your heart rate if desired. When you are finished using the handgrip pulse sensor, remove the sheets of measurement. Speed display-This display shows the speed of the treadmill...

Uk Manual
Page 15
... speed setting for each segment. The Time/Incline display will flash the maximum speed setting. Hold the handrails and begin walking. The speed setting for a few seconds, and the Speed display will then show which preset program (P-1 through P-6) is shown in the Current Segment column are lit after the button is divided into the console. Each program is pressed, the treadmill will automatically adjust to the right will move...
... speed setting for each segment. The Time/Incline display will flash the maximum speed setting. Hold the handrails and begin walking. The speed setting for a few seconds, and the Speed display will then show which preset program (P-1 through P-6) is shown in the Current Segment column are lit after the button is divided into the console. Each program is pressed, the treadmill will automatically adjust to the right will move...

Uk Manual
Page 16
... treadmill will appear or disappear in the Current Segment column. (If any time during the program, you are finished exercising, remove the key. If the speed or incline setting is pressed, an additional indicator will automatically adjust to the speed and incline settings for the next segment. 4 Follow your heart rate if desired. See step 6 on page 14. 6 When you can manually override the setting by pressing the Speed or Incline buttons...
... treadmill will appear or disappear in the Current Segment column. (If any time during the program, you are finished exercising, remove the key. If the speed or incline setting is pressed, an additional indicator will automatically adjust to the speed and incline settings for the next segment. 4 Follow your heart rate if desired. See step 6 on page 14. 6 When you can manually override the setting by pressing the Speed or Incline buttons...

Uk Manual
Page 18
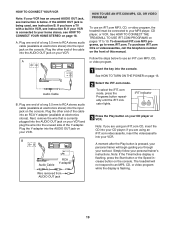
.... B CD VCR Amp LINE OUT B Audio Cable RCA Y-adapter Wire removed from LINE OUT jack B 18 HOW TO CONNECT YOUR HOME STEREO HOW TO CONNECT YOUR COMPUTER Note: If your stereo and CD plug the wire into the unused side of the Y-adapter. If the LINE OUT jack is currently plugged into the input jack on the console. Plug one end of a long 3.5 mm...
.... B CD VCR Amp LINE OUT B Audio Cable RCA Y-adapter Wire removed from LINE OUT jack B 18 HOW TO CONNECT YOUR HOME STEREO HOW TO CONNECT YOUR COMPUTER Note: If your stereo and CD plug the wire into the unused side of the Y-adapter. If the LINE OUT jack is currently plugged into the input jack on the console. Plug one end of a long 3.5 mm...
Uk Manual
Page 19
... jack on your home stereo, see instruction A below to use an iFIT.com MP3, CD, or video program, the treadmill must be connected to 19. Audio Cable ANT. iFIT Indicator 3 Press the Play button on the console. Note: If the Time/Incline display is pressed, your workout. If your VCR is being used, see instruction B. Follow the steps below . Plug one end of this manual. To select the iFIT.com mode, press the Programs button repeatedly until the...
... jack on your home stereo, see instruction A below to use an iFIT.com MP3, CD, or video program, the treadmill must be connected to 19. Audio Cable ANT. iFIT Indicator 3 Press the Play button on the console. Note: If the Time/Incline display is pressed, your workout. If your VCR is being used, see instruction B. Follow the steps below . Plug one end of this manual. To select the iFIT.com mode, press the Programs button repeatedly until the...

Uk Manual
Page 20
... personal trainer describes the change when a "chirp" is heard: • Make sure that the iFIT indicator is lit and that the audio cable is flashing, press the Start button or the Speed increase button on the console. After a moment, the walking belt will begin to step 1 on page 14. During the program, an electronic "chirping" sound will alert you when the speed and/or incline of the treadmill...
... personal trainer describes the change when a "chirp" is heard: • Make sure that the iFIT indicator is lit and that the audio cable is flashing, press the Start button or the Speed increase button on the console. After a moment, the walking belt will begin to step 1 on page 14. During the program, an electronic "chirping" sound will alert you when the speed and/or incline of the treadmill...

Uk Manual
Page 21
... walking belt, and begin to move . Note: To use programs from our Web site. 1 Insert the key into the console. See step 8 on page 18. HOW TO USE AN IFIT.COM PROGRAM DIRECTLY FROM OUR WEB SITE 7 Return to the treadmill and stand on page 13. 2 Select the iFIT.com mode. To use another program, press the Stop button and go to our Web site at any time by pressing the Speed...
... walking belt, and begin to move . Note: To use programs from our Web site. 1 Insert the key into the console. See step 8 on page 18. HOW TO USE AN IFIT.COM PROGRAM DIRECTLY FROM OUR WEB SITE 7 Return to the treadmill and stand on page 13. 2 Select the iFIT.com mode. To use another program, press the Stop button and go to our Web site at any time by pressing the Speed...
Uk Manual
Page 24
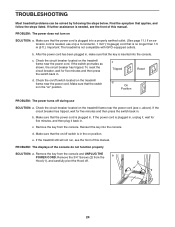
... . 2 1 24 Make sure that the on the treadmill frame near the power cord (see the front of this manual. Remove the key from the a Hood (1), and carefully pivot the Hood off switch is needed , use SOLUTION: a. Remove the 3/4" Screws (2) from the console. Important: The treadmill is plugged in the on the treadmill frame near the power cord. c. d On Position PROBLEM: The power turns off switch located on position. e. If further assistance is in . b. Check...
... . 2 1 24 Make sure that the on the treadmill frame near the power cord (see the front of this manual. Remove the key from the a Hood (1), and carefully pivot the Hood off switch is needed , use SOLUTION: a. Remove the 3/4" Screws (2) from the console. Important: The treadmill is plugged in the on the treadmill frame near the power cord. c. d On Position PROBLEM: The power turns off switch located on position. e. If further assistance is in . b. Check...

Uk Manual
Page 25
... power cord, insert the key, and run the treadmill for a few minutes. Repeat until the Magnet is properly tightened. 25 Turn the Pulley until the walking belt is aligned with the Reed Switch. If the walking belt is about 3 mm (1/8 in the power cord, insert the key, and run the treadmill for a correct speed reading. Then, plug in .). Locate the Reed Switch (10) and the Magnet (18) on the left rear roller bolt clockwise 1/2 of a turn...
... power cord, insert the key, and run the treadmill for a few minutes. Repeat until the Magnet is properly tightened. 25 Turn the Pulley until the walking belt is aligned with the Reed Switch. If the walking belt is about 3 mm (1/8 in the power cord, insert the key, and run the treadmill for a correct speed reading. Then, plug in .). Locate the Reed Switch (10) and the Magnet (18) on the left rear roller bolt clockwise 1/2 of a turn...
Uk Manual
Page 26
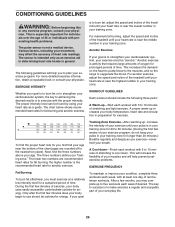
... workouts each workout with preexisting health problems. The pulse sensor is especially important for a sustained period of the treadmill until your exercise program. This is not a medical device. The following three parts: A Warm-up to use stored fat calories for longer than 20 minutes.) Breathe regularly and deeply as you , first find the three numbers above your heart rate as an exercise aid in determining heart rate...
... workouts each workout with preexisting health problems. The pulse sensor is especially important for a sustained period of the treadmill until your exercise program. This is not a medical device. The following three parts: A Warm-up to use stored fat calories for longer than 20 minutes.) Breathe regularly and deeply as you , first find the three numbers above your heart rate as an exercise aid in determining heart rate...
Uk Manual
Page 28
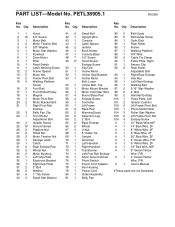
... 1 80 1 81 1 Small Bolt Upright Wire Console Latch Spacer Isolator Book Holder Console Base 1/2" Screw Hood Screw/ Endcap Screw Key/Clip Incline Motor Incline Stop Bracket Incline Motor Bolt, Lower Incline Bolt, Top Motor Mount Bracket Motor Controller Wire Round Base Pad Endcap Screw Controller Lift Frame Base Pad Warning Decal Extension Leg 2" Bolt Base Endcap Wheel U-Nut 8" Cable Tie Upright Grommet Left Handrail Right Handrail Transformer Left Foot Rail Endcap Silver Ground Screw Photo Switch Power Cord Adapter Fan Housing Power Cord Outlet Assembly Belly Pan 82 2 83...
... 1 80 1 81 1 Small Bolt Upright Wire Console Latch Spacer Isolator Book Holder Console Base 1/2" Screw Hood Screw/ Endcap Screw Key/Clip Incline Motor Incline Stop Bracket Incline Motor Bolt, Lower Incline Bolt, Top Motor Mount Bracket Motor Controller Wire Round Base Pad Endcap Screw Controller Lift Frame Base Pad Warning Decal Extension Leg 2" Bolt Base Endcap Wheel U-Nut 8" Cable Tie Upright Grommet Left Handrail Right Handrail Transformer Left Foot Rail Endcap Silver Ground Screw Photo Switch Power Cord Adapter Fan Housing Power Cord Outlet Assembly Belly Pan 82 2 83...
Uk Manual
Page 30
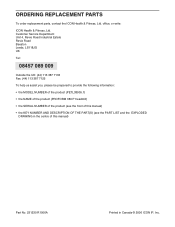
... the following information: • the MODEL NUMBER of the product (PETL38905.1) • the NAME of the product (PROFORM 380 P treadmill) • the SERIAL NUMBER of the product (see the front of this manual) • the KEY NUMBER AND DESCRIPTION OF THE PART(S) (see the PART LIST and the EXPLODED DRAWING in the centre of this manual) Part No. 231230 R1006A Printed in Canada © 2006 ICON IP...
... the following information: • the MODEL NUMBER of the product (PETL38905.1) • the NAME of the product (PROFORM 380 P treadmill) • the SERIAL NUMBER of the product (see the front of this manual) • the KEY NUMBER AND DESCRIPTION OF THE PART(S) (see the PART LIST and the EXPLODED DRAWING in the centre of this manual) Part No. 231230 R1006A Printed in Canada © 2006 ICON IP...


