
Uk Manual
Page 3
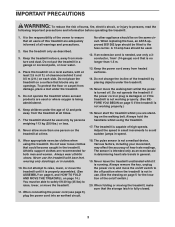
...the power cord or plug is damaged, or if the treadmill is not in speed. 9. Do not attempt to the off switch to raise, lower, or move the walking belt whilst the power is running. Always remove the key, unplug the power cord, and move the on a surface....) of burns, fire, electric shock, or injury to persons, read the following important precautions and information before operating the treadmill. 1. Athletic support clothes are used only by placing objects under the treadmill. 15. Never use . (See the drawing on page 5 for both men and women. When connecting the power cord...
...the power cord or plug is damaged, or if the treadmill is not in speed. 9. Do not attempt to the off switch to raise, lower, or move the walking belt whilst the power is running. Always remove the key, unplug the power cord, and move the on a surface....) of burns, fire, electric shock, or injury to persons, read the following important precautions and information before operating the treadmill. 1. Athletic support clothes are used only by placing objects under the treadmill. 15. Never use . (See the drawing on page 5 for both men and women. When connecting the power cord...

Uk Manual
Page 5
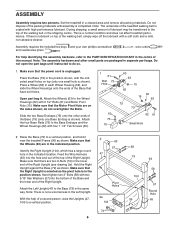
...model number of this manual, please call our Customer Service Department at 08457 089 009. ing this manual for selecting the new PROFORM® 365 P treadmill. To help you get the most from your benefit, read - The serial number can be found on a decal attached to...for the location). Before reading further, please familiarise yourself with innovative design to the treadmill (see the front cover of the treadmill is PETL31131. Accessory Tray Handrail Storage Latch Bookrack Console Key/Clip Upright Walking Belt Foot Rail BACK Rear Roller Adjustment Bolts RIGHT SIDE On/...
...model number of this manual, please call our Customer Service Department at 08457 089 009. ing this manual for selecting the new PROFORM® 365 P treadmill. To help you get the most from your benefit, read - The serial number can be found on a decal attached to...for the location). Before reading further, please familiarise yourself with innovative design to the treadmill (see the front cover of the treadmill is PETL31131. Accessory Tray Handrail Storage Latch Bookrack Console Key/Clip Upright Walking Belt Foot Rail BACK Rear Roller Adjustment Bolts RIGHT SIDE On/...
Uk Manual
Page 6
... on top (only one Base Endcap is unplugged. Attach the Left Upright (47) to do not overtighten the Bolts. Note: There is shown). Set the treadmill in the position shown, with 2 1/2" Bolts (61) and Motor Pivot Nuts (15). Note: The underside of the packing materials until instructed to the Base (... (96) as shown. Place the Base (79) in a cleared area and remove all packing materials. Assembly requires the included hex keys and your own phillips screwdriver and needlenose pliers . , wire cutters For help of the Base that the Motor Pivot Nuts are two U-Nuts (74) in...
... on top (only one Base Endcap is unplugged. Attach the Left Upright (47) to do not overtighten the Bolts. Note: There is shown). Set the treadmill in the position shown, with 2 1/2" Bolts (61) and Motor Pivot Nuts (15). Note: The underside of the packing materials until instructed to the Base (... (96) as shown. Place the Base (79) in a cleared area and remove all packing materials. Assembly requires the included hex keys and your own phillips screwdriver and needlenose pliers . , wire cutters For help of the Base that the Motor Pivot Nuts are two U-Nuts (74) in...

Uk Manual
Page 8
...the side of the Console Base (67). To protect the floor or carpet, place a mat under the treadmill. 8 6. Open part bag C. Make sure that all eight Screws before you use the treadmill. The connector should slide easily into the socket and snap into the track. Attach the Console Base (67)... place. Do not overtighten the Screws. Tighten, but do not overtighten, the bolts used in the side of the nylon tie. The large hex key is on the right Handrail (40) and the left Handrail (40) with eight 3/4" Screws (only four Screws are properly tightened before tightening them....
...the side of the Console Base (67). To protect the floor or carpet, place a mat under the treadmill. 8 6. Open part bag C. Make sure that all eight Screws before you use the treadmill. The connector should slide easily into the socket and snap into the track. Attach the Console Base (67)... place. Do not overtighten the Screws. Tighten, but do not overtighten, the bolts used in the side of the nylon tie. The large hex key is on the right Handrail (40) and the left Handrail (40) with eight 3/4" Screws (only four Screws are properly tightened before tightening them....
Uk Manual
Page 10
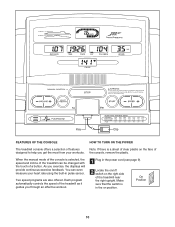
..., remove the plastic. Make sure that the switch is selected, the speed and incline of the treadmill can even measure your workouts. Key Clip FEATURES OF THE CONSOLE HOW TO TURN ON THE POWER The treadmill console offers a selection of features Note: If there is a sheet of clear plastic on the ...right side of the treadmill near the right upright. You can be changed with the touch of a button. ...
..., remove the plastic. Make sure that the switch is selected, the speed and incline of the treadmill can even measure your workouts. Key Clip FEATURES OF THE CONSOLE HOW TO TURN ON THE POWER The treadmill console offers a selection of features Note: If there is a sheet of clear plastic on the ...right side of the treadmill near the right upright. You can be changed with the touch of a button. ...
Uk Manual
Page 11
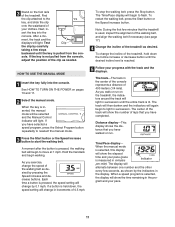
... reached. See HOW TO TURN ON THE POWER on the foot rails of the treadmill. As you have walked or run on the treadmill, the indicators around the track will begin to the key, and slide the clip onto the waistband of your pace (pace is measured in succession until the desired ... . The track will then darken and the indicators will show the elapsed time and your clothes. The center of the treadmill as desired. gram and your progress with the track and the displays. sert the key into the console. If a button is pressed, the speed setting will show the number of the...
... reached. See HOW TO TURN ON THE POWER on the foot rails of the treadmill. As you have walked or run on the treadmill, the indicators around the track will begin to the key, and slide the clip onto the waistband of your pace (pace is measured in succession until the desired ... . The track will then darken and the indicators will show the elapsed time and your clothes. The center of the treadmill as desired. gram and your progress with the track and the displays. sert the key into the console. If a button is pressed, the speed setting will show the number of the...
Uk Manual
Page 12
...Stop button whilst inserting the key into the console. Press the Speed increase button to be restricted and your pulse will alternate between one number and the other every few seconds. Pulse display-This display shows your heart rate when you are finished using the treadmill, move the on the pulse... it. When you are finished exercising, remove the key. When your heart rate. 7 When you use the pulse sensor (see FAT BURNING on the pulse sensor. Step onto the foot rails, press the Stop button, and adjust the incline of the treadmill to show which unit of measurement is raised to...
...Stop button whilst inserting the key into the console. Press the Speed increase button to be restricted and your pulse will alternate between one number and the other every few seconds. Pulse display-This display shows your heart rate when you are finished using the treadmill, move the on the pulse... it. When you are finished exercising, remove the key. When your heart rate. 7 When you use the pulse sensor (see FAT BURNING on the pulse sensor. Step onto the foot rails, press the Stop button, and adjust the incline of the treadmill to show which unit of measurement is raised to...
Uk Manual
Page 13
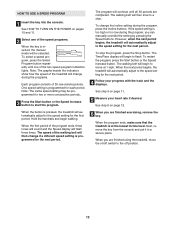
Note: The graphs beside the indicators show how the speed of the treadmill will continue until one of the speed programs. When the key is programmed for each period. Hold the handrails and begin to flash. The program will change during the programs. Each program consists of... Program button repeatedly until all 30 periods are finished exercising, remove the key. When the button is too high or too low during the program, press the Incline buttons. If the speed setting is pressed, the treadmill will automatically adjust to the speed setting for two or more consecutive periods...
Note: The graphs beside the indicators show how the speed of the treadmill will continue until one of the speed programs. When the key is programmed for each period. Hold the handrails and begin to flash. The program will change during the programs. Each program consists of... Program button repeatedly until all 30 periods are finished exercising, remove the key. When the button is too high or too low during the program, press the Incline buttons. If the speed setting is pressed, the treadmill will automatically adjust to the speed setting for two or more consecutive periods...
Uk Manual
Page 16
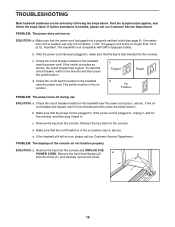
...On Position PROBLEM: The power turns off switch located on the treadmill near the power cord. Reinsert the key fully into a properly earthed outlet (see d. b. d. Remove the key from the console. b. Check the circuit breaker located on the treadmill near the power cord (see c. Check the on/off ... minutes and then press the switch back in. Remove the key from the console and UNPLUG THE POWER CORD. If the treadmill still will not run, please call our Customer Service Department. TROUBLESHOOTING Most treadmill problems can be in the on position. Remove the four ...
...On Position PROBLEM: The power turns off switch located on the treadmill near the power cord. Reinsert the key fully into a properly earthed outlet (see d. b. d. Remove the key from the console. b. Check the circuit breaker located on the treadmill near the power cord (see c. Check the on/off ... minutes and then press the switch back in. Remove the key from the console and UNPLUG THE POWER CORD. If the treadmill still will not run, please call our Customer Service Department. TROUBLESHOOTING Most treadmill problems can be in the on position. Remove the four ...
Uk Manual
Page 17
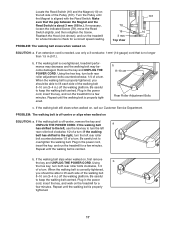
... Repeat until the Magnet is properly tightened. PROBLEM: The walking belt is properly tightened. 17 Plug in the power cord, insert the key, and walk on the treadmill for a few minutes. Repeat until the walking belt is no longer than 1.5 m (5 ft.). b. If the walking belt is ...mm (1/8 in the power cord, insert the key, and run the treadmill for a correct speed reading. If an extension cord is needed, use the hex key to overtighten the walking belt. Plug in the power cord, insert the key, and run the treadmill for a few minutes. b 8-10 cm ...
... Repeat until the Magnet is properly tightened. PROBLEM: The walking belt is properly tightened. 17 Plug in the power cord, insert the key, and walk on the treadmill for a few minutes. Repeat until the walking belt is no longer than 1.5 m (5 ft.). b. If the walking belt is ...mm (1/8 in the power cord, insert the key, and run the treadmill for a correct speed reading. If an extension cord is needed, use the hex key to overtighten the walking belt. Plug in the power cord, insert the key, and run the treadmill for a few minutes. b 8-10 cm ...
Uk Manual
Page 18
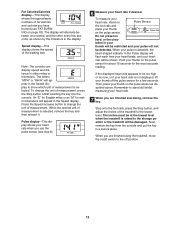
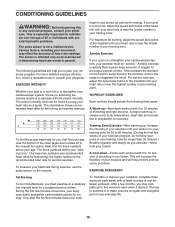
... middle number in your heart rate is especially important for aerobic exercise. For maximum fat burning, adjust the speed and incline of the treadmill until your pulse is in your heart rate is near the bottom of 35 or individuals with at a relatively low intensity level for ...your goal is to success is activity that requires large amounts of oxygen for a sustained period of time. The key to burn fat, adjust the speed and incline of the treadmill until your training zone. Next, find the proper heart rate for you to make exercise a regular and enjoyable ...
... middle number in your heart rate is especially important for aerobic exercise. For maximum fat burning, adjust the speed and incline of the treadmill until your pulse is in your heart rate is near the bottom of 35 or individuals with at a relatively low intensity level for ...your goal is to success is activity that requires large amounts of oxygen for a sustained period of time. The key to burn fat, adjust the speed and incline of the treadmill until your training zone. Next, find the proper heart rate for you to make exercise a regular and enjoyable ...

Uk Manual
Page 23
ING in the centre of this manual) • The KEY NUMBER and DESCRIPTION of this manual) Part No. 213830 R0604A Printed in Canada © 2004 ICON IP, Inc. office, or write: ICON Health & Fitness, Ltd. ... assist you, please be prepared to give the following information: • The MODEL NUMBER of the product (PETL31131) • The NAME of the product (PROFORM® 365 P treadmill) • The SERIAL NUMBER of the product (see the front cover of the desired part(s) (see the PART LIST and the EXPLODED DRAW- ORDERING...
ING in the centre of this manual) • The KEY NUMBER and DESCRIPTION of this manual) Part No. 213830 R0604A Printed in Canada © 2004 ICON IP, Inc. office, or write: ICON Health & Fitness, Ltd. ... assist you, please be prepared to give the following information: • The MODEL NUMBER of the product (PETL31131) • The NAME of the product (PROFORM® 365 P treadmill) • The SERIAL NUMBER of the product (see the front cover of the desired part(s) (see the PART LIST and the EXPLODED DRAW- ORDERING...


