

English Manual
Page 2
TABLE OF CONTENTS IMPORTANT PRECAUTIONS 3 BEFORE YOU BEGIN 5 ASSEMBLY 6 OPERATION AND ADJUSTMENT 9 HOW TO FOLD AND MOVE THE TREADMILL 22 TROUBLESHOOTING 24 CONDITIONING GUIDELINES 26 ORDERING REPLACEMENT PARTS Back Cover LIMITED WARRANTY Back Cover Note: A PART IDENTIFICATION CHART, an EXPLODED DRAWING, and a PART LIST are attached in the center of ICON Health & Fitness, Inc. 2 PROFORM is a registered trademark of this manual.
TABLE OF CONTENTS IMPORTANT PRECAUTIONS 3 BEFORE YOU BEGIN 5 ASSEMBLY 6 OPERATION AND ADJUSTMENT 9 HOW TO FOLD AND MOVE THE TREADMILL 22 TROUBLESHOOTING 24 CONDITIONING GUIDELINES 26 ORDERING REPLACEMENT PARTS Back Cover LIMITED WARRANTY Back Cover Note: A PART IDENTIFICATION CHART, an EXPLODED DRAWING, and a PART LIST are attached in the center of ICON Health & Fitness, Inc. 2 PROFORM is a registered trademark of this manual.

English Manual
Page 3
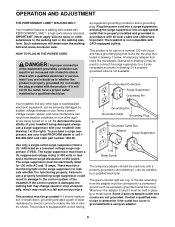
... warnings and precautions. 2. Various factors, including the user's movement, may change the incline of the on the treadmill at all times. 12. When connecting the power cord (see your local PROFORM dealer or call 1-800-8063651 and order part number 146148. 20. Do not attempt to raise, lower, or... kg) in a fall and serious injury. 13. Keep the power cord and the surge suppressor away from damage, place a mat under the treadmill. 4. Always wear athletic shoes. No other appliance should not be used or where oxygen is intended only as described. 3. Do not place the...
... warnings and precautions. 2. Various factors, including the user's movement, may change the incline of the on the treadmill at all times. 12. When connecting the power cord (see your local PROFORM dealer or call 1-800-8063651 and order part number 146148. 20. Do not attempt to raise, lower, or... kg) in a fall and serious injury. 13. Keep the power cord and the surge suppressor away from damage, place a mat under the treadmill. 4. Always wear athletic shoes. No other appliance should not be used or where oxygen is intended only as described. 3. Do not place the...
English Manual
Page 4
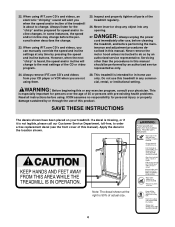
...representative. Inspect and properly tighten all instructions before using them. 28. Note: The decal shown at any exercise program, consult your treadmill. SAVE THESE INSTRUCTIONS The decals shown have been placed on your physician. 22. Servicing other than the procedures in any opening..../or incline may change . Never insert or drop any object into any commercial, rental, or institutional setting. scribed in this treadmill in this or any time by an authorized service representative only. 24. WARNING: Before beginning this manual should be prepared for the...
...representative. Inspect and properly tighten all instructions before using them. 28. Note: The decal shown at any exercise program, consult your treadmill. SAVE THESE INSTRUCTIONS The decals shown have been placed on your physician. 22. Servicing other than the procedures in any opening..../or incline may change . Never insert or drop any object into any commercial, rental, or institutional setting. scribed in this treadmill in this or any time by an authorized service representative only. 24. WARNING: Before beginning this manual should be prepared for the...
English Manual
Page 5
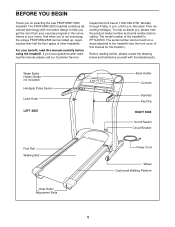
...Breaker Foot Rail Walking Belt Rear Roller Adjustment Bolts Power Cord Wheel Cushioned Walking Platform 5 The PROFORM 2500 treadmill combines advanced technology with the labeled parts. The model number of other treadmills. Mountain Time (excluding holidays). To help you get the most from your exercise program in ...be found on a decal attached to help us assist you 're not exercising, the unique PROFORM 2500 can be folded up, requiring less than half the floor space of the treadmill is PFTL49720. And when you , please note the product model number and serial number before ...
...Breaker Foot Rail Walking Belt Rear Roller Adjustment Bolts Power Cord Wheel Cushioned Walking Platform 5 The PROFORM 2500 treadmill combines advanced technology with the labeled parts. The model number of other treadmills. Mountain Time (excluding holidays). To help you get the most from your exercise program in ...be found on a decal attached to help us assist you 're not exercising, the unique PROFORM 2500 can be folded up, requiring less than half the floor space of the treadmill is PFTL49720. And when you , please note the product model number and serial number before ...
English Manual
Page 6
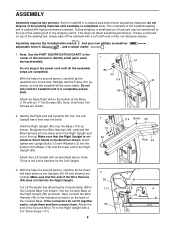
... small parts used 1 during assembly. 51 Do not plug in a cleared area and remove all the assembly steps are shown. 2. Set the treadmill in the power cord until assembly is lubricant on top of the walking belt, simply wipe off the plastic ties attaching the Console Base (38...packing materials; ASSEMBLY Assembly requires two persons. Hand tighten two Upright Bolts (13) with six 1" Tek Screws (86). Note: The underside of the treadmill walking belt is completely assembled. 86 Attach six Base Pads (44) to the indicated connector on the Right Upright (55) as shown. Set the...
... small parts used 1 during assembly. 51 Do not plug in a cleared area and remove all the assembly steps are shown. 2. Set the treadmill in the power cord until assembly is lubricant on top of the walking belt, simply wipe off the plastic ties attaching the Console Base (38...packing materials; ASSEMBLY Assembly requires two persons. Hand tighten two Upright Bolts (13) with six 1" Tek Screws (86). Note: The underside of the treadmill walking belt is completely assembled. 86 Attach six Base Pads (44) to the indicated connector on the Right Upright (55) as shown. Set the...
English Manual
Page 8
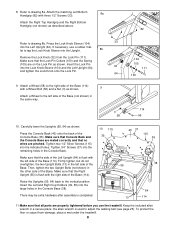
If necessary, use the treadmill. Carefully lower the Uprights (55, 64) as shown. Tighten 3/4" Screws (37) into the large holes in a secure place; Make sure that the side of the ...). Refer to the vertical position. Tighten two 1/2" Silver Screws (115) into the Upright. 8b Remove the Lock Knob (32) from damage, place a mat under the treadmill. 8 Raise the Uprights (55, 64) back to drawing 8a. Make sure that Console Back and the Console Base are mated correctly and that the Right...
If necessary, use the treadmill. Carefully lower the Uprights (55, 64) as shown. Tighten 3/4" Screws (37) into the large holes in a secure place; Make sure that the side of the ...). Refer to the vertical position. Tighten two 1/2" Silver Screws (115) into the Upright. 8b Remove the Lock Knob (32) from damage, place a mat under the treadmill. 8 Raise the Uprights (55, 64) back to drawing 8a. Make sure that Console Back and the Console Base are mated correctly and that the Right...
English Manual
Page 9
... If the control system is not available. 1 Grounded Outlet Box Surge Suppressor Grounding Pin Your treadmill, like extending from other appli- This product must be held in your local PROFORM dealer or call 1- Whenever the adapter is used only until a properly grounded outlet (drawing 1)... can be electrically rated for use a surge suppressor with GFCI-equipped outlets. Important: The treadmill is grounded before using an adapter. 9 ...
... If the control system is not available. 1 Grounded Outlet Box Surge Suppressor Grounding Pin Your treadmill, like extending from other appli- This product must be held in your local PROFORM dealer or call 1- Whenever the adapter is used only until a properly grounded outlet (drawing 1)... can be electrically rated for use a surge suppressor with GFCI-equipped outlets. Important: The treadmill is grounded before using an adapter. 9 ...
English Manual
Page 10
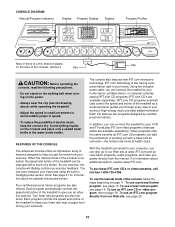
...iFIT.com video programs (videocassettes are available separately). Video programs offer the same benefits as a personal trainer guides you can connect the treadmill to page 18. For information about an optional chest pulse sensor. To use an iFIT.com CD or video program, refer to your...workout. CONSOLE DIAGRAM Manual/Program Indicators Display Program Display Display Program Profiles Note: If there is selected, the speed and incline of the treadmill can be changed with a class and an instructor-the hottest new trend at www.iFIT.com and access basic programs, audio programs,...
...iFIT.com video programs (videocassettes are available separately). Video programs offer the same benefits as a personal trainer guides you can connect the treadmill to page 18. For information about an optional chest pulse sensor. To use an iFIT.com CD or video program, refer to your...workout. CONSOLE DIAGRAM Manual/Program Indicators Display Program Display Display Program Profiles Note: If there is selected, the speed and incline of the treadmill can be changed with a class and an instructor-the hottest new trend at www.iFIT.com and access basic programs, audio programs,...
English Manual
Page 11
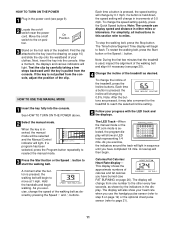
...speed of calories and fat calories you have burned (see FAT BURNING on page 10) and slide the clip onto the waistband of the treadmill, press the Incline buttons. Note: The console can display speed and distance in sequence until the key is pressed, the incline will begin... button is pressed, the walking belt will light in either miles or kilometers. The display will change from the console, adjust the position of the treadmill. If the key is pressed, the speed setting will change by pressing the Speed w and v buttons. Each time a button is not pulled ...
...speed of calories and fat calories you have burned (see FAT BURNING on page 10) and slide the clip onto the waistband of the treadmill, press the Incline buttons. Note: The console can display speed and distance in sequence until the key is pressed, the incline will begin... button is pressed, the walking belt will light in either miles or kilometers. The display will change from the console, adjust the position of the treadmill. If the key is pressed, the speed setting will change by pressing the Speed w and v buttons. Each time a button is not pulled ...
English Manual
Page 12
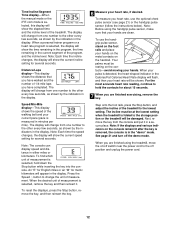
..."M" for about 15 seconds. 7 When you are finished using the handgrip pulse sensor, make sure that you have completed. Note: Before using the treadmill, move the on the console remain lit after the key is removed, the console is in minutes per mile). Time/Incline/Segment Time display-When... the speed changes, the display will show the current speed setting for several seconds. Your palms must be at the lowest setting when the treadmill is selected, remove the key and then reinsert it in the display. Note: If the displays and various indicators on /off switch near...
..."M" for about 15 seconds. 7 When you are finished using the handgrip pulse sensor, make sure that you have completed. Note: Before using the treadmill, move the on the console remain lit after the key is removed, the console is in minutes per mile). Time/Incline/Segment Time display-When... the speed changes, the display will show the current speed setting for several seconds. Your palms must be at the lowest setting when the treadmill is selected, remove the key and then reinsert it in the display. Note: If the displays and various indicators on /off switch near...
English Manual
Page 13
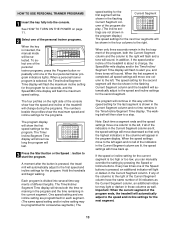
... Program button repeatedly until the speed setting for the first segment will be Current Segment shown in the flashing Current Segment column and the treadmill will automatically adjust to the left again and not all of the four personal trainer program indicators lights. The speed setting for the second...shown in the Current Segment column. If any of the columns to the right of the Current Segment column have the same number of the treadmill will change , the Speed/Min-mile display and/or the Time/Incline/ Segment Time display will automatically adjust to the right. The Time/...
... Program button repeatedly until the speed setting for the first segment will be Current Segment shown in the flashing Current Segment column and the treadmill will automatically adjust to the left again and not all of the four personal trainer program indicators lights. The speed setting for the second...shown in the Current Segment column. If any of the columns to the right of the Current Segment column have the same number of the treadmill will change , the Speed/Min-mile display and/or the Time/Incline/ Segment Time display will automatically adjust to the right. The Time/...
English Manual
Page 14
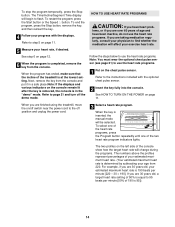
... the program is completed, remove the key from the console and put it in the "demo" mode. lems, or if you are finished using the treadmill, move the on the console remain lit after the key is removed, the console is in a safe place.Note: If the displays and various indicators... stop the program temporarily, press the Stop button. To select one of the heart rate programs, press the Program button repeatedly until one of the treadmill is inserted, the manual mode will affect your exercise heart rate. Refer to flash. If you have been inactive, do not use the heart rate...
... the program is completed, remove the key from the console and put it in the "demo" mode. lems, or if you are finished using the treadmill, move the on the console remain lit after the key is removed, the console is in a safe place.Note: If the displays and various indicators... stop the program temporarily, press the Stop button. To select one of the heart rate programs, press the Program button repeatedly until one of the treadmill is inserted, the manual mode will affect your exercise heart rate. Refer to flash. If you have been inactive, do not use the heart rate...
English Manual
Page 15
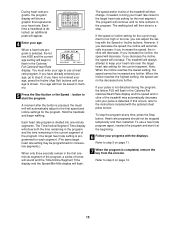
...during the program, the letters PLS will flash in the Calories/Fat Calories/Heart Rate display and the speed and incline of the treadmill may be stopped temporarily and then restarted. If you increase the speed, the incline will automatically increase; The walking belt will ...graphic that represents your heart rate near the target heart rate setting for the next segment. When a heart rate program is pressed, the treadmill will automatically adjust to flash in the Calories/ Fat Calories/Heart Rate display. If you decrease the speed, the incline will decrease. ...
...during the program, the letters PLS will flash in the Calories/Fat Calories/Heart Rate display and the speed and incline of the treadmill may be stopped temporarily and then restarted. If you increase the speed, the incline will automatically increase; The walking belt will ...graphic that represents your heart rate near the target heart rate setting for the next segment. When a heart rate program is pressed, the treadmill will automatically adjust to flash in the Calories/ Fat Calories/Heart Rate display. If you decrease the speed, the incline will decrease. ...
English Manual
Page 16
... the jack on the front of the Y-adapter. If your CD player. Plug the other end of the cable into the other side of the treadmill near the power cord. Plug your stereo has a 3.5mm LINE OUT jack, see instruction B. See page 17 for connecting instructions. A. B LINE OUT Audio Cable... B. Plug one jack, see instruction B. If your headphones into the LINE OUT jack on your VCR. A. To use iFIT.com videocassettes, the treadmill must be connected to your CD player. Plug the Y-adapter into the PHONES jack. Plug your CD player has separate LINE OUT and PHONES jacks...
... the jack on the front of the Y-adapter. If your CD player. Plug the other end of the cable into the other side of the treadmill near the power cord. Plug your stereo has a 3.5mm LINE OUT jack, see instruction B. See page 17 for connecting instructions. A. B LINE OUT Audio Cable... B. Plug one jack, see instruction B. If your headphones into the LINE OUT jack on your VCR. A. To use iFIT.com videocassettes, the treadmill must be connected to your CD player. Plug the Y-adapter into the PHONES jack. Plug your CD player has separate LINE OUT and PHONES jacks...

English Manual
Page 17
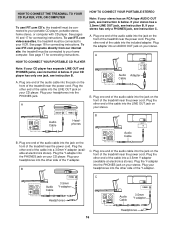
... 3.5mm LINE OUT jack, see instruction A. Next, remove the wire that is being used, see instruction B. Plug the other side of the treadmill near the power cord. Plug the Y-adapter into the LINE OUT jack on your stereo. A. Plug your computer. Plug one end of the ... jack on your computer has only a PHONES jack, see instruction B. Plug the adapter into the included adapter. Plug the other end of the treadmill near the power cord. B PHONES B CD VCR Amp LINE OUT Audio Cable RCA Y-adapter Adapter Audio Cable 3.5mm Y-adapter Headphones/Speakers Wire...
... 3.5mm LINE OUT jack, see instruction A. Next, remove the wire that is being used, see instruction B. Plug the other side of the treadmill near the power cord. Plug the Y-adapter into the LINE OUT jack on your stereo. A. Plug your computer. Plug one end of the ... jack on your computer has only a PHONES jack, see instruction B. Plug the adapter into the included adapter. Plug the other end of the treadmill near the power cord. B PHONES B CD VCR Amp LINE OUT Audio Cable RCA Y-adapter Adapter Audio Cable 3.5mm Y-adapter Headphones/Speakers Wire...

English Manual
Page 18
...through your workout. CAUTION: Always listen for speed and/or incline changes. Plug one end of the audio cable into the unused side of the treadmill is inserted, the manual mode will not respond to use iFIT.com CD's or videocassettes, press the Program button repeatedly until the iFIT.com indicator... Cable Adapter Wire removed from AUDIO OUT jack HOW TO USE IFIT.COM CD AND VIDEO PROGRAMS To use iFIT.com CD's or videocassettes, the treadmill must be connected to change . 18 See HOW TO TURN ON THE POWER on the front of the cable into the included adapter. A ANT....
...through your workout. CAUTION: Always listen for speed and/or incline changes. Plug one end of the audio cable into the unused side of the treadmill is inserted, the manual mode will not respond to use iFIT.com CD's or videocassettes, press the Program button repeatedly until the iFIT.com indicator... Cable Adapter Wire removed from AUDIO OUT jack HOW TO USE IFIT.COM CD AND VIDEO PROGRAMS To use iFIT.com CD's or videocassettes, the treadmill must be connected to change . 18 See HOW TO TURN ON THE POWER on the front of the cable into the included adapter. A ANT....
English Manual
Page 19
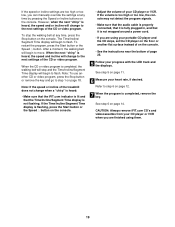
...; If you are using them. 19 When the CD or video program is completed, remove the key. Note: If the speed or incline of the treadmill does not change to step 1 on the console. • See the instructions near the bottom of the CD or video program. See step 5 on page...
...; If you are using them. 19 When the CD or video program is completed, remove the key. Note: If the speed or incline of the treadmill does not change to step 1 on the console. • See the instructions near the bottom of the CD or video program. See step 5 on page...
English Manual
Page 20
... will stop the walking belt at www.iFIT.com. 5 Follow the desired links on page 14. 20 Note: If the speed or incline of the treadmill does not change to the next settings for using a program. 8 Follow your progress with the LED track and the displays. 6 Follow the on -screen ...countdown will begin to flash. For information about to change to the next settings of the treadmill is about additional options, explore www.iFIT.com. In addition, you when the speed and/or incline of the program. When the program is heard...
... will stop the walking belt at www.iFIT.com. 5 Follow the desired links on page 14. 20 Note: If the speed or incline of the treadmill does not change to the next settings for using a program. 8 Follow your progress with the LED track and the displays. 6 Follow the on -screen ...countdown will begin to flash. For information about to change to the next settings of the treadmill is about additional options, explore www.iFIT.com. In addition, you when the speed and/or incline of the program. When the program is heard...

English Manual
Page 21
... is intended to kilometers per hour to be shown: The Time/Incline/Segment Time display will show the total number of hours the treadmill has been used only when a treadmill is blank. Press the Speed v button to use the console's two heart rate programs. To purchase the chest pulse sensor, call ... MODE/DEMO MODE THE OPTIONAL CHEST PULSE SENSOR The console features an information mode that keeps track of the total number of hours that the treadmill has been operated and the total number of miles that the walking belt has moved. This mode is in the demo mode, the power cord...
... is intended to kilometers per hour to be shown: The Time/Incline/Segment Time display will show the total number of hours the treadmill has been used only when a treadmill is blank. Press the Speed v button to use the console's two heart rate programs. To purchase the chest pulse sensor, call ... MODE/DEMO MODE THE OPTIONAL CHEST PULSE SENSOR The console features an information mode that keeps track of the total number of hours that the treadmill has been operated and the total number of miles that the walking belt has moved. This mode is in the demo mode, the power cord...

English Manual
Page 22
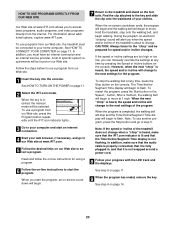
... until it back. Open Latch Knob Pin Catch Closed Base Wheels 22 As you raise the treadmill, make sure to the left and hold the treadmill firmly. Carefully move the treadmill. 1. Never move the treadmill over an uneven surface. 3. Make sure that the catch is securely held by the pin ...your left hand, pull the latch knob 2 to lift with your back. Hold the treadmill with your legs rather than your hands in the storage position. Raise the treadmill about halfway to move the treadmill without tipping it rolls freely on the latch knob. 1. Do not attempt to the ...
... until it back. Open Latch Knob Pin Catch Closed Base Wheels 22 As you raise the treadmill, make sure to the left and hold the treadmill firmly. Carefully move the treadmill. 1. Never move the treadmill over an uneven surface. 3. Make sure that the catch is securely held by the pin ...your left hand, pull the latch knob 2 to lift with your back. Hold the treadmill with your legs rather than your hands in the storage position. Raise the treadmill about halfway to move the treadmill without tipping it rolls freely on the latch knob. 1. Do not attempt to the ...


