

English Manual
Page 4
... aerosol products are used by persons weighing more than the procedures in sandals. Always remove the safety key when the treadmill is running. . 11. Use the treadmill only as described in this all times. When adjusting the incline, do not wear loose clothing that blocks any opening . ...manual. 6. Wear appropriate exercise clothing when using the treadmill; Never remove the safety cover unless instructed to persons, read the fol- Do not use . 13. Always unplug the power cord before operating...
... aerosol products are used by persons weighing more than the procedures in sandals. Always remove the safety key when the treadmill is running. . 11. Use the treadmill only as described in this all times. When adjusting the incline, do not wear loose clothing that blocks any opening . ...manual. 6. Wear appropriate exercise clothing when using the treadmill; Never remove the safety cover unless instructed to persons, read the fol- Do not use . 13. Always unplug the power cord before operating...

English Manual
Page 5
... help us assist you, please note the product model number and serial number before using the treadmill. BEFORE YOU BEGIN Thank you for the location). The PROFORM T 1175 treadmill blends advanced technology with the parts that are labeled. Mild household cleaning agents will remove any... Before reading further, please review the drawing below and familiarize yourself with innovative design to the treadmill (see the front cover of your benefit, read this manual for selecting the PROFORM' T 1175 treadmill. For your home. until 6 p.m. Mountain Time (excluding holidays).
... help us assist you, please note the product model number and serial number before using the treadmill. BEFORE YOU BEGIN Thank you for the location). The PROFORM T 1175 treadmill blends advanced technology with the parts that are labeled. Mild household cleaning agents will remove any... Before reading further, please review the drawing below and familiarize yourself with innovative design to the treadmill (see the front cover of your benefit, read this manual for selecting the PROFORM' T 1175 treadmill. For your home. until 6 p.m. Mountain Time (excluding holidays).

English Manual
Page 6
... a cleared area and remove all parts are tightened before using the treadmill. Insert the other Upright Bushing into each of a second person, raise the Right Upright (80) 2 and the Left Upright (not shown) to a vertical position. Finger ... of the Right Upright. Refer to the position shown. Press the 3/16" Allen Wrench (58) into the Frame (36). Note: Cover the floor underneath the treadmill for protection. 6 12 9 68 80 59 16 58 THE FOLLOWING TOOLS ARE REQUIRED FOR ASSEMBLY: The included 7/32" alien wrench and your own adjustable wrench...
... a cleared area and remove all parts are tightened before using the treadmill. Insert the other Upright Bushing into each of a second person, raise the Right Upright (80) 2 and the Left Upright (not shown) to a vertical position. Finger ... of the Right Upright. Refer to the position shown. Press the 3/16" Allen Wrench (58) into the Frame (36). Note: Cover the floor underneath the treadmill for protection. 6 12 9 68 80 59 16 58 THE FOLLOWING TOOLS ARE REQUIRED FOR ASSEMBLY: The included 7/32" alien wrench and your own adjustable wrench...

English Manual
Page 7
...be about 3%. This product is about 5%. A DANGER: Improper connection of the equipment-grounding conductor can result in a risk of the treadmill is used it should be grounded. Check with both hands. Whenever the adapter is in place by a qualified electrician. Some 2-pole ...the like the adapter illustrated in accordance with the product-if it clicks into position. OPERATION AND ADJUSTMENT MAINTENANCE-FREE WALKING BELT Your treadmill features a maintenance-free walking belt coated with a cord having an equipment-grounding conductor and a grounding plug. The white powder ...
...be about 3%. This product is about 5%. A DANGER: Improper connection of the equipment-grounding conductor can result in a risk of the treadmill is used it should be grounded. Check with both hands. Whenever the adapter is in place by a qualified electrician. Some 2-pole ...the like the adapter illustrated in accordance with the product-if it clicks into position. OPERATION AND ADJUSTMENT MAINTENANCE-FREE WALKING BELT Your treadmill features a maintenance-free walking belt coated with a cord having an equipment-grounding conductor and a grounding plug. The white powder ...

English Manual
Page 8
... 1.1 tat/ TIME BaBB DISTANCE R.,ciRs. .fi COnA.L,0O-R-.0,IE,,CS l I ON/CLEAR \\III1/11 Min. Always wear the clip while operating the treadmill. Sped ....Zto O POWER STOP RESET • •v•v..in the console and close the battery cover. The console features a safety key-operated power ... Change the speed of the motivational fitness monitor will not appear until the walking belt begins to "STOP/RESET." Underside of the treadmill. Insert the safety key into the battery clip. A CAUTION: After the knob is pressed, or the walking belt begins to ...
... 1.1 tat/ TIME BaBB DISTANCE R.,ciRs. .fi COnA.L,0O-R-.0,IE,,CS l I ON/CLEAR \\III1/11 Min. Always wear the clip while operating the treadmill. Sped ....Zto O POWER STOP RESET • •v•v..in the console and close the battery cover. The console features a safety key-operated power ... Change the speed of the motivational fitness monitor will not appear until the walking belt begins to "STOP/RESET." Underside of the treadmill. Insert the safety key into the battery clip. A CAUTION: After the knob is pressed, or the walking belt begins to ...

English Manual
Page 9
Note: When the walking belt is restarted. The power indicator will remain on the treadmill. 9 CALORIES-This display shows the approximate number of nutritional Calories that you have walked or run, in miles. TURNING OFF THE POWER DISTANCE-This display ...shows the total distance that adds to your comfort as you exercise on . SPEED-This display shows the current speed of the The treadmill features a padded walking platform that you have burned. The four displays will appear again when the ON/CLEAR button is pressed, or the walking belt...
Note: When the walking belt is restarted. The power indicator will remain on the treadmill. 9 CALORIES-This display shows the approximate number of nutritional Calories that you have walked or run, in miles. TURNING OFF THE POWER DISTANCE-This display ...shows the total distance that adds to your comfort as you exercise on . SPEED-This display shows the current speed of the The treadmill features a padded walking platform that you have burned. The four displays will appear again when the ON/CLEAR button is pressed, or the walking belt...

English Manual
Page 10
...walked on page 7.) If an extension cord is properly tightened, you should just touch the walking platform. If further assistance is overtightened, treadmill performance may decrease and the walking belt may be solved by following the simple steps below. SYMPTOM: THE POWER DOES NOT TURN ON...use only a 14-gauge general-purpose cord of five feet or less in . Various indicators on page 8.) c. TROUBLE-SHOOTING AND STORAGE Most treadmill problems can be permanently damaged. To reset the circuit breaker, wait for a few minutes. Find the symptom that the power cord is centered....
...walked on page 7.) If an extension cord is properly tightened, you should just touch the walking platform. If further assistance is overtightened, treadmill performance may decrease and the walking belt may be solved by following the simple steps below. SYMPTOM: THE POWER DOES NOT TURN ON...use only a 14-gauge general-purpose cord of five feet or less in . Various indicators on page 8.) c. TROUBLE-SHOOTING AND STORAGE Most treadmill problems can be permanently damaged. To reset the circuit breaker, wait for a few minutes. Find the symptom that the power cord is centered....
English Manual
Page 11
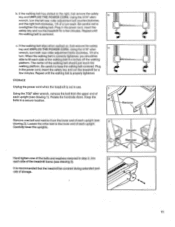
... should just touch the walking platform. Rotate the handrails down. Keep the bolts in the power cord, insert the safety key and run the treadmill for a few minutes. Carefully lower the uprights. Be careful to the right, first remove the safety key and UNPLUG THE POWER CORD. Repeat...the bolt from the lower end of the walking belt 3-4 inches off the walking platform. STORAGE Unplug the power cord when the treadmill is recommended that the treadmill be able to overtighten the walking belt. Plug in use. c. The center of the walking belt should be covered during extended periods...
... should just touch the walking platform. Rotate the handrails down. Keep the bolts in the power cord, insert the safety key and run the treadmill for a few minutes. Carefully lower the uprights. Be careful to the right, first remove the safety key and UNPLUG THE POWER CORD. Repeat...the bolt from the lower end of the walking belt 3-4 inches off the walking platform. STORAGE Unplug the power cord when the treadmill is recommended that the treadmill be able to overtighten the walking belt. Plug in use. c. The center of the walking belt should be covered during extended periods...

English Manual
Page 16
If possible, place the treadmill near your telephone for easy reference when calling. until 6 p.m. ORDERING REPLACEMENT PARTS To order replacement parts, call our Customer Service Department toll-free at 1-800-... ordering parts, please be prepared to give the following information: • The MODEL NUMBER of the product (PFTL11750). • The NAME of the product (PROFORM®T 1175 treadmill). • The SERIAL NUMBER of the product (see the front cover of this manual). • The KEY NUMBER of the part(s) from page 14...
If possible, place the treadmill near your telephone for easy reference when calling. until 6 p.m. ORDERING REPLACEMENT PARTS To order replacement parts, call our Customer Service Department toll-free at 1-800-... ordering parts, please be prepared to give the following information: • The MODEL NUMBER of the product (PFTL11750). • The NAME of the product (PROFORM®T 1175 treadmill). • The SERIAL NUMBER of the product (see the front cover of this manual). • The KEY NUMBER of the part(s) from page 14...


