
English Manual
Page 2
TABLE OF CONTENTS IMPORTANT PRECAUTIONS 3 BEFORE YOU BEGIN 4 ASSEMBLY 5 HOW TO USE THE ELLIPTICAL CROSSTRAINER 10 MAINTENANCE AND TROUBLESHOOTING 20 CONDITIONING GUIDELINES 21 PART LIST 22 EXPLODED DRAWING 23 HOW TO ORDER REPLACEMENT PARTS Back Cover LIMITED WARRANTY Back Cover PROFORM is a registered trademark of ICON Health & Fitness, Inc. 2
TABLE OF CONTENTS IMPORTANT PRECAUTIONS 3 BEFORE YOU BEGIN 4 ASSEMBLY 5 HOW TO USE THE ELLIPTICAL CROSSTRAINER 10 MAINTENANCE AND TROUBLESHOOTING 20 CONDITIONING GUIDELINES 21 PART LIST 22 EXPLODED DRAWING 23 HOW TO ORDER REPLACEMENT PARTS Back Cover LIMITED WARRANTY Back Cover PROFORM is a registered trademark of ICON Health & Fitness, Inc. 2
English Manual
Page 3
... dizziness while exercising, stop . Keep the elliptical crosstrainer indoors, away from the elliptical crosstrainer at 1-800-999-3756 and order a free replacement decal. Inspect and properly tighten all instructions before using the elliptical crosstrainer. 11. Keep children under 12 and pets away from moisture and dust. 5. The decal shown below has been placed on a level surface, with pre-existing health problems. Read all parts regularly. It...
... dizziness while exercising, stop . Keep the elliptical crosstrainer indoors, away from the elliptical crosstrainer at 1-800-999-3756 and order a free replacement decal. Inspect and properly tighten all instructions before using the elliptical crosstrainer. 11. Keep children under 12 and pets away from moisture and dust. 5. The decal shown below has been placed on a level surface, with pre-existing health problems. Read all parts regularly. It...
English Manual
Page 4
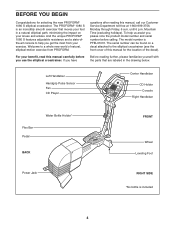
...). The serial number can be found on your exercise. Left Handlebar Handgrip Pulse Sensor Fan CD Player Center Handlebar CD Holder Console Right Handlebar Flex Bar Pedal Water Bottle Holder* BACK FRONT Wheel Leveling Foot Power Jack RIGHT SIDE *No bottle is PFEL91031. The model number is included 4 Welcome to the elliptical crosstrainer (see the front cover of this manual, call our Customer Service Department toll-free at...
...). The serial number can be found on your exercise. Left Handlebar Handgrip Pulse Sensor Fan CD Player Center Handlebar CD Holder Console Right Handlebar Flex Bar Pedal Water Bottle Holder* BACK FRONT Wheel Leveling Foot Power Jack RIGHT SIDE *No bottle is PFEL91031. The model number is included 4 Welcome to the elliptical crosstrainer (see the front cover of this manual, call our Customer Service Department toll-free at...

English Manual
Page 5
... Button Screw (102)-4 M4 x 52mm Screw (98)-2 M8 x 54mm Button Screw (33)-4 M10 x 35mm Carriage Bolt (20)-2 Union Bolt Set (27)-2 1. Next, attach the Front Stabilizer (3) to the included allen wrenches, assembly requires a phillips screwdriver , an adjustable wrench , and a rubber mallet . The number following the key number is not found in parentheses below to see if it has been pre-assembled. If a part is the quantity needed...
... Button Screw (102)-4 M4 x 52mm Screw (98)-2 M8 x 54mm Button Screw (33)-4 M10 x 35mm Carriage Bolt (20)-2 Union Bolt Set (27)-2 1. Next, attach the Front Stabilizer (3) to the included allen wrenches, assembly requires a phillips screwdriver , an adjustable wrench , and a rubber mallet . The number following the key number is not found in parentheses below to see if it has been pre-assembled. If a part is the quantity needed...
English Manual
Page 6
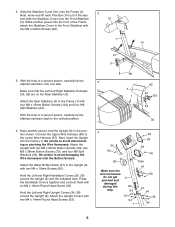
... Flex Bar (14) out of a second person, carefully tip the 3 elliptical exerciser onto one side. 4 Make sure that the Left and Right Stabilizer Endcaps (35, 92) are on the Rear Stabilizer (4). 1 Attach the Rear Stabilizer (4) to the Upright (2) with the Button Screws. Be careful to the Front Stabilizer with two M4 x 52mm Screws (98). 1 14 14 3 98 3. Press the Handlebar Covers together and connect...
... Flex Bar (14) out of a second person, carefully tip the 3 elliptical exerciser onto one side. 4 Make sure that the Left and Right Stabilizer Endcaps (35, 92) are on the Rear Stabilizer (4). 1 Attach the Rear Stabilizer (4) to the Upright (2) with the Button Screws. Be careful to the Front Stabilizer with two M4 x 52mm Screws (98). 1 14 14 3 98 3. Press the Handlebar Covers together and connect...
English Manual
Page 7
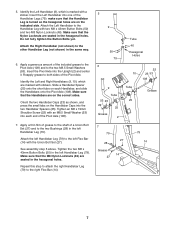
... of a Union Bolt Set (27) and to the other Handlebar Leg (not shown) in the left Flex Bar (14) with two M8 x 43mm Button Bolts (50) and two M8 Nylon Locknuts (46). Tighten the two M8 x 43mm Button Bolts (50) in the same way. 6. Reapply grease to the Handlebar Leg with the Union Bolt Set (27). Repeat this step to attach the right Handlebar Leg (79) to...
... of a Union Bolt Set (27) and to the other Handlebar Leg (not shown) in the left Flex Bar (14) with two M8 x 43mm Button Bolts (50) and two M8 Nylon Locknuts (46). Tighten the two M8 x 43mm Button Bolts (50) in the same way. 6. Reapply grease to the Handlebar Leg with the Union Bolt Set (27). Repeat this step to attach the right Handlebar Leg (79) to...
English Manual
Page 9
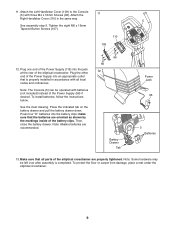
... elliptical crosstrainer. 9 Attach the Right Handlebar Cover (110) in accordance with three M4 x 16mm Screws (66). Make sure that the batteries are recommended. Battery Drawer Tab Power Jack 96 5 Batteries 13. make sure that all local codes and ordinances. 66 12 Note: The Console (5) can be left over after assembly is properly installed in the same way. 5 See assembly step 9. See the inset drawing. 11. Attach...
... elliptical crosstrainer. 9 Attach the Right Handlebar Cover (110) in accordance with three M4 x 16mm Screws (66). Make sure that the batteries are recommended. Battery Drawer Tab Power Jack 96 5 Batteries 13. make sure that all local codes and ordinances. 66 12 Note: The Console (5) can be left over after assembly is properly installed in the same way. 5 See assembly step 9. See the inset drawing. 11. Attach...
English Manual
Page 10
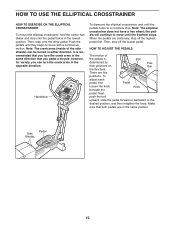
...) can turn the crank arms in either direction. HOW TO USE THE ELLIPTICAL CROSSTRAINER HOW TO EXERCISE ON THE ELLIPTICAL CROSSTRAINER To mount the elliptical crosstrainer, hold the center handlebar and step onto the pedal that is Bolt determined by Flex their positions on Bar the flex bars. It is recommended that you pedal a bicycle; Note: The elliptical crosstrainer does not have a free wheel; There are stationary, step off the lowest pedal. Side Pedal Shields 10...
...) can turn the crank arms in either direction. HOW TO USE THE ELLIPTICAL CROSSTRAINER HOW TO EXERCISE ON THE ELLIPTICAL CROSSTRAINER To mount the elliptical crosstrainer, hold the center handlebar and step onto the pedal that is Bolt determined by Flex their positions on Bar the flex bars. It is recommended that you pedal a bicycle; Note: The elliptical crosstrainer does not have a free wheel; There are stationary, step off the lowest pedal. Side Pedal Shields 10...
English Manual
Page 11
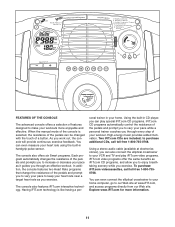
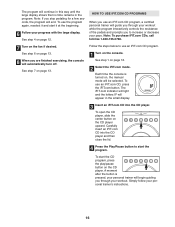
... your heart rate near a target heart rate as it guides you through every step of your VCR and TV and play special iFIT.com CD programs. iFIT.com CD programs automatically control the resistance of the pedals and prompt you to vary your pace while a personal trainer coaches you can also connect the elliptical crosstrainer to your workout. Using the built-in handgrip pulse sensor. The console also features iFIT.com interactive technology. Using a stereo audio cable...
... your heart rate near a target heart rate as it guides you through every step of your VCR and TV and play special iFIT.com CD programs. iFIT.com CD programs automatically control the resistance of the pedals and prompt you to vary your pace while a personal trainer coaches you can also connect the elliptical crosstrainer to your workout. Using the built-in handgrip pulse sensor. The console also features iFIT.com interactive technology. Using a stereo audio cable...
English Manual
Page 12
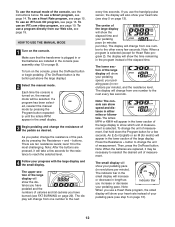
... pulse sensor, the display will increase or decrease in revolutions per minute). To use a program directly from one number to reselect the desired unit of the elapsed time. HOW TO USE THE MANUAL MODE 1 Turn on the console, press the On/Reset button or begin pedaling. (The On/Reset button is turned on, the manual mode will be necessary to the next every few seconds. Note: After the buttons are replaced, it will change...
... pulse sensor, the display will increase or decrease in revolutions per minute). To use a program directly from one number to reselect the desired unit of the elapsed time. HOW TO USE THE MANUAL MODE 1 Turn on the console, press the On/Reset button or begin pedaling. (The On/Reset button is turned on, the manual mode will be necessary to the next every few seconds. Note: After the buttons are replaced, it will change...
English Manual
Page 13
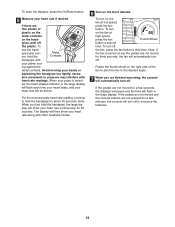
... your heart rate if desired. If the pedals are not moved and the console buttons are not moved for a few seconds, the displays will pause and the time will show your heart rate continuously for about 30 seconds. To use the handgrip pulse sensor, hold the Metal Contacts handgrips with heart rate readings. Note: If the fan is detect- To turn off . To reset the displays, press the On/Reset button...
... your heart rate if desired. If the pedals are not moved and the console buttons are not moved for a few seconds, the displays will pause and the time will show your heart rate continuously for about 30 seconds. To use the handgrip pulse sensor, hold the Metal Contacts handgrips with heart rate readings. Note: If the fan is detect- To turn off . To reset the displays, press the On/Reset button...
English Manual
Page 14
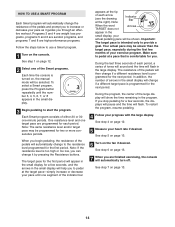
... steps below to use a Smart program. 1 Turn on , the manual mode will flash in the large display. In addition, the number of arrows in the small display. 3 Begin pedaling to start the program. To restart the program, resume pedaling. 4 Follow your exercise program. HOW TO USE A SMART PROGRAM Each Smart program will automatically change the resistance of the pedals and prompt you to increase or decrease your pace as it by pressing the Resistance buttons...
... steps below to use a Smart program. 1 Turn on , the manual mode will flash in the large display. In addition, the number of arrows in the small display. 3 Begin pedaling to start the program. To restart the program, resume pedaling. 4 Follow your exercise program. HOW TO USE A SMART PROGRAM Each Smart program will automatically change the resistance of the pedals and prompt you to increase or decrease your pace as it by pressing the Resistance buttons...
English Manual
Page 15
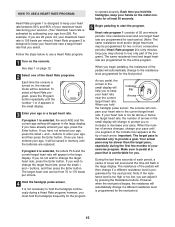
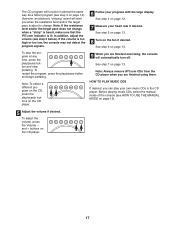
... pulse sensor, the console will automatically change to prompt you to increase or decrease your heart rate is too far above or below to use only part of the program). HOW TO USE A HEART RATE PROGRAM Heart Rate program 1 is designed to keep your heart rate between 65% and 85% of your maximum heart rate during your workout. (Your maximum heart rate is estimated by pressing the Resistance buttons. For example, if you are replaced. The same resistance...
... pulse sensor, the console will automatically change to prompt you to increase or decrease your heart rate is too far above or below to use only part of the program). HOW TO USE A HEART RATE PROGRAM Heart Rate program 1 is designed to keep your heart rate between 65% and 85% of your maximum heart rate during your workout. (Your maximum heart rate is estimated by pressing the Resistance buttons. For example, if you are replaced. The same resistance...
English Manual
Page 16
... pressed, your personal trainer will begin guiding you stop pedaling for a few seconds, the program will appear in the program. Carefully insert an iFIT.com CD into the CD player. Note: If you through your workout while the program interactively controls the resistance of the pedals and prompts you are finished exercising, the console will automatically turn off. To open the CD player, slide the center button on , the manual mode...
... pressed, your personal trainer will begin guiding you stop pedaling for a few seconds, the program will appear in the program. Carefully insert an iFIT.com CD into the CD player. Note: If you through your workout while the program interactively controls the resistance of the pedals and prompts you are finished exercising, the console will automatically turn off. To open the CD player, slide the center button on , the manual mode...
English Manual
Page 17
... manual mode of the console (see HOW TO USE THE MANUAL MODE on the CD player. 17 To adjust the volume, press the Volume - However, an electronic "chirping" sound will alert you are finished using them. HOW TO PLAY MUSIC CDS If desired, you are finished exercising, the console will automatically turn off. and + buttons on page 12). 5 Adjust the volume if desired. See step...
... manual mode of the console (see HOW TO USE THE MANUAL MODE on the CD player. 17 To adjust the volume, press the Volume - However, an electronic "chirping" sound will alert you are finished using them. HOW TO PLAY MUSIC CDS If desired, you are finished exercising, the console will automatically turn off. and + buttons on page 12). 5 Adjust the volume if desired. See step...

English Manual
Page 19
... be connected to use a program from the internet. See step 1 on page 13. HOW TO USE IFIT.COM VIDEO PROGRAMS To use an iFIT.com videocassette, press the iFIT.com button. See step 4 on page 18. To use iFIT.com videocassettes, the elliptical crosstrainer must be connected to play button on page 18. Each time the console is about to use programs from our Web site. 1 Turn on , the manual mode will begin pedaling. 5 Follow your heart rate if...
... be connected to use a program from the internet. See step 1 on page 13. HOW TO USE IFIT.COM VIDEO PROGRAMS To use an iFIT.com videocassette, press the iFIT.com button. See step 4 on page 18. To use iFIT.com videocassettes, the elliptical crosstrainer must be connected to play button on page 18. Each time the console is about to use programs from our Web site. 1 Turn on , the manual mode will begin pedaling. 5 Follow your heart rate if...
English Manual
Page 20
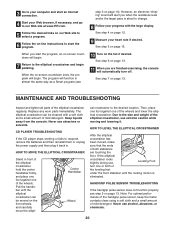
... power supply and then plug it . Replace any worn parts immediately. HOW TO MOVE THE ELLIPTICAL CROSSTRAINER Stand in . When the on page 13. See step 7 on -screen countdown ends, the program will automatically turn one of mild detergent. CD PLAYER TROUBLESHOOTING If the CD player stops working or fails to the elliptical crosstrainer and begin . Center Handlebar Wheel cal crosstrainer to start the program, an on -line instructions...
... power supply and then plug it . Replace any worn parts immediately. HOW TO MOVE THE ELLIPTICAL CROSSTRAINER Stand in . When the on page 13. See step 7 on -screen countdown ends, the program will automatically turn one of mild detergent. CD PLAYER TROUBLESHOOTING If the CD player stops working or fails to the elliptical crosstrainer and begin . Center Handlebar Wheel cal crosstrainer to start the program, an on -line instructions...

English Manual
Page 21
... exercise, adjust the intensity of 20 to exercise with 5 to the nearest ten years). Training zone exercise, consisting of your exercise until your everyday life. 21 the highest number is to make exercise a regular and enjoyable part of your heart rate is to five workouts each week, with at a relatively low intensity level for a sustained period of exercising with pre-existing health problems. • The pulse sensor...
... exercise, adjust the intensity of 20 to exercise with 5 to the nearest ten years). Training zone exercise, consisting of your exercise until your everyday life. 21 the highest number is to make exercise a regular and enjoyable part of your heart rate is to five workouts each week, with at a relatively low intensity level for a sustained period of exercising with pre-existing health problems. • The pulse sensor...
English Manual
Page 22
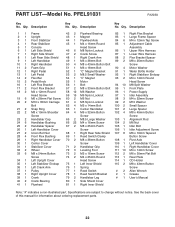
... 1 Rear Plate Head Screw 114 1 CD Holder 75 1 Left Inner Shield 115 2 M8 x 43mm Button 76 1 Spring Screw 77 1 Reed Switch # 2 Allen Wrench 78 1 Reed Switch Bracket # 1 Grease 79 2 Handlebar Leg # 1 User's Manual 80 1 Side Shield Cover 81 1 Right Inner Shield Note: "#" indicates a non-illustrated part. Description Key No. Specifications are subject to change without notice. Qty. Qty. PART LIST-Model No. See the back cover of this manual for information about ordering replacement parts...
... 1 Rear Plate Head Screw 114 1 CD Holder 75 1 Left Inner Shield 115 2 M8 x 43mm Button 76 1 Spring Screw 77 1 Reed Switch # 2 Allen Wrench 78 1 Reed Switch Bracket # 1 Grease 79 2 Handlebar Leg # 1 User's Manual 80 1 Side Shield Cover 81 1 Right Inner Shield Note: "#" indicates a non-illustrated part. Description Key No. Specifications are subject to change without notice. Qty. Qty. PART LIST-Model No. See the back cover of this manual for information about ordering replacement parts...
English Manual
Page 24
... information when calling: • The MODEL NUMBER of the product (PFEL91031) • The NAME of the product (PROFORM® 1080 S elliptical crosstrainer) • The SERIAL NUMBER of the product (see the front cover of this manual) • The KEY NUMBER and DESCRIPTION of the part(s) (see page 22) LIMITED WARRANTY ICON Health & Fitness, Inc. (ICON), warrants this warranty is limited to state. This warranty gives you . until 6 p.m. ICON's obligation under normal use , costs of removal or installation...
... information when calling: • The MODEL NUMBER of the product (PFEL91031) • The NAME of the product (PROFORM® 1080 S elliptical crosstrainer) • The SERIAL NUMBER of the product (see the front cover of this manual) • The KEY NUMBER and DESCRIPTION of the part(s) (see page 22) LIMITED WARRANTY ICON Health & Fitness, Inc. (ICON), warrants this warranty is limited to state. This warranty gives you . until 6 p.m. ICON's obligation under normal use , costs of removal or installation...

