
English Manual
Page 3
... is not a medical device. do not arch your exercise bike. Always wear athletic shoes for home use the exercise bike in a commercial, rental, or institutional setting. 10. It is intended for foot protection. 2. The exercise bike is the responsibility of clearance around the exercise bike. Do not use only. Various factors, including the user's movement...
... is not a medical device. do not arch your exercise bike. Always wear athletic shoes for home use the exercise bike in a commercial, rental, or institutional setting. 10. It is intended for foot protection. 2. The exercise bike is the responsibility of clearance around the exercise bike. Do not use only. Various factors, including the user's movement...
English Manual
Page 4
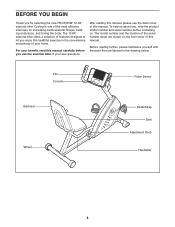
... the serial number decal are labeled in the convenience and privacy of your benefit, read this manual. The 10.8X exercise bike offers a selection of the most effective exercises for selecting the new PROFORM® 10.8X exercise bike. If you have questions after reading this manual, please see the back cover of this manual carefully before...
... the serial number decal are labeled in the convenience and privacy of your benefit, read this manual. The 10.8X exercise bike offers a selection of the most effective exercises for selecting the new PROFORM® 10.8X exercise bike. If you have questions after reading this manual, please see the back cover of this manual carefully before...
English Manual
Page 10
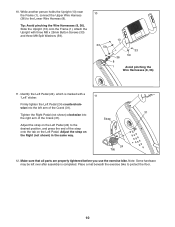
Make sure that all parts are properly tightened before you use the exercise bike. Strap Adjust the strap on the Left Pedal (24) to protect the floor. 10 Identify the Left Pedal (24), which is completed. Note: Some hardware may be left arm of the Crank (31). 31 Tighten the Right ... Right (not shown) in the same way. 24 Tab 12. Place a mat beneath the exercise bike to the desired position, and press the end of the Crank (31). Adjust the strap on the Left Pedal. 10. Attach the Upright with a "Left" sticker. 11 Firmly tighten the Left Pedal (24) counterclockwise ...
Make sure that all parts are properly tightened before you use the exercise bike. Strap Adjust the strap on the Left Pedal (24) to protect the floor. 10 Identify the Left Pedal (24), which is completed. Note: Some hardware may be left arm of the Crank (31). 31 Tighten the Right ... Right (not shown) in the same way. 24 Tab 12. Place a mat beneath the exercise bike to the desired position, and press the end of the Crank (31). Adjust the strap on the Left Pedal. 10. Attach the Upright with a "Left" sticker. 11 Firmly tighten the Left Pedal (24) counterclockwise ...


