

Owners Manual
Page 4
...near water or outdoors. Always wear running . Never Start the treadmill while you'are used or where oxygen is being administered. 2. Keep small children away from the rear roller. Never drop or insert any opening. 10. Alviays hold the handrail when exercising on a level surface,... with at a time. Always unplug the power cord before operating the treadmill. 1. Do not operate where aerosol products are standing on the same ...
...near water or outdoors. Always wear running . Never Start the treadmill while you'are used or where oxygen is being administered. 2. Keep small children away from the rear roller. Never drop or insert any opening. 10. Alviays hold the handrail when exercising on a level surface,... with at a time. Always unplug the power cord before operating the treadmill. 1. Do not operate where aerosol products are standing on the same ...
Owners Manual
Page 5
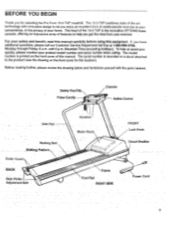
... our Customer Service Department toll-free at your convenience, in the privacy of -the-art technology with the parts labeled. The 10.0 TXP combines state-of your home. The heart of the 10.0 TXP is the innovative OPTIONS base console, offering an impressive array of this equipment. until 6 p.m. BEFORE YOU BEGIN Thank you for... Handrail Motor Hood FRONT Lock Knob CirOuit Breaker Frame Foot Rail . The model number is recorded on the front cover for selecting the Pro Form 10.0 TXP treadmill.
... our Customer Service Department toll-free at your convenience, in the privacy of -the-art technology with the parts labeled. The 10.0 TXP combines state-of your home. The heart of the 10.0 TXP is the innovative OPTIONS base console, offering an impressive array of this equipment. until 6 p.m. BEFORE YOU BEGIN Thank you for... Handrail Motor Hood FRONT Lock Knob CirOuit Breaker Frame Foot Rail . The model number is recorded on the front cover for selecting the Pro Form 10.0 TXP treadmill.
Owners Manual
Page 6
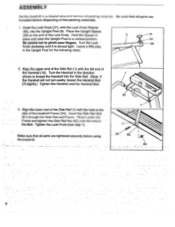
... Knob clockwise until it is almost tight. Make stire.that all ci rts-are included before using the.treadmill. 1 1 10 7 1 • 81 .54. Insert the Lock Knob (31), with the left end of the treadmill Frame (54). Insert the Side Rail Bolt (81) through-the Side Rail and Frame_ Reach under the Frame... to thread the Handrail into the Upright Post (9). Be sure that all parts are tightened securely before disposing of the packing materials. 1. ASSEMBLY Set the treadmill in the side of the Handrail...
... Knob clockwise until it is almost tight. Make stire.that all ci rts-are included before using the.treadmill. 1 1 10 7 1 • 81 .54. Insert the Lock Knob (31), with the left end of the treadmill Frame (54). Insert the Side Rail Bolt (81) through-the Side Rail and Frame_ Reach under the Frame... to thread the Handrail into the Upright Post (9). Be sure that all parts are tightened securely before disposing of the packing materials. 1. ASSEMBLY Set the treadmill in the side of the Handrail...
Owners Manual
Page 7
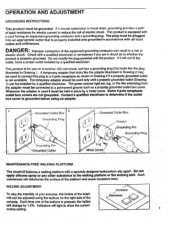
... Outlet Box Grounding Plug Adapter - This product is .properly grounded. Grounding Plug Grounding Pin NGrounded Outlet Lug •r, Metal Screw' 'MAINTENANCE-FREE WALKING PLATFORM This treadmill teaturesla walking platform:with -a cord having an equipment-grounding conductor and a grounding plug. Such substances will light to show the current incline setting. The plug...
... Outlet Box Grounding Plug Adapter - This product is .properly grounded. Grounding Plug Grounding Pin NGrounded Outlet Lug •r, Metal Screw' 'MAINTENANCE-FREE WALKING PLATFORM This treadmill teaturesla walking platform:with -a cord having an equipment-grounding conductor and a grounding plug. Such substances will light to show the current incline setting. The plug...
Owners Manual
Page 8
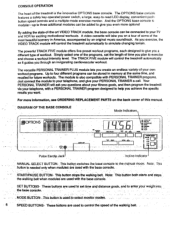
...START/PAUSE BUTTON- A video cassette will ask you even more Information, see ORDERING REPLACEMENT PARTS on a tour of some of the treadmill is the innovative OPTIONS base console. The module is modular-up to three additional modules can be connected to set the length of ... and a multiple-mode exercise monitor. Your PERSONAL TRAINER will take you plan to give you questions about your fitness goals, and then program the treadmill via your PERSONAL TRAINER a call. os \ I SPIED II ION SS SIN V Pulse Earclip Jack Incline Indicator MANUAL SELECT BUTTON- the base ...
...START/PAUSE BUTTON- A video cassette will ask you even more Information, see ORDERING REPLACEMENT PARTS on a tour of some of the treadmill is the innovative OPTIONS base console. The module is modular-up to three additional modules can be connected to set the length of ... and a multiple-mode exercise monitor. Your PERSONAL TRAINER will take you plan to give you questions about your fitness goals, and then program the treadmill via your PERSONAL TRAINER a call. os \ I SPIED II ION SS SIN V Pulse Earclip Jack Incline Indicator MANUAL SELECT BUTTON- the base ...
Owners Manual
Page 9
... down . There is turned on, the.walking belt will change -by pressing the START/PAUSE button. WARNING: Always wear the clip when operating the treadmill. MANUAL SPEED MODE When the power is a clip attached by 0.1 mile per hour. Each time one of monitor mode's to give you exercise.... pressing the MODE button. Whemthe,distance goal.is in the.manual mode. . Note: Distance goals can be stopped quickly, if desired, by .10 seconds. As the buttons are described below.: WEIGHT SET: For the CALORIES mode tote accurate, your weight should be counted down to enter your ...
... down . There is turned on, the.walking belt will change -by pressing the START/PAUSE button. WARNING: Always wear the clip when operating the treadmill. MANUAL SPEED MODE When the power is a clip attached by 0.1 mile per hour. Each time one of monitor mode's to give you exercise.... pressing the MODE button. Whemthe,distance goal.is in the.manual mode. . Note: Distance goals can be stopped quickly, if desired, by .10 seconds. As the buttons are described below.: WEIGHT SET: For the CALORIES mode tote accurate, your weight should be counted down to enter your ...
Owners Manual
Page 10
... desired, you finish exercising. ••, • io After a few seconds, your collar to your weight into the jack on the foot rails of the treadmill. Note: Each time one of the earclip wire. The pulse earclip is worn. Remove the safety key from the console when you can measure your...
... desired, you finish exercising. ••, • io After a few seconds, your collar to your weight into the jack on the foot rails of the treadmill. Note: Each time one of the earclip wire. The pulse earclip is worn. Remove the safety key from the console when you can measure your...
Owners Manual
Page 11
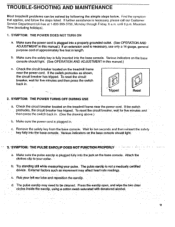
...(See OPERATION AND ADJUSTMENT in this manual.) c. Press-the earclip open, and wipe the two clear. Check the circuit breaker located on the treadmill frame near the power cord. jSee the drawing above.) b. Various indicators on the base console. b. circles inside the -earclip, using a... necessary, use only a 14-gauge, general purpose cord of approximately five feet in length. Check the circuit breaker located on the treadmill frame hear the power cord. Rub yourleft ear lobe and reposition the earclip. a. External factors such as shown, the circuit breaker ...
...(See OPERATION AND ADJUSTMENT in this manual.) c. Press-the earclip open, and wipe the two clear. Check the circuit breaker located on the treadmill frame near the power cord. jSee the drawing above.) b. Various indicators on the base console. b. circles inside the -earclip, using a... necessary, use only a 14-gauge, general purpose cord of approximately five feet in length. Check the circuit breaker located on the treadmill frame hear the power cord. Rub yourleft ear lobe and reposition the earclip. a. External factors such as shown, the circuit breaker ...
Owners Manual
Page 12
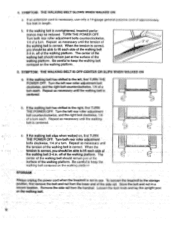
...on the walking platform . . . •.. • STORAGE AlWays unplug the power cord when theireadmill is necessary, use . To -convert the treadmill to keep the . Lobsen the lock knob and lay the upright post on the walking platform. 3"-4" 5. SYMPTOM: THE WALKING BELT IS OFF-...necessary until the tension of a turn each side of the walking platform. Turn the left , first TURN THE POWER OFF. belt is overtightened, treadmill performance may be able to the left rear roller adjustment bolt clockwise, and the right bolt counterclockwise, 1/4 of a turn . bolts clockwise, ...
...on the walking platform . . . •.. • STORAGE AlWays unplug the power cord when theireadmill is necessary, use . To -convert the treadmill to keep the . Lobsen the lock knob and lay the upright post on the walking platform. 3"-4" 5. SYMPTOM: THE WALKING BELT IS OFF-...necessary until the tension of a turn each side of the walking platform. Turn the left , first TURN THE POWER OFF. belt is overtightened, treadmill performance may be able to the left rear roller adjustment bolt clockwise, and the right bolt counterclockwise, 1/4 of a turn . bolts clockwise, ...

Owners Manual
Page 16
... telephone for easy reference when calling. Mountain Time (excluding holidays). The SERIAL NUMBER of the product (see the front cover of the product (Pro Form 10.0 TXP treadmill). 3. The NAME of this manual. 5. ORDERING REPLACEMENT PARTS To order replacement parts, simply call our Customer Service Department toll-free at 1-800-999-3756, Monday...
... telephone for easy reference when calling. Mountain Time (excluding holidays). The SERIAL NUMBER of the product (see the front cover of the product (Pro Form 10.0 TXP treadmill). 3. The NAME of this manual. 5. ORDERING REPLACEMENT PARTS To order replacement parts, simply call our Customer Service Department toll-free at 1-800-999-3756, Monday...


