

English Manual
Page 3
TABLE OF CONTENTS Before You Begin Assembly Operation and Adjustment Trouble-Shooting and Storage Conditioning Guidelines Part List Exploded Drawing Ordering Replacement Parts Limited Warranty 3 4 5 6 9 10 11 Back Cover Back Cover BEFORE YOU BEGIN Thank you have additional questions, please call our ...Department toll-free at your home. For your product model number and serial number when calling. The Pro Form 10.0TPI combines state-of-theart technology with the parts labeled. until 6 p.m. Mountain Time (excluding holidays). The serial number can be found on a decal attached ...
TABLE OF CONTENTS Before You Begin Assembly Operation and Adjustment Trouble-Shooting and Storage Conditioning Guidelines Part List Exploded Drawing Ordering Replacement Parts Limited Warranty 3 4 5 6 9 10 11 Back Cover Back Cover BEFORE YOU BEGIN Thank you have additional questions, please call our ...Department toll-free at your home. For your product model number and serial number when calling. The Pro Form 10.0TPI combines state-of-theart technology with the parts labeled. until 6 p.m. Mountain Time (excluding holidays). The serial number can be found on a decal attached ...

English Manual
Page 4
Insert the Short Side Rail Bolt (10) through the Side Rail and Frame. Insert the Long Side Rail Bott (72) through the metal plate under the ..., roll back the Side Rail Foam Grip (2) slightly. 3. Slide the upper end of the Side Rail (1) into the Side Rail. Make sure that all parts are tightened securely before using the treadmill. 1 O 2 o. 49 1 72 57 Lf3 71 4 Leave a little play in a cleared area and remove ... step 1). ASSEMBLY Set the treadmill in the Upright Post for the following steps. 31 33 32 2. Make sure that all parts are included before beginning. 1.
Insert the Short Side Rail Bolt (10) through the Side Rail and Frame. Insert the Long Side Rail Bott (72) through the metal plate under the ..., roll back the Side Rail Foam Grip (2) slightly. 3. Slide the upper end of the Side Rail (1) into the Side Rail. Make sure that all parts are tightened securely before using the treadmill. 1 O 2 o. 49 1 72 57 Lf3 71 4 Leave a little play in a cleared area and remove ... step 1). ASSEMBLY Set the treadmill in the Upright Post for the following steps. 31 33 32 2. Make sure that all parts are included before beginning. 1.
English Manual
Page 9
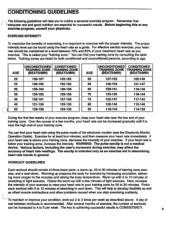
... keep your heart rate using the heart rate as offset muscle contractions and other problems caused when you exercise. This will help to 10 minutes of light exercise. The key to outline a personal exercise program. For effective aerobic exercise, your training zone, increase the intensity...you stop exercising suddenly. You can find your training zone by consulting the table below your heart rate should consist of three basic parts: a warm-up prepares the body for both conditioned and unconditioned persons, according to the muscles and raising the body temperature. ...
... keep your heart rate using the heart rate as offset muscle contractions and other problems caused when you exercise. This will help to 10 minutes of light exercise. The key to outline a personal exercise program. For effective aerobic exercise, your training zone, increase the intensity...you stop exercising suddenly. You can find your training zone by consulting the table below your heart rate should consist of three basic parts: a warm-up prepares the body for both conditioned and unconditioned persons, according to the muscles and raising the body temperature. ...

English Manual
Page 10
Description Key No. Qty. f0 Description 1 1 2 1 3 1 4 1 5 1 6 1 7 1 8 1 9 1 10 1 11 1 12 8 13, 1 14 1 15 1 16 1 17 1 18 4 19 3 20 3 21 12 22 1 23 1 24 2 25 1 26 5 27 1 28 1 29 4 30 1 31 1 32 1 33 1 34 1 ... Washer Tension Spring Speed Control Assembly Power Indicator Light Ground Washer Lift Board Plastic Stand-Off Owner's Manual Monitor Operation Guide Note: "#" indicates a non-illustrated part. Specifications are subject to change without notice. Qty. PF102220 Rev. 4/92 Key No. PART LIST-Model No. See the back cover for information about ordering replacement...
Description Key No. Qty. f0 Description 1 1 2 1 3 1 4 1 5 1 6 1 7 1 8 1 9 1 10 1 11 1 12 8 13, 1 14 1 15 1 16 1 17 1 18 4 19 3 20 3 21 12 22 1 23 1 24 2 25 1 26 5 27 1 28 1 29 4 30 1 31 1 32 1 33 1 34 1 ... Washer Tension Spring Speed Control Assembly Power Indicator Light Ground Washer Lift Board Plastic Stand-Off Owner's Manual Monitor Operation Guide Note: "#" indicates a non-illustrated part. Specifications are subject to change without notice. Qty. PF102220 Rev. 4/92 Key No. PART LIST-Model No. See the back cover for information about ordering replacement...

English Manual
Page 12
...p.m. Mountain Time (excluding holidays). The NAME of the product (PF102220). 2. The DESCRIPTION of the part(s) from the date of purchase. All products for which vary from page 10 of this manual. THE WARRANTY EXTENDED HEREUNDER IS IN LIEU OF ANY AND ALL OTHER WARRANTIES AND ANY... for products used for a period of ninety (90) days from page 10 of this manual. 5. PROFORM's obligation under normal use and service conditions, for commercial or rental purposes. ORDERING REPLACEMENT PARTS Replacement parts can be ordered by calling our Customer Service Department toll-free at one ...
...p.m. Mountain Time (excluding holidays). The NAME of the product (PF102220). 2. The DESCRIPTION of the part(s) from the date of purchase. All products for which vary from page 10 of this manual. THE WARRANTY EXTENDED HEREUNDER IS IN LIEU OF ANY AND ALL OTHER WARRANTIES AND ANY... for products used for a period of ninety (90) days from page 10 of this manual. 5. PROFORM's obligation under normal use and service conditions, for commercial or rental purposes. ORDERING REPLACEMENT PARTS Replacement parts can be ordered by calling our Customer Service Department toll-free at one ...


