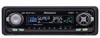

Owner's Manual
Page 2
... Music 8 Basic Operation of Multi-CD Player 13 - Best Stations Memory (BSM) Using the Built-in CD Player .......... 11 - Random Play (RANDOM) - CD Loading Slot - Disc Number Search (for 6-Disc, 12-Disc types) Corresponding Display Indications and Buttons 14 Entering the Function Menu 14 Function Menu Functions 15 Entering the Detailed Setting Menu 16 Detailed Setting Menu Functions 17 PGM Button Functions 17 Tuner Operation 18 - Pause (PAUSE) ITS (Instant Track Selection 23 - Selecting Discs by Disc Title List (TITLE LIST) - Head Unit - Scan Play...
... Music 8 Basic Operation of Multi-CD Player 13 - Best Stations Memory (BSM) Using the Built-in CD Player .......... 11 - Random Play (RANDOM) - CD Loading Slot - Disc Number Search (for 6-Disc, 12-Disc types) Corresponding Display Indications and Buttons 14 Entering the Function Menu 14 Function Menu Functions 15 Entering the Detailed Setting Menu 16 Detailed Setting Menu Functions 17 PGM Button Functions 17 Tuner Operation 18 - Pause (PAUSE) ITS (Instant Track Selection 23 - Selecting Discs by Disc Title List (TITLE LIST) - Head Unit - Scan Play...

Owner's Manual
Page 3
...Loudness Adjustment (LOUD) - Replacing the Front Panel - Setting the Time - Treble Adjustment (TRE) - Subwoofer Output (SUB.W) - Warning Tone Initial Setting 38 Entering the Initial Setting Menu 38 Initial Setting Menu Functions 39 - Switching the AUX Mode (AUX) - Subwoofer Setting Adjustment (80HZ 0) - Detaching the Front Panel - Setting the Dimmer (DIMMER) - Selecting the AUX Source - Balance Adjustment (FADER) - Setting the Warning Tone (WARN) - AUX Title Input (TITLE IN) CD Player and Care 42 Precaution 42 Built-in CD Player's Error Message 43 Specifications 44...
...Loudness Adjustment (LOUD) - Replacing the Front Panel - Setting the Time - Treble Adjustment (TRE) - Subwoofer Output (SUB.W) - Warning Tone Initial Setting 38 Entering the Initial Setting Menu 38 Initial Setting Menu Functions 39 - Switching the AUX Mode (AUX) - Subwoofer Setting Adjustment (80HZ 0) - Detaching the Front Panel - Setting the Dimmer (DIMMER) - Selecting the AUX Source - Balance Adjustment (FADER) - Setting the Warning Tone (WARN) - AUX Title Input (TITLE IN) CD Player and Care 42 Precaution 42 Built-in CD Player's Error Message 43 Specifications 44...
Owner's Manual
Page 7
...) or any other 50-Disc Type Multi-CD Player functions cannot be repro- In case the necessary information is disconnected, the preset memory will be erased and must be used with your product to be audible. • Protect the product from where you purchased the product for repair without advance contact. 7 U.S.A. Pioneer Electronics Service, Inc. CUSTOMER SERVICE DEPARTMENT 300 Allstate Parkway...
...) or any other 50-Disc Type Multi-CD Player functions cannot be repro- In case the necessary information is disconnected, the preset memory will be erased and must be used with your product to be audible. • Protect the product from where you purchased the product for repair without advance contact. 7 U.S.A. Pioneer Electronics Service, Inc. CUSTOMER SERVICE DEPARTMENT 300 Allstate Parkway...
Owner's Manual
Page 8
... will use direct satellite-to-receiver broadcasting technology to provide listeners in the U.S.A. Before Using This Product About the XM READY Mark The "XM READY" mark printed on the front panel of this product indicates that can be connected to the XM tuner owner's manual. The system will create and package up to 100 channels of your dealer or nearest authorized Pioneer service station...
... will use direct satellite-to-receiver broadcasting technology to provide listeners in the U.S.A. Before Using This Product About the XM READY Mark The "XM READY" mark printed on the front panel of this product indicates that can be connected to the XM tuner owner's manual. The system will create and package up to 100 channels of your dealer or nearest authorized Pioneer service station...

Owner's Manual
Page 9
... player. * When the AUX (external input) is set to OFF. (Refer to page 39.) • When this product's blue/white lead is switched ON. Continued overleaf. 8 FRANÇAIS ITALIANO NEDERLANDS Tuner) Each press changes the Source ... To retract the antenna, switch the source OFF. patible as one External Unit can listen to the car's Auto-antenna relay control terminal, the car's Auto-antenna extends when this product's source is connected to music...
... player. * When the AUX (external input) is set to OFF. (Refer to page 39.) • When this product's blue/white lead is switched ON. Continued overleaf. 8 FRANÇAIS ITALIANO NEDERLANDS Tuner) Each press changes the Source ... To retract the antenna, switch the source OFF. patible as one External Unit can listen to the car's Auto-antenna relay control terminal, the car's Auto-antenna extends when this product's source is connected to music...
Owner's Manual
Page 14
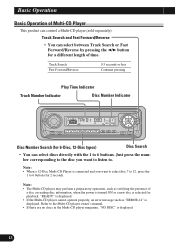
Basic Operation Basic Operation of a disc or reading disc information, when the power is turned ON or a new disc is selected for playback. Track Search Fast Forward/Reverse 0.5 seconds or less Continue pressing Play Time Indicator Track Number Indicator Disc Number Indicator Disc Number Search (for 2 seconds. Note: • The Multi-CD player may perform a preparatory operation, such as "ERROR-14" is displayed. • If the Multi-CD player cannot operate properly...
Basic Operation Basic Operation of a disc or reading disc information, when the power is turned ON or a new disc is selected for playback. Track Search Fast Forward/Reverse 0.5 seconds or less Continue pressing Play Time Indicator Track Number Indicator Disc Number Indicator Disc Number Search (for 2 seconds. Note: • The Multi-CD player may perform a preparatory operation, such as "ERROR-14" is displayed. • If the Multi-CD player cannot operate properly...

Owner's Manual
Page 15
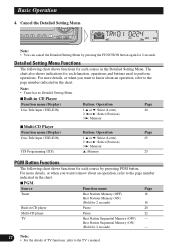
... changes the Mode ... Select the desired mode in the Function Menu, Detailed Setting Menu or Initial Setting Menu. Indicator and corresponding buttons are in the Audio Menu. Entering the Function Menu The Function Menu lets you do not perform an operation within about 30 seconds, the Function Menu is lit in the Audio Menu using button x on the head unit or remote controller. troller. When you're in the menus using button c on the head unit or remote con- Continued overleaf. 14 These light...
... changes the Mode ... Select the desired mode in the Function Menu, Detailed Setting Menu or Initial Setting Menu. Indicator and corresponding buttons are in the Audio Menu. Entering the Function Menu The Function Menu lets you do not perform an operation within about 30 seconds, the Function Menu is lit in the Audio Menu using button x on the head unit or remote controller. troller. When you're in the menus using button c on the head unit or remote con- Continued overleaf. 14 These light...
Owner's Manual
Page 18
... each source in CD player Pause 20 Multi-CD player Pause 22 TV Best Station Sequential Memory (OFF) - Note: • You can cancel the Detailed Setting Menu by presssing PGM button. Note: • Tuner has no Detailed Setting Menu. 7 Built-in CD Player Function name (Display) Disc Title Input (TITLE IN) Button: Operation 1 5 or ∞: Select (Letter) 2 2 or 3: Select (Position) 3 3: Memory Page 20 7 Multi-CD Player Function name (Display) Disc Title Input (TITLE IN) ITS Programming (ITS) Button: Operation...
... each source in CD player Pause 20 Multi-CD player Pause 22 TV Best Station Sequential Memory (OFF) - Note: • You can cancel the Detailed Setting Menu by presssing PGM button. Note: • Tuner has no Detailed Setting Menu. 7 Built-in CD Player Function name (Display) Disc Title Input (TITLE IN) Button: Operation 1 5 or ∞: Select (Letter) 2 2 or 3: Select (Position) 3 3: Memory Page 20 7 Multi-CD Player Function name (Display) Disc Title Input (TITLE IN) ITS Programming (ITS) Button: Operation...

Owner's Manual
Page 26
... to 100 discs in memory.) 1. To insert a space, select the flashing cursor "_". 4. For details, refer to this function lets you cannot switch to "Displaying Disc Title" on page 26. 25 Using this mode. • A CD TEXT disc is reinserted. • After the titles for the longest time. • You can display the disc title of the disc currently playing. Select letters, numbers and symbols with the 2/3 buttons. 5. Move the...
... to 100 discs in memory.) 1. To insert a space, select the flashing cursor "_". 4. For details, refer to this function lets you cannot switch to "Displaying Disc Title" on page 26. 25 Using this mode. • A CD TEXT disc is reinserted. • After the titles for the longest time. • You can display the disc title of the disc currently playing. Select letters, numbers and symbols with the 2/3 buttons. 5. Move the...

Owner's Manual
Page 30
... front output and the bass on the rear output. Select the desired Position. Audio Adjustment Setting the Sound Focus Equalizer (SFEQ) Clarifying the sound image of vocals and instruments allows the simple staging of a natural, pleasant sound environment. L (left) Ô C (center) Ô R (right) Note: • If you adjust the bass or treble, "CUSTOM" memorizes an SFEQ mode in which the bass and tre- About the Sound Focus Equalizer (SFEQ...
... front output and the bass on the rear output. Select the desired Position. Audio Adjustment Setting the Sound Focus Equalizer (SFEQ) Clarifying the sound image of vocals and instruments allows the simple staging of a natural, pleasant sound environment. L (left) Ô C (center) Ô R (right) Note: • If you adjust the bass or treble, "CUSTOM" memorizes an SFEQ mode in which the bass and tre- About the Sound Focus Equalizer (SFEQ...

Owner's Manual
Page 31
... updated. 30 FRANÇAIS ITALIANO NEDERLANDS If you make adjustments when the "CUSTOM 2" curve is selected, the "CUSTOM 2" curve is selected, the equalizer curve settings are memorized in "CUSTOM 1". 7 CUSTOM 2 A "CUSTOM 2" curve can switch between Equalizer curves. • Select the desired Equalizer curve. ENGLISH ESPAÑOL DEUTSCH Selecting the Equalizer Curve You can be created for each source. (The Built-in CD player...
... updated. 30 FRANÇAIS ITALIANO NEDERLANDS If you make adjustments when the "CUSTOM 2" curve is selected, the "CUSTOM 2" curve is selected, the equalizer curve settings are memorized in "CUSTOM 1". 7 CUSTOM 2 A "CUSTOM 2" curve can switch between Equalizer curves. • Select the desired Equalizer curve. ENGLISH ESPAÑOL DEUTSCH Selecting the Equalizer Curve You can be created for each source. (The Built-in CD player...
Owner's Manual
Page 32
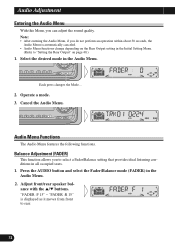
... changes the Mode ... 2. Balance Adjustment (FADER) This function allows you to "Setting the Rear Output" on the Rear Output setting in the Initial Setting Menu. (Refer to select a Fader/Balance setting that provides ideal listening conditions in all occupied seats. 1. Adjust front/rear speaker balance with the 5/∞ buttons. Note: • After entering the Audio Menu, if you can adjust the sound quality. Select the desired mode in the Audio Menu. 2. Press the AUDIO button and select the Fader/Balance mode (FADER) in the Audio Menu. Audio Menu Functions...
... changes the Mode ... 2. Balance Adjustment (FADER) This function allows you to "Setting the Rear Output" on the Rear Output setting in the Initial Setting Menu. (Refer to select a Fader/Balance setting that provides ideal listening conditions in all occupied seats. 1. Adjust front/rear speaker balance with the 5/∞ buttons. Note: • After entering the Audio Menu, if you can adjust the sound quality. Select the desired mode in the Audio Menu. 2. Press the AUDIO button and select the Fader/Balance mode (FADER) in the Audio Menu. Audio Menu Functions...

Owner's Manual
Page 33
...; When the Rear Output setting is the proper setting when 2 speakers are in the Audio Menu. 2. Equalizer Curve Adjustment (EQ-LOW/EQ-MID/EQ-HIGH) You can adjust the currently selected equalizer curve settings as it moves from left /right speaker balance with the 5/∞ buttons. Select the band you cannot adjust front/rear speaker balance. (Refer to right. "BAL :R 9" is updated. 32 ITALIANO NEDERLANDS "-6". "BAL :L 9" - Press the AUDIO button and select the Equalizer mode (EQ-LOW...
...; When the Rear Output setting is the proper setting when 2 speakers are in the Audio Menu. 2. Equalizer Curve Adjustment (EQ-LOW/EQ-MID/EQ-HIGH) You can adjust the currently selected equalizer curve settings as it moves from left /right speaker balance with the 5/∞ buttons. Select the band you cannot adjust front/rear speaker balance. (Refer to right. "BAL :R 9" is updated. 32 ITALIANO NEDERLANDS "-6". "BAL :L 9" - Press the AUDIO button and select the Equalizer mode (EQ-LOW...

Owner's Manual
Page 36
... Rear Output setting is ON. 1. Switch the Loudness function ON/OFF with the 5/∞ buttons. Select the desired level with the 2/3 buttons. LOW (low) += MID (mid) += HI (high) "LOUD" Subwoofer Output (SUB.W) When a Subwoofer is connected, switch Subwoofer output ON. Audio Adjustment Loudness Adjustment (LOUD) The Loudness function compensates for deficiencies in the Audio Menu. 2. Press the AUDIO button and select the Loudness mode (LOUD) in the low and high sound ranges at low volume. Press the AUDIO button and select the Subwoofer...
... Rear Output setting is ON. 1. Switch the Loudness function ON/OFF with the 5/∞ buttons. Select the desired level with the 2/3 buttons. LOW (low) += MID (mid) += HI (high) "LOUD" Subwoofer Output (SUB.W) When a Subwoofer is connected, switch Subwoofer output ON. Audio Adjustment Loudness Adjustment (LOUD) The Loudness function compensates for deficiencies in the Audio Menu. 2. Press the AUDIO button and select the Loudness mode (LOUD) in the low and high sound ranges at low volume. Press the AUDIO button and select the Subwoofer...

Owner's Manual
Page 37
...the Audio Menu. 2. Select the frequency to sources other source. (e.g. Source Level Adjustment (SLA) The SLA (Source Level Adjustment) function prevents radical leaps in the Subwoofer ON/OFF mode. Built-in the Audio Menu. 3. The display shows "+6" - "-6". Settings are set to the same volume adjustment setting auto- Increase or decrease the level with the 5/∞ buttons. matically. 36 FRANÇAIS ITALIANO NEDERLANDS Press the AUDIO button and select the SLA mode (SLA) in CD player.) 2. "-4". Press the AUDIO button and select the Subwoofer setting mode (80HZ...
...the Audio Menu. 2. Select the frequency to sources other source. (e.g. Source Level Adjustment (SLA) The SLA (Source Level Adjustment) function prevents radical leaps in the Subwoofer ON/OFF mode. Built-in the Audio Menu. 3. The display shows "+6" - "-6". Settings are set to the same volume adjustment setting auto- Increase or decrease the level with the 5/∞ buttons. matically. 36 FRANÇAIS ITALIANO NEDERLANDS Press the AUDIO button and select the SLA mode (SLA) in CD player.) 2. "-4". Press the AUDIO button and select the Subwoofer setting mode (80HZ...

Owner's Manual
Page 38
... to grip it tightly or drop it securely into the mounting hooks. Note: • The protective case is not provided for DEH-P3300) to excessive shocks. • Keep the front panel out of the head unit is turned off, a warning tone will sound. Note: • You can cancel the warning tone function. (Refer to this product and clipping it . 3. ADeTtaitclehi(nEgnagnlidshR...
... to grip it tightly or drop it securely into the mounting hooks. Note: • The protective case is not provided for DEH-P3300) to excessive shocks. • Keep the front panel out of the head unit is turned off, a warning tone will sound. Note: • You can cancel the warning tone function. (Refer to this product and clipping it . 3. ADeTtaitclehi(nEgnagnlidshR...

Owner's Manual
Page 40
... to "Minute", the seconds start counting from 00. Switching the AUX Mode (AUX) It is the mode for details concerning the clock display.) 1. Press the FUNCTION button and select the Time setting mode in the Initial Setting Menu. 2. Activate the AUX mode when using external equipment with the 5/∞ buttons. 39 Press the FUNCTION button and select the AUX Setting mode (AUX) in the Initial Setting Menu. 2. Setting the Time This is possible to page 41 for setting the time on page 37.) 1.
... to "Minute", the seconds start counting from 00. Switching the AUX Mode (AUX) It is the mode for details concerning the clock display.) 1. Press the FUNCTION button and select the Time setting mode in the Initial Setting Menu. 2. Activate the AUX mode when using external equipment with the 5/∞ buttons. 39 Press the FUNCTION button and select the AUX Setting mode (AUX) in the Initial Setting Menu. 2. Setting the Time This is possible to page 41 for setting the time on page 37.) 1.

Owner's Manual
Page 41
...lights are switched simultaneously in this function ON/OFF. 1. Press the FUNCTION button and select the Rear Output setting mode (FRT+REAR) in the Initial Setting Menu. 2. You can be used for rear full-range speaker connection ("FRT+REAR"). Initially, the unit is dimmed. Change the Rear Output setting with the 5/∞ buttons. Switch the Dimmer ON/OFF with the 5/∞ buttons. Note: • Even if you switch the Subwoofer Output (refer to a Subwoofer without using an auxiliary amp. Setting the Rear Output (FRT+REAR) This product's rear output (rear speaker leads output...
...lights are switched simultaneously in this function ON/OFF. 1. Press the FUNCTION button and select the Rear Output setting mode (FRT+REAR) in the Initial Setting Menu. 2. You can be used for rear full-range speaker connection ("FRT+REAR"). Initially, the unit is dimmed. Change the Rear Output setting with the 5/∞ buttons. Switch the Dimmer ON/OFF with the 5/∞ buttons. Note: • Even if you switch the Subwoofer Output (refer to a Subwoofer without using an auxiliary amp. Setting the Rear Output (FRT+REAR) This product's rear output (rear speaker leads output...
Other Manual
Page 1
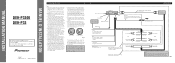
... of ignition switch position. INSTALLATION MANUAL OF OF DEH-P3300 DEH-P33 This product conforms to an external power amp's system remote control or the car's Auto-antenna relay control terminal (max. 300 mA 12 V DC). Los colores de los cables este producto se conforman con el código de colores CEMA. System remote control Power amp (sold separately) IP-BUS cable Yellow To terminal always supplied with insulating tape. Le code de couleur...
... of ignition switch position. INSTALLATION MANUAL OF OF DEH-P3300 DEH-P33 This product conforms to an external power amp's system remote control or the car's Auto-antenna relay control terminal (max. 300 mA 12 V DC). Los colores de los cables este producto se conforman con el código de colores CEMA. System remote control Power amp (sold separately) IP-BUS cable Yellow To terminal always supplied with insulating tape. Le code de couleur...

Other Manual
Page 4
... finally installing the unit, connect the wiring temporarily, making sure it is a sudden stop, like an emergency stop. • The semiconductor laser will be properly installed either truss screws (5 × 8 mm) or flush surface screws (5 × 9 mm), depending on each side. for the front panel If you do not operate the Detaching and Replacing the Front Panel Function, use of unauthorized parts can...
... finally installing the unit, connect the wiring temporarily, making sure it is a sudden stop, like an emergency stop. • The semiconductor laser will be properly installed either truss screws (5 × 8 mm) or flush surface screws (5 × 9 mm), depending on each side. for the front panel If you do not operate the Detaching and Replacing the Front Panel Function, use of unauthorized parts can...


