
Owner's Manual
Page 4
...Guard against this manufacturer and the Electronic Industries Association's Consumer Electronics Group recommend you have established a comfortable sound level: • Set the dial and leave it comfortably and clearly, and without affecting your hearing adapts. Once you avoid prolonged exposure to your ... conditioner at 20 feet, sewing machine 70 Vacuum cleaner, hair dryer, noisy restaurant 80 Average city traffic, garbage disposals, alarm clock at a low setting. • Slowly increase the sound until it at a safe level BEFORE your sensitive hearing. This list of sound. Now ...
...Guard against this manufacturer and the Electronic Industries Association's Consumer Electronics Group recommend you have established a comfortable sound level: • Set the dial and leave it comfortably and clearly, and without affecting your hearing adapts. Once you avoid prolonged exposure to your ... conditioner at 20 feet, sewing machine 70 Vacuum cleaner, hair dryer, noisy restaurant 80 Average city traffic, garbage disposals, alarm clock at a low setting. • Slowly increase the sound until it at a safe level BEFORE your sensitive hearing. This list of sound. Now ...

Owner's Manual
Page 40
... counting from 00. Press the FUNCTION button and select the Warning Tone mode (WARN) in the Initial Setting Menu. 2. Switching the AUX Mode (AUX) It is the mode for setting the time on the unit's clock display. (Refer to "Warning Tone" on page 37.) 1. Activate the AUX mode when using external equipment with...
... counting from 00. Press the FUNCTION button and select the Warning Tone mode (WARN) in the Initial Setting Menu. 2. Switching the AUX Mode (AUX) It is the mode for setting the time on the unit's clock display. (Refer to "Warning Tone" on page 37.) 1. Activate the AUX mode when using external equipment with...
Owner's Manual
Page 42
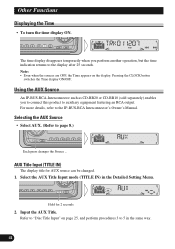
... display after 25 seconds. For more details, refer to auxiliary equipment featuring an RCA output. Hold for AUX source can be changed. 1. Pressing the CLOCK button switches the Time display ON/OFF. Select the AUX Title Input mode (TITLE IN) in the same way. 41 Selecting the AUX Source •...; Select AUX. (Refer to 5 in the Detailed Setting Menu. Refer to "Disc Title Input" on the display. The time display disappears temporarily when you to connect this product to the IP-BUS-RCA...
... display after 25 seconds. For more details, refer to auxiliary equipment featuring an RCA output. Hold for AUX source can be changed. 1. Pressing the CLOCK button switches the Time display ON/OFF. Select the AUX Title Input mode (TITLE IN) in the same way. 41 Selecting the AUX Source •...; Select AUX. (Refer to 5 in the Detailed Setting Menu. Refer to "Disc Title Input" on the display. The time display disappears temporarily when you to connect this product to the IP-BUS-RCA...


