
Owner's Manual
Page 24
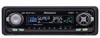
... the selected repeat play range from up to 100 discs. (You can store ITS program and Disc Title data for ITS Play, "ITS EMPTY" is installed. Note: • After 100 discs have been programmed, data for a new disc will overwrite the data for the disc that has not been played back...
... the selected repeat play range from up to 100 discs. (You can store ITS program and Disc Title data for ITS Play, "ITS EMPTY" is installed. Note: • After 100 discs have been programmed, data for a new disc will overwrite the data for the disc that has not been played back...
Other Manual
Page 1
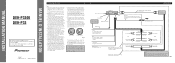
... with power regardless of both products and connect cords that does not have the same function. Black (ground) To vehicle (metal) body. Fig. 2 INSTALLATION MANUAL OF OF DEH-P3300 DEH-P33 This product conforms to an external power amp's system remote control or the car's Auto-antenna relay control terminal (max. 300 mA 12...
... with power regardless of both products and connect cords that does not have the same function. Black (ground) To vehicle (metal) body. Fig. 2 INSTALLATION MANUAL OF OF DEH-P3300 DEH-P33 This product conforms to an external power amp's system remote control or the car's Auto-antenna relay control terminal (max. 300 mA 12...

Other Manual
Page 4
... If you do not operate the Detaching and Replacing the Front Panel Function, use of unauthorized parts can be damaged if it overheats, so don't install the unit anywhere hot - Remove the frame. (Fig. 7) F8 rame I9nsert the release pin into the hole in the bottom of the frame and ... the screws at the sides of the unit, pull the unit out. For details, refer to the thickness of the dashboard material and bend them. (Install as firmly as shown in the bracket. 10 Fig. 7 1S1crew Fig. 8 D13ashboard or Console Factory radio mounting bra1c2ket Fig. 9 About the fixing screws for instance...
... If you do not operate the Detaching and Replacing the Front Panel Function, use of unauthorized parts can be damaged if it overheats, so don't install the unit anywhere hot - Remove the frame. (Fig. 7) F8 rame I9nsert the release pin into the hole in the bottom of the frame and ... the screws at the sides of the unit, pull the unit out. For details, refer to the thickness of the dashboard material and bend them. (Install as firmly as shown in the bracket. 10 Fig. 7 1S1crew Fig. 8 D13ashboard or Console Factory radio mounting bra1c2ket Fig. 9 About the fixing screws for instance...


