Owner's Manual
Page 3
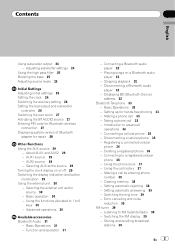
... 32 Bluetooth Telephone 33 - Introduction to 6 keys 30 - Connecting a cellular phone 35 - Registering a connected cellular phone 36 - Connecting to XM Satellite Radio 39 - Making a call 33 - Setting automatic rejecting 38 - Switching the ring tone 39 - Listening to a registered cellular phone 36 - Disconnecting a... phone book 37 - Echo canceling and noise reduction 39 XM tuner 39 - Selecting the external unit as the source 29 Turning the clock display on a Bluetooth audio player 32 - Taking a phone call by entering phone number 38 - Using the call 33 - Setting...
... 32 Bluetooth Telephone 33 - Introduction to 6 keys 30 - Connecting a cellular phone 35 - Registering a connected cellular phone 36 - Connecting to XM Satellite Radio 39 - Making a call 33 - Setting automatic rejecting 38 - Switching the ring tone 39 - Listening to a registered cellular phone 36 - Disconnecting a... phone book 37 - Echo canceling and noise reduction 39 XM tuner 39 - Selecting the external unit as the source 29 Turning the clock display on a Bluetooth audio player 32 - Taking a phone call by entering phone number 38 - Using the call 33 - Setting...
Owner's Manual
Page 8
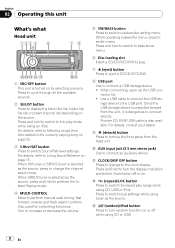
...switch menu. Since the USB storage device is projected forward from the unit, it is turned on by selecting a source. b CLOCK/DISP OFF button Press to link play mode while using CD or USB. 8 En Press and hold to switch to change the channel select mode. For details, refer to connect a ...Press to the currently playing song on . Turn to increase or decrease the volume. 5 SW/BASS button Press to switch to connect an auxiliary device. Pioneer CD-U50E USB cable is selected as the source. Press and hold to turn random function on or off or on page 20. 3 S.Rtrv/SAT button...
...switch menu. Since the USB storage device is projected forward from the unit, it is turned on by selecting a source. b CLOCK/DISP OFF button Press to link play mode while using CD or USB. 8 En Press and hold to switch to change the channel select mode. For details, refer to connect a ...Press to the currently playing song on . Turn to increase or decrease the volume. 5 SW/BASS button Press to switch to connect an auxiliary device. Pioneer CD-U50E USB cable is selected as the source. Press and hold to turn random function on or off or on page 20. 3 S.Rtrv/SAT button...

Owner's Manual
Page 26
... SP :FULL is selected. Hour-Minute As you can select whether to select one segment of the clock display you can be selected only when Bluetooth adapter (e.g., CD-BTB200) is set . Setting the rear output and subwoofer controller This unit's rear output (rear speaker...:FULL). Section 04 Initial Settings Adjusting initial settings 1 Press SRC and hold until the unit turns off , press MULTI-CONTROL again. CLOCK SET (clock)-AUX1 (auxiliary input 1) -AUX2 (auxiliary input 2)-SW CONTROL (rear output and subwoofer controller)- For more information about connecting or using auxiliary...
... SP :FULL is selected. Hour-Minute As you can select whether to select one segment of the clock display you can be selected only when Bluetooth adapter (e.g., CD-BTB200) is set . Setting the rear output and subwoofer controller This unit's rear output (rear speaker...:FULL). Section 04 Initial Settings Adjusting initial settings 1 Press SRC and hold until the unit turns off , press MULTI-CONTROL again. CLOCK SET (clock)-AUX1 (auxiliary input 1) -AUX2 (auxiliary input 2)-SW CONTROL (rear output and subwoofer controller)- For more information about connecting or using auxiliary...
Owner's Manual
Page 29
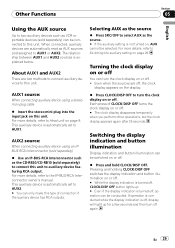
...-RCA Interconnector (sold separately) % Use an IP-BUS-RCA Interconnector such as the CD-RB20/CD-RB10 (sold separately) can be connected to AUX1 or AUX2. When connected, auxiliary devices are off, the clock display appears on the display. % Press CLOCK/DISP OFF to AUX2. # You can only make this unit to Head unit...
...-RCA Interconnector (sold separately) % Use an IP-BUS-RCA Interconnector such as the CD-RB20/CD-RB10 (sold separately) can be connected to AUX1 or AUX2. When connected, auxiliary devices are off, the clock display appears on the display. % Press CLOCK/DISP OFF to AUX2. # You can only make this unit to Head unit...


