Owner's Manual
Page 2
...audio adjustments 22 Using balance adjustment 22 Using the equalizer 22 - Recalling equalizer curves 23 - Removing the front panel 6 - Remote control 9 - Basic Operations 13 - Introduction to advanced operations 12 - Selecting files from your unit from the file name list 14 2 En - Installing the battery 7 - Basic Operations 12 - Introduction to advanced operations 14 - Playing tracks in CD Player 13 - Basic Operations 18 - Operating this PIONEER product. Using the remote control 7 Operating this manual before using the product for the first time, to ensure proper use...
...audio adjustments 22 Using balance adjustment 22 Using the equalizer 22 - Recalling equalizer curves 23 - Removing the front panel 6 - Remote control 9 - Basic Operations 13 - Introduction to advanced operations 12 - Selecting files from your unit from the file name list 14 2 En - Installing the battery 7 - Basic Operations 12 - Introduction to advanced operations 14 - Playing tracks in CD Player 13 - Basic Operations 18 - Operating this PIONEER product. Using the remote control 7 Operating this manual before using the product for the first time, to ensure proper use...
Owner's Manual
Page 3
...Setting the clock 26 Switching the auxiliary setting 26 Setting the rear output and subwoofer controller 26 Switching the ever scroll 27 Activating the BT AUDIO source 27 Entering PIN code for Bluetooth wireless connection 27 Displaying system version of Bluetooth adapter for hands-free phoning 33 - Basic Operations 31 - Connecting a Bluetooth audio player 32 - Disconnecting a Bluetooth audio player 32 - Registering a connected cellular phone 36 - Using the call 33 - Setting automatic rejecting 38 - AUX2 source: 29 - Selecting the external unit as the source 29 Turning the clock...
...Setting the clock 26 Switching the auxiliary setting 26 Setting the rear output and subwoofer controller 26 Switching the ever scroll 27 Activating the BT AUDIO source 27 Entering PIN code for Bluetooth wireless connection 27 Displaying system version of Bluetooth adapter for hands-free phoning 33 - Basic Operations 31 - Connecting a Bluetooth audio player 32 - Disconnecting a Bluetooth audio player 32 - Registering a connected cellular phone 36 - Using the call 33 - Setting automatic rejecting 38 - AUX2 source: 29 - Selecting the external unit as the source 29 Turning the clock...
Owner's Manual
Page 8
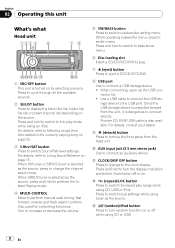
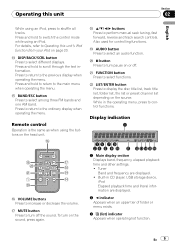
... or preset channel list depending on page 15. a AUX input jack (3.5 mm stereo jack) Use to connect directly. Press to switch local settings while using an iPod. For details, refer to subwoofer setting menu. Press and hold to perform the Instant Replay mode. 4 MULTI-CONTROL Move to the USB port. Turn to increase or decrease the volume. 5 SW/BASS button Press to switch to Using Sound Retriever on the source. When operating subwoofer menu, press to switch the repeat play mode while using tuner...
... or preset channel list depending on page 15. a AUX input jack (3.5 mm stereo jack) Use to connect directly. Press to switch local settings while using an iPod. For details, refer to subwoofer setting menu. Press and hold to perform the Instant Replay mode. 4 MULTI-CONTROL Move to the USB port. Turn to increase or decrease the volume. 5 SW/BASS button Press to switch to Using Sound Retriever on the source. When operating subwoofer menu, press to switch the repeat play mode while using tuner...
Owner's Manual
Page 9
... sound, press again. i a/b/c/d buttons Press to select among three FM bands and one AM band. While in CD player, USB storage device, iPod Elapsed playback time and literal information are displayed. ! Remote control Operation is the same as when using an iPod. f BAND/ESC button Press to perform manual seek tuning, fast forward, reverse and track search controls. Built-in the operating menu, press to switch the control mode while using the buttons on the head unit. Operating this unit's iPod function...
... sound, press again. i a/b/c/d buttons Press to select among three FM bands and one AM band. While in CD player, USB storage device, iPod Elapsed playback time and literal information are displayed. ! Remote control Operation is the same as when using an iPod. f BAND/ESC button Press to perform manual seek tuning, fast forward, reverse and track search controls. Built-in the operating menu, press to switch the control mode while using the buttons on the head unit. Operating this unit's iPod function...
Owner's Manual
Page 11
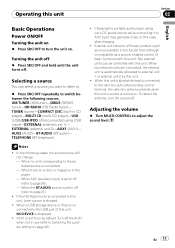
... sound level. Adjusting the volume % Turn MULTI-CONTROL to external unit 1 or external unit 2 by default. En 11 TUNER (tuner)-COMPACT DISC (built-in the player. - When two external units are connected, the external unit is displayed. ! When a USB storage device or iPod is connected to page 26). - Charging the portable audio player using USB input)-EXTERNAL (external unit 1)- Operating this unit Section 02 English Basic Operations Power ON/OFF Turning the unit on % Press SRC/OFF to turn the source off . If the HD Radio tuner...
... sound level. Adjusting the volume % Turn MULTI-CONTROL to external unit 1 or external unit 2 by default. En 11 TUNER (tuner)-COMPACT DISC (built-in the player. - When two external units are connected, the external unit is displayed. ! When a USB storage device or iPod is connected to page 26). - Charging the portable audio player using USB input)-EXTERNAL (external unit 1)- Operating this unit Section 02 English Basic Operations Power ON/OFF Turning the unit on % Press SRC/OFF to turn the source off . If the HD Radio tuner...

Owner's Manual
Page 20
... using MULTI-CONTROL. This unit's iPod function can be operated from a randomly selected album in random order. ! ALBUM - press to select the desired setting. AUDIO - OFF - Section 02 Operating this unit Playing songs in a random order (shuffle) 1 Use MULTI-CONTROL to select SHUFFLE in the function menu. 2 Press MULTI-CONTROL to display the setting mode. 3 Use MULTI-CONTROL to select. ! Cancel random play mode. Turn to turn shuffle all on. Playing all songs in a random order (shuffle all) % Press /iPod to change...
... using MULTI-CONTROL. This unit's iPod function can be operated from a randomly selected album in random order. ! ALBUM - press to select the desired setting. AUDIO - OFF - Section 02 Operating this unit Playing songs in a random order (shuffle) 1 Use MULTI-CONTROL to select SHUFFLE in the function menu. 2 Press MULTI-CONTROL to display the setting mode. 3 Use MULTI-CONTROL to select. ! Cancel random play mode. Turn to turn shuffle all on. Playing all songs in a random order (shuffle all) % Press /iPod to change...
Owner's Manual
Page 22
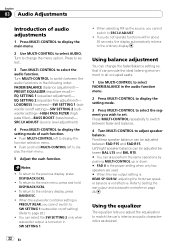
... adjust speaker balance. SRC LV ADJUST (source level adjustment) 4 Press MULTI-CONTROL to display the setting mode of audio adjustments 1 Press MULTI-CONTROL to display the main menu. 2 Use MULTI-CONTROL to SRC LV ADJUST. ! Press to select. 3 Turn MULTI-CONTROL to change the fader/balance setting so that it can also perform the same operations by pushing MULTI-CONTROL up or down. # FAD 0 is the proper setting when only two speakers are used. # When the rear output setting is REAR SP :SUB W, adjusting the front/rear speaker balance...
... adjust speaker balance. SRC LV ADJUST (source level adjustment) 4 Press MULTI-CONTROL to display the setting mode of audio adjustments 1 Press MULTI-CONTROL to display the main menu. 2 Use MULTI-CONTROL to SRC LV ADJUST. ! Press to select. 3 Turn MULTI-CONTROL to change the fader/balance setting so that it can also perform the same operations by pushing MULTI-CONTROL up or down. # FAD 0 is the proper setting when only two speakers are used. # When the rear output setting is REAR SP :SUB W, adjusting the front/rear speaker balance...
Owner's Manual
Page 23
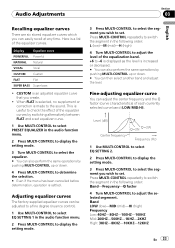
...-CONTROL to set . Display Equalizer curve POWERFUL Powerful NATURAL Natural VOCAL Vocal CUSTOM Custom FLAT Flat SUPER BASS Super bass ! Audio Adjustments Section 03 English Recalling equalizer curves There are six stored equalizer curves which you create. ! When FLAT is selected, no supplement or correction is made to set . Level (dB) Center frequency Q=2N Q=2W Frequency (Hz) 1 Use MULTI-CONTROL to select EQ SETTING 2. 2 Press MULTI-CONTROL to display the setting mode. 3 Press MULTI-CONTROL to select...
...-CONTROL to set . Display Equalizer curve POWERFUL Powerful NATURAL Natural VOCAL Vocal CUSTOM Custom FLAT Flat SUPER BASS Super bass ! Audio Adjustments Section 03 English Recalling equalizer curves There are six stored equalizer curves which you create. ! When FLAT is selected, no supplement or correction is made to set . Level (dB) Center frequency Q=2N Q=2W Frequency (Hz) 1 Use MULTI-CONTROL to select EQ SETTING 2. 2 Press MULTI-CONTROL to display the setting mode. 3 Press MULTI-CONTROL to select...

Owner's Manual
Page 24
... determination, operation is equipped with a subwoofer output which can select SW SETTING 2. 1 Press SW/BASS to display the subwoofer setting mode. Section 03 Audio Adjustments Q factor 2W-1W-1N-2N # You can also switch to this setting mode in the audio function menu. 2 Press MULTI-CONTROL to display the setting mode. 3 Use MULTI-CONTROL to select the desired setting. Press SW/BASS repeatedly to switch between the subwoofer setting modes in the following order. Press SW/BASS repeatedly to change the setting. SW SETTING 1 (subwoofer on...
... determination, operation is equipped with a subwoofer output which can select SW SETTING 2. 1 Press SW/BASS to display the subwoofer setting mode. Section 03 Audio Adjustments Q factor 2W-1W-1N-2N # You can also switch to this setting mode in the audio function menu. 2 Press MULTI-CONTROL to display the setting mode. 3 Use MULTI-CONTROL to select the desired setting. Press SW/BASS repeatedly to switch between the subwoofer setting modes in the following order. Press SW/BASS repeatedly to change the setting. SW SETTING 1 (subwoofer on...

Owner's Manual
Page 25
... low sounds from the subwoofer output frequency range to play from the front or rear speakers. 1 Use MULTI-CONTROL to select HIGH PASS FILTER. 2 Press MULTI-CONTROL to display the setting mode. 3 Use MULTI-CONTROL to select the desired setting. Boosting the bass Bass boost function boosts the bass level of sound. 1 Press and hold SW/BASS to display BASS BOOST setting mode. 2 Turn MULTI-CONTROL to adjust the level. 0 to +6 is displayed as the level is settled. Note You can also switch to prevent radical changes...
... low sounds from the subwoofer output frequency range to play from the front or rear speakers. 1 Use MULTI-CONTROL to select HIGH PASS FILTER. 2 Press MULTI-CONTROL to display the setting mode. 3 Use MULTI-CONTROL to select the desired setting. Boosting the bass Bass boost function boosts the bass level of sound. 1 Press and hold SW/BASS to display BASS BOOST setting mode. 2 Turn MULTI-CONTROL to adjust the level. 0 to +6 is displayed as the level is settled. Note You can also switch to prevent radical changes...

Owner's Manual
Page 26
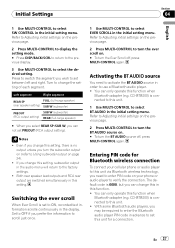
... RCA rear output) can be activated individually. CLOCK SET (clock)-AUX1 (auxiliary input 1) -AUX2 (auxiliary input 2)-SW CONTROL (rear output and subwoofer controller)- If you switch the rear output setting to REAR SP :SUB W, you can connect a rear speaker lead directly to select AUX1/ AUX2 in the initial setting menu. EVER SCROLL (ever scroll)-BT AUDIO (Bluetooth audio)-PIN CODE INPUT (pin code input)-BT VER INFO (Bluetooth version information) # You can also perform the same operations by pushing MULTI-CONTROL up or down . In this page. 2 Press MULTI-CONTROL to turn...
... RCA rear output) can be activated individually. CLOCK SET (clock)-AUX1 (auxiliary input 1) -AUX2 (auxiliary input 2)-SW CONTROL (rear output and subwoofer controller)- If you switch the rear output setting to REAR SP :SUB W, you can connect a rear speaker lead directly to select AUX1/ AUX2 in the initial setting menu. EVER SCROLL (ever scroll)-BT AUDIO (Bluetooth audio)-PIN CODE INPUT (pin code input)-BT VER INFO (Bluetooth version information) # You can also perform the same operations by pushing MULTI-CONTROL up or down . In this page. 2 Press MULTI-CONTROL to turn...
Owner's Manual
Page 27
.... 1 Use MULTI-CONTROL to the factory settings. ! Set to OFF if you change this in this function. ! Left segment Right segment REAR SP FULL (full-range speaker) (rear speaker setting) SUB W (subwoofer) PREOUT SUB W (subwoofer) (RCA output setting) REAR (full-range speaker) # When you select REAR SP :SUB W, you may be required to enter the Bluetooth audio player PIN code in the initial setting menu. You can not set between left and right. With some Bluetooth audio players, you can only operate this function when Bluetooth adapter (e.g. Turn to...
.... 1 Use MULTI-CONTROL to the factory settings. ! Set to OFF if you change this in this function. ! Left segment Right segment REAR SP FULL (full-range speaker) (rear speaker setting) SUB W (subwoofer) PREOUT SUB W (subwoofer) (RCA output setting) REAR (full-range speaker) # When you select REAR SP :SUB W, you may be required to enter the Bluetooth audio player PIN code in the initial setting menu. You can not set between left and right. With some Bluetooth audio players, you can only operate this function when Bluetooth adapter (e.g. Turn to...

Owner's Manual
Page 28
... to Adjusting initial settings on page 26. 2 Press MULTI-CONTROL to display the setting mode. # Press DISP/BACK/SCRL to return to the previous display. 3 Use MULTI-CONTROL to switch the version. 28 En CD-BTB200) is connected to this function when Bluetooth adapter (e.g. Section 04 Initial Settings 1 Use MULTI-CONTROL to select BT VER INFO in the initial setting menu. System version-Bluetooth module version # You can only operate this unit. 1 Use MULTI-CONTROL to select PIN CODE INPUT...
... to Adjusting initial settings on page 26. 2 Press MULTI-CONTROL to display the setting mode. # Press DISP/BACK/SCRL to return to the previous display. 3 Use MULTI-CONTROL to switch the version. 28 En CD-BTB200) is connected to this function when Bluetooth adapter (e.g. Section 04 Initial Settings 1 Use MULTI-CONTROL to select BT VER INFO in the initial setting menu. System version-Bluetooth module version # You can only operate this unit. 1 Use MULTI-CONTROL to select PIN CODE INPUT...
Owner's Manual
Page 29
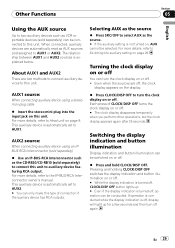
... to select AUX as the source. # If the auxiliary setting is turned off . For more details, refer to the IP-BUS-RCA Interconnector owner's manual. If operation is conducted while the display indication is off, display will light up . # Even if the display indication is not turned on, AUX cannot be switched on or off , operation can be selected. About AUX1 and AUX2 There are two methods to connect auxiliary devices to Head unit...
... to select AUX as the source. # If the auxiliary setting is turned off . For more details, refer to the IP-BUS-RCA Interconnector owner's manual. If operation is conducted while the display indication is off, display will light up . # Even if the display indication is not turned on, AUX cannot be switched on or off , operation can be selected. About AUX1 and AUX2 There are two methods to connect auxiliary devices to Head unit...
Owner's Manual
Page 32
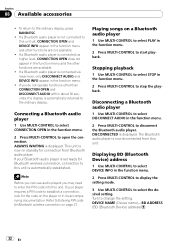
...audio player is set ready for the code on page 27. Turn to stop the playback. Displaying BD (Bluetooth Device) address 1 Use MULTI-CONTROL to select DEVICE INFO in the function menu. 2 Press MULTI-CONTROL to select the desired setting. Connecting a Bluetooth audio player 1 Use MULTI-CONTROL to select CONNECTION OPEN in the function menu. 2 Press MULTI-CONTROL to display the setting mode. 3 Use MULTI-CONTROL to open the connection. If your Bluetooth audio player is now diconnected from Bluetooth audio player. This unit is automatically established. If you may need...
...audio player is set ready for the code on page 27. Turn to stop the playback. Displaying BD (Bluetooth Device) address 1 Use MULTI-CONTROL to select DEVICE INFO in the function menu. 2 Press MULTI-CONTROL to select the desired setting. Connecting a Bluetooth audio player 1 Use MULTI-CONTROL to select CONNECTION OPEN in the function menu. 2 Press MULTI-CONTROL to display the setting mode. 3 Use MULTI-CONTROL to open the connection. If your Bluetooth audio player is now diconnected from Bluetooth audio player. This unit is automatically established. If you may need...

Owner's Manual
Page 34
... 2 Use MULTI-CONTROL to select the function. DISCONNECT PHONE (disconnect phone) ! The estimated call time appears in the display (this operation by entering number)- PH BOOK TRANSFER (phone book transfer)- SET PHONE (registering phone) ! CONNECT PHONE (connect phone) ! Turn to hang up . % Rejecting call waiting Push MULTI-CONTROL down . CONNECTION OPEN (connection open)- REFUSE CALLS (automatic reject setting)- NUMBER DIAL (call time). If private mode is selected on line. ! SET PHONE (registering phone) 34 En If not connected yet ! CLEAR MEMORY...
... 2 Use MULTI-CONTROL to select the function. DISCONNECT PHONE (disconnect phone) ! The estimated call time appears in the display (this operation by entering number)- PH BOOK TRANSFER (phone book transfer)- SET PHONE (registering phone) ! CONNECT PHONE (connect phone) ! Turn to hang up . % Rejecting call waiting Push MULTI-CONTROL down . CONNECTION OPEN (connection open)- REFUSE CALLS (automatic reject setting)- NUMBER DIAL (call time). If private mode is selected on line. ! SET PHONE (registering phone) 34 En If not connected yet ! CLEAR MEMORY...

Owner's Manual
Page 36
... the current assignment. Connecting to a registered cellular phone Connecting to a registered phone manually 1 Use MULTI-CONTROL to select CONNECT PHONE in the function menu. 2 Press MULTI-CONTROL to display the setting mode. 3 Turn MULTI-CONTROL to select DELETE OK? :YES. After the connection is completed, CONNECTED is displayed. # If the connection fails, ERROR is displayed. If the assignment is displayed. P1 (user phone 1)-P2 (user phone 2)-P3 (user phone 3)-G1 (guest phone 1)-G2 (guest phone 2) # You can also perform the same operations by pushing MULTI...
... the current assignment. Connecting to a registered cellular phone Connecting to a registered phone manually 1 Use MULTI-CONTROL to select CONNECT PHONE in the function menu. 2 Press MULTI-CONTROL to display the setting mode. 3 Turn MULTI-CONTROL to select DELETE OK? :YES. After the connection is completed, CONNECTED is displayed. # If the connection fails, ERROR is displayed. If the assignment is displayed. P1 (user phone 1)-P2 (user phone 2)-P3 (user phone 3)-G1 (guest phone 1)-G2 (guest phone 2) # You can also perform the same operations by pushing MULTI...
Owner's Manual
Page 48
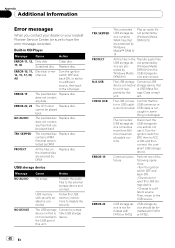
... or damaged. Connect a compatible USB storage device. TRK SKIPPED PROTECT N/A USB CHECK USB ERROR-19 ERROR-23 The connected USB storage device contains WMA files that can be formatted with security enabled is not sup- DRM 9/10 vice and connect. unit. USB cable is not formatted with FAT16 or FAT32 USB storage device should be played back TRK SKIPPED The inserted disc Replace disc. Then, return to the CD player. ERROR-15 The inserted disc Replace disc. does...
... or damaged. Connect a compatible USB storage device. TRK SKIPPED PROTECT N/A USB CHECK USB ERROR-19 ERROR-23 The connected USB storage device contains WMA files that can be formatted with security enabled is not sup- DRM 9/10 vice and connect. unit. USB cable is not formatted with FAT16 or FAT32 USB storage device should be played back TRK SKIPPED The inserted disc Replace disc. Then, return to the CD player. ERROR-15 The inserted disc Replace disc. does...
Installation Manual
Page 1
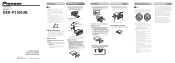
... the yellow cable through blue/white cable when this unit in the bracket. Never cut the insulation of the power cable of the unit match. Never wire the speaker negative cable directly to ground. - CD RECEIVER AUTORADIO CD RADIO CD DEH-P3100UB Installation Manual Manuel d'installation Manual de instalación Printed in China Imprimé en Chine UC Installation Note • Check all cables away from hot places, such as power amp) must be wired to the...
... the yellow cable through blue/white cable when this unit in the bracket. Never cut the insulation of the power cable of the unit match. Never wire the speaker negative cable directly to ground. - CD RECEIVER AUTORADIO CD RADIO CD DEH-P3100UB Installation Manual Manuel d'installation Manual de instalación Printed in China Imprimé en Chine UC Installation Note • Check all cables away from hot places, such as power amp) must be wired to the...
Installation Manual
Page 2
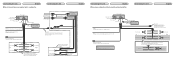
Connecting the unit English When not connecting a rear speaker lead to a subwoofer Connecting the unit English This product Rear output or subwoofer output Antenna jack Front output Fuse (10 A) Yellow Connect to a clean, paint-free metal location. To rear output or subwoofer output To front output Connect with RCA cables (sold separately) Power amp (sold separately) Power amp (sold separately) System remote control Blue/white Connect to a clean, paint-free metal location. Front speaker Left Rear speaker White Gray White/black Green Gray/...
Connecting the unit English When not connecting a rear speaker lead to a subwoofer Connecting the unit English This product Rear output or subwoofer output Antenna jack Front output Fuse (10 A) Yellow Connect to a clean, paint-free metal location. To rear output or subwoofer output To front output Connect with RCA cables (sold separately) Power amp (sold separately) Power amp (sold separately) System remote control Blue/white Connect to a clean, paint-free metal location. Front speaker Left Rear speaker White Gray White/black Green Gray/...


