Owner's Manual
Page 3
... Using the high pass filter 25 Boosting the bass 25 Adjusting source levels 25 Initial Settings Adjusting initial settings 26 Setting the clock 26 Switching the auxiliary setting 26 Setting the rear output and subwoofer controller 26 Switching the ever scroll 27 Activating the BT AUDIO source 27 Entering PIN code for Bluetooth wireless connection... system version of Bluetooth adapter for hands-free phoning 33 - Selecting AUX as the source 30 - Disconnecting a cellular phone 35 - Connecting to XM Satellite Radio 39 - Using the phone book 37 - Setting automatic rejecting 38 -
... Using the high pass filter 25 Boosting the bass 25 Adjusting source levels 25 Initial Settings Adjusting initial settings 26 Setting the clock 26 Switching the auxiliary setting 26 Setting the rear output and subwoofer controller 26 Switching the ever scroll 27 Activating the BT AUDIO source 27 Entering PIN code for Bluetooth wireless connection... system version of Bluetooth adapter for hands-free phoning 33 - Selecting AUX as the source 30 - Disconnecting a cellular phone 35 - Connecting to XM Satellite Radio 39 - Using the phone book 37 - Setting automatic rejecting 38 -
Owner's Manual
Page 8
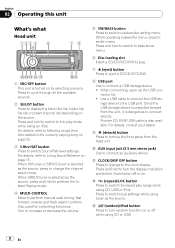
... tuner is selected as the source, press and hold to the USB port. When connecting, open up the USB connector lid. ! Pioneer CD-U50E USB cable is dangerous to turn the display indication and button illumination off while using tuner as the source, press to switch menu... on . For details, refer to switch the repeat play . 7 h (eject) button Press to eject a CD/CD-R/CD-RW. 8 USB port Use to subwoofer setting menu. Also used for controlling functions. b CLOCK/DISP OFF button Press to change the channel select mode. a AUX input jack (3.5 mm stereo jack) Use to...
... tuner is selected as the source, press and hold to the USB port. When connecting, open up the USB connector lid. ! Pioneer CD-U50E USB cable is dangerous to turn the display indication and button illumination off while using tuner as the source, press to switch menu... on . For details, refer to switch the repeat play . 7 h (eject) button Press to eject a CD/CD-R/CD-RW. 8 USB port Use to subwoofer setting menu. Also used for controlling functions. b CLOCK/DISP OFF button Press to change the channel select mode. a AUX input jack (3.5 mm stereo jack) Use to...

Owner's Manual
Page 26
... adapter (e.g., CD-BTB200) is connected to this page. 2 Press MULTI-CONTROL to display the setting mode. # Press DISP/BACK/SCRL to return to the previous display. 3 Press MULTI-CONTROL to select the segment of the clock display you can be activated individually. Set each AUX source...and BT VER INFO can connect the RCA subwoofer output to ON when using. CLOCK SET (clock)-AUX1 (auxiliary input 1) -AUX2 (auxiliary input 2)-SW CONTROL (rear output and subwoofer controller)- Setting the clock Use these instructions to set for fullrange speaker (REAR SP :FULL/ PREOUT :REAR) or subwoofer (REAR ...
... adapter (e.g., CD-BTB200) is connected to this page. 2 Press MULTI-CONTROL to display the setting mode. # Press DISP/BACK/SCRL to return to the previous display. 3 Press MULTI-CONTROL to select the segment of the clock display you can be activated individually. Set each AUX source...and BT VER INFO can connect the RCA subwoofer output to ON when using. CLOCK SET (clock)-AUX1 (auxiliary input 1) -AUX2 (auxiliary input 2)-SW CONTROL (rear output and subwoofer controller)- Setting the clock Use these instructions to set for fullrange speaker (REAR SP :FULL/ PREOUT :REAR) or subwoofer (REAR ...
Owner's Manual
Page 29
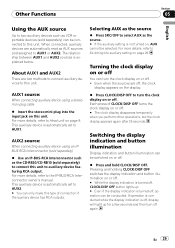
...) % Use an IP-BUS-RCA Interconnector such as the CD-RB20/CD-RB10 (sold separately) can be connected to AUX2. # You can only make this type of CLOCK/DISP OFF turns the clock display on page 8. For more details, refer to Switching the auxiliary setting on page 26. For more details, refer to turn the...
...) % Use an IP-BUS-RCA Interconnector such as the CD-RB20/CD-RB10 (sold separately) can be connected to AUX2. # You can only make this type of CLOCK/DISP OFF turns the clock display on page 8. For more details, refer to Switching the auxiliary setting on page 26. For more details, refer to turn the...


