
Owner's Manual
Page 2
... the AUX source 15 - Before You Start Information to User 3 For Canadian model 3 About this unit 3 After-sales service for Pioneer products 3 In case of audio files 20 Copyright and trademark 21 Specifications 22 Browsing for future reference. Displaying text information 11 - Basic...read and observe WARNINGs and CAUTIONs in a safe and accessible place for a song 11 - Displaying text information 9 - Turning the clock display on or off 15 Additional Information Troubleshooting 16 Error messages 16 Handling guideline 18 Compressed audio compatibility (disc, USB) 19 iPod compatibility...
... the AUX source 15 - Before You Start Information to User 3 For Canadian model 3 About this unit 3 After-sales service for Pioneer products 3 In case of audio files 20 Copyright and trademark 21 Specifications 22 Browsing for future reference. Displaying text information 11 - Basic...read and observe WARNINGs and CAUTIONs in a safe and accessible place for a song 11 - Displaying text information 9 - Turning the clock display on or off 15 Additional Information Troubleshooting 16 Error messages 16 Handling guideline 18 Compressed audio compatibility (disc, USB) 19 iPod compatibility...

Owner's Manual
Page 14
... complete even if the menu is cancelled before being confirmed. to adjust the source volume. to output level and then turn M.C. Clock (clock on the HPF (high pass filter). to turn AUX on or off . 14 En Section 02 Operating this unit This unit is...3 Turn M.C. to select the initial setting. After selecting, perform the following procedures to display the setting mode. 2 Turn M.C. to set (setting the clock) 1 Press M.C. and hold until the initial setting menu appears in volume when switching between cut -off . 2 Press M.C. to select the desired setting...
... complete even if the menu is cancelled before being confirmed. to adjust the source volume. to output level and then turn M.C. Clock (clock on the HPF (high pass filter). to turn AUX on or off . 14 En Section 02 Operating this unit This unit is...3 Turn M.C. to select the initial setting. After selecting, perform the following procedures to display the setting mode. 2 Turn M.C. to set (setting the clock) 1 Press M.C. and hold until the initial setting menu appears in volume when switching between cut -off . 2 Press M.C. to select the desired setting...
Owner's Manual
Page 15
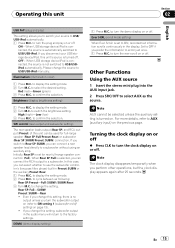
... set to select AUX as following: Rear SP/Preout-Full (SUBW)/SUBW(Rear) 3 Turn M.C. When Rear SP :Full is turned on /off . tp turn the clock display on or off setting) on or off . Other Functions Using the AUX source 1 Insert the stereo mini plug into the AUX input jack. 2 Press... this case, you disconnect your source to scroll just once. 1 Press M.C. For more details, refer to turn the demo display on page 13). ! Turning the clock display on or off % Press CLK to AUX (auxiliary input) on or off . En 15 Red (red)-Green (green) 3 Press M.C. to turn the ever scroll...
... set to select AUX as following: Rear SP/Preout-Full (SUBW)/SUBW(Rear) 3 Turn M.C. When Rear SP :Full is turned on /off . tp turn the clock display on or off setting) on or off . Other Functions Using the AUX source 1 Insert the stereo mini plug into the AUX input jack. 2 Press... this case, you disconnect your source to scroll just once. 1 Press M.C. For more details, refer to turn the demo display on page 13). ! Turning the clock display on or off % Press CLK to AUX (auxiliary input) on or off . En 15 Red (red)-Green (green) 3 Press M.C. to turn the ever scroll...


