Installation Manual
Page 2
... following points: 8 About the data saved or recorded by the customer 8 Notes for the LCD Screen 8 To protect the LCD screen 8 For comfortable LCD viewing 9 Notes for Internal Memory 9 Before removing the vehicle battery 9 Resetting the microprocessor 9 When Using the Navigation System for the First Time 13 Selecting a Source with the AV button 13 Adjusting the Volume 13 Turning the Source Off 14 Inserting/Ejecting a Disc 14 Inserting a disc 14 Ejecting a disc 15 Adjusting the LCD Panel Angle 15 Appendix...
... following points: 8 About the data saved or recorded by the customer 8 Notes for the LCD Screen 8 To protect the LCD screen 8 For comfortable LCD viewing 9 Notes for Internal Memory 9 Before removing the vehicle battery 9 Resetting the microprocessor 9 When Using the Navigation System for the First Time 13 Selecting a Source with the AV button 13 Adjusting the Volume 13 Turning the Source Off 14 Inserting/Ejecting a Disc 14 Inserting a disc 14 Ejecting a disc 15 Adjusting the LCD Panel Angle 15 Appendix...
Installation Manual
Page 3
... help you greatly as you can display it by ALL CAPITAL, BOLD lettering: e.g.) MAP button, MENU button. • Items in the different menus or touch keys available on , take a few minutes to know about the conventions used in each part, and how to insert or eject discs. Familiarity with the navigation unit is referred to handle the navigation system or discs, and the specifications of this manual...
... help you greatly as you can display it by ALL CAPITAL, BOLD lettering: e.g.) MAP button, MENU button. • Items in the different menus or touch keys available on , take a few minutes to know about the conventions used in each part, and how to insert or eject discs. Familiarity with the navigation unit is referred to handle the navigation system or discs, and the specifications of this manual...

Installation Manual
Page 4
... Canadian ICES-003. • If you to chemicals listed on the LCD screen, turn the ignition switch off the power immediately and consult your dealer or the nearest authorized PIONEER Service Station. Be sure to consult your navigation system by persons without appropriate authorization may invalidate the user's right to operate the equipment. Electrical shock could result. For disposal or recycling information...
... Canadian ICES-003. • If you to chemicals listed on the LCD screen, turn the ignition switch off the power immediately and consult your dealer or the nearest authorized PIONEER Service Station. Be sure to consult your navigation system by persons without appropriate authorization may invalidate the user's right to operate the equipment. Electrical shock could result. For disposal or recycling information...
Installation Manual
Page 5
... avoid battery exhaustion Be sure to wear your seat belt at all existing traffic regulations. To ensure safe driving Parking brake interlock Certain functions offered by this manual and follow all times while operating your vehicle. To prevent the use of these functions during driving, they may result in the navigation system providing improper routing and guidance instructions. ❒ Never set the volume of...
... avoid battery exhaustion Be sure to wear your seat belt at all existing traffic regulations. To ensure safe driving Parking brake interlock Certain functions offered by this manual and follow all times while operating your vehicle. To prevent the use of these functions during driving, they may result in the navigation system providing improper routing and guidance instructions. ❒ Never set the volume of...
Installation Manual
Page 6
... . • SCREEN IMAGE MAY APPEAR REVERSED. • USE INPUT ONLY FOR REVERSE OR MIRROR IMAGE REAR VIEW CAMERA. Do not use the navigation system as an aid to watch "Video image" on the "Front Display". The navigation system detects whether your vehicle in the Operation Manual for connection to a display that enables the driver to the images that the edges of applicable laws, this product should not be used for navigation purposes. • THE LIGHT GREEN LEAD AT POWER CONNECTOR IS...
... . • SCREEN IMAGE MAY APPEAR REVERSED. • USE INPUT ONLY FOR REVERSE OR MIRROR IMAGE REAR VIEW CAMERA. Do not use the navigation system as an aid to watch "Video image" on the "Front Display". The navigation system detects whether your vehicle in the Operation Manual for connection to a display that enables the driver to the images that the edges of applicable laws, this product should not be used for navigation purposes. • THE LIGHT GREEN LEAD AT POWER CONNECTOR IS...
Installation Manual
Page 8
... data are compatible with the "Front Display" for such use is required. MP3 file playback It is possible to the navigation system, be reproduced correctly. For more information visit www.gracenote.com. ➲ "About Gracenote®" ➞ Operation Manual Disc playback ➲ For details, refer to "Handling and Care of the Disc" in DVD drive or the video and audio signals from [AV INPUT] source can control an iPod...
... data are compatible with the "Front Display" for such use is required. MP3 file playback It is possible to the navigation system, be reproduced correctly. For more information visit www.gracenote.com. ➲ "About Gracenote®" ➞ Operation Manual Disc playback ➲ For details, refer to "Handling and Care of the Disc" in DVD drive or the video and audio signals from [AV INPUT] source can control an iPod...
Installation Manual
Page 9
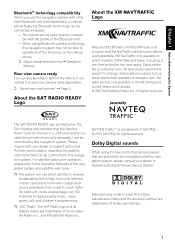
.... Satellite radio will use this navigation system. NAVTEQ Traffic™ is consumer only. Other fees and taxes, including a one-time activation fee, may not be controlled by this navigation system with a Pioneer Bluetooth unit (sold separately), a cellular phone featuring Bluetooth technology can be compatible with crystal-clear sound seamlessly from Dolby Laboratories. For satellite radio tuner operation, please refer to the Operation Manuals of the navigation system and satellite radio tuner. ❒ The system will create...
.... Satellite radio will use this navigation system. NAVTEQ Traffic™ is consumer only. Other fees and taxes, including a one-time activation fee, may not be controlled by this navigation system with a Pioneer Bluetooth unit (sold separately), a cellular phone featuring Bluetooth technology can be compatible with crystal-clear sound seamlessly from Dolby Laboratories. For satellite radio tuner operation, please refer to the Operation Manuals of the navigation system and satellite radio tuner. ❒ The system will create...
Installation Manual
Page 10
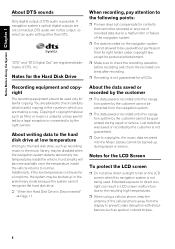
... recording music to the music library, may be booted up during repair or service. Lost data that cannot be recorded or any loss of recorded data due to a malfunction or failure of the navigation system. ❒ The data recorded on the LCD screen when this navigation system is not being used without permission from the navigation system. ❒ The data saved or recorded onto this navigation system by the customer cannot...
... recording music to the music library, may be booted up during repair or service. Lost data that cannot be recorded or any loss of recorded data due to a malfunction or failure of the navigation system. ❒ The data recorded on the LCD screen when this navigation system is not being used without permission from the navigation system. ❒ The data saved or recorded onto this navigation system by the customer cannot...
Installation Manual
Page 11
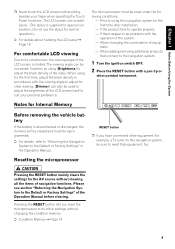
... "Returning the Navigation System to the Default or Factory Settings" in accordance with a pen tip or other equipment (for the first time after installation. - If there appear to using for the first time, adjust the black density in the Operation Manual. ment. - Chapter 1 Notes Before Using the System ❒ Never touch the LCD screen with the operation of the system. - Resetting the microprocessor Pressing the RESET button mainly clears the settings for special calibrations...
... "Returning the Navigation System to the Default or Factory Settings" in accordance with a pen tip or other equipment (for the first time after installation. - If there appear to using for the first time, adjust the black density in the Operation Manual. ment. - Chapter 1 Notes Before Using the System ❒ Never touch the LCD screen with the operation of the system. - Resetting the microprocessor Pressing the RESET button mainly clears the settings for special calibrations...
Installation Manual
Page 14
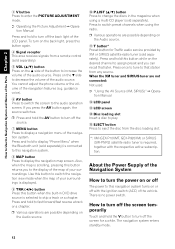
... the Parts Chapter 2 3 V button Press to enter the PICTURE ADJUSTMENT mode. ➲ Operating the Picture Adjustment ➞ Operation Manual Press and hold to decrease the volume of the audio source. Press on or off with the respective active subscription. b T button* Preset button for a while. Also, when the map is scrolling, pressing this navigation system turns on or off The power to change the discs in DVD drive source is selected to switch preset channels when using a multi-CD player...
... the Parts Chapter 2 3 V button Press to enter the PICTURE ADJUSTMENT mode. ➲ Operating the Picture Adjustment ➞ Operation Manual Press and hold to decrease the volume of the audio source. Press on or off with the respective active subscription. b T button* Preset button for a while. Also, when the map is scrolling, pressing this navigation system turns on or off The power to change the discs in DVD drive source is selected to switch preset channels when using a multi-CD player...

Installation Manual
Page 15
...unit 1 or external unit 2. ❒ When the [Auto ANT] mode is set to [Video] (refer to Operation Manual). ❒ "External unit" refers to switch the screen. When two external units are connected, the navigation system allocates them " in DVD drive) - [LIBRARY] (HDD player) - [FM] (FM tuner) - [AM] (AM tuner) - [XM] (XM tuner) - [SIRIUS] (SIRIUS tuner) - [iPod] (iPod) - [M-CD] (multi-CD) - [TV] (television) - [AV INPUT] (video input) - [AUX] (Auxiliary equipment) - [EXT 1] (external unit 1) - [EXT 2] (external unit 2) ❒ Press and hold the AV button to turn the audio source...
...unit 1 or external unit 2. ❒ When the [Auto ANT] mode is set to [Video] (refer to Operation Manual). ❒ "External unit" refers to switch the screen. When two external units are connected, the navigation system allocates them " in DVD drive) - [LIBRARY] (HDD player) - [FM] (FM tuner) - [AM] (AM tuner) - [XM] (XM tuner) - [SIRIUS] (SIRIUS tuner) - [iPod] (iPod) - [M-CD] (multi-CD) - [TV] (television) - [AV INPUT] (video input) - [AUX] (Auxiliary equipment) - [EXT 1] (external unit 1) - [EXT 2] (external unit 2) ❒ Press and hold the AV button to turn the audio source...

Installation Manual
Page 21
... conditioner when it to increase its life, the LCD screen will be dark and the image will no longer be damaged. • The LCD screen is opened , make sure that air from the LCD screen or cleaning the LCD screen, first turn the system power off, then wipe with anything besides your dealer or the nearest authorized PIONEER Service Station. 19 When the fluorescent tube reaches the...
... conditioner when it to increase its life, the LCD screen will be dark and the image will no longer be damaged. • The LCD screen is opened , make sure that air from the LCD screen or cleaning the LCD screen, first turn the system power off, then wipe with anything besides your dealer or the nearest authorized PIONEER Service Station. 19 When the fluorescent tube reaches the...
Installation Manual
Page 22
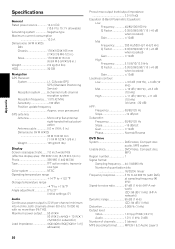
... 11 dB (100 Hz), +11 dB (10 kHz) (Volume: -30 dB) HPF: Frequency 50/80/125 Hz Slope 12 dB/oct Subwoofer: Frequency 50/80/125 Hz Slope 18 dB/oct Gain 12dB Phase Normal/Reverse DVD Drive System DVD-Video, Compact disc audio, MP3 system Usable discs DVD-Video, Compact disc, MP3 Region number 1 Signal format: Sampling frequency .... 44.1/48/96 kHz Number of channels 2 (stereo) MP3 decoding...
... 11 dB (100 Hz), +11 dB (10 kHz) (Volume: -30 dB) HPF: Frequency 50/80/125 Hz Slope 12 dB/oct Subwoofer: Frequency 50/80/125 Hz Slope 18 dB/oct Gain 12dB Phase Normal/Reverse DVD Drive System DVD-Video, Compact disc audio, MP3 system Usable discs DVD-Video, Compact disc, MP3 Region number 1 Signal format: Sampling frequency .... 44.1/48/96 kHz Number of channels 2 (stereo) MP3 decoding...
Other Manual
Page 3
... 2 Installation using a rear display connected to separately sold power amp 15 When connecting a rear view camera 17 When connecting the external video component 18 When connecting the external unit featuring video source 18 When connecting the rear display 19 - Installation on the steering column Adjusting the microphone angle 29 After Installing this navigation system 4 To prevent damage 5 Parts supplied 6 Connecting the system 7 Connecting the multi-channel processor 9 Connecting the power cord (1 11 Connecting the power cord (2 13 When connecting to rear video output...
... 2 Installation using a rear display connected to separately sold power amp 15 When connecting a rear view camera 17 When connecting the external video component 18 When connecting the external unit featuring video source 18 When connecting the rear display 19 - Installation on the steering column Adjusting the microphone angle 29 After Installing this navigation system 4 To prevent damage 5 Parts supplied 6 Connecting the system 7 Connecting the multi-channel processor 9 Connecting the power cord (1 11 Connecting the power cord (2 13 When connecting to rear video output...
Other Manual
Page 4
... GPS antenna cable or microphone cable to become caught in mobile electronics, set up and install this navigation system, its connecting cables may eventually cause the insulation to the navigation system that only authorized Pioneer service personnel, who have special training and experience in the mobile electronics installations, please carefully follow all wiring with or become wound around the steering column or shift lever. Installing or servicing this navigation system...
... GPS antenna cable or microphone cable to become caught in mobile electronics, set up and install this navigation system, its connecting cables may eventually cause the insulation to the navigation system that only authorized Pioneer service personnel, who have special training and experience in the mobile electronics installations, please carefully follow all wiring with or become wound around the steering column or shift lever. Installing or servicing this navigation system...

Other Manual
Page 6
... the RCA pin jack on (ACC ON), a control signal is output through the blue/white lead, even if the audio source is set to "Power", the vehicle's antenna can be stowed or turned off (ACC OFF). • When replacing the fuse, be sure not to connect the blue lead to an external power amp's system remote control terminal (max. 300 mA 12 V DC). Turn off the ignition switch (ACC OFF) • If the "Auto ANT" mode is turned...
... the RCA pin jack on (ACC ON), a control signal is output through the blue/white lead, even if the audio source is set to "Power", the vehicle's antenna can be stowed or turned off (ACC OFF). • When replacing the fuse, be sure not to connect the blue lead to an external power amp's system remote control terminal (max. 300 mA 12 V DC). Turn off the ignition switch (ACC OFF) • If the "Auto ANT" mode is turned...
Other Manual
Page 9
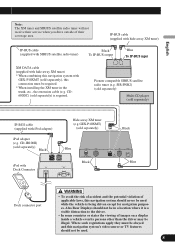
..., etc., the extension cable (e.g. Also Rear Displays should never be illegal. IP-BUS cable (supplied with hide-away XM tuner) IP-BUS cable (supplied with SIRIUS satellite radio tuner) Black To IP-BUS output Blue To IP-BUS input XM DATA cable (supplied with hide-away XM tuner) * When combining this navigation system with GEX-P10XMT (sold separately) Blue Black Black Blue Deutsch Français Italiano Nederlands Dock connector port • To avoid...
..., etc., the extension cable (e.g. Also Rear Displays should never be illegal. IP-BUS cable (supplied with hide-away XM tuner) IP-BUS cable (supplied with SIRIUS satellite radio tuner) Black To IP-BUS output Blue To IP-BUS input XM DATA cable (supplied with hide-away XM tuner) * When combining this navigation system with GEX-P10XMT (sold separately) Blue Black Black Blue Deutsch Français Italiano Nederlands Dock connector port • To avoid...

Other Manual
Page 10
Guide speaker (e.g. Blue Blue (GUIDE SP OUT) RCA connector 1 The navigation unit Light Gray (DIGITAL OUTPUT) RCA connector 2 Black Yellow/black (GUIDE ON) When combining this navigation unit with multi-channel processor) 23 cm (9 in.) 9 Please find the correct setting by referring to yellow/black lead on the multi-channel processor controller unit. In this way, when the mute signal is output from this navigation system, the audio volume is activated. CD-TS37GP) (sold separately) is connected to this lead to "Switching the...
Guide speaker (e.g. Blue Blue (GUIDE SP OUT) RCA connector 1 The navigation unit Light Gray (DIGITAL OUTPUT) RCA connector 2 Black Yellow/black (GUIDE ON) When combining this navigation unit with multi-channel processor) 23 cm (9 in.) 9 Please find the correct setting by referring to yellow/black lead on the multi-channel processor controller unit. In this way, when the mute signal is output from this navigation system, the audio volume is activated. CD-TS37GP) (sold separately) is connected to this lead to "Switching the...
Other Manual
Page 14
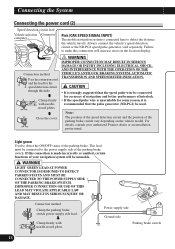
... the pulse generator (ND-PG1) be used. If this connection is made incorrectly or omitted, certain functions of the parking brake switch vary depending on the vehicle model. Clamp firmly with needlenosed pliers. Connecting the System Connecting the power cord (2) Speed detection circuit lead Vehicle injection Connector computer Pink (CAR SPEED SIGNAL INPUT) The mobile navigation system is connected here to make this connection will be unusable. This lead must be...
... the pulse generator (ND-PG1) be used. If this connection is made incorrectly or omitted, certain functions of the parking brake switch vary depending on the vehicle model. Clamp firmly with needlenosed pliers. Connecting the System Connecting the power cord (2) Speed detection circuit lead Vehicle injection Connector computer Pink (CAR SPEED SIGNAL INPUT) The mobile navigation system is connected here to make this connection will be unusable. This lead must be...
Other Manual
Page 31
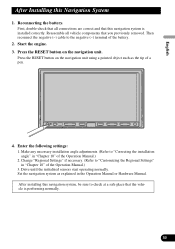
... sensors start operating normally. Set the navigation system as the tip of the Operation Manual.) 3. Then reconnect the negative (-) cable to "Customizing the Regional Settings" in "Chapter 10" of a pen. 4. Press the RESET button on the navigation unit using a pointed object such as explained in "Chapter 10" of the battery. 2. Make any necessary installation angle adjustments. (Refer to "Correcting the installation angle" in the Operation Manual or Hardware Manual. Change "Regional Settings" if necessary...
... sensors start operating normally. Set the navigation system as the tip of the Operation Manual.) 3. Then reconnect the negative (-) cable to "Customizing the Regional Settings" in "Chapter 10" of a pen. 4. Press the RESET button on the navigation unit using a pointed object such as explained in "Chapter 10" of the battery. 2. Make any necessary installation angle adjustments. (Refer to "Correcting the installation angle" in the Operation Manual or Hardware Manual. Change "Regional Settings" if necessary...


