
Owner's Manual
Page 1
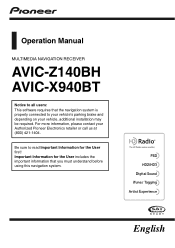
For more information, please contact your vehicle, additional installation may be required. Be sure to your vehicle's parking brake and depending on your Authorized Pioneer Electronics retailer or call us at (800) 421-1404. English Important Information for the User includes the important information that the navigation system is properly connected to read Important Information for the User first! Operation Manual MULTIMEDIA NAVIGATION RECEIVER AVIC-Z140BH AVIC-X940BT Notice to all users: This software requires that you must understand before using this navigation system.
For more information, please contact your vehicle, additional installation may be required. Be sure to your vehicle's parking brake and depending on your Authorized Pioneer Electronics retailer or call us at (800) 421-1404. English Important Information for the User includes the important information that the navigation system is properly connected to read Important Information for the User first! Operation Manual MULTIMEDIA NAVIGATION RECEIVER AVIC-Z140BH AVIC-X940BT Notice to all users: This software requires that you must understand before using this navigation system.
Owner's Manual
Page 2
...on each menu 27 Shortcut Menu 27 - How to use the navigation menu screens Screen switching overview 26 What you have finished reading the instructions, keep this Pioneer product. Inserting an SD memory card (for AVIC-X940BT) 18 Inserting and ejecting an SD memory card 18 - Connecting... images 24 How to see 32 Actual screens may differ from theft 16 - Removing the detachable faceplate 16 - Ejecting an SD memory card (for AVIC-Z140BH) 17 - Selecting the shortcut 27 - Inserting a disc (for AVICX940BT) 20 Plugging and unplugging a USB storage device 21 - Switching the map ...
...on each menu 27 Shortcut Menu 27 - How to use the navigation menu screens Screen switching overview 26 What you have finished reading the instructions, keep this Pioneer product. Inserting an SD memory card (for AVIC-X940BT) 18 Inserting and ejecting an SD memory card 18 - Connecting... images 24 How to see 32 Actual screens may differ from theft 16 - Removing the detachable faceplate 16 - Ejecting an SD memory card (for AVIC-Z140BH) 17 - Selecting the shortcut 27 - Inserting a disc (for AVICX940BT) 20 Plugging and unplugging a USB storage device 21 - Switching the map ...
Owner's Manual
Page 6
... the keyboard 127 - Starting procedure 128 - Reading the screen 135 - When using an application not compatible with Aha Radio and the navigation system 137 Using the Bluetooth audio player Starting procedure 138 Reading the screen 138 Using the touch panel keys 140 Operating by hardware buttons ...116 Using advanced functions 116 Playing video files (from the navigation system 126 - Reading the screen 133 - Setting the code number and level 110 Setting the auto play 111 Setting the subtitle file...
... the keyboard 127 - Starting procedure 128 - Reading the screen 135 - When using an application not compatible with Aha Radio and the navigation system 137 Using the Bluetooth audio player Starting procedure 138 Reading the screen 138 Using the touch panel keys 140 Operating by hardware buttons ...116 Using advanced functions 116 Playing video files (from the navigation system 126 - Reading the screen 133 - Setting the code number and level 110 Setting the auto play 111 Setting the subtitle file...

Owner's Manual
Page 7
... Using the external unit (EXT1, EXT2) Starting procedure 155 Reading the screen 155 Using the touch panel keys 156 Customizing preferences Displaying the screen for navigation settings 157 Checking the connections of fuel cost information 160 Recording your travel history 161 Using the demonstration guidance 161 Registering your home 162 Correcting...
... Using the external unit (EXT1, EXT2) Starting procedure 155 Reading the screen 155 Using the touch panel keys 156 Customizing preferences Displaying the screen for navigation settings 157 Checking the connections of fuel cost information 160 Recording your travel history 161 Using the demonstration guidance 161 Registering your home 162 Correcting...
Owner's Manual
Page 8
... Setting the anti-theft function 195 - Starting the voice operation 189 - Setting the password 195 - Forgotten password 195 Returning the navigation system to hands-free phoning 193 Tips for system settings 170 - Restoring the default setting 196 Switching the muting/attenuation level 179 ... 186 - Adjusting source levels 187 - Enhancing bass (Bass Booster) 188 Replicating the settings 188 Turning off the screen 188 Operating your navigation system with voice To Ensure Safe Driving 189 Basics of the touch panel (touch panel calibration) 174 - Voice operation for rear view ...
... Setting the anti-theft function 195 - Starting the voice operation 189 - Setting the password 195 - Forgotten password 195 Returning the navigation system to hands-free phoning 193 Tips for system settings 170 - Restoring the default setting 196 Switching the muting/attenuation level 179 ... 186 - Adjusting source levels 187 - Enhancing bass (Bass Booster) 188 Replicating the settings 188 Turning off the screen 188 Operating your navigation system with voice To Ensure Safe Driving 189 Basics of the touch panel (touch panel calibration) 174 - Voice operation for rear view ...

Owner's Manual
Page 9
... 213 - iPod and iPhone 223 - Handling the LCD screen 224 - Settings Menu 227 - Bluetooth Settings menu 229 - Returning the navigation system to cause noticeable positioning errors 210 Route setting information 212 - Conditions likely to the initial state 196 - Aha Radio 224 Using... the LCD screen correctly 224 - Setting items to be deleted 197 Appendix Troubleshooting 199 Messages for navigation functions 204 Messages for playing a disc 213 Playable discs 213 - Positioning by GPS 208 - Playing DualDisc 214 - Ambient conditions ...
... 213 - iPod and iPhone 223 - Handling the LCD screen 224 - Settings Menu 227 - Bluetooth Settings menu 229 - Returning the navigation system to cause noticeable positioning errors 210 Route setting information 212 - Conditions likely to the initial state 196 - Aha Radio 224 Using... the LCD screen correctly 224 - Setting items to be deleted 197 Appendix Troubleshooting 199 Messages for navigation functions 204 Messages for playing a disc 213 Playable discs 213 - Positioning by GPS 208 - Playing DualDisc 214 - Ambient conditions ...

Owner's Manual
Page 10
... are indicated with # at the end of terms. "Destination Menu" screen or "AV Source" screen ! How to use your navigation system are collectively referred to find the meanings of the manual. Terms used in this manual. Conventions used in this manual indicates moving... for AVIC-Z140BH. Finding the operation procedure from the examples in brackets [ ]: e.g.) [Destination], [Settings]. ! Functions of an item displayed on , take a few minutes to use this manual Finding the operation procedure for what you want to do , you can be connected to this navigation unit ...
... are indicated with # at the end of terms. "Destination Menu" screen or "AV Source" screen ! How to use your navigation system are collectively referred to find the meanings of the manual. Terms used in this manual. Conventions used in this manual indicates moving... for AVIC-Z140BH. Finding the operation procedure from the examples in brackets [ ]: e.g.) [Destination], [Settings]. ! Functions of an item displayed on , take a few minutes to use this manual Finding the operation procedure for what you want to do , you can be connected to this navigation unit ...

Owner's Manual
Page 11
... only the following iPod models and iPod software versions. p When you use this navigation system, refer to the information on our website. Map coverage For details about iPod compatibility with a Pioneer USB interface cable for private, non-commercial use and does not convey a license ...nor imply any right to use this navigation system with this manual, iPod and iPhone will be compatible with this ...
... only the following iPod models and iPod software versions. p When you use this navigation system, refer to the information on our website. Map coverage For details about iPod compatibility with a Pioneer USB interface cable for private, non-commercial use and does not convey a license ...nor imply any right to use this navigation system with this manual, iPod and iPhone will be compatible with this ...
Owner's Manual
Page 15
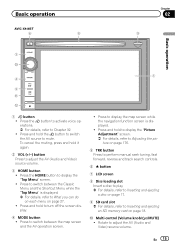
...-loading slot Insert a disc to play. = For details, refer to Inserting and ejecting a disc on page 27. ! Press to display the map screen while the navigation function screen is displayed. = For details, refer to switch between the map screen and the AV operation screen. ! Basic operation...
...-loading slot Insert a disc to play. = For details, refer to Inserting and ejecting a disc on page 27. ! Press to display the map screen while the navigation function screen is displayed. = For details, refer to switch between the map screen and the AV operation screen. ! Basic operation...
Owner's Manual
Page 16
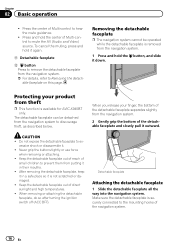
... faceplate can be operated while the detachable faceplate is available for AVIC-X940BT only. cessive shock or disassemble it again. Keep the detachable faceplate out of Multi-control to prevent them from the navigation system. 1 Press and hold the button, and slide it is...it in their mouths. ! Press the center of direct sunlight and high temperatures. ! Removing the detachable faceplate p The navigation system cannot be detached from the navigation system. = For details, refer to discourage theft, as described below. When removing or attaching the detachable faceplate, do...
... faceplate can be operated while the detachable faceplate is available for AVIC-X940BT only. cessive shock or disassemble it again. Keep the detachable faceplate out of Multi-control to prevent them from the navigation system. 1 Press and hold the button, and slide it is...it in their mouths. ! Press the center of direct sunlight and high temperatures. ! Removing the detachable faceplate p The navigation system cannot be detached from the navigation system. = For details, refer to discourage theft, as described below. When removing or attaching the detachable faceplate, do...

Owner's Manual
Page 17
... as the panel could be damaged. The "Monitor Setup" screen appears. 2 Touch or to that angle for AVIC-Z140BH) WARNING ! If this navigation system until you fail to successfully attach the detachable faceplate to the navigation system, try again but be memorized and the LCD panel will automatically return to adjust the angle. WARNING...
... as the panel could be damaged. The "Monitor Setup" screen appears. 2 Touch or to that angle for AVIC-Z140BH) WARNING ! If this navigation system until you fail to successfully attach the detachable faceplate to the navigation system, try again but be memorized and the LCD panel will automatically return to adjust the angle. WARNING...

Owner's Manual
Page 19
...stored on the SD memory card, the navigation system restarts. The LCD panel opens, and the SD card slot appears. 3 Insert an SD memory card into the SD card slot. Do not press the h button when an SD mem- Ejecting an SD memory card (for AVIC-Z140BH) CAUTION ! The LCD panel opens. 3... optimum performance with the label surface facing to map data, such as customized POI data, is not fully inserted. Inserting an SD memory card (for AVIC-Z140BH) 1 Press the h button. The LCD panel closes. p If data related to the upside and press the card until it clicks and completely locks....
...stored on the SD memory card, the navigation system restarts. The LCD panel opens, and the SD card slot appears. 3 Insert an SD memory card into the SD card slot. Do not press the h button when an SD mem- Ejecting an SD memory card (for AVIC-Z140BH) CAUTION ! The LCD panel opens. 3... optimum performance with the label surface facing to map data, such as customized POI data, is not fully inserted. Inserting an SD memory card (for AVIC-Z140BH) 1 Press the h button. The LCD panel closes. p If data related to the upside and press the card until it clicks and completely locks....

Owner's Manual
Page 20
... SD memory card appears. 20 En Ejecting an SD memory card (for ejecting the media appear. 2 Touch [Eject SD]. The LCD panel closes. The navigation system restarts, and then the LCD panel opens. 3 Eject the SD memory card. 4 Press the h button. A message prompting you to map data ...information that you are slightly different. 1 Press the h button and then touch [Eject SD]. 2 Touch [Yes]. Inserting an SD memory card (for AVIC-Z140BH. Insert the SD memory card with the terminal contacts facing down, and press the card until it clicks and locks completely. The touch panel keys...
... SD memory card appears. 20 En Ejecting an SD memory card (for ejecting the media appear. 2 Touch [Eject SD]. The LCD panel closes. The navigation system restarts, and then the LCD panel opens. 3 Eject the SD memory card. 4 Press the h button. A message prompting you to map data ...information that you are slightly different. 1 Press the h button and then touch [Eject SD]. 2 Touch [Yes]. Inserting an SD memory card (for AVIC-Z140BH. Insert the SD memory card with the terminal contacts facing down, and press the card until it clicks and locks completely. The touch panel keys...

Owner's Manual
Page 21
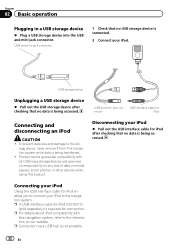
p This navigation system may not achieve optimum performance with all USB mass storage devices and assumes no responsibility for AVIC-X940BT. Basic operation 3 Press the middle of data on the SD memory card, operating procedures are slightly different. 1 Press the h button and ...description is not possible. Plugging and unplugging a USB storage device CAUTION ! To prevent data loss and damage to remove the SD memory card appears. Pioneer cannot guarantee compatibility with some USB storage devices. p Connection via a USB hub is for any loss of the SD memory card gently until it...
p This navigation system may not achieve optimum performance with all USB mass storage devices and assumes no responsibility for AVIC-X940BT. Basic operation 3 Press the middle of data on the SD memory card, operating procedures are slightly different. 1 Press the h button and ...description is not possible. Plugging and unplugging a USB storage device CAUTION ! To prevent data loss and damage to remove the SD memory card appears. Pioneer cannot guarantee compatibility with some USB storage devices. p Connection via a USB hub is for any loss of the SD memory card gently until it...
Owner's Manual
Page 22
...smart phones, or other devices while using this product. Connecting your iPod Using the USB interface cable for iPod enables you to the navigation system. Chapter 02 Basic operation Plugging in a USB storage device % Plug a USB storage device into the USB and mini-jack ... Connection via a USB hub is connected. 2 Connect your iPod. rage device, never remove it from this navigation system, refer to the sto- Pioneer cannot guarantee compatibility with this navigation system while data is being transferred. ! USB and mini-jack connector 1 Check that no responsibility for iPod Connecting...
...smart phones, or other devices while using this product. Connecting your iPod Using the USB interface cable for iPod enables you to the navigation system. Chapter 02 Basic operation Plugging in a USB storage device % Plug a USB storage device into the USB and mini-jack ... Connection via a USB hub is connected. 2 Connect your iPod. rage device, never remove it from this navigation system, refer to the sto- Pioneer cannot guarantee compatibility with this navigation system while data is being transferred. ! USB and mini-jack connector 1 Check that no responsibility for iPod Connecting...

Owner's Manual
Page 23
...the previous conditions. Read the disclaimer carefully, checking its details, and then touch [OK] if you agree to terminate the system. The navigation system is also turned off the vehicle engine to the conditions. p The screen shown will now restart. p When there is activated, you... % Start the engine to boot up the system. p If the anti-theft function is no route, the disclaimer appears after the navigation system reboots. The navigation system will differ depending on for a few seconds. The map screen appears. After a short pause, the splash screen comes on for...
...the previous conditions. Read the disclaimer carefully, checking its details, and then touch [OK] if you agree to terminate the system. The navigation system is also turned off the vehicle engine to the conditions. p The screen shown will now restart. p When there is activated, you... % Start the engine to boot up the system. p If the anti-theft function is no route, the disclaimer appears after the navigation system reboots. The navigation system will differ depending on for a few seconds. The map screen appears. After a short pause, the splash screen comes on for...
Owner's Manual
Page 24
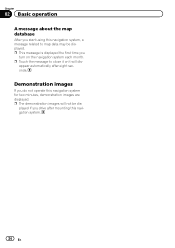
Demonstration images If you drive after eight seconds. played if you do not operate this navigation system, a message related to close it or it will not be displayed. p The demonstration images will dis- appear automatically after mounting this navigation system. 24 En p Touch the message to map data may be dis- p This message is displayed the first time you start using this navigation system for two minutes, demonstration images are displayed. Chapter 02 Basic operation A message about the map database After you turn on the navigation system each month.
Demonstration images If you drive after eight seconds. played if you do not operate this navigation system, a message related to close it or it will not be displayed. p The demonstration images will dis- appear automatically after mounting this navigation system. 24 En p Touch the message to map data may be dis- p This message is displayed the first time you start using this navigation system for two minutes, demonstration images are displayed. Chapter 02 Basic operation A message about the map database After you turn on the navigation system each month.
Owner's Manual
Page 26
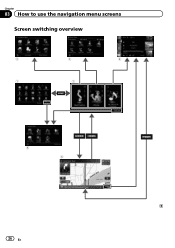
Chapter 03 How to use the navigation menu screens Screen switching overview 2 3 4 1 1 5 6 26 En
Chapter 03 How to use the navigation menu screens Screen switching overview 2 3 4 1 1 5 6 26 En
Owner's Manual
Page 27
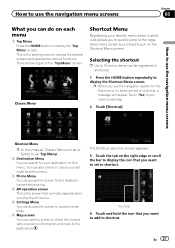
... the tab on the right edge or scroll the bar to display the icon that you want to set to shortcut. p When you use the navigation system for your destination on this menu. Shortcut Menu p In this manual, Classic Menu will appear. Selecting the shortcut p Up to 15 menu items can.... 4 AV operation screen This is the starting menu to access the desired screens and operate the various functions. How to use the navigation menu screens How to use the navigation menu screens Chapter 03 What you can search for the first time or no items are two types of the "Top Menu...
... the tab on the right edge or scroll the bar to display the icon that you want to set to shortcut. p When you use the navigation system for your destination on this menu. Shortcut Menu p In this manual, Classic Menu will appear. Selecting the shortcut p Up to 15 menu items can.... 4 AV operation screen This is the starting menu to access the desired screens and operate the various functions. How to use the navigation menu screens How to use the navigation menu screens Chapter 03 What you can search for the first time or no items are two types of the "Top Menu...
Owner's Manual
Page 28
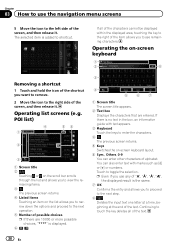
... to proceed to the next step. 8 Deletes the input text one letter at a time, beginning at the end of the item allows you use the navigation menu screens 5 Move the icon to the left side of the screen, and then release it . p Even if you to see remaining characters. Touch to...
... to proceed to the next step. 8 Deletes the input text one letter at a time, beginning at the end of the item allows you use the navigation menu screens 5 Move the icon to the left side of the screen, and then release it . p Even if you to see remaining characters. Touch to...


