Owner's Manual
Page 8
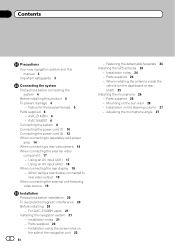
...commands 191 - Forgotten password 195 Returning the navigation system to the splash screen stored in the SD memory card 173 - Setting the rear output 179 - Displaying your DivX VOD deregistration code 181 - Using sonic center control 186 - Voice operation for AV sound settings ...than iPod) 192 - Setting for AV system settings 177 - Checking the version information 175 Selecting the video for rear display 176 Adjusting the picture 176 Displaying the screen for rear view camera 174 - Setting video input 1 (AV1) 177 - Setting the illumination color 175 - Setting video input 2...
...commands 191 - Forgotten password 195 Returning the navigation system to the splash screen stored in the SD memory card 173 - Setting the rear output 179 - Displaying your DivX VOD deregistration code 181 - Using sonic center control 186 - Voice operation for AV sound settings ...than iPod) 192 - Setting for AV system settings 177 - Checking the version information 175 Selecting the video for rear display 176 Adjusting the picture 176 Displaying the screen for rear view camera 174 - Setting video input 1 (AV1) 177 - Setting the illumination color 175 - Setting video input 2...
Owner's Manual
Page 34
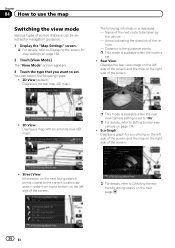
...Distance to be selected for navigation guidance. 1 Display the "Map Settings" screen. = For details, refer to set. p This mode is available when the rear view camera setting is displayed. - Street View: Information on the next four guidance points closest to the current location appear in order from top to bottom on... the left side of the screen. = For details, refer to Setting for rear view camera on page 163. 2 Touch [View Mode]. Eco Graph: Displays a graph for eco-driving on the left side of the screen and the...
...Distance to be selected for navigation guidance. 1 Display the "Map Settings" screen. = For details, refer to set. p This mode is available when the rear view camera setting is displayed. - Street View: Information on the next four guidance points closest to the current location appear in order from top to bottom on... the left side of the screen. = For details, refer to Setting for rear view camera on page 163. 2 Touch [View Mode]. Eco Graph: Displays a graph for eco-driving on the left side of the screen and the...
Owner's Manual
Page 174
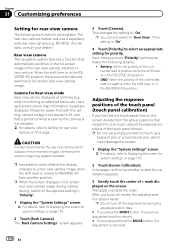
... full-screen rear view camera image. GND: When the polarity of the connected lead is negative while the shift lever is in the REVERSE (R) position, the screen automatically switches to "On". When the shift lever is not resized to your vehicle. CAUTION Pioneer recommends the ...Setting for polarity. Battery: When the polarity of + mark displayed on this page. p Immediately verify whether the display changes to a rear view camera image when the shift lever is saved. Each time you touch [Polarity] switches between the following two functions are available. Chapter 31 ...
... full-screen rear view camera image. GND: When the polarity of the connected lead is negative while the shift lever is in the REVERSE (R) position, the screen automatically switches to "On". When the shift lever is not resized to your vehicle. CAUTION Pioneer recommends the ...Setting for polarity. Battery: When the polarity of + mark displayed on this page. p Immediately verify whether the display changes to a rear view camera image when the shift lever is saved. Each time you touch [Polarity] switches between the following two functions are available. Chapter 31 ...
Owner's Manual
Page 176
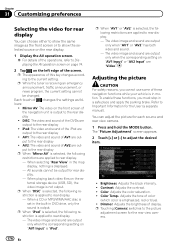
...Adjusts the brightness of the DVDs are output to Important Information for the rear view camera. 176 En p Touching [Camera] switches to the rear display ! p While the tuner is emphasized, red or blue). ! When selecting "Rear View" in DVD drive, only the sound is displayed. - When...DISC" is selected, the following restriction is selected, the following restrictions are applied to the rear display ! Chapter 31 Customizing preferences Selecting the video for each source and rear view camera. 1 Press and hold the MODE button. Contrast: Adjusts the contrast. ! DISC: The...
...Adjusts the brightness of the DVDs are output to Important Information for the rear view camera. 176 En p Touching [Camera] switches to the rear display ! p While the tuner is emphasized, red or blue). ! When selecting "Rear View" in DVD drive, only the sound is displayed. - When...DISC" is selected, the following restriction is selected, the following restrictions are applied to the rear display ! Chapter 31 Customizing preferences Selecting the video for each source and rear view camera. 1 Press and hold the MODE button. Contrast: Adjusts the contrast. ! DISC: The...

Owner's Manual
Page 177
...appears. 3 Touch [AV Settings]. Customizing preferences Chapter 31 Customizing preferences p Touching [Source] while adjusting the rear view camera image returns you may not be available with some rear view cameras. p The setting contents can switch this setting according to change the setting. # If you touch ,... the screen for AV system settings 1 Press the HOME button to mini-jack input. Video source - DVD-V and DivX - Rear view camera image ! Map screen p The picture adjustment may not be memorized separately for the source without a video and navigation map display....
...appears. 3 Touch [AV Settings]. Customizing preferences Chapter 31 Customizing preferences p Touching [Source] while adjusting the rear view camera image returns you may not be available with some rear view cameras. p The setting contents can switch this setting according to change the setting. # If you touch ,... the screen for AV system settings 1 Press the HOME button to mini-jack input. Video source - DVD-V and DivX - Rear view camera image ! Map screen p The picture adjustment may not be memorized separately for the source without a video and navigation map display....

Owner's Manual
Page 178
...screen picture). ! AV1 and AV2 ! p The followings are the same as that matches its original aspect ratio to the connected component. Rear view camera image ! iPod: iPod connected with the USB Interface cable for iPod (CD-IU51V) (sold separately) through the external video component. p ...4:3 picture is displayed normally, giving you to enjoy a 4:3 TV picture (normal picture) without any omissions. ! RM10 (sold separately) ! EXT: Pioneer external unit connected with video. 1 Display the "AV System Settings" screen. = For details, refer to Displaying the screen for AV system settings on ...
...screen picture). ! AV1 and AV2 ! p The followings are the same as that matches its original aspect ratio to the connected component. Rear view camera image ! iPod: iPod connected with the USB Interface cable for iPod (CD-IU51V) (sold separately) through the external video component. p ...4:3 picture is displayed normally, giving you to enjoy a 4:3 TV picture (normal picture) without any omissions. ! RM10 (sold separately) ! EXT: Pioneer external unit connected with video. 1 Display the "AV System Settings" screen. = For details, refer to Displaying the screen for AV system settings on ...
Owner's Manual
Page 201
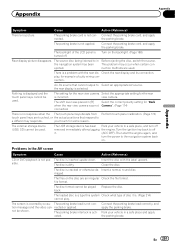
...parking brake lead is incorrect. vated. the parking brake. The backlight of disc it . (ACC OFF). ejected. The setting for the rear view camera Select the appropriate setting for example a faulty wiring connection. Turn the ignition key back to a different key responds. sible. maged. The...cord, and apply the parking brake. play . The USB storage device has been Park your touch for "Back when the rear view camera was not Camera". (Page 174) connected. The disc is inserted upside down. nected or applied. The disc is cracked or otherwise da- ...
...parking brake lead is incorrect. vated. the parking brake. The backlight of disc it . (ACC OFF). ejected. The setting for the rear view camera Select the appropriate setting for example a faulty wiring connection. Turn the ignition key back to a different key responds. sible. maged. The...cord, and apply the parking brake. play . The USB storage device has been Park your touch for "Back when the rear view camera was not Camera". (Page 174) connected. The disc is inserted upside down. nected or applied. The disc is cracked or otherwise da- ...
Installation Manual
Page 2
Installation notes 24 - Parts supplied 26 - AVIC-Z140BH 6 - AVIC-X940BT 6 Connecting the system 8 Connecting the power cord (1) 10 Connecting the power cord (2) 12 When connecting to rear video output 18 When connecting the external unit featuring video source 19 Installation Precautions before ... interference 20 Before installing 20 - For AVIC-Z140BH users 21 Installing the navigation system 21 - Installation notes 21 - Installation using a rear display connected to separately sold power amp 14 When connecting a rear view camera 16 When connecting the external video component ...
Installation notes 24 - Parts supplied 26 - AVIC-Z140BH 6 - AVIC-X940BT 6 Connecting the system 8 Connecting the power cord (1) 10 Connecting the power cord (2) 12 When connecting to rear video output 18 When connecting the external unit featuring video source 19 Installation Precautions before ... interference 20 Before installing 20 - For AVIC-Z140BH users 21 Installing the navigation system 21 - Installation notes 21 - Installation using a rear display connected to separately sold power amp 14 When connecting a rear view camera 16 When connecting the external video component ...
Installation Manual
Page 3
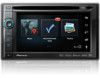
The navigation features of this product (and the rear view camera option if purchased) are in your navigation system. ! Do not install this manual fully and carefully before making the necessary adjustments. ! Important safeguards WARNING Pioneer does not recommend that you experience difficulty in ...PRODUCT YOURSELF. Please exercise your vehicle. It is not covered by warranty. ! Operation of this navigation system (or the rear view camera option if purchased) if doing so will divert your attention in certain circumstances display inaccurate position of your seat belt at...
The navigation features of this product (and the rear view camera option if purchased) are in your navigation system. ! Do not install this manual fully and carefully before making the necessary adjustments. ! Important safeguards WARNING Pioneer does not recommend that you experience difficulty in ...PRODUCT YOURSELF. Please exercise your vehicle. It is not covered by warranty. ! Operation of this navigation system (or the rear view camera option if purchased) if doing so will divert your attention in certain circumstances display inaccurate position of your seat belt at...

Installation Manual
Page 13
Otherwise you use a rear view camera, please make sure to the rear view camera picture. Note When you cannot switch to connect this lead. Connecting the system The navigation unit Power cord Violet/white (REVERSE GEAR SIGNAL INPUT) This ...
Otherwise you use a rear view camera, please make sure to the rear view camera picture. Note When you cannot switch to connect this lead. Connecting the system The navigation unit Power cord Violet/white (REVERSE GEAR SIGNAL INPUT) This ...
Installation Manual
Page 16
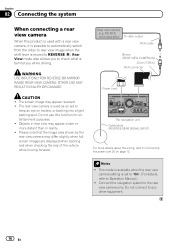
...into a tight parking spot. This mode is available when the rear view camera setting is used with a rear view camera, it is possible to automatically switch from the video to REVERSE (R). Do not connect to the rear view camera only. The rear view camera is set to "On". (For details, refer to keep...GEAR SIGNAL INPUT) For more distant than in reality. ! ND-BC5) (sold separately) To video output RCA cable Brown (REAR VIEW CAMERA IN) 20 cm (7-7/8 in rear view may appear reversed. ! Connect the navigation system to any other equipment. 16 En WARNING USE INPUT ONLY FOR REVERSE OR...
...into a tight parking spot. This mode is available when the rear view camera setting is used with a rear view camera, it is possible to automatically switch from the video to REVERSE (R). Do not connect to the rear view camera only. The rear view camera is set to "On". (For details, refer to keep...GEAR SIGNAL INPUT) For more distant than in reality. ! ND-BC5) (sold separately) To video output RCA cable Brown (REAR VIEW CAMERA IN) 20 cm (7-7/8 in rear view may appear reversed. ! Connect the navigation system to any other equipment. 16 En WARNING USE INPUT ONLY FOR REVERSE OR...


