Installation Manual
Page 2
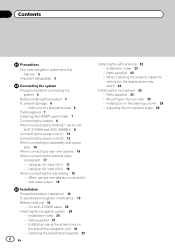
... antenna inside the vehicle (on the sun visor 25 - For AVIC-Z150BH users 20 Installing the navigation system 20 - Installation notes 23 - Mounting on the dashboard or rear shelf) 24 Installing the microphone 25 - Notice for the blue/white lead 6 Parts supplied 7 Installing the HDMI® cable holder 7 Connecting the system 8 When connecting the Android...
... antenna inside the vehicle (on the sun visor 25 - For AVIC-Z150BH users 20 Installing the navigation system 20 - Installation notes 23 - Mounting on the dashboard or rear shelf) 24 Installing the microphone 25 - Notice for the blue/white lead 6 Parts supplied 7 Installing the HDMI® cable holder 7 Connecting the system 8 When connecting the Android...
Installation Manual
Page 3
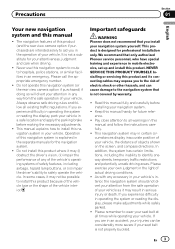
...for the navigation system. ! Important safeguards WARNING Pioneer does not recommend that you experience difficulty in operating the system or reading the display, park your vehicle in a safe location and apply the parking brake before installing your navigation system. ! Keep this navigation ... you are intended solely to aid you to the navigation system that only authorized Pioneer service personnel, who have special training and experience in mobile electronics, set up and install this manual and follow all times while operating your vehicle. Precautions Section 01 English...
...for the navigation system. ! Important safeguards WARNING Pioneer does not recommend that you experience difficulty in operating the system or reading the display, park your vehicle in a safe location and apply the parking brake before installing your navigation system. ! Keep this navigation ... you are intended solely to aid you to the navigation system that only authorized Pioneer service personnel, who have special training and experience in mobile electronics, set up and install this manual and follow all times while operating your vehicle. Precautions Section 01 English...

Installation Manual
Page 4
Please comply with all applicable laws and regulations regarding the use of your vehicle. Section 01 Precautions ! Certain country and government laws may prohibit or restrict the placement and use , installation and operation of this system in your navigation system. 4 En
Please comply with all applicable laws and regulations regarding the use of your vehicle. Section 01 Precautions ! Certain country and government laws may prohibit or restrict the placement and use , installation and operation of this system in your navigation system. 4 En

Installation Manual
Page 5
...sure that they will be exceeded, causing overheating. Do not route wires where they will not interfere with or become damaged, resulting in the installation manual. ! Do not shorten any leads. Never feed power to other electronic products by cutting the insulation of the power supply lead of ... to become wound around the steering column or shift lever. If the yellow lead's insulation tears as a result of the vehicle's controls. ! Before installing this product, its cables, and wiring away in a short circuit or malfunction. ! En 5 Secure all of the lead will be exposed to high...
...sure that they will be exceeded, causing overheating. Do not route wires where they will not interfere with or become damaged, resulting in the installation manual. ! Do not shorten any leads. Never feed power to other electronic products by cutting the insulation of the power supply lead of ... to become wound around the steering column or shift lever. If the yellow lead's insulation tears as a result of the vehicle's controls. ! Before installing this product, its cables, and wiring away in a short circuit or malfunction. ! En 5 Secure all of the lead will be exposed to high...

Installation Manual
Page 6
... ACC O F O ! Attach the connectors of the speaker lead on this navigation system. The control signal is output through the blue/white lead. When installing this lead as the power supply lead for the ground wire loosens or falls out, it out of the connector. ! Notice for the auto-antenna...8 W (impedance value). Be sure not to connect the ground wire first. Do not use a fuse of this unit or any other device must be installed in the car) *1Not supplied for details on (ACC ON), a control signal is especially important to 3 W speakers for this lead as you may ...
... ACC O F O ! Attach the connectors of the speaker lead on this navigation system. The control signal is output through the blue/white lead. When installing this lead as the power supply lead for the ground wire loosens or falls out, it out of the connector. ! Notice for the auto-antenna...8 W (impedance value). Be sure not to connect the ground wire first. Do not use a fuse of this unit or any other device must be installed in the car) *1Not supplied for details on (ACC ON), a control signal is especially important to 3 W speakers for this lead as you may ...
Installation Manual
Page 7
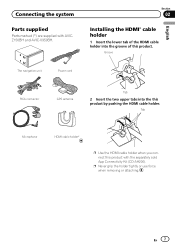
... cable holder* p Use the HDMI cable holder when you connect this product with AVICZ150BH and AVIC-X950BH. Connecting the system Parts supplied Parts marked (*) are supplied with the separately sold App Connectivity Kit (CD-AH200). Section 02 Installing the HDMI® cable holder 1 Insert the lower tab of this product by pushing...
... cable holder* p Use the HDMI cable holder when you connect this product with AVICZ150BH and AVIC-X950BH. Connecting the system Parts supplied Parts marked (*) are supplied with the separately sold App Connectivity Kit (CD-AH200). Section 02 Installing the HDMI® cable holder 1 Insert the lower tab of this product by pushing...
Installation Manual
Page 12
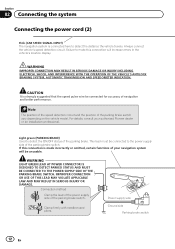
... accuracy of navigation and better performance. Light green (PARKING BRAKE) Used to make this connection is made incorrectly or omitted, certain functions of your authorized Pioneer dealer or an installation professional. IMPROPER CONNECTION OR USE OF THIS LEAD MAY VIOLATE APPLICABLE LAW AND MAY RESULT IN SERIOUS INJURY OR DAMAGE.
... accuracy of navigation and better performance. Light green (PARKING BRAKE) Used to make this connection is made incorrectly or omitted, certain functions of your authorized Pioneer dealer or an installation professional. IMPROPER CONNECTION OR USE OF THIS LEAD MAY VIOLATE APPLICABLE LAW AND MAY RESULT IN SERIOUS INJURY OR DAMAGE.
Installation Manual
Page 18
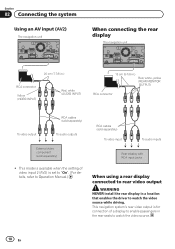
... (sold separately) To video input To audio inputs Rear display with RCA input jacks When using a rear display connected to rear video output WARNING NEVER install the rear display in a location that enables the driver to watch the video source. 18 En This navigation system's rear video output is set to...
... (sold separately) To video input To audio inputs Rear display with RCA input jacks When using a rear display connected to rear video output WARNING NEVER install the rear display in a location that enables the driver to watch the video source. 18 En This navigation system's rear video output is set to...

Installation Manual
Page 19
... area of this product, temporarily connect the wiring to come into contact with the driver's opera- If any electrical lead. Do not install this navigation system, other equipment after you should lay or route each antenna lead as far as on the floor in front of the... or safety features, including airbags, hazard lamp buttons or (iii) impair the driver's ability to use compatible parts in the manner specified after installation of your vehicle's owner's manual for errors in them . Please refer to prevent interference, set the following items as far as possible from this...
... area of this product, temporarily connect the wiring to come into contact with the driver's opera- If any electrical lead. Do not install this navigation system, other equipment after you should lay or route each antenna lead as far as on the floor in front of the... or safety features, including airbags, hazard lamp buttons or (iii) impair the driver's ability to use compatible parts in the manner specified after installation of your vehicle's owner's manual for errors in them . Please refer to prevent interference, set the following items as far as possible from this...
Installation Manual
Page 20
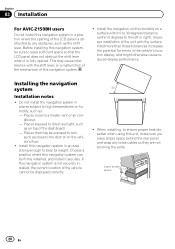
... blocking the vents. Places that the LCD panel does not obstruct the shift lever when it securely. When installing, to a heater, vent or air conditioner. - Installing the navigation system Installation notes ! Section 03 Installation For AVIC-Z150BH users Do not install this navigation system in a position where the opening of the LCD panel is not securely...
... blocking the vents. Places that the LCD panel does not obstruct the shift lever when it securely. When installing, to a heater, vent or air conditioner. - Installing the navigation system Installation notes ! Section 03 Installation For AVIC-Z150BH users Do not install this navigation system in a position where the opening of the LCD panel is not securely...
Installation Manual
Page 21
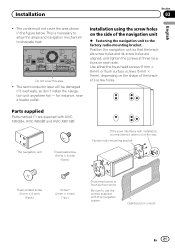
... mm × 4 mm) (1 pc.) Truss head screw or flush surface screw Be sure to dissipate heat. Dashboard or console En 21 Installation Section 03 English ! The cords must not cover the area shown in the figure below. This is necessary to allow the amps and navigation ...screws supplied with installation, you may bend it overheats, so don't install the navigation unit anywhere hot - for instance, near a heater outlet. Position the navigation unit so that the brackets screw holes and its screw holes are supplied with AVICX950BH, AVIC-X850BT and AVIC-X8510BT. Parts supplied...
... mm × 4 mm) (1 pc.) Truss head screw or flush surface screw Be sure to dissipate heat. Dashboard or console En 21 Installation Section 03 English ! The cords must not cover the area shown in the figure below. This is necessary to allow the amps and navigation ...screws supplied with installation, you may bend it overheats, so don't install the navigation unit anywhere hot - for instance, near a heater outlet. Position the navigation unit so that the brackets screw holes and its screw holes are supplied with AVICX950BH, AVIC-X850BT and AVIC-X8510BT. Parts supplied...
Installation Manual
Page 22
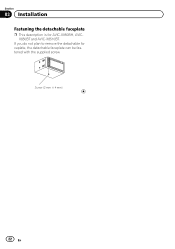
Section 03 Installation Fastening the detachable faceplate p This description is for AVIC-X950BH, AVICX850BT and AVIC-X8510BT. Screw (2 mm × 4 mm) 22 En If you do not plan to remove the detachable faceplate, the detachable faceplate can be fastened with the supplied screw.
Section 03 Installation Fastening the detachable faceplate p This description is for AVIC-X950BH, AVICX850BT and AVIC-X8510BT. Screw (2 mm × 4 mm) 22 En If you do not plan to remove the detachable faceplate, the detachable faceplate can be fastened with the supplied screw.

Installation Manual
Page 23
... antenna if reception from the satellite is very powerful, and the lead may affect its performance. If this may become detached. ! The antenna should be installed on a level surface where radio waves will be sure to use an extension to make it or use the metal sheet provided with your system.... When installing the GPS antenna inside the vehicle, be poor. ! Do not paint the GPS antenna, as possible. This would reduce the sensitivity of the GPS ...
... antenna if reception from the satellite is very powerful, and the lead may affect its performance. If this may become detached. ! The antenna should be installed on a level surface where radio waves will be sure to use an extension to make it or use the metal sheet provided with your system.... When installing the GPS antenna inside the vehicle, be poor. ! Do not paint the GPS antenna, as possible. This would reduce the sensitivity of the GPS ...

Installation Manual
Page 24
...does not allow signals from GPS satellites to secure the lead where necessary inside the vehicle (on the dashboard or rear shelf) WARNING Do not install the GPS antenna over any sensors or vents on the dashboard of the vehicle, as possible where the GPS antenna faces the window. Note ...sheet contains a strong adhesive which may compromise the ability of the vehicle. 24 En Clamps Use separately sold clamps to pass through. On such models, install the GPS antenna on the outside of the metal sheet under the GPS antenna to properly and securely affix to the dashboard. Make sure the...
...does not allow signals from GPS satellites to secure the lead where necessary inside the vehicle (on the dashboard or rear shelf) WARNING Do not install the GPS antenna over any sensors or vents on the dashboard of the vehicle, as possible where the GPS antenna faces the window. Note ...sheet contains a strong adhesive which may compromise the ability of the vehicle. 24 En Clamps Use separately sold clamps to pass through. On such models, install the GPS antenna on the outside of the metal sheet under the GPS antenna to properly and securely affix to the dashboard. Make sure the...
Installation Manual
Page 25
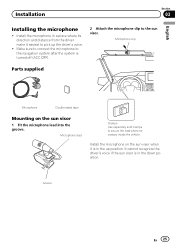
... the driver make it is turned off (ACC OFF). 2 Attach the microphone clip to secure the lead where necessary inside the vehicle. Groove En 25 Install the microphone on the sun visor 1 Fit the microphone lead into the groove...
... the driver make it is turned off (ACC OFF). 2 Attach the microphone clip to secure the lead where necessary inside the vehicle. Groove En 25 Install the microphone on the sun visor 1 Fit the microphone lead into the groove...

Installation Manual
Page 26
Double-sided tape Clamps Use separately sold clamps to secure the lead where necessary inside the vehicle. Install the microphone on the steering column 1 Detach the microphone base from the steering wheel. 26 En Section 03 Installation Installation on the steering column, keeping it away from the microphone clip by sliding the microphone base while pressing the tab. Adjusting the microphone angle The microphone angle can be adjusted. Microphone Tab Microphone clip Microphone base 2 Mount the microphone on the steering column.
Double-sided tape Clamps Use separately sold clamps to secure the lead where necessary inside the vehicle. Install the microphone on the steering column 1 Detach the microphone base from the steering wheel. 26 En Section 03 Installation Installation on the steering column, keeping it away from the microphone clip by sliding the microphone base while pressing the tab. Adjusting the microphone angle The microphone angle can be adjusted. Microphone Tab Microphone clip Microphone base 2 Mount the microphone on the steering column.
Operation Manual
Page 1
Important Information for the User first! English Operation Manual MULTIMEDIA NAVIGATION RECEIVER AVIC-Z150BH AVIC-X950BH AVIC-X850BT AVIC-X8510BT Notice to your vehicle's parking brake and depending on your Authorized Pioneer Electronics retailer or call us at (800) 421-1404. Be sure to read Important Information for the User includes the important information that the ...properly connected to all users: This software requires that you must understand before using this navigation system. For more information, please contact your vehicle, additional installation may be required.
Important Information for the User first! English Operation Manual MULTIMEDIA NAVIGATION RECEIVER AVIC-Z150BH AVIC-X950BH AVIC-X850BT AVIC-X8510BT Notice to your vehicle's parking brake and depending on your Authorized Pioneer Electronics retailer or call us at (800) 421-1404. Be sure to read Important Information for the User includes the important information that the ...properly connected to all users: This software requires that you must understand before using this navigation system. For more information, please contact your vehicle, additional installation may be required.
Operation Manual
Page 107
.... ! p Before starting up the Pandora or Aha application installed on page 157. 2 Start up , sign in doubt as iPhone. Pandora® ! The device has Android OS 2.2 or high- The device has iOS 3.0 or higher. ! The device supports Bluetooth SPP (Se- Information for AVIC-X850BT and AVIC-X8510BT ). p If the iPhone is safe to do...
.... ! p Before starting up the Pandora or Aha application installed on page 157. 2 Start up , sign in doubt as iPhone. Pandora® ! The device has Android OS 2.2 or high- The device has iOS 3.0 or higher. ! The device supports Bluetooth SPP (Se- Information for AVIC-X850BT and AVIC-X8510BT ). p If the iPhone is safe to do...

Operation Manual
Page 108
.... 3 Unlock your smartphone. 4 Connect your smartphone to this product via the separately sold App Connectivity Kit (CD-AH200) (for AVIC-Z150BH and AVIC-X950BH). = For details of the operations, refer to the Installation Manual. p The registered device must be selected as the priority device. = For details, refer to Registering your smartphone and connect...
.... 3 Unlock your smartphone. 4 Connect your smartphone to this product via the separately sold App Connectivity Kit (CD-AH200) (for AVIC-Z150BH and AVIC-X950BH). = For details of the operations, refer to the Installation Manual. p The registered device must be selected as the priority device. = For details, refer to Registering your smartphone and connect...

Operation Manual
Page 109
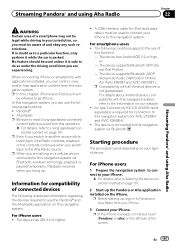
... latest version of the Pandora application by connecting an iPhone or smartphone that has the Pandora application installed. Streaming Pandora® and using Aha Radio 4 1 1 Source icon Shows which source has been selected. 2 Current time 3 Current track information ! : ... information, logging in . ! : Track title Shows the title of the Pandora service is displayed. More information is a music service not affiliated with Pioneer. p is displayed if there is available. Play time indicator Shows the elapsed playing time within the current track. Note: ! Pandora internet radio is ...
... latest version of the Pandora application by connecting an iPhone or smartphone that has the Pandora application installed. Streaming Pandora® and using Aha Radio 4 1 1 Source icon Shows which source has been selected. 2 Current time 3 Current track information ! : ... information, logging in . ! : Track title Shows the title of the Pandora service is displayed. More information is a music service not affiliated with Pioneer. p is displayed if there is available. Play time indicator Shows the elapsed playing time within the current track. Note: ! Pandora internet radio is ...


