
Installation Manual
Page 2
... Canada require that displays the backup view through the factory receiver, do not use the Pioneer receiver unless it is explained in the separate manuals. • Do not install this product where it may in certain circumstances display inaccurate position of your vehicle, the ...laws and regulations regarding the use this product in your vehicle. Precautions before making the necessary adjustments. • This manual explains how to install this product yourself. Connection to the factory backup camera will divert your attention in any steps to tamper with applicable ...
... Canada require that displays the backup view through the factory receiver, do not use the Pioneer receiver unless it is explained in the separate manuals. • Do not install this product where it may in certain circumstances display inaccurate position of your vehicle, the ...laws and regulations regarding the use this product in your vehicle. Precautions before making the necessary adjustments. • This manual explains how to install this product yourself. Connection to the factory backup camera will divert your attention in any steps to tamper with applicable ...

Installation Manual
Page 3
... is extremely dangerous to allow any other electronic products by cutting the insulation of the power supply lead of the steps in the installation manual. • Secure all wiring with the auto antenna function (if the antenna is output through the blue/white lead, even if... directly connected to the battery, engine vibration may cause a short circuit. • Attach the connectors of contact with different screws. Before installing this product • Use this unit with insulating tape. It is especially important to insulate all unused speaker leads, which if left uncovered...
... is extremely dangerous to allow any other electronic products by cutting the insulation of the power supply lead of the steps in the installation manual. • Secure all wiring with the auto antenna function (if the antenna is output through the blue/white lead, even if... directly connected to the battery, engine vibration may cause a short circuit. • Attach the connectors of contact with different screws. Before installing this product • Use this unit with insulating tape. It is especially important to insulate all unused speaker leads, which if left uncovered...
Installation Manual
Page 4
...of the power amp (max. 300 mA 12 V DC). Unless connected, the sensor may be connected for accuracy of your authorized Pioneer dealer or an installation professional. Otherwise you use a rear view camera, please make this lead. Connect the violet/white lead to detect the ON/OFF...] screen Power cord GPS antenna 3.55 m (11 ft. 8 in.) Microphone 3 m (9 ft. 10-1/8 in.) iDatalink adapter input Refer to the instruction manual for the iDataLink adapter (sold separately). This product Antenna jack AV cable IN/OUT 4 En WARNING IMPROPER CONNECTION MAY RESULT IN SERIOUS DAMAGE OR INJURY...
...of the power amp (max. 300 mA 12 V DC). Unless connected, the sensor may be connected for accuracy of your authorized Pioneer dealer or an installation professional. Otherwise you use a rear view camera, please make this lead. Connect the violet/white lead to detect the ON/OFF...] screen Power cord GPS antenna 3.55 m (11 ft. 8 in.) Microphone 3 m (9 ft. 10-1/8 in.) iDatalink adapter input Refer to the instruction manual for the iDataLink adapter (sold separately). This product Antenna jack AV cable IN/OUT 4 En WARNING IMPROPER CONNECTION MAY RESULT IN SERIOUS DAMAGE OR INJURY...

Installation Manual
Page 6
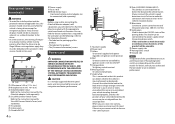
... mute or attenuate, while the following sounds will not be set to Operation Manual. - Attaching identification labels to USB cables W8500NEX Attach identification labels to USB cables (supplied and sold separately) before installing this product in .) USB interface cable for iPod/iPhone (CDIU52) (sold... cable, refer to the manual for the cable. • For details concerning the ...
... mute or attenuate, while the following sounds will not be set to Operation Manual. - Attaching identification labels to USB cables W8500NEX Attach identification labels to USB cables (supplied and sold separately) before installing this product in .) USB interface cable for iPod/iPhone (CDIU52) (sold... cable, refer to the manual for the cable. • For details concerning the ...

Installation Manual
Page 8
External video component (sold separately) NOTE The appropriate setting is for wiring. This product HDMI port High Speed HDMI™ Cable (sold separately) WARNING NEVER install the rear display in a location that enables the driver to watch the video source. Rear display passengers in .) Mini pin plug cable (sold separately) RCA ... use other cables, the wiring position might differ resulting in disturbed images and sounds. Securing the High Speed HDMI™ Be sure to the Operation Manual.
External video component (sold separately) NOTE The appropriate setting is for wiring. This product HDMI port High Speed HDMI™ Cable (sold separately) WARNING NEVER install the rear display in a location that enables the driver to watch the video source. Rear display passengers in .) Mini pin plug cable (sold separately) RCA ... use other cables, the wiring position might differ resulting in disturbed images and sounds. Securing the High Speed HDMI™ Be sure to the Operation Manual.
Installation Manual
Page 9
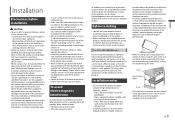
... would deploy. Do not bind, lay or route them together, or cross them to your dealer. This is obstructed by your vehicle's owner's manual for reference to the deployment area of the frontal airbags. • Failure to follow all of the LCD panel is necessary to a short circuit... not cover the area shown in front of the dashboard. - For AVIC-W8500NEX users Do not install this product in a manner that the LCD panel does not obstruct the shift lever when it securely. Installation notes • Do not install this product in serious injury or death. Could injure the driver or...
... would deploy. Do not bind, lay or route them together, or cross them to your dealer. This is obstructed by your vehicle's owner's manual for reference to the deployment area of the frontal airbags. • Failure to follow all of the LCD panel is necessary to a short circuit... not cover the area shown in front of the dashboard. - For AVIC-W8500NEX users Do not install this product in a manner that the LCD panel does not obstruct the shift lever when it securely. Installation notes • Do not install this product in serious injury or death. Could injure the driver or...

Installation Manual
Page 12
...En After installation After installing this product is performing normally. W8500NEX 5 Drive down an unobstructed road until the GPS starts receiving the signal normally. W6500NEX • Some of the vehicle's battery. Reassemble all connections are correct and that you previously removed. NOTE Install the microphone... on this product, be reset. 4 Change the settings as the tip of the battery. 2 Start the engine. 3 Press the RESET button. Then reconnect the negative (-) cable to Operation Manual. Press the RESET button on...
...En After installation After installing this product is performing normally. W8500NEX 5 Drive down an unobstructed road until the GPS starts receiving the signal normally. W6500NEX • Some of the vehicle's battery. Reassemble all connections are correct and that you previously removed. NOTE Install the microphone... on this product, be reset. 4 Change the settings as the tip of the battery. 2 Start the engine. 3 Press the RESET button. Then reconnect the negative (-) cable to Operation Manual. Press the RESET button on...

Owners Manual
Page 1
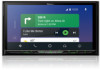
For more information, please contact your vehicle, additional installation may be required. Important Information for the User first! Be sure to your vehicle' s parking brake and depending on your Authorized Pioneer Electronics retailer or call us at (800) 421-1404. English AVIC-W8500NEX AVIC-W6500NEX MULTIMEDIA NAVIGATION RECEIVER Operation Manual Notice to all users: This software requires that the product is properly connected to read Important Information for the User includes the important information that you must understand before using this product.
For more information, please contact your vehicle, additional installation may be required. Important Information for the User first! Be sure to your vehicle' s parking brake and depending on your Authorized Pioneer Electronics retailer or call us at (800) 421-1404. English AVIC-W8500NEX AVIC-W6500NEX MULTIMEDIA NAVIGATION RECEIVER Operation Manual Notice to all users: This software requires that the product is properly connected to read Important Information for the User includes the important information that you must understand before using this product.

Owners Manual
Page 59
...support all the listed units in case you want to be set. [Automatic Time Zone] The time zone setting changes automatically. [Manual Time Zone] The present setting value for the time difference and daylight saving time that you set the time difference... restart if you change this navigation system offers different alternatives near the exit like gas stations or restaurants. By default, the time zone is installed (AVIC-W6500NEX). [Regional] Changes the voice guidance language, the application language, and measurement units. English Menu Item [Offer Hints Upon Detour] Description ...
...support all the listed units in case you want to be set. [Automatic Time Zone] The time zone setting changes automatically. [Manual Time Zone] The present setting value for the time difference and daylight saving time that you set the time difference... restart if you change this navigation system offers different alternatives near the exit like gas stations or restaurants. By default, the time zone is installed (AVIC-W6500NEX). [Regional] Changes the voice guidance language, the application language, and measurement units. English Menu Item [Offer Hints Upon Detour] Description ...

Owners Manual
Page 94
... available. • When connecting an iPhone or iPod touch, quit all applications before connecting the device. 1 Connect your iPod When connecting an iPod to the Installation Manual. then touch and hold or , you can also perform fast reverse or fast forward. NOTE For details on the generation or version of the iPod...
... available. • When connecting an iPhone or iPod touch, quit all applications before connecting the device. 1 Connect your iPod When connecting an iPod to the Installation Manual. then touch and hold or , you can also perform fast reverse or fast forward. NOTE For details on the generation or version of the iPod...

Owners Manual
Page 99
For smartphone (Android) users NOTE The video playback capability depends on the connected Android device. 1 Unlock your iPhone to the Installation Manual. 2 Press . 3 Touch . 4 Touch [WebLink]. 5 Touch desired icon in the tab. The WebLink app is launched. Refer to this product via ...USB. For iPhone users 1 Connect your smartphone and connect it to the Installation Manual. 2 Press . 3 Touch . 4 Touch [WebLink]. 5 Touch desired icon in the tab. The WebLink app is launched. - 99 - English WebLink ...
For smartphone (Android) users NOTE The video playback capability depends on the connected Android device. 1 Unlock your iPhone to the Installation Manual. 2 Press . 3 Touch . 4 Touch [WebLink]. 5 Touch desired icon in the tab. The WebLink app is launched. Refer to this product via ...USB. For iPhone users 1 Connect your smartphone and connect it to the Installation Manual. 2 Press . 3 Touch . 4 Touch [WebLink]. 5 Touch desired icon in the tab. The WebLink app is launched. - 99 - English WebLink ...

Owners Manual
Page 103
... Apple CarPlay is turned on, only a Bluetooth audio connection will be possible for four seconds. NOTES • For details on USB connection, refer to the Installation Manual. • If an Apple CarPlay compatible device has been connected and another screen is displayed, touch [Apple CarPlay] on . Touch to display the Application menu...
... Apple CarPlay is turned on, only a Bluetooth audio connection will be possible for four seconds. NOTES • For details on USB connection, refer to the Installation Manual. • If an Apple CarPlay compatible device has been connected and another screen is displayed, touch [Apple CarPlay] on . Touch to display the Application menu...

Owners Manual
Page 106
...mute. Touch to adjust the guidance volume. To adjust the main sound volume, press VOL (+/-) on USB connection, refer to the Installation Manual. • If twenty devices are already paired, the message confirming whether to delete the registered device is displayed. The unit configures the...8226; For details on the unit. English 5 Touch a desired device on a cellular phone other device, touch [BT Settings] and delete the devices manually (page 63). • If Android Auto is turned on during a call . The menu reappears. Adjusting the volume You can use voice recognition ...
...mute. Touch to adjust the guidance volume. To adjust the main sound volume, press VOL (+/-) on USB connection, refer to the Installation Manual. • If twenty devices are already paired, the message confirming whether to delete the registered device is displayed. The unit configures the...8226; For details on the unit. English 5 Touch a desired device on a cellular phone other device, touch [BT Settings] and delete the devices manually (page 63). • If Android Auto is turned on during a call . The menu reappears. Adjusting the volume You can use voice recognition ...

Owners Manual
Page 109
Skips tracks forward. Stores the current station to the preset station. Displays the preset station list. Select an item on USB connection, refer to the Installation Manual. Switches among connected devices. - 109 - TIP By pressing then touch , you can skip songs forward. * Gives a Thumbs Up to the playing track. * Gives a Thumbs Down ...
Skips tracks forward. Stores the current station to the preset station. Displays the preset station list. Select an item on USB connection, refer to the Installation Manual. Switches among connected devices. - 109 - TIP By pressing then touch , you can skip songs forward. * Gives a Thumbs Up to the playing track. * Gives a Thumbs Down ...

Owners Manual
Page 119
.... Basic operation HDMI source screen Hides the touch panel keys. To display the keys again, touch anywhere on the screen. For details, refer to the Installation Manual. The HDMI source screen appears. English HDMI CAUTION For safety reasons, video images cannot be viewed while your vehicle is required for the video image...
.... Basic operation HDMI source screen Hides the touch panel keys. To display the keys again, touch anywhere on the screen. For details, refer to the Installation Manual. The HDMI source screen appears. English HDMI CAUTION For safety reasons, video images cannot be viewed while your vehicle is required for the video image...

Owners Manual
Page 120
...] is required for the video image (page 154). The AUX screen appears. - 120 - To view video images, stop in motion. For details, refer to the Installation Manual. • You can display the video image output by the device connected to video input. English AUX You can set the screen size for connection...
...] is required for the video image (page 154). The AUX screen appears. - 120 - To view video images, stop in motion. For details, refer to the Installation Manual. • You can display the video image output by the device connected to video input. English AUX You can set the screen size for connection...

Owners Manual
Page 122
... place and apply the parking brake. English AV input You can display the video image output by the device connected or the camera to the Installation Manual. For details, refer to video input. NOTE If [Source] is selected, [2nd Camera Input] is displayed on the screen.
... place and apply the parking brake. English AV input You can display the video image output by the device connected or the camera to the Installation Manual. For details, refer to video input. NOTE If [Source] is selected, [2nd Camera Input] is displayed on the screen.

Owners Manual
Page 127
...in Car Sources These operations are almost similar to configure the desired firmware. Starting procedure 1 Connect the iDatalink Maestro adapter to the Installation manual. 2 Press then touch . 3 Touch [Car Sources] or [Car Features]. Take a note of the device number as necessary. • For details ... firmware, refer to iDatalink Maestro website. • For details on connecting this product to iDatalink Maestro, refer to the Installation Manual. • You can check and operate the following website and follow the on the [Firmware Information] screen of this product (page 138...
...in Car Sources These operations are almost similar to configure the desired firmware. Starting procedure 1 Connect the iDatalink Maestro adapter to the Installation manual. 2 Press then touch . 3 Touch [Car Sources] or [Car Features]. Take a note of the device number as necessary. • For details ... firmware, refer to iDatalink Maestro website. • For details on connecting this product to iDatalink Maestro, refer to the Installation Manual. • You can check and operate the following website and follow the on the [Firmware Information] screen of this product (page 138...

Owners Manual
Page 148
English - Noise - Microphone for Auto EQ will be overwritten. 1 Stop the vehicle in progress. W8500NEX Plug the microphone into the AUX input jack on the back panel of the driver's seat, facing forward. If the engine is canceled. 2 Fix the ... conditioner or heater is in a quiet place, close all doors, windows, and sun roof, and then turn off . The fader/balance settings return to the Installation Manual). - 148 -
English - Noise - Microphone for Auto EQ will be overwritten. 1 Stop the vehicle in progress. W8500NEX Plug the microphone into the AUX input jack on the back panel of the driver's seat, facing forward. If the engine is canceled. 2 Fix the ... conditioner or heater is in a quiet place, close all doors, windows, and sun roof, and then turn off . The fader/balance settings return to the Installation Manual). - 148 -
Owners Manual
Page 160
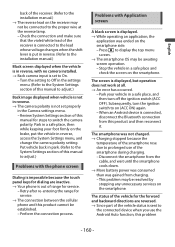
...be resolved by stopping any unnecessary services on the smartphone. Park your foot firmly on the brake, put in reverse. (Refer to the installation manual.) Black screen displayed when the vehicle is displayed. → While operating an application, the application was not charged. → Charging stopped... rose due to prolonged use the Android Auto function, this product cannot be established. - English back of the receiver. (Refer to the installation manual.) → The reverse lead on the receiver may not be connected to the proper wire at all. → An error has occurred....
...be resolved by stopping any unnecessary services on the smartphone. Park your foot firmly on the brake, put in reverse. (Refer to the installation manual.) Black screen displayed when the vehicle is displayed. → While operating an application, the application was not charged. → Charging stopped... rose due to prolonged use the Android Auto function, this product cannot be established. - English back of the receiver. (Refer to the installation manual.) → The reverse lead on the receiver may not be connected to the proper wire at all. → An error has occurred....


