Owner's Manual
Page 59
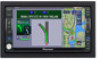
...of Emergency Roadside Assist- Please contact Nationwide Auto Club, Inc. NAVI Emergency Info The Emergency Info screen provides important emergency information pertaining to your Navigation System with Pioneer. at : Your current position is indicated by Nationwide Auto Club, Inc. You are determined solely.... Checking the information registered as Emergency Info appears on registering for more information. for by Pioneer only if your insurance company can be edited and replaced by the user. • The Emergency Info screen is available to call for this product.
...of Emergency Roadside Assist- Please contact Nationwide Auto Club, Inc. NAVI Emergency Info The Emergency Info screen provides important emergency information pertaining to your Navigation System with Pioneer. at : Your current position is indicated by Nationwide Auto Club, Inc. You are determined solely.... Checking the information registered as Emergency Info appears on registering for more information. for by Pioneer only if your insurance company can be edited and replaced by the user. • The Emergency Info screen is available to call for this product.
Owner's Manual
Page 63
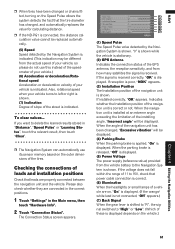
...position of the navigation unit has been changed , and automatically replaces the value for calculating distance. ❒ If the ND-PG1 is connected, the distance calculation value cannot be replaced automatically. (5) Speed Speed detected by the Navigation System is ...indicated. Also, rotational speed when your vehicle is shown. Please also check whether they are properly connected between the navigation unit and the vehicle. The Connection Status screen appears. (1) (2) ...
...position of the navigation unit has been changed , and automatically replaces the value for calculating distance. ❒ If the ND-PG1 is connected, the distance calculation value cannot be replaced automatically. (5) Speed Speed detected by the Navigation System is ...indicated. Also, rotational speed when your vehicle is shown. Please also check whether they are properly connected between the navigation unit and the vehicle. The Connection Status screen appears. (1) (2) ...
Owner's Manual
Page 79
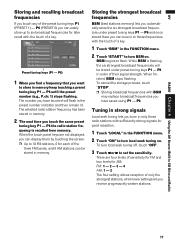
... lets you can tune in to those radio stations with the touch of sensitivity for FM and two levels for later recall with BSM may replace broadcast frequencies you automatically store the six strongest broadcast frequencies under preset tuning keys P1 - To turn local seek tuning off, touch "OFF". 3 ... tuning on . P6 in memory. 2 The next time you touch any of a key. P6 and once stored there you can display them by touching the screen. ❒ Up to 18 FM stations, 6 for good reception. 1 Touch "LOCAL" in memory. BSM begins to set the sensitivity. To cancel the storage ...
... lets you can tune in to those radio stations with the touch of sensitivity for FM and two levels for later recall with BSM may replace broadcast frequencies you automatically store the six strongest broadcast frequencies under preset tuning keys P1 - To turn local seek tuning off, touch "OFF". 3 ... tuning on . P6 in memory. 2 The next time you touch any of a key. P6 and once stored there you can display them by touching the screen. ❒ Up to 18 FM stations, 6 for good reception. 1 Touch "LOCAL" in memory. BSM begins to set the sensitivity. To cancel the storage ...
Owner's Manual
Page 93
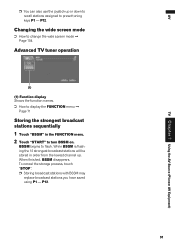
BSSM begins to turn BSSM on. P12. 91 Changing the wide screen mode ➲ How to change the wide screen mode ➞ Page 104 Advanced TV tuner operation (1) (1) Function display Shows the function names. ➲ How to display the FUNCTION menu ➞ Page ... menu. 2 Touch "START" to flash. When finished, BSSM disappears. To cancel the storage process, touch "STOP". ❒ Storing broadcast stations with BSSM may replace broadcast stations you have saved using P1 - AV TV Chapter 7 Using the AV Source (Pioneer AV Equipment) ❒ You can also use the joystick up .
BSSM begins to turn BSSM on. P12. 91 Changing the wide screen mode ➲ How to change the wide screen mode ➞ Page 104 Advanced TV tuner operation (1) (1) Function display Shows the function names. ➲ How to display the FUNCTION menu ➞ Page ... menu. 2 Touch "START" to flash. When finished, BSSM disappears. To cancel the storage process, touch "STOP". ❒ Storing broadcast stations with BSSM may replace broadcast stations you have saved using P1 - AV TV Chapter 7 Using the AV Source (Pioneer AV Equipment) ❒ You can also use the joystick up .
Owner's Manual
Page 117
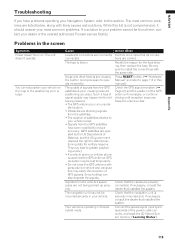
Problems in the screen Symptom Power doesn't turn on the map or the positioning error is large. ble ...most common problems. If a solution to your problem cannot be found here, contact your dealer or the nearest authorized Pioneer service facility. The unit doesn't operate. Cause Leads and connectors are listed below, along with the same rate....once more that the cables are properly connected. Be very sure to distort positioning data for the fuse blowing, then replace the fuse. Check that all connections are not being picked up properly. Connect the speed signal input (pink lead...
Problems in the screen Symptom Power doesn't turn on the map or the positioning error is large. ble ...most common problems. If a solution to your problem cannot be found here, contact your dealer or the nearest authorized Pioneer service facility. The unit doesn't operate. Cause Leads and connectors are listed below, along with the same rate....once more that the cables are properly connected. Be very sure to distort positioning data for the fuse blowing, then replace the fuse. Check that all connections are not being picked up properly. Connect the speed signal input (pink lead...

Owner's Manual
Page 119
Rear display picture disappears. Clean disc. The disc is selected. Replace disc. (Refer to "Handing and care of the disc" on the rear display while the PICTURE ADJUST is carried out. The source without a video is ... source display and then select the correct setting for CAMERA. ➲ About CAMERA setting ➞ Page 102 The back light of the disc" on the screen. Switch the source with a video. Select view mode other than Rear View. secured. The disc is not possible. Connect a parking brake cord correctly, and apply...
Rear display picture disappears. Clean disc. The disc is selected. Replace disc. (Refer to "Handing and care of the disc" on the rear display while the PICTURE ADJUST is carried out. The source without a video is ... source display and then select the correct setting for CAMERA. ➲ About CAMERA setting ➞ Page 102 The back light of the disc" on the screen. Switch the source with a video. Select view mode other than Rear View. secured. The disc is not possible. Connect a parking brake cord correctly, and apply...

Installation Manual
Page 19
...turned ON (or turned to install the correct fuse with the label upward. A disc which is inserted. Noise and other than [R] position, the screen will not rise. Connect a parking brake cord, and apply the parking brake. Select view mode other factors are incorrectly connected. Turn the attenuator or...10142; Page 18) Confirm once more that all connections are heard. Select SOURCE in REAR DISP menu.) The setting for the fuse blowing, then replace the fuse. Turn the volume up or CD playback is not connected. Clean disc. Check what type the disc is blown. Press RESET button. ...
...turned ON (or turned to install the correct fuse with the label upward. A disc which is inserted. Noise and other than [R] position, the screen will not rise. Connect a parking brake cord, and apply the parking brake. Select view mode other factors are incorrectly connected. Turn the attenuator or...10142; Page 18) Confirm once more that all connections are heard. Select SOURCE in REAR DISP menu.) The setting for the fuse blowing, then replace the fuse. Turn the volume up or CD playback is not connected. Clean disc. Check what type the disc is blown. Press RESET button. ...


