
Owner's Manual
Page 22
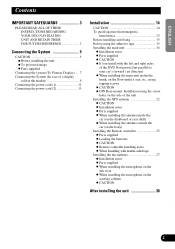
...is in the form of a function reference giving voice commands while under guidance. 8. Read the chapters marked * before attempting to obtain guidance to your Navigation System. 5. You will help you greatly as play DVD or CD. Read it to learn more about the useful features available to you fully understand your... an overview of the system and explain how to prepare it for checking the details of each item on a number of settings. Playing DVD/CD With this unit, you see "Display Information" in the end of this manual for use this manual For reasons of safety, it when you don't...
...is in the form of a function reference giving voice commands while under guidance. 8. Read the chapters marked * before attempting to obtain guidance to your Navigation System. 5. You will help you greatly as play DVD or CD. Read it to learn more about the useful features available to you fully understand your... an overview of the system and explain how to prepare it for checking the details of each item on a number of settings. Playing DVD/CD With this unit, you see "Display Information" in the end of this manual for use this manual For reasons of safety, it when you don't...

Owner's Manual
Page 25
...and to scroll the map. sThe Remote Controller 1 NEXT ZOOM 2 PREV 4 OK 6 8 10 11 12 NAVI MENU DVD NAVI VoL TOP MENU MENU DETOUR DISPLAY CANCEL ROUTE GUIDE 1 2 ABC 3 DEF 4 GHI 5 JKL 6MNO 13 7.... ➲ With the "CD-SR80" Steering Remote Controller (sold separately), you to command the Navigation System by pressing the BAND button of the Steering Remote Controller, you move the scale con3 troller ...Chapter 1 Getting Started Setup 2: Getting to Know the Components and What They Do Before using this unit, get to know the name of each component and how it is displayed. Also, when a ...
...and to scroll the map. sThe Remote Controller 1 NEXT ZOOM 2 PREV 4 OK 6 8 10 11 12 NAVI MENU DVD NAVI VoL TOP MENU MENU DETOUR DISPLAY CANCEL ROUTE GUIDE 1 2 ABC 3 DEF 4 GHI 5 JKL 6MNO 13 7.... ➲ With the "CD-SR80" Steering Remote Controller (sold separately), you to command the Navigation System by pressing the BAND button of the Steering Remote Controller, you move the scale con3 troller ...Chapter 1 Getting Started Setup 2: Getting to Know the Components and What They Do Before using this unit, get to know the name of each component and how it is displayed. Also, when a ...

Owner's Manual
Page 26
...pressed for more than two seconds, you can switch to operate either the Navigation System or the DVD/CD. This button is used only when the navigation image (RGB image) is output from RCA Video output (yellow) of the Hide-away Unit of this product. (For details, see the installation manual.) ➲...it upwards increases the volume. • When the Dipswitch 2 is OFF, volume of the voice guidance of the Navigation System is adjusted. • When the Dipswitch 2 is ON, the volume of Pioneer Head Unit is also switched (see "How to Listen to a CD" on page 110 and "How to traffic ...
...pressed for more than two seconds, you can switch to operate either the Navigation System or the DVD/CD. This button is used only when the navigation image (RGB image) is output from RCA Video output (yellow) of the Hide-away Unit of this product. (For details, see the installation manual.) ➲...it upwards increases the volume. • When the Dipswitch 2 is OFF, volume of the voice guidance of the Navigation System is adjusted. • When the Dipswitch 2 is ON, the volume of Pioneer Head Unit is also switched (see "How to Listen to a CD" on page 110 and "How to traffic ...
Owner's Manual
Page 29
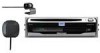
... damaged, or a malfunction may break the main unit of the navigation system, or corrupt the data stored on the front of the Disc" on page 135 for advice on page 106) ➲ Do not attempt to use discs other than a disc designed for playing the DVD-video or Audio-CD, see "Before Using... completely.) 1 3 2 Caution Do not remove the PC card while the PC card lock lamp is red. Please use only the disc specified by Pioneer. (for this system. Setting the PC card Open the cover at the front of insertion. Chapter 1 Getting Started ➲ Do not try to use discs...
... damaged, or a malfunction may break the main unit of the navigation system, or corrupt the data stored on the front of the Disc" on page 135 for advice on page 106) ➲ Do not attempt to use discs other than a disc designed for playing the DVD-video or Audio-CD, see "Before Using... completely.) 1 3 2 Caution Do not remove the PC card while the PC card lock lamp is red. Please use only the disc specified by Pioneer. (for this system. Setting the PC card Open the cover at the front of insertion. Chapter 1 Getting Started ➲ Do not try to use discs...
Owner's Manual
Page 137
...scratched or bent. • This product is designed for use with DVD, CD Formats" on page 106 for use with a soft cloth (from the center outward). • At extremely high temperatures, a temperature cutout protects the Navigation System by driving may sometimes interrupt the reading of data from the...• Never apply solvents to provide greater protection against warping. Use of shaped discs is not a sign of the malfunction of the unit. Appendix Handling and Care of the Disc Some basic precautions are necessary when handling your disc clean and free of dust. Discs you ...
...scratched or bent. • This product is designed for use with DVD, CD Formats" on page 106 for use with a soft cloth (from the center outward). • At extremely high temperatures, a temperature cutout protects the Navigation System by driving may sometimes interrupt the reading of data from the...• Never apply solvents to provide greater protection against warping. Use of shaped discs is not a sign of the malfunction of the unit. Appendix Handling and Care of the Disc Some basic precautions are necessary when handling your disc clean and free of dust. Discs you ...

Owner's Manual
Page 150
...DVD-ROM A disc used to your route is given as railway stations, shops, restaurants, and amusement parks. Favorite location A frequently visited location (such as traffic jams or accidents on the screen. The next way point along your route, generally intersections. Menu A list of options shown on the Remote Controller; The Navigation...data. Point of previously searched destinations, way points and locations registered manually. Remote Controller The remote control unit for a variety of purposes. your car; A learning function increases its accuracy and two sets of ...
...DVD-ROM A disc used to your route is given as railway stations, shops, restaurants, and amusement parks. Favorite location A frequently visited location (such as traffic jams or accidents on the screen. The next way point along your route, generally intersections. Menu A list of options shown on the Remote Controller; The Navigation...data. Point of previously searched destinations, way points and locations registered manually. Remote Controller The remote control unit for a variety of purposes. your car; A learning function increases its accuracy and two sets of ...
Other Manual
Page 2
Please comply with this unit. 1 IMPORTANT INFORMATION ABOUT YOUR NEW DVD NAVIGATION UNIT AND THIS MANUAL • The Pioneer DVD Navigation Unit is intended solely as an aid to you to install this DVD Navigation Unit is not a substitute for your attentiveness, judgement and care while driving. • Do not use of navigation systems in your car. Not all emergency service facilities are...
Please comply with this unit. 1 IMPORTANT INFORMATION ABOUT YOUR NEW DVD NAVIGATION UNIT AND THIS MANUAL • The Pioneer DVD Navigation Unit is intended solely as an aid to you to install this DVD Navigation Unit is not a substitute for your attentiveness, judgement and care while driving. • Do not use of navigation systems in your car. Not all emergency service facilities are...
Other Manual
Page 3
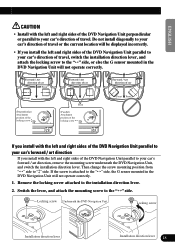
... left and right sides of the DVD Navigation Unit parallel to your car's forward / art direction - CAUTION - When installing the microphone on the steering column - When installing the microphone on the sun visor - Parts supplied Connecting the system (To Pioneer Display) .... 7 Connecting the System (In case of the unit Installing the GPS antenna 22 - CAUTION...
... left and right sides of the DVD Navigation Unit parallel to your car's forward / art direction - CAUTION - When installing the microphone on the steering column - When installing the microphone on the sun visor - Parts supplied Connecting the system (To Pioneer Display) .... 7 Connecting the System (In case of the unit Installing the GPS antenna 22 - CAUTION...
Other Manual
Page 4
...aid to you in your car. Do not operate your DVD Navigation Unit if doing so will divert your attention from the safe operation of your DVD Navigation Unit. 2. Certain state laws may in light of your navigation system. 6. This unit is not a substitute for future reference. 3. Please comply...driving conditions. 3 Keep this system in the operation of objects shown on the screen, and compass directions. fully. 4. This DVD Navigation Unit may restrict the placement and use of this manual handy for your car. Always observe safe driving rules and follow the instructions ...
...aid to you in your car. Do not operate your DVD Navigation Unit if doing so will divert your attention from the safe operation of your DVD Navigation Unit. 2. Certain state laws may in light of your navigation system. 6. This unit is not a substitute for future reference. 3. Please comply...driving conditions. 3 Keep this system in the operation of objects shown on the screen, and compass directions. fully. 4. This DVD Navigation Unit may restrict the placement and use of this manual handy for your car. Always observe safe driving rules and follow the instructions ...

Other Manual
Page 5
ENGLISH ESPAÑOL DEUTSCH 7. Installation or servicing of the DVD Navigation Unit by yourself. As with any accessory in your car's interior, the DVD Navigation Unit should not divert your attention from the safe operation of electric shock or other hazards. 9. If you ... can be dangerous and could expose you experience difficulty in electronic equipment and automotive accessories may be considerably more severe if your DVD Navigation Unit by persons without training and experience in operating the system or reading the display, please make adjustments while safely parked. 8. ...
ENGLISH ESPAÑOL DEUTSCH 7. Installation or servicing of the DVD Navigation Unit by yourself. As with any accessory in your car's interior, the DVD Navigation Unit should not divert your attention from the safe operation of electric shock or other hazards. 9. If you ... can be dangerous and could expose you experience difficulty in electronic equipment and automotive accessories may be considerably more severe if your DVD Navigation Unit by persons without training and experience in operating the system or reading the display, please make adjustments while safely parked. 8. ...
Other Manual
Page 6
...steering column or shift lever. Do not allow the GPS antenna lead or microphone lead to authorised Pioneer service personnel. • Secure all wiring with moving parts of the DVD navigation unit and tapping into the engine compartment. Be sure to make it will not obstruct driving. •..., causing overheating. 5 Take extra care in such a way that you to risk of your DVD navigation unit yourself. If the insulation heats up, wires may expose you install or service your navigation unit to become damaged, resulting in a short circuit or malfunction. • Do not cut the ...
...steering column or shift lever. Do not allow the GPS antenna lead or microphone lead to authorised Pioneer service personnel. • Secure all wiring with moving parts of the DVD navigation unit and tapping into the engine compartment. Be sure to make it will not obstruct driving. •..., causing overheating. 5 Take extra care in such a way that you to risk of your DVD navigation unit yourself. If the insulation heats up, wires may expose you install or service your navigation unit to become damaged, resulting in a short circuit or malfunction. • Do not cut the ...

Other Manual
Page 15
...supplied ones are used, they may damage internal parts of the unit or they may work loose and the unit may come off. • It is nothing behind the dashboard or panelling when drilling holes in your DVD navigation unit yourself. If any electrical lead. Please comply with any parts ...of the car, such as on the floor in front of the DVD navigation unit. 14 FRANÇAIS ITALIANO NEDERLANDS Refer all applicable laws and regulations regarding the use, installation, and operation of your navigation system. • Pioneer does not recommend that leads cannot get caught in a door or the...
...supplied ones are used, they may damage internal parts of the unit or they may work loose and the unit may come off. • It is nothing behind the dashboard or panelling when drilling holes in your DVD navigation unit yourself. If any electrical lead. Please comply with any parts ...of the car, such as on the floor in front of the DVD navigation unit. 14 FRANÇAIS ITALIANO NEDERLANDS Refer all applicable laws and regulations regarding the use, installation, and operation of your navigation system. • Pioneer does not recommend that leads cannot get caught in a door or the...
Other Manual
Page 19
...displayed incorrectly. • If you install with the left and right sides of the DVD Navigation Unit parallel to your car's forward / art direction, remove the mounting screw underneath the DVD Navigation Unit, and switch the installation direction lever. Remove the locking screw attached to "↕" side...lever Installation direction lever 18 ENGLISH ESPAÑOL DEUTSCH CAUTION • Install with the left and right sides of the DVD Navigation Unit perpendicular or parallel to your car's direction of travel, switch the installation direction lever, and attach the locking screw to ...
...displayed incorrectly. • If you install with the left and right sides of the DVD Navigation Unit parallel to your car's forward / art direction, remove the mounting screw underneath the DVD Navigation Unit, and switch the installation direction lever. Remove the locking screw attached to "↕" side...lever Installation direction lever 18 ENGLISH ESPAÑOL DEUTSCH CAUTION • Install with the left and right sides of the DVD Navigation Unit perpendicular or parallel to your car's direction of travel, switch the installation direction lever, and attach the locking screw to ...


