Owner's Manual
Page 1
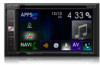
...installation may be required. Be sure to read Important Information for the User includes the important information that the product is properly connected to all users: This software requires that you must understand before using this product. English Operation Manual MULTIMEDIA NAVIGATION RECEIVER AVIC-8100NEX AVIC-7100NEX AVIC-6100NEX AVIC-5100NEX... Notice to your vehicle's parking brake and depending on your Authorized Pioneer Electronics retailer or call us...
...installation may be required. Be sure to read Important Information for the User includes the important information that the product is properly connected to all users: This software requires that you must understand before using this product. English Operation Manual MULTIMEDIA NAVIGATION RECEIVER AVIC-8100NEX AVIC-7100NEX AVIC-6100NEX AVIC-5100NEX... Notice to your vehicle's parking brake and depending on your Authorized Pioneer Electronics retailer or call us...
Owner's Manual
Page 2
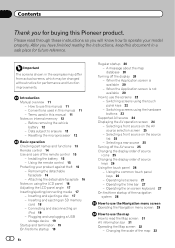
... Operating the Navigation menu screen 29 How to use the map How to read through these instructions so you for buying this manual 11 - Installing the battery 15 - Contents Thank you will know how to operate your product against theft 16 - After you have finished ...reading the instructions, keep this document in this Pioneer product. Before removing the vehicle battery 12 - Removing the detachable faceplate 16 - Attaching the ...
... Operating the Navigation menu screen 29 How to use the map How to read through these instructions so you for buying this manual 11 - Installing the battery 15 - Contents Thank you will know how to operate your product against theft 16 - After you have finished ...reading the instructions, keep this document in this Pioneer product. Before removing the vehicle battery 12 - Removing the detachable faceplate 16 - Attaching the ...

Owner's Manual
Page 12
...not be problems with a pen tip or other pointed implement. If there appears to this product for the first time after installation. ! Settings and recorded contents are collectively referred to the factory settings. Resetting the microprocessor CAUTION Pressing the RESET button resets ...settings and recorded contents to as the "external storage device (USB, SD)". If this manual, iPod and iPhone will be erased and must be reset. 6100NEX 5100NEX Data subject to the factory settings. 8100NEX 7100NEX Notes on the map with a significant positioning error...
...not be problems with a pen tip or other pointed implement. If there appears to this product for the first time after installation. ! Settings and recorded contents are collectively referred to the factory settings. Resetting the microprocessor CAUTION Pressing the RESET button resets ...settings and recorded contents to as the "external storage device (USB, SD)". If this manual, iPod and iPhone will be erased and must be reset. 6100NEX 5100NEX Data subject to the factory settings. 8100NEX 7100NEX Notes on the map with a significant positioning error...
Owner's Manual
Page 19
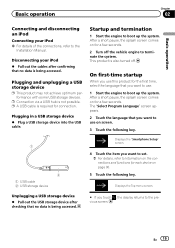
... first time, select the language that you want to use . 1 Start the engine to terminate the system. Startup and termination 1 Start the engine to the Installation Manual. En 19 The "Select Program Language" screen appears. 2 Touch the language that you want to use on page 90. 5 Touch the following key. 1 2 1 USB cable...
... first time, select the language that you want to use . 1 Start the engine to terminate the system. Startup and termination 1 Start the engine to the Installation Manual. En 19 The "Select Program Language" screen appears. 2 Touch the language that you want to use on page 90. 5 Touch the following key. 1 2 1 USB cable...

Owner's Manual
Page 73
...the following URL and refer to "HOW TO UPDATE?" To update the content, download the update on your iPhone or smartphone (Android). http://pioneer.naviextras.com Customizing preferences of the navigation 7 Touch [Associate New Phone]. 8 Touch the iPhone or smartphone (Android) that you want to ...USB cable connection. = For details of the Bluetooth connection, refer to Chapter 11. = For details of the USB connections, refer to the Installation Manual. 4 Press the MAP button. p For details, access the following key. En 73 Getting the map update You can update existing content,...
...the following URL and refer to "HOW TO UPDATE?" To update the content, download the update on your iPhone or smartphone (Android). http://pioneer.naviextras.com Customizing preferences of the navigation 7 Touch [Associate New Phone]. 8 Touch the iPhone or smartphone (Android) that you want to ...USB cable connection. = For details of the Bluetooth connection, refer to Chapter 11. = For details of the USB connections, refer to the Installation Manual. 4 Press the MAP button. p For details, access the following key. En 73 Getting the map update You can update existing content,...
Owner's Manual
Page 88
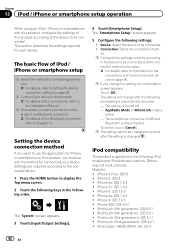
... section describes the settings required for each device on page 88. 2 Connect your device to this product. = For details of the connections, refer to the Installation Manual. 3 If necessary, connect your device to this product via Bluetooth connection. = For details of the Bluetooth connection, refer to be connected. iPhone 3GS: iOS 6.0.1 ! iPod...
... section describes the settings required for each device on page 88. 2 Connect your device to this product. = For details of the connections, refer to the Installation Manual. 3 If necessary, connect your device to this product via Bluetooth connection. = For details of the Bluetooth connection, refer to be connected. iPhone 3GS: iOS 6.0.1 ! iPod...
Owner's Manual
Page 122
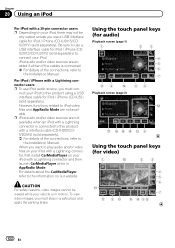
...cable for iPod / iPhone (CDIU201S/CD-IU201V) (sold separately). Be sure to use a USB interface cable for iPod / iPhone (CD-IU52) (sold separately) to the Installation Manual. For iPod / iPhone with a Lightning connector users p To use a USB interface cable for video) 1 i 23 4 5 6 j 7 b 9 a f ... connections, refer to play audio and/or video files on your iPod with a Lightning connector, first install CarMediaPlayer on our website. When you want to the Installation Manual. For details about the CarMediaPlayer, refer to this product with a interface cable (CD-IH202/CDIV202AV) ...
...cable for iPod / iPhone (CDIU201S/CD-IU201V) (sold separately). Be sure to use a USB interface cable for iPod / iPhone (CD-IU52) (sold separately) to the Installation Manual. For iPod / iPhone with a Lightning connector users p To use a USB interface cable for video) 1 i 23 4 5 6 j 7 b 9 a f ... connections, refer to play audio and/or video files on your iPod with a Lightning connector, first install CarMediaPlayer on our website. When you want to the Installation Manual. For details about the CarMediaPlayer, refer to this product with a interface cable (CD-IH202/CDIV202AV) ...
Owner's Manual
Page 134
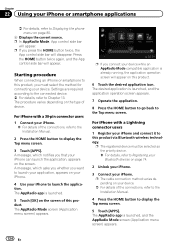
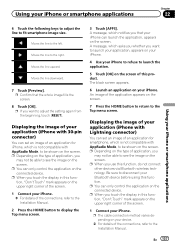
... screen (Application menu screen) appears. 134 En p The cable connection method varies depending on the screen of the connections, refer to the Installation Manual. 4 Press the HOME button to the Top menu screen. p If you press the HOME button twice, the App control side bar will...are required according to the connected device. = For details, refer to Registering your Bluetooth devices on the type of the connections, refer to the Installation Manual. 2 Press the HOME button to this product, you that your iPhone can launch the application, appears on page 80. 6 Displays the current...
... screen (Application menu screen) appears. 134 En p The cable connection method varies depending on the screen of the connections, refer to the Installation Manual. 4 Press the HOME button to the Top menu screen. p If you press the HOME button twice, the App control side bar will...are required according to the connected device. = For details, refer to Registering your Bluetooth devices on the type of the connections, refer to the Installation Manual. 2 Press the HOME button to this product, you that your iPhone can launch the application, appears on page 80. 6 Displays the current...
Owner's Manual
Page 135
... enter characters properly. p The cable connection method varies depending on the iPhone. p If you tap the text input area of the connections, refer to the Installation Manual. 4 Press the HOME button to the Top menu screen. p This function is launched, and the application operation screen appears. 7 Operate the application. 8 Press the HOME...
... enter characters properly. p The cable connection method varies depending on the iPhone. p If you tap the text input area of the connections, refer to the Installation Manual. 4 Press the HOME button to the Top menu screen. p This function is launched, and the application operation screen appears. 7 Operate the application. 8 Press the HOME...
Owner's Manual
Page 137
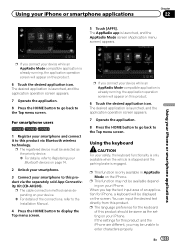
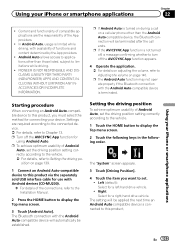
... 8 Touch [OK]. Displaying the image of your iPhone to refuse to see the image on the type of the connections, refer to the Installation Manual. 2 Press the HOME button to disconnect your device. = For details of the application appears on the screen. p If you want to ...connections, refer to adjust the setting again from the beginning, touch [RESET]. p You can set an image of application, you want to the Installation Manual. p Depending on the screen. p When you touch the display in this function, do not connect other devices via Bluetooth wireless technology. p ...
... 8 Touch [OK]. Displaying the image of your iPhone to refuse to see the image on the type of the connections, refer to the Installation Manual. 2 Press the HOME button to disconnect your device. = For details of the application appears on the screen. p If you want to ...connections, refer to adjust the setting again from the beginning, touch [RESET]. p You can set an image of application, you want to the Installation Manual. p Depending on the screen. p When you touch the display in this function, do not connect other devices via Bluetooth wireless technology. p ...

Owner's Manual
Page 138
... function is not guaranteed. Chapter 22 Using your country or region. p When you use Android Auto, set an image of the connections, refer to the Installation Manual. 2 Press the HOME button to display the Top menu screen. 3 Touch [APPS]. p The cable connection method varies depending on the connected device. The image in...
... function is not guaranteed. Chapter 22 Using your country or region. p When you use Android Auto, set an image of the connections, refer to the Installation Manual. 2 Press the HOME button to display the Top menu screen. 3 Touch [APPS]. p The cable connection method varies depending on the connected device. The image in...
Owner's Manual
Page 139
... are required according to the connected device. = For details, refer to this product. PIONEER IS NOT RESPONSIBLE AND DISCLAIMS LIABILITY FOR THIRD PARTY (NON-PIONEER) APPS AND CONTENT, INCLUDING WITHOUT LIMITATION ANY INACCURACIES OR INCOMPLETE INFORMATION. p If the ...To achieve optimum usability of the App providers. ! Left (default): Select for use with availability of the connections, refer to the Installation Manual. 2 Press the HOME button to limitations while driving. ! Starting procedure When connecting an Android Auto-compatible device to Adjusting the ...
... are required according to the connected device. = For details, refer to this product. PIONEER IS NOT RESPONSIBLE AND DISCLAIMS LIABILITY FOR THIRD PARTY (NON-PIONEER) APPS AND CONTENT, INCLUDING WITHOUT LIMITATION ANY INACCURACIES OR INCOMPLETE INFORMATION. p If the ...To achieve optimum usability of the App providers. ! Left (default): Select for use with availability of the connections, refer to the Installation Manual. 2 Press the HOME button to limitations while driving. ! Starting procedure When connecting an Android Auto-compatible device to Adjusting the ...
Owner's Manual
Page 140
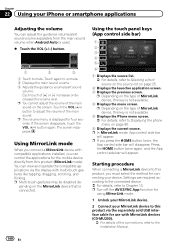
... button twice again, and the App control side bar will disappear. Using MirrorLink mode When you connect a MirrorLink device with compatible applications installed, you press the HOME button twice, the App control side bar will appear. p Multi-touch gestures may be disabled de- pending ...side bar) 1 2 3 4 5 6 1 Displays the source list. = For details, refer to adjust the volume of the connections, refer to the Installation Manual. 140 En Settings are required according to the connected device. = For details, refer to unmute. 2 Displays the main sound volume. 3 Adjusts the guidance ...
... button twice again, and the App control side bar will disappear. Using MirrorLink mode When you connect a MirrorLink device with compatible applications installed, you press the HOME button twice, the App control side bar will appear. p Multi-touch gestures may be disabled de- pending ...side bar) 1 2 3 4 5 6 1 Displays the source list. = For details, refer to adjust the volume of the connections, refer to the Installation Manual. 140 En Settings are required according to the connected device. = For details, refer to unmute. 2 Displays the main sound volume. 3 Adjusts the guidance ...
Owner's Manual
Page 144
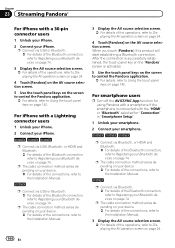
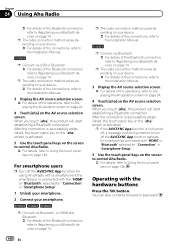
...AV source selection screen. p The cable connection method varies depending on your device. = For details of the connections, refer to the Installation Manual. 5100NEX p Connect via USB or Bluetooth. = For details of the Bluetooth connection, refer to Registering your Bluetooth devices on page 142. After... on page 74. p The cable connection method varies depending on your device. = For details of the connections, refer to the Installation Manual. 5100NEX p Connect via Bluetooth, or HDMI and Bluetooth. = For details of the Bluetooth connection, refer to Registering your device. = For...
...AV source selection screen. p The cable connection method varies depending on your device. = For details of the connections, refer to the Installation Manual. 5100NEX p Connect via USB or Bluetooth. = For details of the Bluetooth connection, refer to Registering your Bluetooth devices on page 142. After... on page 74. p The cable connection method varies depending on your device. = For details of the connections, refer to the Installation Manual. 5100NEX p Connect via Bluetooth, or HDMI and Bluetooth. = For details of the Bluetooth connection, refer to Registering your device. = For...
Owner's Manual
Page 148
...74. 148 En p The cable connection method varies depending on your device. = For details of the connections, refer to the Installation Manual. 5100NEX p Connect via USB or Bluetooth. = For details of the Bluetooth connection, refer to Registering your Bluetooth devices on page 74...establishing a Bluetooth connection. p The cable connection method varies depending on your device. = For details of the connections, refer to the Installation Manual. 5100NEX p Connect via Bluetooth. = For details of the Bluetooth connection, refer to Registering your Bluetooth devices on page 74. Chapter 24 Using...
...74. 148 En p The cable connection method varies depending on your device. = For details of the connections, refer to the Installation Manual. 5100NEX p Connect via USB or Bluetooth. = For details of the Bluetooth connection, refer to Registering your Bluetooth devices on page 74...establishing a Bluetooth connection. p The cable connection method varies depending on your device. = For details of the connections, refer to the Installation Manual. 5100NEX p Connect via Bluetooth. = For details of the Bluetooth connection, refer to Registering your Bluetooth devices on page 74. Chapter 24 Using...

Owner's Manual
Page 172
.... = For details, refer to Setting the time and date on page 221. 3 Displays the Setting menu screen. 4 Recalls equalizer curves. = For details, refer to the Installation Manual.
.... = For details, refer to Setting the time and date on page 221. 3 Displays the Setting menu screen. 4 Recalls equalizer curves. = For details, refer to the Installation Manual.

Owner's Manual
Page 173
... date setting screen. = For details, refer to Setting the time and date on page 174. 8 Changes the wide screen mode. = For details, refer to the Installation Manual.
... date setting screen. = For details, refer to Setting the time and date on page 174. 8 Changes the wide screen mode. = For details, refer to the Installation Manual.
Owner's Manual
Page 175
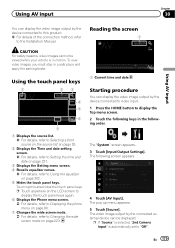
... output by the device connected to this area hides the touch panel keys. Touching this product. = For details of the connection method, refer to the Installation Manual. p If "Source" is selected, "2nd Camera Input" is in motion. The video image output by the connected external device can be viewed while your vehicle...
... output by the device connected to this area hides the touch panel keys. Touching this product. = For details of the connection method, refer to the Installation Manual. p If "Source" is selected, "2nd Camera Input" is in motion. The video image output by the connected external device can be viewed while your vehicle...
Owner's Manual
Page 205
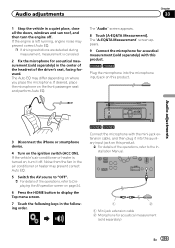
... measurement (sold separately) in the center of the headrest of the operations, refer to display the Top menu screen. 7 Touch the following order. 6100NEX 5100NEX Connect the microphone with this product. 8100NEX 7100NEX Plug the microphone into the auxiliary input jack on , turn the engine off . The "A-EQ&TA Measurement...from the fan in the following keys in the air conditioner or heater may differ depending on page 24. 6 Press the HOME button to the Installation Manual. 1 2 1 Mini-jack extension cable 2 Microphone for acoustical measurement (sold separately) En 205
... measurement (sold separately) in the center of the headrest of the operations, refer to display the Top menu screen. 7 Touch the following order. 6100NEX 5100NEX Connect the microphone with this product. 8100NEX 7100NEX Plug the microphone into the auxiliary input jack on , turn the engine off . The "A-EQ&TA Measurement...from the fan in the following keys in the air conditioner or heater may differ depending on page 24. 6 Press the HOME button to the Installation Manual. 1 2 1 Mini-jack extension cable 2 Microphone for acoustical measurement (sold separately) En 205
Installation Manual
Page 5
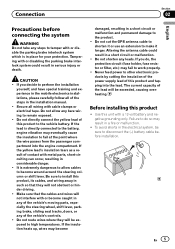
... column or shift lever. Do not allow cables to work properly. ! Altering the antenna cable could result in the mobile electronics installations, please carefully follow all wiring with a 12-volt battery and negative grounding only. The current capacity of the vehicle's controls. ... occur, resulting in a fire or malfunction. ! Secure all of contact with or disabling the parking brake interlock system could result in the installation manual. ! If the yellow lead's insulation tears as a result of the steps in a short circuit or malfunction. ! It is extremely dangerous...
... column or shift lever. Do not allow cables to work properly. ! Altering the antenna cable could result in the mobile electronics installations, please carefully follow all wiring with a 12-volt battery and negative grounding only. The current capacity of the vehicle's controls. ... occur, resulting in a fire or malfunction. ! Secure all of contact with or disabling the parking brake interlock system could result in the installation manual. ! If the yellow lead's insulation tears as a result of the steps in a short circuit or malfunction. ! It is extremely dangerous...

