Owner's Manual
Page 3
..." 43 Searching for a location by the coordinates 44 Searching for recently 42 - Canceling the current route guidance 49 - Watching the simulation of Interest (POI) 38 - Setting the trip logger 59 En 3 Control keys on or off 56 Checking useful information about your trip Checking useful information 57 Recording your travel history...
..." 43 Searching for a location by the coordinates 44 Searching for recently 42 - Canceling the current route guidance 49 - Watching the simulation of Interest (POI) 38 - Setting the trip logger 59 En 3 Control keys on or off 56 Checking useful information about your trip Checking useful information 57 Recording your travel history...
Owner's Manual
Page 4
... the screen 80 Making a phone call 83 - Contents - Entering the fuel consumption information 60 - Restoring the default settings 63 Information on each option of the navigation Customizing the navigation settings 62 - "Route Preferences" settings 63 - "Fuel" settings 69 - Be sure to a Bluetooth device automatically 76 - AVICSYNC compatibility 72 - Touch panel keys 80 - Dialing from...
... the screen 80 Making a phone call 83 - Contents - Entering the fuel consumption information 60 - Restoring the default settings 63 Information on each option of the navigation Customizing the navigation settings 62 - "Route Preferences" settings 63 - "Fuel" settings 69 - Be sure to a Bluetooth device automatically 76 - AVICSYNC compatibility 72 - Touch panel keys 80 - Dialing from...
Owner's Manual
Page 5
Contents iPod / iPhone or smartphone setup operation The basic flow of iPod / iPhone or smartphone setup 88 Setting the device connection method 88 iPod compatibility 88 Android™ device compatibility 89 AppRadio Mode Compatibility 89 MirrorLink device compatibility 89 Information on the connections...audio) 105 Reading the screen (for video) 105 Starting procedure 106 Selecting files from the file name list 106 Playing tracks in random order 106 Setting a repeat play range 106 Switching the media file type 107 Searching for the part you want to play 107 Operating the DVD menu 107 Switching...
Contents iPod / iPhone or smartphone setup operation The basic flow of iPod / iPhone or smartphone setup 88 Setting the device connection method 88 iPod compatibility 88 Android™ device compatibility 89 AppRadio Mode Compatibility 89 MirrorLink device compatibility 89 Information on the connections...audio) 105 Reading the screen (for video) 105 Starting procedure 106 Selecting files from the file name list 106 Playing tracks in random order 106 Setting a repeat play range 106 Switching the media file type 107 Searching for the part you want to play 107 Operating the DVD menu 107 Switching...
Owner's Manual
Page 6
...the playlist screen 126 Using iTunes Radio 127 - Starting procedure 134 - Displaying the image of your application (iPhone with Lightning connector) 137 - Setting the driving position 139 Using the touch panel keys 129 - Using the keyboard 135 - Displaying the image of your application (smartphone) 138 ...the screen (for audio) 123 Reading the screen (for video) 124 Reading the screen (for iTunes Radio) 124 Starting procedure 125 Setting the shuffle play 125 Setting a repeat play range 125 Selecting song or video sources from a music app other than iPod music, as the iPod source 129...
...the playlist screen 126 Using iTunes Radio 127 - Starting procedure 134 - Displaying the image of your application (iPhone with Lightning connector) 137 - Setting the driving position 139 Using the touch panel keys 129 - Using the keyboard 135 - Displaying the image of your application (smartphone) 138 ...the screen (for audio) 123 Reading the screen (for video) 124 Reading the screen (for iTunes Radio) 124 Starting procedure 125 Setting the shuffle play 125 Setting a repeat play range 125 Selecting song or video sources from a music app other than iPod music, as the iPod source 129...
Owner's Manual
Page 7
... Selecting files from the list 145 Creating a station 145 Operating with a Lightning connector users 147 - Registering the city 163 Setting parental lock 164 - Setting the passcode 164 - For iPhone with the hardware buttons 148 Using iDatalink Activating iDatalink Maestro 149 - For iPhone with the... of all channels 160 Selecting a channel from the category list 160 Switching the displayed list 160 Using the Replay™ function 161 Setting SiriusXM TuneStart™ 161 Using TuneScan™ 162 Using category scan 162 Using TuneMix™ 162 Checking the update Traffic and Weather ...
... Selecting files from the list 145 Creating a station 145 Operating with a Lightning connector users 147 - Registering the city 163 Setting parental lock 164 - Setting the passcode 164 - For iPhone with the hardware buttons 148 Using iDatalink Activating iDatalink Maestro 149 - For iPhone with the... of all channels 160 Selecting a channel from the category list 160 Switching the displayed list 160 Using the Replay™ function 161 Setting SiriusXM TuneStart™ 161 Using TuneScan™ 162 Using category scan 162 Using TuneMix™ 162 Checking the update Traffic and Weather ...
Owner's Manual
Page 8
... application for the dimmer function to the navigation screen 179 Activating the Bluetooth audio source 179 Setting the ever scroll 180 Setting AV input 180 Setting the rear view camera 180 - Setting the reversed image setting for the second camera input image 185 Turning off the demo screen 185 Selecting the system... the screen 172 Starting procedure 172 Using an AUX source Using the touch panel keys 173 Reading the screen 173 Starting procedure 173 Setting the video signal 174 Switching the operation screen 174 Using AV input Using the touch panel keys 175 Reading the screen 175 Starting ...
... application for the dimmer function to the navigation screen 179 Activating the Bluetooth audio source 179 Setting the ever scroll 180 Setting AV input 180 Setting the rear view camera 180 - Setting the reversed image setting for the second camera input image 185 Turning off the demo screen 185 Selecting the system... the screen 172 Starting procedure 172 Using an AUX source Using the touch panel keys 173 Reading the screen 173 Starting procedure 173 Setting the video signal 174 Switching the operation screen 174 Using AV input Using the touch panel keys 175 Reading the screen 175 Starting ...

Owner's Manual
Page 9
... the password 225 En 9 Contents Checking sensor learning status and driving status 191 Clearing the status 192 Checking the connections of DVDs 217 Setting the video signal for the rear view camera 218 Language code chart for DVDs 219 Favorite menu Creating a shortcut 220 Selecting a shortcut...adjustment 194 Switching sound muting/attenuation 195 Adjusting source levels 195 Adjusting the filter 198 - Before operating the Auto EQ function 204 - Setting the subtitle language 213 - Creating a user-defined color 209 Selecting the theme color 209 Selecting the clock image 209 Changing the ...
... the password 225 En 9 Contents Checking sensor learning status and driving status 191 Clearing the status 192 Checking the connections of DVDs 217 Setting the video signal for the rear view camera 218 Language code chart for DVDs 219 Favorite menu Creating a shortcut 220 Selecting a shortcut...adjustment 194 Switching sound muting/attenuation 195 Adjusting source levels 195 Adjusting the filter 198 - Before operating the Auto EQ function 204 - Setting the subtitle language 213 - Creating a user-defined color 209 Selecting the theme color 209 Selecting the clock image 209 Changing the ...
Owner's Manual
Page 10
... iOS 251 - LED (light-emitting diode) backlight 254 Display information 255 - Audio menu 257 - Conditions likely to the default settings 226 - Ambient conditions for playable media 242 - Lightning 251 - Video Setup menu 257 - Dolby Digital 242 Detailed information for playing... (LCD) screen 253 - Theme menu 256 - Deleting the password 225 - iTunes 251 - Phone menu 255 - Restoring the default settings 226 Appendix Troubleshooting 227 Error messages 229 Positioning technology 236 - When positioning by GPS 236 - Pandora® 252 - AVCHD recorded discs...
... iOS 251 - LED (light-emitting diode) backlight 254 Display information 255 - Audio menu 257 - Conditions likely to the default settings 226 - Ambient conditions for playable media 242 - Lightning 251 - Video Setup menu 257 - Dolby Digital 242 Detailed information for playing... (LCD) screen 253 - Theme menu 256 - Deleting the password 225 - iTunes 251 - Phone menu 255 - Restoring the default settings 226 Appendix Troubleshooting 227 Error messages 229 Positioning technology 236 - When positioning by GPS 236 - Pandora® 252 - AVCHD recorded discs...

Owner's Manual
Page 11
... are available on screen, you learn how to use this manual Finding the operation procedure for AVIC-8100NEX. How to as generalpurpose AV equipment. Conventions used in brackets [ ]: e.g.) [Disc], [AV Source Settings]. ! Extra information, alternatives and other keys on , take a few minutes to read Important...of an item displayed on the screen are presented in the following format: e.g.) p If the home location has not been stored yet, set the location first. ! If the following information about the conventions used in this manual "Front display" and "Rear display" In this manual...
... are available on screen, you learn how to use this manual Finding the operation procedure for AVIC-8100NEX. How to as generalpurpose AV equipment. Conventions used in brackets [ ]: e.g.) [Disc], [AV Source Settings]. ! Extra information, alternatives and other keys on , take a few minutes to read Important...of an item displayed on the screen are presented in the following format: e.g.) p If the home location has not been stored yet, set the location first. ! If the following information about the conventions used in this manual "Front display" and "Rear display" In this manual...

Owner's Manual
Page 12
... "USB storage device". If this product fails to using this manual, iPod and iPhone will be erased and must be reset. 6100NEX 5100NEX Data subject to erasure 1 The information is connected to this operation when a device is erased by disconnecting the yellow lead from the ...this product. tents will not be problems with a pen tip or other pointed implement. If there appears to the factory settings. Settings and recorded contents are reset to the factory settings. 8100NEX 7100NEX Notes on the map with a significant positioning error. 1 Turn the ignition switch OFF. 2 Press the...
... "USB storage device". If this product fails to using this manual, iPod and iPhone will be erased and must be reset. 6100NEX 5100NEX Data subject to erasure 1 The information is connected to this operation when a device is erased by disconnecting the yellow lead from the ...this product. tents will not be problems with a pen tip or other pointed implement. If there appears to the factory settings. Settings and recorded contents are reset to the factory settings. 8100NEX 7100NEX Notes on the map with a significant positioning error. 1 Turn the ignition switch OFF. 2 Press the...
Owner's Manual
Page 13
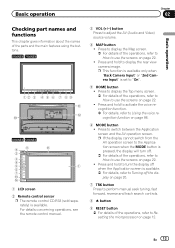
...and track search controls. 8 h button 9 RESET button = For details of the parts and the main features using the buttons. 8100NEX 7100NEX 12 3 4 5 6 7 8 9 b c a 6100NEX 5100NEX 9 8 b 2 3 4 5 1 6 7 d e 1 LCD screen 2 Remote control sensor p The remote control CD-R33 (sold separately) is available. p If the display cannot switch from ... to the Application screen when the MODE button is pressed, the display will turn the display off when the Application screen is set to display the rear view camera image. En 13 Press to display the Top menu screen. = For details of the operations...
...and track search controls. 8 h button 9 RESET button = For details of the parts and the main features using the buttons. 8100NEX 7100NEX 12 3 4 5 6 7 8 9 b c a 6100NEX 5100NEX 9 8 b 2 3 4 5 1 6 7 d e 1 LCD screen 2 Remote control sensor p The remote control CD-R33 (sold separately) is available. p If the display cannot switch from ... to the Application screen when the MODE button is pressed, the display will turn the display off when the Application screen is set to display the rear view camera image. En 13 Press to display the Top menu screen. = For details of the operations...
Owner's Manual
Page 19
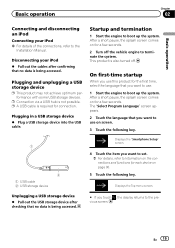
... cable. Basic operation Chapter 02 Basic operation Connecting and disconnecting an iPod Connecting your iPod % Pull out the cables after checking that you want to set. = For details, refer to Information on the connections and functions for each device on page 90. 5 Touch the following key. 1 2 1 USB cable 2 USB storage device...
... cable. Basic operation Chapter 02 Basic operation Connecting and disconnecting an iPod Connecting your iPod % Pull out the cables after checking that you want to set. = For details, refer to Information on the connections and functions for each device on page 90. 5 Touch the following key. 1 2 1 USB cable 2 USB storage device...
Owner's Manual
Page 23
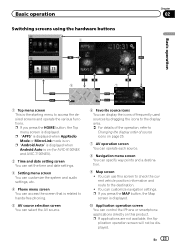
... this product. En 23 p "Android Auto" is displayed when Android Auto is on (for AVIC-8100NEX and AVIC-7100NEX). 2 Time and date setting screen You can set the time and date settings. 3 Setting menu screen You can customize the system and audio settings, etc. 4 Phone menu screen You can access the screen that is related to hands... starting menu to Changing the display order of the operation, refer to access the desired screens and operate the various functions. You can customize navigation settings.
... this product. En 23 p "Android Auto" is displayed when Android Auto is on (for AVIC-8100NEX and AVIC-7100NEX). 2 Time and date setting screen You can set the time and date settings. 3 Setting menu screen You can customize the system and audio settings, etc. 4 Phone menu screen You can access the screen that is related to hands... starting menu to Changing the display order of the operation, refer to access the desired screens and operate the various functions. You can customize navigation settings.
Owner's Manual
Page 24
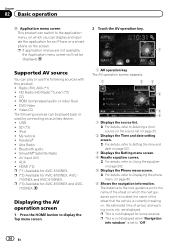
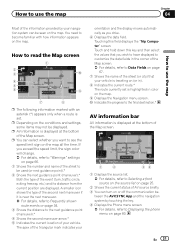
... Bluetooth audio ! SD (*3) ! AUX ! p (*3) Available for an iPhone or a smart- Pandora® ! SiriusXM® Satellite Radio ! AV input (AV) ! p (*2) Available for AVIC-5100NEX. The distance to the next guidance point, the name of the street on which you can switch to the application menu, on which the next... is located, the name of arrival, and warning icons, etc. HD Radio (HD Radio™ tuner) (*2) ! CD ! p This is set to Displaying the phone menu on , the estimated time of the street that the vehicle is currently traveling on page 80. 6 Shows the navigation ...
... Bluetooth audio ! SD (*3) ! AUX ! p (*3) Available for an iPhone or a smart- Pandora® ! SiriusXM® Satellite Radio ! AV input (AV) ! p (*2) Available for AVIC-5100NEX. The distance to the next guidance point, the name of the street on which you can switch to the application menu, on which the next... is located, the name of arrival, and warning icons, etc. HD Radio (HD Radio™ tuner) (*2) ! CD ! p This is set to Displaying the phone menu on , the estimated time of the street that the vehicle is currently traveling on page 80. 6 Shows the navigation ...
Owner's Manual
Page 25
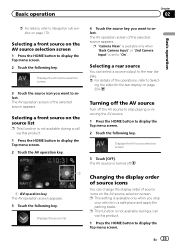
...to stop your vehicle in a safe place and apply the parking brake. En 25 Selecting a front source on the source list p This function is set to display the Top menu screen. 2 Touch the following key. Displays the source list. 4 Touch the source key you want to select. Changing the...only when "Back Camera Input" or "2nd Camera Input" is not available during a call via this product. 1 Press the HOME button to select. p This setting is not available during a call via this product. 1 Press the HOME button to display the Top menu screen. 2 Touch the following key. p This function...
...to stop your vehicle in a safe place and apply the parking brake. En 25 Selecting a front source on the source list p This function is set to display the Top menu screen. 2 Touch the following key. Displays the source list. 4 Touch the source key you want to select. Changing the...only when "Back Camera Input" or "2nd Camera Input" is not available during a call via this product. 1 Press the HOME button to select. p This setting is not available during a call via this product. 1 Press the HOME button to display the Top menu screen. 2 Touch the following key. p This function...
Owner's Manual
Page 26
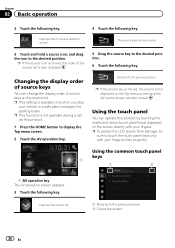
... following key. The source keys can change the display order of the source list is moved, the source icons displayed on the source list. p This setting is not available during a call via this product by touching the marks and items (touch panel keys) displayed on the screen directly with your fingers...
... following key. The source keys can change the display order of the source list is moved, the source icons displayed on the source list. p This setting is not available during a call via this product by touching the marks and items (touch panel keys) displayed on the screen directly with your fingers...
Owner's Manual
Page 28
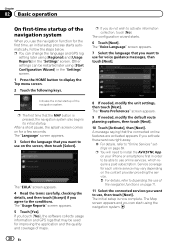
... voice guidance messages, then touch [Next]. The "Usage Reports" screen appears. 5 Touch [Yes]. p You can change the language and GPS log setting later using the navigation system. 28 En p The first time that the MAP button is now complete. The "Language" screen appears. 3 Select the... activate these services right away. = For details, refer to the conditions. The "Route Preferences" screen appears. 9 If needed , modify the unit settings, then touch [Next]. The "EULA" screen appears. 4 Read the terms carefully, checking the details, and then touch [Accept] if you agree to ...
... voice guidance messages, then touch [Next]. The "Usage Reports" screen appears. 5 Touch [Yes]. p You can change the language and GPS log setting later using the navigation system. 28 En p The first time that the MAP button is now complete. The "Language" screen appears. 3 Select the... activate these services right away. = For details, refer to the conditions. The "Route Preferences" screen appears. 9 If needed , modify the unit settings, then touch [Next]. The "EULA" screen appears. 4 Read the terms carefully, checking the details, and then touch [Accept] if you agree to ...
Owner's Manual
Page 29
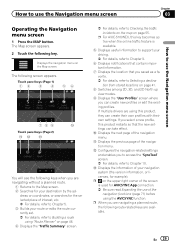
p For AVIC-5100NEX, this key becomes active when the online traffic feature is used for the selected place of interest, etc. = For details, refer to Chapter 5. 3 Builds your route or edits the route currently set. = For details, refer to Building a route using "Route Planner" on page 46. 4 ... the previous page of the navigation menu. If you select a new profile, this product, they can create their own profiles with their own settings. d Displays the information of your navigation system (the version information, or licenses, for your driving. = For details, refer to Chapter 9....
p For AVIC-5100NEX, this key becomes active when the online traffic feature is used for the selected place of interest, etc. = For details, refer to Chapter 5. 3 Builds your route or edits the route currently set. = For details, refer to Building a route using "Route Planner" on page 46. 4 ... the previous page of the navigation menu. If you select a new profile, this product, they can create their own profiles with their own settings. d Displays the information of your navigation system (the version information, or licenses, for your driving. = For details, refer to Chapter 9....
Owner's Manual
Page 31
... 6 Displays the data field. a Indicates the progress to the final destination.* AV information bar AV information is set is highlighted in ). 8 Indicates the current route.* The route currently set . p AV information is near the next maneuver. = For details, refer to Frequently shown route events on ... the current location of your navigation system can select whether you exceed the speed limit, the sign color will change. = For details, refer to "Warnings" settings on page 66. 1 Shows the number and name of the street to be displayed. En 31 How to read the Map screen 1 2 3 a 4 5...
... 6 Displays the data field. a Indicates the progress to the final destination.* AV information bar AV information is set is highlighted in ). 8 Indicates the current route.* The route currently set . p AV information is near the next maneuver. = For details, refer to Frequently shown route events on ... the current location of your navigation system can select whether you exceed the speed limit, the sign color will change. = For details, refer to "Warnings" settings on page 66. 1 Shows the number and name of the street to be displayed. En 31 How to read the Map screen 1 2 3 a 4 5...
Owner's Manual
Page 32
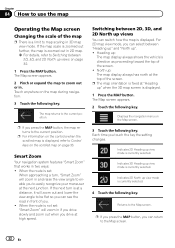
... MAP button, you press the MAP button, the map returns to the current position. p If you can switch how the map is not set : When approaching a turn is set : "Smart Zoom" will zoom in two ways: ! Displays the navigation menu on the map during navigation. 3 Touch the following key. Each time ... 33. Smart Zoom Your navigation system features "Smart Zoom" that works in if you drive slowly and zoom out when you touch the key the setting changes. Indicates 2D North up : The map display always has north at high speed. North up view mode is displayed, refer to Control keys ...
... MAP button, you press the MAP button, the map returns to the current position. p If you can switch how the map is not set : When approaching a turn is set : "Smart Zoom" will zoom in two ways: ! Displays the navigation menu on the map during navigation. 3 Touch the following key. Each time ... 33. Smart Zoom Your navigation system features "Smart Zoom" that works in if you drive slowly and zoom out when you touch the key the setting changes. Indicates 2D North up : The map display always has north at high speed. North up view mode is displayed, refer to Control keys ...


