
Installation Manual
Page 4
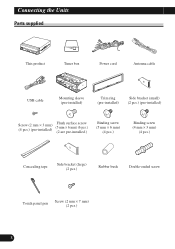
Connecting the Units Parts supplied This product Tuner box Power cord Antenna cable USB cable Mounting sleeve (pre-installed) Trim ring (pre-installed) Side bracket (small) (2 pcs.) (pre-installed) Screw (2 mm × 3 mm) (4 pcs.) (pre-installed) Flush surface screw (5 mm × 6 mm) (6 pcs.) (2 are pre-installed.) Binding screw (5 mm × 6 mm) (4 pcs.) Binding screw (4 mm × 3 mm) (4 pcs.) Concealing tape Side bracket (large) (2 pcs.) Rubber bush Double-ended screw Touch panel pen Screw (2 mm × 7 mm) (2 pcs.) 3
Connecting the Units Parts supplied This product Tuner box Power cord Antenna cable USB cable Mounting sleeve (pre-installed) Trim ring (pre-installed) Side bracket (small) (2 pcs.) (pre-installed) Screw (2 mm × 3 mm) (4 pcs.) (pre-installed) Flush surface screw (5 mm × 6 mm) (6 pcs.) (2 are pre-installed.) Binding screw (5 mm × 6 mm) (4 pcs.) Binding screw (4 mm × 3 mm) (4 pcs.) Concealing tape Side bracket (large) (2 pcs.) Rubber bush Double-ended screw Touch panel pen Screw (2 mm × 7 mm) (2 pcs.) 3
Installation Manual
Page 15
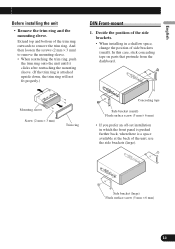
... there is a space available at the back of the trim ring outwards to remove the mounting sleeve. • When reattaching the trim ring, push the trim ring onto the unit until it clicks after reattaching the mounting sleeve. (If the trim ring is attached upside down, the trim ring will not fit properly.) DIN Front-mount 1. Deutsch Fran...203;È Side bracket (large) Flush surface screw (5 mm × 6 mm) 14 English Español Before installing the unit • Remove the trim ring and the mounting sleeve. Extend top and bottom of the unit, use the side brackets (large).
... there is a space available at the back of the trim ring outwards to remove the mounting sleeve. • When reattaching the trim ring, push the trim ring onto the unit until it clicks after reattaching the mounting sleeve. (If the trim ring is attached upside down, the trim ring will not fit properly.) DIN Front-mount 1. Deutsch Fran...203;È Side bracket (large) Flush surface screw (5 mm × 6 mm) 14 English Español Before installing the unit • Remove the trim ring and the mounting sleeve. Extend top and bottom of the unit, use the side brackets (large).
Installation Manual
Page 17
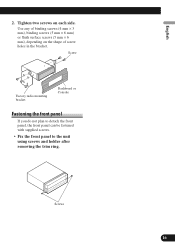
... panel, the front panel can be fastened with supplied screws. • Fix the front panel to the unit using screws and holder after removing the trim ring.
... panel, the front panel can be fastened with supplied screws. • Fix the front panel to the unit using screws and holder after removing the trim ring.

