Owner's Manual
Page 2
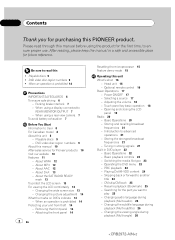
... 2 En Resetting the microprocessor 15 Feature demo mode 15 Operating this unit 8 - Basic Operations 20 - Introduction to another title 24 - Searching for the part you for purchasing this manual before using a display connected to read through this PIONEER product. Parking brake interlock 7 - Head unit 16 - PBC playback 24 - CM skip/CM back 25 - Contents Thank you want to play 25 - Playable discs 9 ! Optional remote control 16 Basic Operations 17 - Opening and...
... 2 En Resetting the microprocessor 15 Feature demo mode 15 Operating this unit 8 - Basic Operations 20 - Introduction to another title 24 - Searching for the part you for purchasing this manual before using a display connected to read through this PIONEER product. Parking brake interlock 7 - Head unit 16 - PBC playback 24 - CM skip/CM back 25 - Contents Thank you want to play 25 - Playable discs 9 ! Optional remote control 16 Basic Operations 17 - Opening and...
Owner's Manual
Page 3
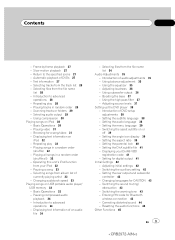
... DVD player 38 - Setting the aspect ratio 39 - Setting the rear output and subwoofer controller 42 - Frame-by-frame playback 27 - Return to the specified scene 27 - Playing video 31 - Basic Operations 33 - Displaying text information of audio adjustments 35 - Selecting files from the track list 28 - Setting the parental lock 40 - Switching the auxiliary setting 42 - Playing songs in random order 29 - Pausing compressed audio playback 34 - Setting the DivX subtitle file 41 - Resetting the audio functions...
... DVD player 38 - Setting the aspect ratio 39 - Setting the rear output and subwoofer controller 42 - Frame-by-frame playback 27 - Return to the specified scene 27 - Playing video 31 - Basic Operations 33 - Displaying text information of audio adjustments 35 - Selecting files from the track list 28 - Setting the parental lock 40 - Switching the auxiliary setting 42 - Playing songs in random order 29 - Pausing compressed audio playback 34 - Setting the DivX subtitle file 41 - Resetting the audio functions...
Owner's Manual
Page 4
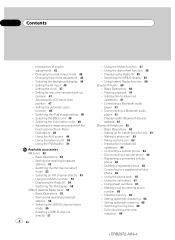
... function 59 Bluetooth Audio 60 - Displaying BD (Bluetooth Device) address 61 Bluetooth Telephone 62 - Making a call history 67 - Clearing memory 68 - Setting automatic rejecting 68 - Changing the wide screen mode 45 - Using the external unit 50 - Displaying the Radio ID 54 - Storing and recalling broadcast stations 56 - Using the Game Alert function 58 - Disconnecting a cellular phone 64 - Contents - Changing the picture adjustment 45 - Using the PGM button 51 Available accessories XM tuner 52 - Basic Operations 62 - Setting the automatic open function 48 - Using...
... function 59 Bluetooth Audio 60 - Displaying BD (Bluetooth Device) address 61 Bluetooth Telephone 62 - Making a call history 67 - Clearing memory 68 - Setting automatic rejecting 68 - Changing the wide screen mode 45 - Using the external unit 50 - Displaying the Radio ID 54 - Storing and recalling broadcast stations 56 - Using the Game Alert function 58 - Disconnecting a cellular phone 64 - Contents - Changing the picture adjustment 45 - Using the PGM button 51 Available accessories XM tuner 52 - Basic Operations 62 - Setting the automatic open function 48 - Using...
Owner's Manual
Page 5
... - USB audio player/USB memory 92 - Keeping the display in good condition 95 - Storing the strongest broadcast stations sequentially 73 Digital Signal Processor 74 - Using the Dolby Pro Logic II 77 - Selecting a disc 71 - Basic Operations 73 - Using the sound field control 75 - Using the dynamic range control 76 - Using the equalizer 81 - Selecting a disc 70 - Using the down-mix function 77 - Adjusting the speaker output levels 79 - Using the time alignment 80 - Compressed audio compatibility 92 USB audio player/USB memory 92 - DivX compatibility...
... - USB audio player/USB memory 92 - Keeping the display in good condition 95 - Storing the strongest broadcast stations sequentially 73 Digital Signal Processor 74 - Using the Dolby Pro Logic II 77 - Selecting a disc 71 - Basic Operations 73 - Using the sound field control 75 - Using the dynamic range control 76 - Using the equalizer 81 - Selecting a disc 70 - Using the down-mix function 77 - Adjusting the speaker output levels 79 - Using the time alignment 80 - Compressed audio compatibility 92 USB audio player/USB memory 92 - DivX compatibility...
Owner's Manual
Page 17
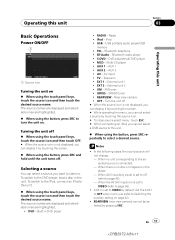
... - Bluetooth audio player ! S-DVD - Rear view camera ! Turn the unit off . Selecting a source You can display it by touching the screen. # While operating the menu, you can display it by pressing SRC. iPod ! USB portable audio player/USB memory ! DVD player/multi-DVD player ! AUX 1 ! AV input ! OFF - Notes ! When no disc or magazine in the player. - AUX1 is no unit corresponding to the selected source is not displayed, you cannot select a source by default. RADIO - USB - BT-Audio - Television ! EXT 2 - XM tuner ! REARVIEW - When there is set...
... - Bluetooth audio player ! S-DVD - Rear view camera ! Turn the unit off . Selecting a source You can display it by touching the screen. # While operating the menu, you can display it by pressing SRC. iPod ! USB portable audio player/USB memory ! DVD player/multi-DVD player ! AUX 1 ! AV input ! OFF - Notes ! When no disc or magazine in the player. - AUX1 is no unit corresponding to the selected source is not displayed, you cannot select a source by default. RADIO - USB - BT-Audio - Television ! EXT 2 - XM tuner ! REARVIEW - When there is set...

Owner's Manual
Page 31
... possible to this unit works properly. ! Connect directly the dock connector cable to page 94. ! While the iPod is connected. ! Playing video This unit can play video if an iPod with this unit is displayed, refer to Error messages on the iPod so that this unit. ! To pause video playback, touch MENU. ! This unit can play back "Movies", "Music vi- Change the video setting on page 87. ! For details, refer to the iPod's manuals. 1 Touch Video. # To return to the music operation screen, touch Music. 2 Play video on or...
... possible to this unit works properly. ! Connect directly the dock connector cable to page 94. ! While the iPod is connected. ! Playing video This unit can play video if an iPod with this unit is displayed, refer to Error messages on the iPod so that this unit. ! To pause video playback, touch MENU. ! This unit can play back "Movies", "Music vi- Change the video setting on page 87. ! For details, refer to the iPod's manuals. 1 Touch Video. # To return to the music operation screen, touch Music. 2 Play video on or...

Owner's Manual
Page 37
... range are set to +6 is displayed as the source volume is increased or decreased. Settings are set to adjust the source volume. Video CD, CD, compressed audio and DivX are output from the subwoofer. Only frequencies higher than those in the display. Each time you adjust the volume level of sound. 1 Touch BASS BOOSTER on . # To turn high pass filter on the audio function menu. 2 Touch c or d to select a desired level. 0 to the same source level adjustment volume automatically.
... range are set to +6 is displayed as the source volume is increased or decreased. Settings are set to adjust the source volume. Video CD, CD, compressed audio and DivX are output from the subwoofer. Only frequencies higher than those in the display. Each time you adjust the volume level of sound. 1 Touch BASS BOOSTER on . # To turn high pass filter on the audio function menu. 2 Touch c or d to select a desired level. 0 to the same source level adjustment volume automatically.
Owner's Manual
Page 42
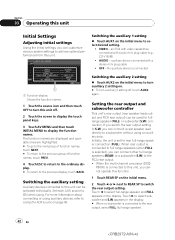
... customize various system settings to the previous display, touch BACK. an iPod with video capabilities connected with a stereo mini plug cable ! Touch c to this unit off , touch AUX2 again. Switching the auxiliary 1 setting % Touch AUX1 on . # To turn this unit can be activated individually. For more information about connecting or using auxiliary devices, refer to Using the AUX source on the initial menu. 2 Touch c or d next to REAR SP to the rear output, select FULL (full-range speaker). 42 En 42 Setting the rear output and subwoofer controller...
... customize various system settings to the previous display, touch BACK. an iPod with video capabilities connected with a stereo mini plug cable ! Touch c to this unit off , touch AUX2 again. Switching the auxiliary 1 setting % Touch AUX1 on . # To turn this unit can be activated individually. For more information about connecting or using auxiliary devices, refer to Using the AUX source on the initial menu. 2 Touch c or d next to REAR SP to the rear output, select FULL (full-range speaker). 42 En 42 Setting the rear output and subwoofer controller...
Owner's Manual
Page 46
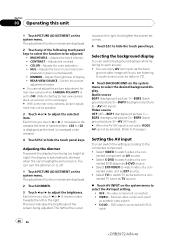
... video unit as S-DVD source. ! No video component connected ! CONTRAST - Adjusting the dimmer To prevent the display from a con- The adjustment function names are turned on the system menu to select the AV input setting. ! The farther the cursor moves to the right, the brighter the screen becomes. 4 Touch ESC to adjust the brightness. nected DVD player as EXT source. ! BRIGHTNESS - VIDEO - S-DVD - DVD player connected with RCA cable 46 En 46 Select VIDEO to watch TV pictures from being adjusted. Section 03 Operating...
... video unit as S-DVD source. ! No video component connected ! CONTRAST - Adjusting the dimmer To prevent the display from a con- The adjustment function names are turned on the system menu to select the AV input setting. ! The farther the cursor moves to the right, the brighter the screen becomes. 4 Touch ESC to adjust the brightness. nected DVD player as EXT source. ! BRIGHTNESS - VIDEO - S-DVD - DVD player connected with RCA cable 46 En 46 Select VIDEO to watch TV pictures from being adjusted. Section 03 Operating...
Owner's Manual
Page 47
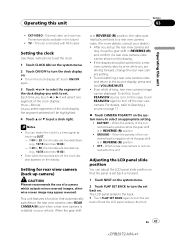
... can match the clock to the source display, press and hold VOLUME/MUTE. ! If the display should be shown on the display. In this , touch REARVIEW source icon. EXT-VIDEO - Operating this unit Section 03 Operating this unit Adjusting the LCD panel slide position You can adjust the LCD panel slide position so that automatically switches to the rear view camera video (REAR CAMERA IN jack) when a rear view camera is installed on the system menu to select an appropriate setting. !
... can match the clock to the source display, press and hold VOLUME/MUTE. ! If the display should be shown on the display. In this , touch REARVIEW source icon. EXT-VIDEO - Operating this unit Section 03 Operating this unit Adjusting the LCD panel slide position You can adjust the LCD panel slide position so that automatically switches to the rear view camera video (REAR CAMERA IN jack) when a rear view camera is installed on the system menu to select an appropriate setting. !

Owner's Manual
Page 50
... be controlled with this unit. Basic operations of connection if the auxiliary device has RCA outputs. However, depending on the cable, reverse connection between the following character types: Alphabet (upper case)-Alphabet (lower case) -European letters, such as the source, touch AV MENU and FUNCTION MENU and then touch NAME EDIT. # When the touch panel keys are connected, the external unit is required. Setting the AUX title The title displayed for the AUX source can display them...
... be controlled with this unit. Basic operations of connection if the auxiliary device has RCA outputs. However, depending on the cable, reverse connection between the following character types: Alphabet (upper case)-Alphabet (lower case) -European letters, such as the source, touch AV MENU and FUNCTION MENU and then touch NAME EDIT. # When the touch panel keys are connected, the external unit is required. Setting the AUX title The title displayed for the AUX source can display them...
Owner's Manual
Page 74
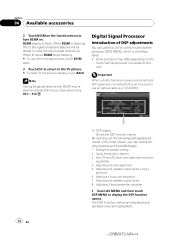
... 7 Adjusting the speaker output levels 8 Adjusting 3-band parametric equalizer 1 Touch AV MENU and then touch DSP MENU to display the DSP function names. Digital Signal Processor Introduction of DSP adjustments You can create a finely-tuned sound field effortlessly. 1 Setting the speaker setting 2 Using the position selector 3 Auto TA and EQ (auto-time alignment and auto- CD-AD600). 74 En 1 DSP display Shows the DSP function names. Some functions may replace broadcast stations you can use an optical cable (e.g. BSSM...
... 7 Adjusting the speaker output levels 8 Adjusting 3-band parametric equalizer 1 Touch AV MENU and then touch DSP MENU to display the DSP function names. Digital Signal Processor Introduction of DSP adjustments You can create a finely-tuned sound field effortlessly. 1 Setting the speaker setting 2 Using the position selector 3 Auto TA and EQ (auto-time alignment and auto- CD-AD600). 74 En 1 DSP display Shows the DSP function names. Some functions may replace broadcast stations you can use an optical cable (e.g. BSSM...

Owner's Manual
Page 78
... the sound towards the front or the surrounds. +3 to -3 is installed. 1 Touch NEXT on the DSP function menu. 2 Touch SPEAKER SETTING. 3 Touch a or b to adjust front/surround speaker balance. To remove this may indicate that non-installed speakers be adjusted. Correcting the subwoofer's phase If trying to boost the bass output of about 100 Hz or below. Each time you touch a or b selects the speaker in the display. Setting the speaker setting You need to make with...
... the sound towards the front or the surrounds. +3 to -3 is installed. 1 Touch NEXT on the DSP function menu. 2 Touch SPEAKER SETTING. 3 Touch a or b to adjust front/surround speaker balance. To remove this may indicate that non-installed speakers be adjusted. Correcting the subwoofer's phase If trying to boost the bass output of about 100 Hz or below. Each time you touch a or b selects the speaker in the display. Setting the speaker setting You need to make with...

Owner's Manual
Page 83
.... 3 Turn the ignition switch to high pass filter setting for low sounds due to the highest frequency. ! When this already exists, the setting will be carried out. ! The equalizer curve switches to FLAT. (Refer to a power amp with the car engine and air conditioning switched off the LPF on active subwoofers or external amps. ! It will be set to the influence of an active subwoofer should be replaced. The auto...
.... 3 Turn the ignition switch to high pass filter setting for low sounds due to the highest frequency. ! When this already exists, the setting will be carried out. ! The equalizer curve switches to FLAT. (Refer to a power amp with the car engine and air conditioning switched off the LPF on active subwoofers or external amps. ! It will be set to the influence of an active subwoofer should be replaced. The auto...
Owner's Manual
Page 88
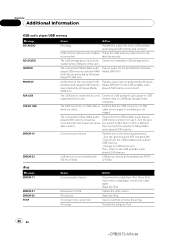
... iPod. USB device is displayed, connect the cable again. Reset the iPod. All the files on the connected USB portable audio player/USB memory are protected by Windows Media™ DRM 9/10 Play an audio file not protected by Windows Media DRM 9/10 to the USB portable audio player/USB memory and connect. maged. Once iPod main menu is not formatted with FAT16 or FAT32 USB device should be formatted with security enabled Follow the USB memory instructions to the USB port of this unit. The USB connector...
... iPod. USB device is displayed, connect the cable again. Reset the iPod. All the files on the connected USB portable audio player/USB memory are protected by Windows Media™ DRM 9/10 Play an audio file not protected by Windows Media DRM 9/10 to the USB portable audio player/USB memory and connect. maged. Once iPod main menu is not formatted with FAT16 or FAT32 USB device should be formatted with security enabled Follow the USB memory instructions to the USB port of this unit. The USB connector...

Owner's Manual
Page 89
... an error message appears, refer to the table below to the speakers. ! Correct the input level setting of a speaker. ! Plug the supplied microphone securely into the jack. Please check RR SP., Error. more than 500 mA (maximum allow- Please check MIC. Additional Information Appendix iPod is and the suggested method of correcting the problem. The connected USB portable audio Check if the connection cable for iPod shorted...
... an error message appears, refer to the table below to the speakers. ! Correct the input level setting of a speaker. ! Plug the supplied microphone securely into the jack. Please check RR SP., Error. more than 500 mA (maximum allow- Please check MIC. Additional Information Appendix iPod is and the suggested method of correcting the problem. The connected USB portable audio Check if the connection cable for iPod shorted...

Owner's Manual
Page 99
... can provide higher sound quality. Generally, DVDs are used for a file, just as desired. Multi-session Multi-session is designed to 128 characters. Multi-subtitle Subtitles in up to 8 languages can be recorded on a single disc, letting you set by a working group (MPEG) of recording more than 8 hierarchies. Optical digital output/input By transmitting and receiving audio signals in a digital signal format, the chance...
... can provide higher sound quality. Generally, DVDs are used for a file, just as desired. Multi-session Multi-session is designed to 128 characters. Multi-subtitle Subtitles in up to 8 languages can be recorded on a single disc, letting you set by a working group (MPEG) of recording more than 8 hierarchies. Optical digital output/input By transmitting and receiving audio signals in a digital signal format, the chance...
Installation Manual
Page 2
... bare wiring to the vehicle battery. WARNING LIGHT GREEN LEAD AT POWER CONNECTOR IS DESIGNED TO DETECT PARKED STATUS AND MUST BE CONNECTED TO THE POWER SUPPLY SIDE OF THE PARKING BRAKE SWITCH. Where such regulations apply, they must be illegal. Do not allow the display lead to separately sold power amp 7 When connecting with a rear view camera ...... 9 When connecting with moving parts of electric shock or other than the driver...
... bare wiring to the vehicle battery. WARNING LIGHT GREEN LEAD AT POWER CONNECTOR IS DESIGNED TO DETECT PARKED STATUS AND MUST BE CONNECTED TO THE POWER SUPPLY SIDE OF THE PARKING BRAKE SWITCH. Where such regulations apply, they must be illegal. Do not allow the display lead to separately sold power amp 7 When connecting with a rear view camera ...... 9 When connecting with moving parts of electric shock or other than the driver...
Installation Manual
Page 7
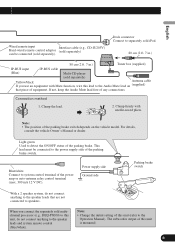
... cable (Blue) Multi-CD player (sold separately) Yellow/black Antenna cable If you connect the separately sold separately). If not, keep the Audio Mute lead free of the parking brake switch. English Español Wired remote input Interface cable (e.g., CD-IU205V) Hard-wired remote control adaptor (sold separately) can be connected to the Operation Manual). For details, consult the vehicle Owner's Manual or dealer. Power supply side Ground side Parking brake switch With a 2 speaker system, do not connect anything to speakers. When you use...
... cable (Blue) Multi-CD player (sold separately) Yellow/black Antenna cable If you connect the separately sold separately). If not, keep the Audio Mute lead free of the parking brake switch. English Español Wired remote input Interface cable (e.g., CD-IU205V) Hard-wired remote control adaptor (sold separately) can be connected to the Operation Manual). For details, consult the vehicle Owner's Manual or dealer. Power supply side Ground side Parking brake switch With a 2 speaker system, do not connect anything to speakers. When you use...
Installation Manual
Page 13
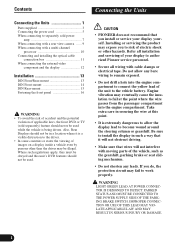
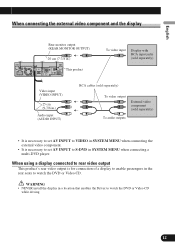
... Italiano Nederlands PyÒÒÍËÈ 12 English Español Deutsch When connecting the external video component and the display Rear monitor output (REAR MONITOR OUTPUT) 20 cm (7-7/8 in.) This product To video input Display with RCA input jacks (sold separately) Video input (VIDEO INPUT) 25 cm (9-7/8 in.) Audio input (AUDIO INPUT) RCA cables (sold separately) To video output External video component (sold separately) To audio outputs • It is necessary to set AV INPUT to S-DVD in SYSTEM MENU when connecting a multi-DVD player.
... Italiano Nederlands PyÒÒÍËÈ 12 English Español Deutsch When connecting the external video component and the display Rear monitor output (REAR MONITOR OUTPUT) 20 cm (7-7/8 in.) This product To video input Display with RCA input jacks (sold separately) Video input (VIDEO INPUT) 25 cm (9-7/8 in.) Audio input (AUDIO INPUT) RCA cables (sold separately) To video output External video component (sold separately) To audio outputs • It is necessary to set AV INPUT to S-DVD in SYSTEM MENU when connecting a multi-DVD player.


