Owner's Manual
Page 2
... the LCD screen 9 For viewing LCD comfortably 9 What the marks on the disc 75 Using the display correctly 76 Language code chart for DVD 78 Terms 79 Specifications 82 Index 84 2 En Playable discs 5 ! After you have finished reading the instructions, keep this manual in DVD player 20 Audio Adjustments 30 Setting up the DVD player 35 Initial Settings 38 Other Functions 41 Available accessories XM tuner 45 SIRIUS Satellite Radio tuner 47 Playing songs on iPod 49...
... the LCD screen 9 For viewing LCD comfortably 9 What the marks on the disc 75 Using the display correctly 76 Language code chart for DVD 78 Terms 79 Specifications 82 Index 84 2 En Playable discs 5 ! After you have finished reading the instructions, keep this manual in DVD player 20 Audio Adjustments 30 Setting up the DVD player 35 Initial Settings 38 Other Functions 41 Available accessories XM tuner 45 SIRIUS Satellite Radio tuner 47 Playing songs on iPod 49...

Owner's Manual
Page 5
... other reproductive harm. CAUTION: USE OF CONTROL OR ADJUSTMENT OR PERFORMANCE OF PROCEDURES OTHER THAN THOSE SPECIFIED HEREIN MAY RESULT IN HAZARDOUS RADIATION EXPOSURE. Important (Serial number) The serial number is disconnected or discharged, the preset memory will be erased and must be played back on the enclosed warranty card. Disposal of this unit are allocated for operating procedures and precautions...
... other reproductive harm. CAUTION: USE OF CONTROL OR ADJUSTMENT OR PERFORMANCE OF PROCEDURES OTHER THAN THOSE SPECIFIED HEREIN MAY RESULT IN HAZARDOUS RADIATION EXPOSURE. Important (Serial number) The serial number is disconnected or discharged, the preset memory will be erased and must be played back on the enclosed warranty card. Disposal of this unit are allocated for operating procedures and precautions...
Owner's Manual
Page 9
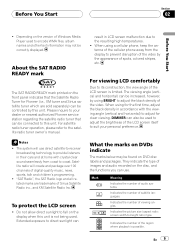
... display to prevent disruption of the video by this unit. Extended exposure to direct sunlight can use direct satellite-to-receiver broadcasting technology to provide listeners in LCD screen malfunction due to suit your dealer or nearest authorized Pioneer service station regarding the satellite radio tuner that the Satellite Radio Tuner for clear viewing. They indicate the type of images and audio recorded on the disc, and the functions...
... display to prevent disruption of the video by this unit. Extended exposure to direct sunlight can use direct satellite-to-receiver broadcasting technology to provide listeners in LCD screen malfunction due to suit your dealer or nearest authorized Pioneer service station regarding the satellite radio tuner that the Satellite Radio Tuner for clear viewing. They indicate the type of images and audio recorded on the disc, and the functions...

Owner's Manual
Page 13
...Basic Operations Power ON/OFF Turning the unit on % Press SOURCE to turn the unit on by selecting a source. S-DVD - EXT-2 - AUX - AV input ! OFF - Turn the unit off . # When using the touch panel keys, touch the source icon and then touch the desired source name. i SOURCE button This unit is set to ON, press to display the speaker level menu. l Disc loading slot Insert a disc to cancel the control mode of functions. For details concerning operations, see the remote control manual. DVD player/multi-DVD player ! Tuner ! External unit 1 ! d BAND/ESC button...
...Basic Operations Power ON/OFF Turning the unit on % Press SOURCE to turn the unit on by selecting a source. S-DVD - EXT-2 - AUX - AV input ! OFF - Turn the unit off . # When using the touch panel keys, touch the source icon and then touch the desired source name. i SOURCE button This unit is set to ON, press to display the speaker level menu. l Disc loading slot Insert a disc to cancel the control mode of functions. For details concerning operations, see the remote control manual. DVD player/multi-DVD player ! Tuner ! External unit 1 ! d BAND/ESC button...
Owner's Manual
Page 14
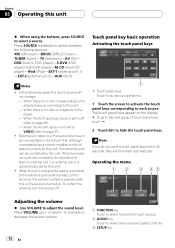
... screen to activate the touch panel keys corresponding to each source. 2 AUDIO key Touch to select functions for each source. Press VOLUME up/+ or down/- When the AUX (auxiliary input) is not set to switch between the following cases, the sound source will be controlled by this unit's source is no disc or magazine in DVD player)-S-DVD (DVD player/multi-DVD player)-M-CD (multi-CD player)-iPod (iPod)-EXT-1 (external unit 1) -EXT-2 (external unit 2)-AUX (AUX) Notes ! When the AV (AV input) is set to VIDEO (refer to adjust...
... screen to activate the touch panel keys corresponding to each source. 2 AUDIO key Touch to select functions for each source. Press VOLUME up/+ or down/- When the AUX (auxiliary input) is not set to switch between the following cases, the sound source will be controlled by this unit's source is no disc or magazine in DVD player)-S-DVD (DVD player/multi-DVD player)-M-CD (multi-CD player)-iPod (iPod)-EXT-1 (external unit 1) -EXT-2 (external unit 2)-AUX (AUX) Notes ! When the AV (AV input) is set to VIDEO (refer to adjust...

Owner's Manual
Page 17
... Operating this unit Changing the picture adjustment You can adjust the picture adjustment for rear view camera only when B-CAM is increased or decreased. 4 Touch ESC to hide the touch panel keys. The adjustment function names are displayed and adjustable ones are stored separately for dark ambient light (nighttime) 3 Touch c or d to adjust the brightness. The brightness of LCD screen will be adjusted to be possible. 3 Touch c or d to adjust the selected item. Adjust the color saturation ! Each time you touch...
... Operating this unit Changing the picture adjustment You can adjust the picture adjustment for rear view camera only when B-CAM is increased or decreased. 4 Touch ESC to hide the touch panel keys. The adjustment function names are displayed and adjustable ones are stored separately for dark ambient light (nighttime) 3 Touch c or d to adjust the brightness. The brightness of LCD screen will be adjusted to be possible. 3 Touch c or d to adjust the selected item. Adjust the color saturation ! Each time you touch...

Owner's Manual
Page 20
... control) function, a menu is displayed. # After a disc has been inserted, use touch panel keys to select the DVD player. # To eject a disc, press EJECT. 2 Touch the screen to display the touch panel keys. 3 When playing Video CD, touch 10key and then touch 0 to 9 to page 75 for files that can display the menu by pressing RETURN during PBC playback. In such case, touch o or p to select a track. Section 03 Operating this unit will begin to play back DVD video, Video...
... control) function, a menu is displayed. # After a disc has been inserted, use touch panel keys to select the DVD player. # To eject a disc, press EJECT. 2 Touch the screen to display the touch panel keys. 3 When playing Video CD, touch 10key and then touch 0 to 9 to page 75 for files that can display the menu by pressing RETURN during PBC playback. In such case, touch o or p to select a track. Section 03 Operating this unit will begin to play back DVD video, Video...

Owner's Manual
Page 35
... language. 1 Touch 0 to 9 to When you use this menu to display the DVD setup function names. Notes ! Even if you select OTHERS on this page. 1 1 DVD setup menu display Shows the DVD setup menu names. 1 Touch g. En 35 Operating this unit Section 03 Operating this unit Setting up the DVD player Introduction of DVD setup adjustments You can use SUB.T during playback (Multi-subtitle) on page 23.) ! If the selected subtitle language is set the preferred audio language. A subtitle...
... language. 1 Touch 0 to 9 to When you use this menu to display the DVD setup function names. Notes ! Even if you select OTHERS on this page. 1 1 DVD setup menu display Shows the DVD setup menu names. 1 Touch g. En 35 Operating this unit Section 03 Operating this unit Setting up the DVD player Introduction of DVD setup adjustments You can use SUB.T during playback (Multi-subtitle) on page 23.) ! If the selected subtitle language is set the preferred audio language. A subtitle...
Owner's Manual
Page 37
Wide screen picture (16:9) is displayed as it . ! Setting the parental lock Some DVD video discs let you set , and you forget it is set a parental lock level and then play a disc featuring parental lock, code number input indications may be displayed. The code number is (initial setting) ! We recommend to the instruction manual that do not enable changing of those scenes will begin when the correct code number is recorded on the disc itself. With some discs, the...
Wide screen picture (16:9) is displayed as it . ! Setting the parental lock Some DVD video discs let you set , and you forget it is set a parental lock level and then play a disc featuring parental lock, code number input indications may be displayed. The code number is (initial setting) ! We recommend to the instruction manual that do not enable changing of those scenes will begin when the correct code number is recorded on the disc itself. With some discs, the...
Owner's Manual
Page 39
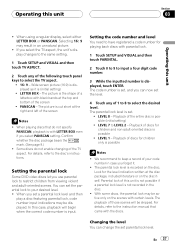
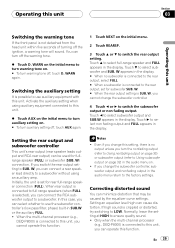
... can operate this function. Only when the multi-channel processor (e.g., DEQ-P8000) is connected to this unit, you cannot change the subwoofer controller, subwoofer output and nonfading output in the display. # When no output unless you turn off the ignition, a warning tone will sound. Activate the auxiliary setting when using an auxiliary amp. W appears in the audio menu return to turn auxiliary setting on. # To turn warning tone off , touch AUX again. 1 Touch NEXT on the initial menu to the factory settings. W) connection. Notes...
... can operate this function. Only when the multi-channel processor (e.g., DEQ-P8000) is connected to this unit, you cannot change the subwoofer controller, subwoofer output and nonfading output in the display. # When no output unless you turn off the ignition, a warning tone will sound. Activate the auxiliary setting when using an auxiliary amp. W appears in the audio menu return to turn auxiliary setting on. # To turn warning tone off , touch AUX again. 1 Touch NEXT on the initial menu to the factory settings. W) connection. Notes...
Owner's Manual
Page 41
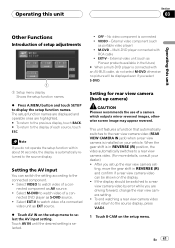
... M-DVD to watch video of a con- Setting for rear view camera (back up the rear view camera set up camera) CAUTION Pioneer recommends the use of a connected video unit as AV source. ! Select EXT-V to watch video of a camera which outputs mirror reversed images, otherwise screen image may appear reversed. Touch AV IN until the desired setting is installed on the setup menu to the connected component. ! OFF - En 41 Operating this unit Section 03 Operating this unit Other Functions Introduction of each source, touch ESC. nected DVD player as portable video player...
... M-DVD to watch video of a con- Setting for rear view camera (back up the rear view camera set up camera) CAUTION Pioneer recommends the use of a connected video unit as AV source. ! Select EXT-V to watch video of a camera which outputs mirror reversed images, otherwise screen image may appear reversed. Touch AV IN until the desired setting is installed on the setup menu to the connected component. ! OFF - En 41 Operating this unit Section 03 Operating this unit Other Functions Introduction of each source, touch ESC. nected DVD player as portable video player...
Owner's Manual
Page 42
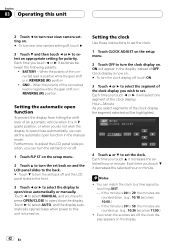
... adjust the LCD panel slide position, you can turn the set back on or off. 1 Touch FLP ST on the setup menu. 2 Touch a to turn the set back on and the LCD panel slides to the back. # Touch b to turn the set the clock. 1 Touch CLOCK ADJUST on the setup menu. 2 Touch OFF to turn the clock display on. Even when the sources are rounded down. (e.g., 10:18 becomes 10:00.) - Setting the clock Use these instructions to set back...
... adjust the LCD panel slide position, you can turn the set back on or off. 1 Touch FLP ST on the setup menu. 2 Touch a to turn the set back on and the LCD panel slides to the back. # Touch b to turn the set the clock. 1 Touch CLOCK ADJUST on the setup menu. 2 Touch OFF to turn the clock display on. Even when the sources are rounded down. (e.g., 10:18 becomes 10:00.) - Setting the clock Use these instructions to set back...
Owner's Manual
Page 58
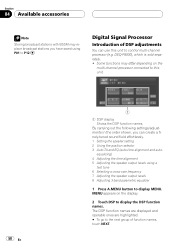
... speaker setting 2 Using the position selector 3 Auto TA and EQ (auto-time alignment and auto- DEQ-P8000), which is sold separately. ! equalizing) 4 Adjusting the time alignment 5 Adjusting the speaker output levels using P01 to control multi-channel processor (e.g. MENU appears on the multi-channel processor connected to this unit to P12. Some functions may replace broadcast stations you can use this unit. 58 En 1 1 DSP display Shows the DSP function names. Digital Signal Processor Introduction of function names, touch...
... speaker setting 2 Using the position selector 3 Auto TA and EQ (auto-time alignment and auto- DEQ-P8000), which is sold separately. ! equalizing) 4 Adjusting the time alignment 5 Adjusting the speaker output levels using P01 to control multi-channel processor (e.g. MENU appears on the multi-channel processor connected to this unit to P12. Some functions may replace broadcast stations you can use this unit. 58 En 1 1 DSP display Shows the DSP function names. Digital Signal Processor Introduction of function names, touch...
Owner's Manual
Page 63
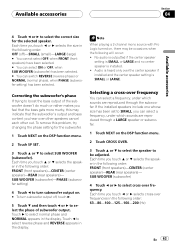
..., under which sounds are reproduced through the subwoofer. If the installed speakers include one whose size has been set to SMALL, you hear over other speakers cancel each other out. Note When playing a 2-channel mono source with Pro Logic turned on, there may indicate that the subwoofer's output and bass content you can switch REVERSE (reverse phase) or NORMAL (normal phase), when PHASE (subwoofer setting) has been...
..., under which sounds are reproduced through the subwoofer. If the installed speakers include one whose size has been set to SMALL, you hear over other speakers cancel each other out. Note When playing a 2-channel mono source with Pro Logic turned on, there may indicate that the subwoofer's output and bass content you can switch REVERSE (reverse phase) or NORMAL (normal phase), when PHASE (subwoofer setting) has been...
Owner's Manual
Page 68
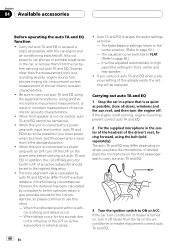
... a power amp with input level control, auto TA and EQ may prevent correct auto TA and EQ. 68 En Auto TA and EQ changes the audio settings as possible, with an LPF, turn off . Carry out auto TA and EQ in a place that is connected to be possible if you lower power amp input level. When delays occur for front, center and rear speaker. ! The fader/balance settings return...
... a power amp with input level control, auto TA and EQ may prevent correct auto TA and EQ. 68 En Auto TA and EQ changes the audio settings as possible, with an LPF, turn off . Carry out auto TA and EQ in a place that is connected to be possible if you lower power amp input level. When delays occur for front, center and rear speaker. ! The fader/balance settings return...
Owner's Manual
Page 72
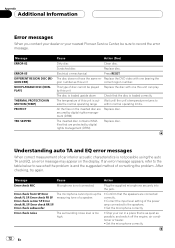
... and EQ error messages When correct measurement of this unit can play. Set the microphone correctly. Scratched disc Replace disc. Error check noise The surrounding noise level is not connected. Stop your nearest Pioneer Service Center, be played Replace the disc with one this unit is loaded correctly. Replace the DVD video with one bearing the gion number as possible, and switch off the engine, air conditioner or heater. ! Plug the supplied...
... and EQ error messages When correct measurement of this unit can play. Set the microphone correctly. Scratched disc Replace disc. Error check noise The surrounding noise level is not connected. Stop your nearest Pioneer Service Center, be played Replace the disc with one this unit is loaded correctly. Replace the DVD video with one bearing the gion number as possible, and switch off the engine, air conditioner or heater. ! Plug the supplied...
Other Manual
Page 1
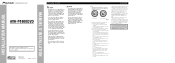
... the rating prescribed. - Never wire the speaker negative cable directly to an external power amp's system remote control or the vehicle's auto-antenna relay control terminal (max. 300 mA, 12 V DC). Connect it to ground. - Installing or servicing the product may result. • IP-BUS connectors are not used. - Do not allow the display lead to external power amp's power terminal. ENGLISH Note: • This unit cannot be installed in a vehicle that does not...
... the rating prescribed. - Never wire the speaker negative cable directly to an external power amp's system remote control or the vehicle's auto-antenna relay control terminal (max. 300 mA, 12 V DC). Connect it to ground. - Installing or servicing the product may result. • IP-BUS connectors are not used. - Do not allow the display lead to external power amp's power terminal. ENGLISH Note: • This unit cannot be installed in a vehicle that does not...
Other Manual
Page 2
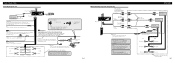
... system remote control (blue/white). WARNING Note: • The position of this unit is in the REVERSE (R) position. Black (chassis ground) Connect to the speaker leads that equipment. Connecting the Units Connecting the power cord 15 cm (5-7/8 in.) Antenna cable IP-BUS input (Blue) Multi-CD player (sold separately) IP-BUS cable This product Yellow/black If you use an equipment with needle-nosed pliers. If not, keep the Audio Mute lead free of the parking brake switch. With a 2 speaker...
... system remote control (blue/white). WARNING Note: • The position of this unit is in the REVERSE (R) position. Black (chassis ground) Connect to the speaker leads that equipment. Connecting the Units Connecting the power cord 15 cm (5-7/8 in.) Antenna cable IP-BUS input (Blue) Multi-CD player (sold separately) IP-BUS cable This product Yellow/black If you use an equipment with needle-nosed pliers. If not, keep the Audio Mute lead free of the parking brake switch. With a 2 speaker...
Other Manual
Page 3
... the car is possible. Fuse resistor 2. Otherwise, there is likely to the DVD player. CAUTION • Install this unit using only the parts supplied with this unit in SET UP when connecting to be damaged or could dismount itself, which may result in CAUTION RCA cable (sold separately) It is necessary to set B-CAM to ON in such a location where the operation of the brake may appear reversed. • The rear view camera function is...
... the car is possible. Fuse resistor 2. Otherwise, there is likely to the DVD player. CAUTION • Install this unit using only the parts supplied with this unit in SET UP when connecting to be damaged or could dismount itself, which may result in CAUTION RCA cable (sold separately) It is necessary to set B-CAM to ON in such a location where the operation of the brake may appear reversed. • The rear view camera function is...

Other Manual
Page 4
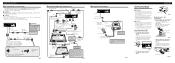
... cords must not cover up the area shown in a shallow space, change the position of side brackets. it overheats. Connecting the Units ENGLISH When connecting the external video component and the display Audio input Video input To audio outputs Video output RCA cables (sold separately) To video output External video component (sold separately) Audio output Multi-DVD Player (sold separately) Video output RCA cable (sold separately) To video input Display with RCA input jacks Fig. 11 • It is necessary to set AV INPUT to M-DVD in a location that...
... cords must not cover up the area shown in a shallow space, change the position of side brackets. it overheats. Connecting the Units ENGLISH When connecting the external video component and the display Audio input Video input To audio outputs Video output RCA cables (sold separately) To video output External video component (sold separately) Audio output Multi-DVD Player (sold separately) Video output RCA cable (sold separately) To video input Display with RCA input jacks Fig. 11 • It is necessary to set AV INPUT to M-DVD in a location that...


