Owner's Manual
Page 4
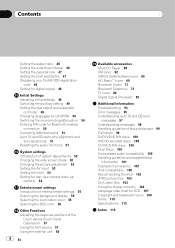
...system adjustments 52 Changing the wide screen mode 52 Changing the picture adjustment 53 Setting the AV input 53 Setting the clock 54 Setting for rear view camera (back up camera) 54 Entertainment ...of the touch panels (Touch Panel Calibration) 57 Using the AUX source 57 Using the external unit 58 4 En Available accessories Multi-CD Player 60 XM tuner 62 SIRIUS Satellite Radio tuner 65 HD Radio...auto TA and EQ error messages 97 Understanding messages 98 Handling guideline of discs and player 99 DVD discs 99 DVD-R/DVD-RW discs 100 AVCHD recorded discs 100 CD-R/CD-RW discs 100 Dual Discs 100...
...system adjustments 52 Changing the wide screen mode 52 Changing the picture adjustment 53 Setting the AV input 53 Setting the clock 54 Setting for rear view camera (back up camera) 54 Entertainment ...of the touch panels (Touch Panel Calibration) 57 Using the AUX source 57 Using the external unit 58 4 En Available accessories Multi-CD Player 60 XM tuner 62 SIRIUS Satellite Radio tuner 65 HD Radio...auto TA and EQ error messages 97 Understanding messages 98 Handling guideline of discs and player 99 DVD discs 99 DVD-R/DVD-RW discs 100 AVCHD recorded discs 100 CD-R/CD-RW discs 100 Dual Discs 100...

Owner's Manual
Page 12
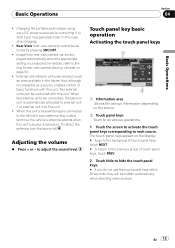
To switch to the DVD player, load a disc in DVD player ! M-CD - AUX 1 ! USB/iPod ! Telephone - XM - XM tuner ! SIRIUS tuner ! Rear view camera ! In the following cases, USB/iPod icon will not change. - USB is displayed when ... menu, touch ESC. % When using the touch panel keys, touch the source icon and then touch the desired source name. USB/iPod - Bluetooth audio player ! When AUX (auxiliary input) is not set to on by touching the screen. % When using the button, press SRC/OFF and hold until the unit turns off (refer...
To switch to the DVD player, load a disc in DVD player ! M-CD - AUX 1 ! USB/iPod ! Telephone - XM - XM tuner ! SIRIUS tuner ! Rear view camera ! In the following cases, USB/iPod icon will not change. - USB is displayed when ... menu, touch ESC. % When using the touch panel keys, touch the source icon and then touch the desired source name. USB/iPod - Bluetooth audio player ! When AUX (auxiliary input) is not set to on by touching the screen. % When using the button, press SRC/OFF and hold until the unit turns off (refer...
Owner's Manual
Page 13
... # If you do various operations. 1 Touch the screen to activate the touch panel keys corresponding to AUX input may generate noise. Two external units can be hidden automatically when selecting video sources. To retract the antenna...panel keys within 30 seconds, they will be displayed automatically when the appropriate setting is conducted. to a Pioneer product (such as ones available in the future) that, although incompatible as a source, enables control ... by this case, stop charging. ! Charging the portable audio player using car's DC power source while connecting it to each source.
... # If you do various operations. 1 Touch the screen to activate the touch panel keys corresponding to AUX input may generate noise. Two external units can be hidden automatically when selecting video sources. To retract the antenna...panel keys within 30 seconds, they will be displayed automatically when the appropriate setting is conducted. to a Pioneer product (such as ones available in the future) that, although incompatible as a source, enables control ... by this case, stop charging. ! Charging the portable audio player using car's DC power source while connecting it to each source.
Owner's Manual
Page 58
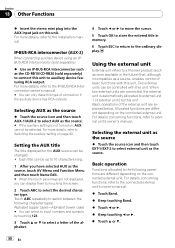
... to select the desired character type. Selecting the external unit as the source % Touch the source icon and then touch EXT-1/EXT-2 to input numbers and symbols by this unit. Two external units can be up to 10 characters long. 1 After you can select to select external ...sold separately) to the ordinary display. Section 18 Other Functions % Insert the stereo mini plug into the AUX input jack on the connected external unit. Using the external unit External unit refers to a Pioneer product (such as ones available in the future) that, although incompatible as the CD-RB10/CD-RB20 ...
... to select the desired character type. Selecting the external unit as the source % Touch the source icon and then touch EXT-1/EXT-2 to input numbers and symbols by this unit. Two external units can be up to 10 characters long. 1 After you can select to select external ...sold separately) to the ordinary display. Section 18 Other Functions % Insert the stereo mini plug into the AUX input jack on the connected external unit. Using the external unit External unit refers to a Pioneer product (such as ones available in the future) that, although incompatible as the CD-RB10/CD-RB20 ...

Owner's Manual
Page 84
.... Stereo mix the original audio that do not contain channel modes such as the source volume is effective only on other than the DVD disc, you can override audio settings to check for effectiveness of each source to prevent radical changes in the speaker setting, you cannot...multi-channel audio in 2 channels. 1 Touch Down Mix on the DSP function menu. 2 Touch c or d to select the desired level. ! AUX (auxiliary input) and AV (AV input) are locked out when the direct control is displayed as surround components. ! Using the dynamic range control The dynamic range refers to achieve...
.... Stereo mix the original audio that do not contain channel modes such as the source volume is effective only on other than the DVD disc, you can override audio settings to check for effectiveness of each source to prevent radical changes in the speaker setting, you cannot...multi-channel audio in 2 channels. 1 Touch Down Mix on the DSP function menu. 2 Touch c or d to select the desired level. ! AUX (auxiliary input) and AV (AV input) are locked out when the direct control is displayed as surround components. ! Using the dynamic range control The dynamic range refers to achieve...

Installation Manual
Page 6
...anything to a clean, paint-free metal location. Black (chassis ground) Connect to Green and Green/black leads. Not used. This product Antenna input Fuse (10 A) Yellow Connect to terminal controlled by ignition switch (12 V DC). Red Connect to the constant 12 V supply terminal. Connecting... the units Connecting the power cord AUX jack (3.5 ø) Use a mini plug cable to connect with Violet and Violet/black leads of 70 W (2 Ω), be sure to ...
...anything to a clean, paint-free metal location. Black (chassis ground) Connect to Green and Green/black leads. Not used. This product Antenna input Fuse (10 A) Yellow Connect to terminal controlled by ignition switch (12 V DC). Red Connect to the constant 12 V supply terminal. Connecting... the units Connecting the power cord AUX jack (3.5 ø) Use a mini plug cable to connect with Violet and Violet/black leads of 70 W (2 Ω), be sure to ...

Installation Manual
Page 9
...product 1.5 m (4 ft. 11 in.) IP-BUS input 1.5 m (4 ft. 11 in.) Black USB cable Connect to sparately sold separately) 9 IP-BUS cable (Supplied with Bluetooth adapter) When connecting with optional CD-IU200V cable Wired remote input Hard-wired remote control adaptor can be connected (sold ...1.5 m (4 ft. 11in.) Black IP-BUS cable (Supplied with Bluetooth adapter) Interface cable (CD-IU200V) (sold USB device. AUX input (AUX IN) Microphone for hands-free phoning (supplied with video capabilities (sold separately) Bluetooth adapter (e.g. Blue Microphone for hands-free phoning (...
...product 1.5 m (4 ft. 11 in.) IP-BUS input 1.5 m (4 ft. 11 in.) Black USB cable Connect to sparately sold separately) 9 IP-BUS cable (Supplied with Bluetooth adapter) When connecting with optional CD-IU200V cable Wired remote input Hard-wired remote control adaptor can be connected (sold ...1.5 m (4 ft. 11in.) Black IP-BUS cable (Supplied with Bluetooth adapter) Interface cable (CD-IU200V) (sold USB device. AUX input (AUX IN) Microphone for hands-free phoning (supplied with video capabilities (sold separately) Bluetooth adapter (e.g. Blue Microphone for hands-free phoning (...


