Leaflet
Page 3
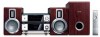
... are subject to change without notice. or their respective owners. Specifications are the property of Koninklijke Philips Electronics N.V. www.philips.com All Rights reserved. DVD Micro Theater Specifications MCD718/37 Sound • Output Power: Total 100W RMS • Sound Enhancement: Class "D" Digital Amplifier, Loudness, Digital Sound Control 4 modes, Dynamic Bass Boost • Sound System: Dolby Digital Loudspeakers • Main Speaker: 2 way, Bass Reflex Speaker System, 4" woofer, Speaker grilles detachable • Subwoofer type: Passive Video Playback • Playback...
... are subject to change without notice. or their respective owners. Specifications are the property of Koninklijke Philips Electronics N.V. www.philips.com All Rights reserved. DVD Micro Theater Specifications MCD718/37 Sound • Output Power: Total 100W RMS • Sound Enhancement: Class "D" Digital Amplifier, Loudness, Digital Sound Control 4 modes, Dynamic Bass Boost • Sound System: Dolby Digital Loudspeakers • Main Speaker: 2 way, Bass Reflex Speaker System, 4" woofer, Speaker grilles detachable • Subwoofer type: Passive Video Playback • Playback...
User manual
Page 2
... rights owners. patents and other intellectual property rights owned by method claims of certain U.S. Canada English: This digital apparatus does not exceed the Class B limits for home and other limited viewing uses only unless otherwise authorized by Macrovision Corporation. Manufactured under license. This product incorporates copyright protection technology that is intended for radio noise emissions from Dolby Laboratories...
... rights owners. patents and other intellectual property rights owned by method claims of certain U.S. Canada English: This digital apparatus does not exceed the Class B limits for home and other limited viewing uses only unless otherwise authorized by Macrovision Corporation. Manufactured under license. This product incorporates copyright protection technology that is intended for radio noise emissions from Dolby Laboratories...

User manual
Page 7
... Progressive manually Step 3: Setting language preference 21 Setting the OSD Language Setting the Audio, Subtitle and Disc Menu language Basic Functions Switching the system on/off 22 Switching the system to Eco Power Standby mode 22 Power-saving automatic standby 22 Volume control 22 Sound control 22 DBB (Dynamic Bass Boost) DSC (Digital Sound Control) LOUDNESS Dimming the display screen 23 Demonstration mode 23 Contents Disc Operations Playable Discs 24 Playing discs 24 Using the Disc Menu 25 Basic playback controls 25~27 Pausing playback (DVD...
... Progressive manually Step 3: Setting language preference 21 Setting the OSD Language Setting the Audio, Subtitle and Disc Menu language Basic Functions Switching the system on/off 22 Switching the system to Eco Power Standby mode 22 Power-saving automatic standby 22 Volume control 22 Sound control 22 DBB (Dynamic Bass Boost) DSC (Digital Sound Control) LOUDNESS Dimming the display screen 23 Demonstration mode 23 Contents Disc Operations Playable Discs 24 Playing discs 24 Using the Disc Menu 25 Basic playback controls 25~27 Pausing playback (DVD...
User manual
Page 9
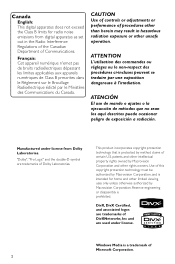
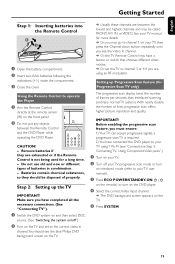
...: - Supplied accessories - Remote control with 2.1 channel full digital amplifier creates the same dynamic sound qualities that has a rating higher than you set . Progressive Scan Provides high quality flicker-free images for the DVD player and power amplifier - 2 front speakers including 2 speaker cables - 1 passive subwoofer including 1 subwoofer cable - Composite video cable (yellow) - If any item is damaged or missing, contact your children cannot watch a DVD that you connect other audio and audio/visual components to separate...
...: - Supplied accessories - Remote control with 2.1 channel full digital amplifier creates the same dynamic sound qualities that has a rating higher than you set . Progressive Scan Provides high quality flicker-free images for the DVD player and power amplifier - 2 front speakers including 2 speaker cables - 1 passive subwoofer including 1 subwoofer cable - Composite video cable (yellow) - If any item is damaged or missing, contact your children cannot watch a DVD that you connect other audio and audio/visual components to separate...
User manual
Page 12
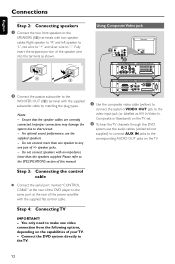
... to the SPECIFICATIONS section of the power amplifier with two speaker cables. Notes: - Step 3: Connecting the control cable ● Connect the serial port marked "CONTROL CABLE" at the rear of the DVD player to the same port at the rear of this manual. 1 Use the composite video cable (yellow) to connect the system's VIDEO OUT jack to the video input jack (or labelled as shown. Connect the DVD system directly to short-circuit. - Right speaker to "R" and left speaker to "L", red wire to "+" and...
... to the SPECIFICATIONS section of the power amplifier with two speaker cables. Notes: - Step 3: Connecting the control cable ● Connect the serial port marked "CONTROL CABLE" at the rear of the DVD player to the same port at the rear of this manual. 1 Use the composite video cable (yellow) to connect the system's VIDEO OUT jack to the video input jack (or labelled as shown. Connect the DVD system directly to short-circuit. - Right speaker to "R" and left speaker to "L", red wire to "+" and...
User manual
Page 14
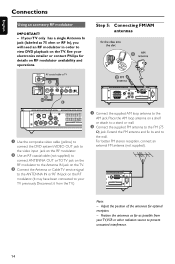
... will need an RF modulator in order to the wall. Step 5: Connecting FM/AM antennas 1 Use the composite video cable (yellow) to connect the DVD system's VIDEO OUT jack to the video input jack on the RF modulator. 2 Use an RF coaxial cable (not supplied) to connect ANTENNA OUT or TO TV jack on the RF modulator to the Antenna IN jack on the TV. 3 Connect the Antenna or Cable TV service signal to the ANTENNA IN...
... will need an RF modulator in order to the wall. Step 5: Connecting FM/AM antennas 1 Use the composite video cable (yellow) to connect the DVD system's VIDEO OUT jack to the video input jack on the RF modulator. 2 Use an RF coaxial cable (not supplied) to connect ANTENNA OUT or TO TV jack on the RF modulator to the Antenna IN jack on the TV. 3 Connect the Antenna or Cable TV service signal to the ANTENNA IN...
User manual
Page 15
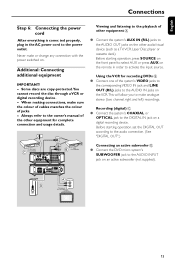
... remote in the AC power cord to the power outlet. Before starting operation, press SOURCE on the front panel to select AUX or press AUX on the other equipment for recording DVDs B ● Connect one of jacks. - Using the VCR for complete connection and usage details. Recording (digital) C ● Connect the system's COAXIAL or OPTICAL jack to the AUDIO INPUT jack on a digital recording device. Additional: Connecting additional equipment IMPORTANT! - Before star ting operation, set the DIGITAL...
... remote in the AC power cord to the power outlet. Before starting operation, press SOURCE on the front panel to select AUX or press AUX on the other equipment for recording DVDs B ● Connect one of jacks. - Using the VCR for complete connection and usage details. Recording (digital) C ● Connect the system's COAXIAL or OPTICAL jack to the AUDIO INPUT jack on a digital recording device. Additional: Connecting additional equipment IMPORTANT! - Before star ting operation, set the DIGITAL...
User manual
Page 16
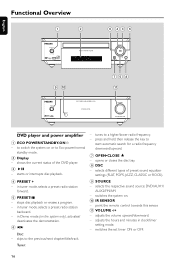
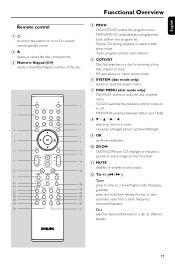
...¡/™ Disc: - in tuner mode, selects a preset radio station backward. - press and hold, then release the key to a higher/lower radio frequency. - VOLUME -/+ - adjusts the volume upward/downward. - adjusts the hours and minutes in tuner mode, selects a preset radio station forward. 5 PRESET-/9 - DVD player and power amplifier 1 ECO POWER/STANDBY-ON y - in clock/timer setting mode. - tunes to start automatic search for a radio frequency downward/upward. 7 OPEN•CLOSE ç - to switch the system on . 0 IR SENSOR - Tuner: - English Functional Overview 1 2 6 43...
...¡/™ Disc: - in tuner mode, selects a preset radio station backward. - press and hold, then release the key to a higher/lower radio frequency. - VOLUME -/+ - adjusts the volume upward/downward. - adjusts the hours and minutes in tuner mode, selects a preset radio station forward. 5 PRESET-/9 - DVD player and power amplifier 1 ECO POWER/STANDBY-ON y - in clock/timer setting mode. - tunes to start automatic search for a radio frequency downward/upward. 7 OPEN•CLOSE ç - to switch the system on . 0 IR SENSOR - Tuner: - English Functional Overview 1 2 6 43...
User manual
Page 17
.../higher radio frequency gradually. - enters or exits the system menu. 7 DISC MENU (disc mode only) - Disc: fast searches in a menu. - FM: sets stereo or mono sound mode. 6 SYSTEM (disc mode only) - confirms a selection. 0 ZOOM - press to tune to /from the program list. - VCD2.0: switches the playback control mode on the TV screen. ! opens or closes the disc compartment 3 Numeric Keypad (0-9) - DVD/VCD: enters or exits the disc contents menu. - MP3/WMA: switches between Album and Filelist. 84 / 3 / 2 / 1 - Picture CD...
.../higher radio frequency gradually. - enters or exits the system menu. 7 DISC MENU (disc mode only) - Disc: fast searches in a menu. - FM: sets stereo or mono sound mode. 6 SYSTEM (disc mode only) - confirms a selection. 0 ZOOM - press to tune to /from the program list. - VCD2.0: switches the playback control mode on the TV screen. ! opens or closes the disc compartment 3 Numeric Keypad (0-9) - DVD/VCD: enters or exits the disc contents menu. - MP3/WMA: switches between Album and Filelist. 84 / 3 / 2 / 1 - Picture CD...
User manual
Page 19
... "Connecting TV"). 1 Switch the DVD system on and then select DISC source. (See "Switching the system on/off your TV progressive scan mode or turn on interlaced mode (refer to turn on the DVD player. 4 Select the correct Video Input channel. ➜ The DVD background screen appears on the front panel. 2 Do not put any objects between the lowest and highest channels and may have a button or switch that chooses different video modes. ➜ Or, set...
... "Connecting TV"). 1 Switch the DVD system on and then select DISC source. (See "Switching the system on/off your TV progressive scan mode or turn on interlaced mode (refer to turn on the DVD player. 4 Select the correct Video Input channel. ➜ The DVD background screen appears on the front panel. 2 Do not put any objects between the lowest and highest channels and may have a button or switch that chooses different video modes. ➜ Or, set...
User manual
Page 24
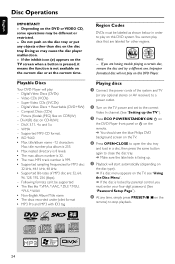
... receiver) to a power outlet. 2 Turn on the TV power and set to stop playback. 24 Region Codes DVDs must enter your four-digit password. (See "Password Setup Page"). 6 At any objects other regions. Super Video CDs (SVCDs) - DivX(R) disc on CDR(W) - English Disc Operations IMPORTANT! - Depending on the remote) to the correct Video In channel. (See "Setting up . 5 Playback will not play : - Improper formatted disc will start automatically (depending on the disc type). ➜ If a disc menu...
... receiver) to a power outlet. 2 Turn on the TV power and set to stop playback. 24 Region Codes DVDs must enter your four-digit password. (See "Password Setup Page"). 6 At any objects other regions. Super Video CDs (SVCDs) - DivX(R) disc on CDR(W) - English Disc Operations IMPORTANT! - Depending on the remote) to the correct Video In channel. (See "Setting up . 5 Playback will not play : - Improper formatted disc will start automatically (depending on the disc type). ➜ If a disc menu...

User manual
Page 27
... Video In channel. (See "Setting up the TV"). 3 Press 3 4 or use Windows Media Player 10 (or later) for CD burning/conversion.Visit www.microsoft.com for DVD recorded with multiple languages) ● Press AUDIO repeatedly to large number of the current single/total track. ➜ Display Off: switches time display off. You have to turn on the TV screen. 2 Use 1 2 3 4 or Numeric Keypad (0-9) to select a play...
... Video In channel. (See "Setting up the TV"). 3 Press 3 4 or use Windows Media Player 10 (or later) for CD burning/conversion.Visit www.microsoft.com for DVD recorded with multiple languages) ● Press AUDIO repeatedly to large number of the current single/total track. ➜ Display Off: switches time display off. You have to turn on the TV screen. 2 Use 1 2 3 4 or Numeric Keypad (0-9) to select a play...
User manual
Page 31
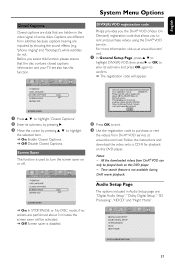
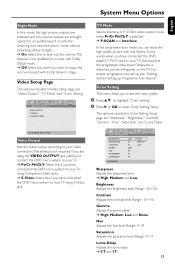
... be played back on this function. Screen Saver This function is not available during DivX movie playback. English System Menu Options Closed Captions Closed captions are data that allows you to rent and purchase videos using the DivX® VOD service. Before you select this function, please ensure that the disc contains closed captions information and your TV set also has this DVD player...
... be played back on this function. Screen Saver This function is not available during DivX movie playback. English System Menu Options Closed Captions Closed captions are data that allows you to rent and purchase videos using the DivX® VOD service. Before you select this function, please ensure that the disc contains closed captions information and your TV set also has this DVD player...

User manual
Page 32
... mono sound will send output signals to Left speaker and Right speaker. ➜ R-Mono: Right mono sound will send output signals to a multi-channel decoder/receiver. ➜ SPDIF/PCM: Only if your receiver is : "Filter". Filter Sets the audio output cutoff frequency point when playing an HDCD disc. ➜ Off, 44.1K and 88.2K. 32 Dolby Digital Setup The option included in Dolby Digital Setup is : "Reverb Mode". English System Menu Options Digital Audio Setup The options included in Digital Audio Setup...
... mono sound will send output signals to Left speaker and Right speaker. ➜ R-Mono: Right mono sound will send output signals to a multi-channel decoder/receiver. ➜ SPDIF/PCM: Only if your receiver is : "Filter". Filter Sets the audio output cutoff frequency point when playing an HDCD disc. ➜ Off, 44.1K and 88.2K. 32 Dolby Digital Setup The option included in Dolby Digital Setup is : "Reverb Mode". English System Menu Options Digital Audio Setup The options included in Digital Audio Setup...
User manual
Page 33
... using Component video jacks. ➜ S-Video: Select this when you want to your favourite action movie without disturbing others at night. ➜ On: Select this to level out the volume.This feature is only available for movies with Dolby Digital mode. ➜ Off: Select this if you are : "Video Output", "TV Mode" and "Color Setting". Video Output Sets the video output according to your video connection.This setting is not required if you have connected the DVD player...
... using Component video jacks. ➜ S-Video: Select this when you want to your favourite action movie without disturbing others at night. ➜ On: Select this to level out the volume.This feature is only available for movies with Dolby Digital mode. ➜ Off: Select this if you are : "Video Output", "TV Mode" and "Color Setting". Video Output Sets the video output according to your video connection.This setting is not required if you have connected the DVD player...
User manual
Page 39
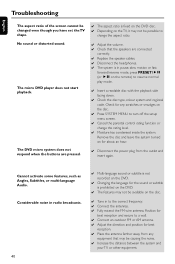
... the remote to turn on to interlaced mode. 2) Press SYSTEM on the remote to exit the system menu and then DISC to exit progressive scan. ✔ Sometimes a small amount of the DVD player repeatedly to select "DVD" or press DISC on the remote. ✔ Set your TV to the correct Video In channel.This channel is activated but the connected TV does not support progressive signals or the cables are...
... the remote to turn on to interlaced mode. 2) Press SYSTEM on the remote to exit the system menu and then DISC to exit progressive scan. ✔ Sometimes a small amount of the DVD player repeatedly to select "DVD" or press DISC on the remote. ✔ Set your TV to the correct Video In channel.This channel is activated but the connected TV does not support progressive signals or the cables are...
User manual
Page 40
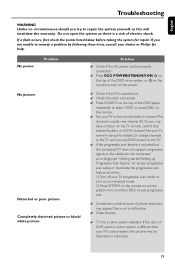
...; Disconnect the power plug from any scratches or smudges on the remote) to a wall. ✔ Connect an outdoor FM or AM antenna. ✔ Adjust the direction and position for any equipment that the speakers are connected correctly. ✔ Replace the speaker cables. ✔ Disconnect the headphones. ✔ The system is in to turn off the setup menu screen. ✔ Cancel the parental control rating function or change the rating level. ✔...
...; Disconnect the power plug from any scratches or smudges on the remote) to a wall. ✔ Connect an outdoor FM or AM antenna. ✔ Adjust the direction and position for any equipment that the speakers are connected correctly. ✔ Replace the speaker cables. ✔ Disconnect the headphones. ✔ The system is in to turn off the setup menu screen. ✔ Cancel the parental control rating function or change the rating level. ✔...

User manual
Page 42
... digital sound has specific numerical values.These jacks send audio through multiple channels, instead of the users according to a progressive display. Digital: Sound that supports PBC, you use S-Video only if your unit from the system. MP3: A file format with more than one time, as analog does. By using screen menus recorded on DVD, music, etc., in video software, or the entire album in kilobits per second. A progressive scan TV set level. S-Video...
... digital sound has specific numerical values.These jacks send audio through multiple channels, instead of the users according to a progressive display. Digital: Sound that supports PBC, you use S-Video only if your unit from the system. MP3: A file format with more than one time, as analog does. By using screen menus recorded on DVD, music, etc., in video software, or the entire album in kilobits per second. A progressive scan TV set level. S-Video...
Quick start guide
Page 2
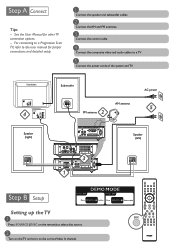
Subwoofer FM antenna AM antenna AC power Speaker (right) Speaker (left) Setting up the TV 1 Press SOURCE (DISC on the remote) to select disc source. 2 Turn on the TV and set it to a TV. 5 Connect the power cords of the system and TV. See the User Manual for proper connections and detailed setup. 1 Connect the speaker and subwoofer cables. 2 Connect the AM and FM antennas. 3 Connect the control cable. 4 Connect the composite video and audio cables to the correct Video In channel. For connecting to a Progressive Scan TV, refer...
Subwoofer FM antenna AM antenna AC power Speaker (right) Speaker (left) Setting up the TV 1 Press SOURCE (DISC on the remote) to select disc source. 2 Turn on the TV and set it to a TV. 5 Connect the power cords of the system and TV. See the User Manual for proper connections and detailed setup. 1 Connect the speaker and subwoofer cables. 2 Connect the AM and FM antennas. 3 Connect the control cable. 4 Connect the composite video and audio cables to the correct Video In channel. For connecting to a Progressive Scan TV, refer...
Quick start guide
Page 3
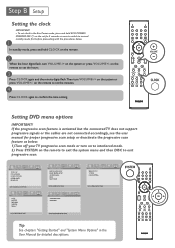
... again and the minute digits flash.Then turn VOLUME-/+ on the system or press VOLUME+/- on the set clock in the User Manual for detailed descriptions. Setting DVD menu options IMPORTANT! If the progressive scan feature is activated but the connected TV does not support progressive signals or the cables are not connected accordingly, see the user manual for 3 seconds or more to switch to normal standby mode first before proceeding...
... again and the minute digits flash.Then turn VOLUME-/+ on the system or press VOLUME+/- on the set clock in the User Manual for detailed descriptions. Setting DVD menu options IMPORTANT! If the progressive scan feature is activated but the connected TV does not support progressive signals or the cables are not connected accordingly, see the user manual for 3 seconds or more to switch to normal standby mode first before proceeding...


