User Guide
Page 2
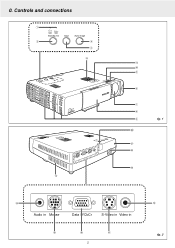
Controls and connections 1 y I Status Standby/On Input Auto image 2 4 3 @ Status Standby/On Input Auto image OPEN # y StSattuasndby/On Input Auto image Mouse Audio in Data / YCbCr S Video in Video in ! 0 9 8 7 6 5 ™ ¡ ) ( fig. 1 $ Audio in Mouse Data / YCbCr S-Video in Video in % ^ & 2 * fig. 2 0.
Controls and connections 1 y I Status Standby/On Input Auto image 2 4 3 @ Status Standby/On Input Auto image OPEN # y StSattuasndby/On Input Auto image Mouse Audio in Data / YCbCr S Video in Video in ! 0 9 8 7 6 5 ™ ¡ ) ( fig. 1 $ Audio in Mouse Data / YCbCr S-Video in Video in % ^ & 2 * fig. 2 0.

User Guide
Page 4
... 8. XGA or SVGA) projector - Note: Save energy! User guide (CD-ROM + Quick Reference Guide) Note: This equipment has been tested to use the lamp after 1000 hours of the most spectacular multimedia projectors on , the user is a convenient source of the projector 9 Moving the projector 9 Inserting the batteries in a commercial environment. data input 16 Menu structure - VGA Cable - Mouse cable set up your purchase of one or more than 15 minutes. Audio conversion cable...
... 8. XGA or SVGA) projector - Note: Save energy! User guide (CD-ROM + Quick Reference Guide) Note: This equipment has been tested to use the lamp after 1000 hours of the most spectacular multimedia projectors on , the user is a convenient source of the projector 9 Moving the projector 9 Inserting the batteries in a commercial environment. data input 16 Menu structure - VGA Cable - Mouse cable set up your purchase of one or more than 15 minutes. Audio conversion cable...

User Guide
Page 5
... recommended by wiping with it is in the specifications and with a mounting kit approved by its installation, use for service). 18. If you follow the manufacturer's instructions. 7. D. Use a soft brush attachment when using a vacuum cleaner. If the lens becomes dirty or smudged, clean it from the type of power source indicated on . 13. Follow all warnings and instructions marked on an unstable cart, stand, or...
... recommended by wiping with it is in the specifications and with a mounting kit approved by its installation, use for service). 18. If you follow the manufacturer's instructions. 7. D. Use a soft brush attachment when using a vacuum cleaner. If the lens becomes dirty or smudged, clean it from the type of power source indicated on . 13. Follow all warnings and instructions marked on an unstable cart, stand, or...

User Guide
Page 6
... and remote control provide direct access buttons for more natural image displays. Standby/On Switches the projector in the room. UGO S-lite Impact; With the 'vertical keystone correction' feature you to operate both operates the unit and acts as a wireless mouse control to present clear compression SXGA images without any ) can correct this picture distortion. DVD and other high picture quality data/video sources. High reliability and excellent brightness The new short arc lamp guarantees long life...
... and remote control provide direct access buttons for more natural image displays. Standby/On Switches the projector in the room. UGO S-lite Impact; With the 'vertical keystone correction' feature you to operate both operates the unit and acts as a wireless mouse control to present clear compression SXGA images without any ) can correct this picture distortion. DVD and other high picture quality data/video sources. High reliability and excellent brightness The new short arc lamp guarantees long life...

User Guide
Page 7
... the menu is starting up orange in function). On: lamp life of the projection lamp nears or the end or is switched from the remote control. 9 Focus ring To adjust the focus of the projected image. 0 Zoom ring To adjust the size of a video recorder, Laser Disc player, video camera or TV with the resolution. Lights up (1 min.) - Flashes orange when the projector is expired. 2 Standby/On For switching the projector in the power standby mode. 3 Input selection button To toggle between Video, S-Video and Data signal. 4 Auto image button...
... the menu is starting up orange in function). On: lamp life of the projection lamp nears or the end or is switched from the remote control. 9 Focus ring To adjust the focus of the projected image. 0 Zoom ring To adjust the size of a video recorder, Laser Disc player, video camera or TV with the resolution. Lights up (1 min.) - Flashes orange when the projector is expired. 2 Standby/On For switching the projector in the power standby mode. 3 Input selection button To toggle between Video, S-Video and Data signal. 4 Auto image button...
User Guide
Page 8
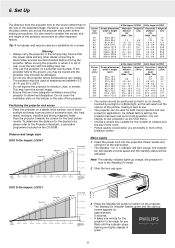
... by sunlight or artificial light, as this will be used as other cables connecting to rear projection via the OSD menu. • Choose a screen size suitable for both front projection and rear projection applications. Wait until the indicator stops flashing and lights steadily in green. 8 Do not cover the ventilation slots on the projector. - Press the Standby/On button to see. • The projector can change to Audio/Video sources are disconnected before...
... by sunlight or artificial light, as this will be used as other cables connecting to rear projection via the OSD menu. • Choose a screen size suitable for both front projection and rear projection applications. Wait until the indicator stops flashing and lights steadily in green. 8 Do not cover the ventilation slots on the projector. - Press the Standby/On button to see. • The projector can change to Audio/Video sources are disconnected before...

User Guide
Page 9
... the button. Vertical keystone correction allows you can Keystoned image fine adjust the projected image. Projection angle • Press the adjuster button on the back where the connections are not properly placed, the picture will be locked. 9 To switch off and the Standby/On indicator will blink orange for 1 minute before the standby status will be distorted, producing a keystone image. buttons of the remote control you to readjust the focus of the projector lens when moving the projector. 6. Set Up...
... the button. Vertical keystone correction allows you can Keystoned image fine adjust the projected image. Projection angle • Press the adjuster button on the back where the connections are not properly placed, the picture will be locked. 9 To switch off and the Standby/On indicator will blink orange for 1 minute before the standby status will be distorted, producing a keystone image. buttons of the remote control you to readjust the focus of the projector lens when moving the projector. 6. Set Up...

User Guide
Page 10
...). Status Standby/On y Input Auto image OPEN 30˚ 50˚ 50˚ 30˚ 10 Press firmly and slide the battery cover off. 2. The controllable range is 50 degrees horizontally and 30 degrees vertically relative to the remote sensor. Remote control mouse functions • The cursor key on the remote control operates the computer mouse functions. • If a computer running Windows is connected, the OK button...
...). Status Standby/On y Input Auto image OPEN 30˚ 50˚ 50˚ 30˚ 10 Press firmly and slide the battery cover off. 2. The controllable range is 50 degrees horizontally and 30 degrees vertically relative to the remote sensor. Remote control mouse functions • The cursor key on the remote control operates the computer mouse functions. • If a computer running Windows is connected, the OK button...

User Guide
Page 12
... be connected directly to the Audio in 1. This red light shows that the cursor key on the power of this , use the pointing device until the PC is completed, turn off . Installation Connecting to a computer Connecting to PC mouse connector General - Connect the audio OUT socket of the projector. PC (Personal computer) Status Standby/On y Input Auto image OPEN (3) (1) (6) $ Audio in Mouse Data / YCbCr S-Video in Video in (5) # Audio in Mouse % Data / YCbCr S-Video in Video in...
... be connected directly to the Audio in 1. This red light shows that the cursor key on the power of this , use the pointing device until the PC is completed, turn off . Installation Connecting to a computer Connecting to PC mouse connector General - Connect the audio OUT socket of the projector. PC (Personal computer) Status Standby/On y Input Auto image OPEN (3) (1) (6) $ Audio in Mouse Data / YCbCr S-Video in Video in (5) # Audio in Mouse % Data / YCbCr S-Video in Video in...
User Guide
Page 14
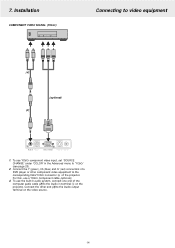
... the projector. To use the built-in audio system, connect one end of the computer audio cable (3) to the corresponding Data/YCbCr connector % of a DVD player or other end (4) to video equipment (4) (optional) (3) # Audio in Mouse % Data / YCbCr S-Video in Video in 1. Connect the Y (green), Cb (blue) and Cr (red) connectors of the projector. To use a YCbCr Component cable (optional). 3. 7. For this, use YCbCr component video input, set 'SOURCE CHANGE' under 'COLOR' in terminal # on the video source...
... the projector. To use the built-in audio system, connect one end of the computer audio cable (3) to the corresponding Data/YCbCr connector % of a DVD player or other end (4) to video equipment (4) (optional) (3) # Audio in Mouse % Data / YCbCr S-Video in Video in 1. Connect the Y (green), Cb (blue) and Cr (red) connectors of the projector. To use a YCbCr Component cable (optional). 3. 7. For this, use YCbCr component video input, set 'SOURCE CHANGE' under 'COLOR' in terminal # on the video source...

User Guide
Page 15
... factory. General explanation All video and data adjustments and settings (except A/V Mute) are done via On Screen Displays and with help of total lamp usage will be projected onto the screen when the input is turned on the projector. - 8. When the lamp is pressed with the remote control Flip cover open. 1. Switch on the remote control. Open Flip cover and press Menu. - If required, select the next item to be displayed when the Menu button is on the remote control. The Standby/On indicator flashes green...
... factory. General explanation All video and data adjustments and settings (except A/V Mute) are done via On Screen Displays and with help of total lamp usage will be projected onto the screen when the input is turned on the projector. - 8. When the lamp is pressed with the remote control Flip cover open. 1. Switch on the remote control. Open Flip cover and press Menu. - If required, select the next item to be displayed when the Menu button is on the remote control. The Standby/On indicator flashes green...
User Guide
Page 16
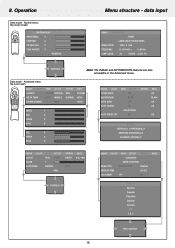
... D-Zoom D-Keystone Volume IMAGE COLOR V-EFFECT COLOR TEMP. OPTION INFO. Normal menu flip cover closed Mouse Video Menu Cancel Standby /On Data IMAGE INFORMATION BRIGHTNESS 0 CONTRAST 0 PICTURE ADJ 0 FINE PICTURE 0 -POSITION- DIRECT 4:3>16:9 FULL POSITION IMAGE COLOR VIEW SET UP OPTION -LANGUAGE- -MENU POSITION- ENGLISH Deutsch Français ITALIANO Español Svenska ∑ ¥ Menu position 16 Menu structure - SOURCE CHANGE VIEW SET UP OPTION NORMAL NATURAL REAL LOW MIDDLE NORMAL DATA INFO. MENU TYPE TRANSLUCENT OPAQUE DISPLAY TIME...
... D-Zoom D-Keystone Volume IMAGE COLOR V-EFFECT COLOR TEMP. OPTION INFO. Normal menu flip cover closed Mouse Video Menu Cancel Standby /On Data IMAGE INFORMATION BRIGHTNESS 0 CONTRAST 0 PICTURE ADJ 0 FINE PICTURE 0 -POSITION- DIRECT 4:3>16:9 FULL POSITION IMAGE COLOR VIEW SET UP OPTION -LANGUAGE- -MENU POSITION- ENGLISH Deutsch Français ITALIANO Español Svenska ∑ ¥ Menu position 16 Menu structure - SOURCE CHANGE VIEW SET UP OPTION NORMAL NATURAL REAL LOW MIDDLE NORMAL DATA INFO. MENU TYPE TRANSLUCENT OPAQUE DISPLAY TIME...
User Guide
Page 17
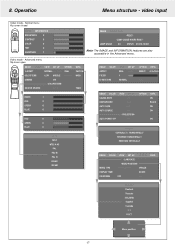
... IMAGE COLOR VIEW SET UP OPTION -LANGUAGE- -MENU POSITION- Video mode - video input Video mode - LAMP USAGE 34 STATUS 21212.13361 Note: The IMAGE and INFORMATION features are also accessible in the Advanced menu. CINEMA SOURCE CHANGE VIEW SET UP OPTION NORMAL NATURAL REAL LOW MIDDLE NORMAL ON -COLORSYSTEM- DATA INFO. Advanced menu flip cover open Mouse Video Menu Cancel Standby /On Data Auto image D-Freeze A/V Mute D-Zoom D-Keystone Volume IMAGE COLOR V-EFFECT COLOR TEMP. Operation Menu structure - MENU TYPE TRANSLUCENT OPAQUE DISPLAY TIME 30 SEC ON SCREEN...
... IMAGE COLOR VIEW SET UP OPTION -LANGUAGE- -MENU POSITION- Video mode - video input Video mode - LAMP USAGE 34 STATUS 21212.13361 Note: The IMAGE and INFORMATION features are also accessible in the Advanced menu. CINEMA SOURCE CHANGE VIEW SET UP OPTION NORMAL NATURAL REAL LOW MIDDLE NORMAL ON -COLORSYSTEM- DATA INFO. Advanced menu flip cover open Mouse Video Menu Cancel Standby /On Data Auto image D-Freeze A/V Mute D-Zoom D-Keystone Volume IMAGE COLOR V-EFFECT COLOR TEMP. Operation Menu structure - MENU TYPE TRANSLUCENT OPAQUE DISPLAY TIME 30 SEC ON SCREEN...
User Guide
Page 18
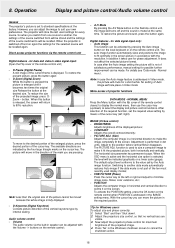
... care for Windows users: To adjust size and phase correctly: 1. function is muted at the factory. For details see 'Data mode - The available directions are visible. 3. D-Keystone (Digital Keystone) Corrects picture distortion of the vertical keystone type by pressing the Auto image button on the local keyboard or on the remote control when POSITION is selected, the level will mute for data and video/s-video signal input: (Open the Flip cover of the projected image. 4. Adjust the projectors size control, so...
... care for Windows users: To adjust size and phase correctly: 1. function is muted at the factory. For details see 'Data mode - The available directions are visible. 3. D-Keystone (Digital Keystone) Corrects picture distortion of the vertical keystone type by pressing the Auto image button on the local keyboard or on the remote control when POSITION is selected, the level will mute for data and video/s-video signal input: (Open the Flip cover of the projected image. 4. Adjust the projectors size control, so...

User Guide
Page 19
... times; - 4:3 > 16:9: 4:3 aspect ratio images are projected after automatic input signal zoom-in dot units. Note: Less than the original size of the displayed picture; - VIDEO/S-VIDEO MODE - BRIGHTNESS Adjusts brightness of the picture cannot be made to Real. Input source BRIGHTNESS CONTRAST COLOR TINT SHARPNESS VIDEO/S-VIDEO COMPONENT VIDEO • • • • • • o - • - Four different settings can make your desired personal setting; - ADVANCED MENU Press the Menu button with '•' are not adjustable VIEW - Use...
... times; - 4:3 > 16:9: 4:3 aspect ratio images are projected after automatic input signal zoom-in dot units. Note: Less than the original size of the displayed picture; - VIDEO/S-VIDEO MODE - BRIGHTNESS Adjusts brightness of the picture cannot be made to Real. Input source BRIGHTNESS CONTRAST COLOR TINT SHARPNESS VIDEO/S-VIDEO COMPONENT VIDEO • • • • • • o - • - Four different settings can make your desired personal setting; - ADVANCED MENU Press the Menu button with '•' are not adjustable VIEW - Use...

User Guide
Page 20
8. Operation Display and picture control/Other settings VIDEO/S-VIDEO MODE - ADVANCED MENU Press the Menu button with the flip cover of the projected image; - TINT Adjusts the tint of the remote control open press the Menu button to display the advanced menu, then use and handling: SET UP With the Flip cover of cursor control (left /right). The selection is automatic when AUTO is adjustable for enjoying video in the COLOR setting menu. Data for a bright-lit room. Four different settings can be muted for component video; AUTO: projection after...
8. Operation Display and picture control/Other settings VIDEO/S-VIDEO MODE - ADVANCED MENU Press the Menu button with the flip cover of the projected image; - TINT Adjusts the tint of the remote control open press the Menu button to display the advanced menu, then use and handling: SET UP With the Flip cover of cursor control (left /right). The selection is automatic when AUTO is adjustable for enjoying video in the COLOR setting menu. Data for a bright-lit room. Four different settings can be muted for component video; AUTO: projection after...

User Guide
Page 21
... replacing the lamp. 1. MENU TYPE (Menu Viewing Settings) The menu viewing method can move the cursor to display the advanced menu, then use cursor control (left /right). - when the power is no signal input for a specific application. or more, the power is automatically turned off and standby status is set from 5 sec to a horizontal mirror image of the input signal for a period of 5 min. MENU POSITION (Menu Display Position) The menu display position can be set with respect to reset the hours...
... replacing the lamp. 1. MENU TYPE (Menu Viewing Settings) The menu viewing method can move the cursor to display the advanced menu, then use cursor control (left /right). - when the power is no signal input for a specific application. or more, the power is automatically turned off and standby status is set from 5 sec to a horizontal mirror image of the input signal for a period of 5 min. MENU POSITION (Menu Display Position) The menu display position can be set with respect to reset the hours...
User Guide
Page 22
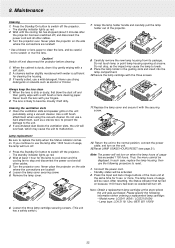
... the power cord and all other cables. 3. In such case, replace the lamp housing, then use the following information when ordering a replacement lamp cartridge: - Press the Input and Auto image buttons of the main unit at least 1 hour for the lamp to cool down and the cooling fan to replace the lamp when the Status indicator comes on the side where the connections are located! • Use a blower or lens paper to clean the lens...
... the power cord and all other cables. 3. In such case, replace the lamp housing, then use the following information when ordering a replacement lamp cartridge: - Press the Input and Auto image buttons of the main unit at least 1 hour for the lamp to cool down and the cooling fan to replace the lamp when the Status indicator comes on the side where the connections are located! • Use a blower or lens paper to clean the lens...

User Guide
Page 23
... operating for 1000 hours or longer, the Status indicator on after 1100 hours. (It will go off the unit and replace the lamp cartridge with a new one. Order this happens, turn on the control panel will be too hot to your Philips dealer using the unit model number (see 'Note' under the test conditions of our company) for those mentioned in use a lamp cartridge other than the Philips replacement lamp...
... operating for 1000 hours or longer, the Status indicator on after 1100 hours. (It will go off the unit and replace the lamp cartridge with a new one. Order this happens, turn on the control panel will be too hot to your Philips dealer using the unit model number (see 'Note' under the test conditions of our company) for those mentioned in use a lamp cartridge other than the Philips replacement lamp...
User Guide
Page 24
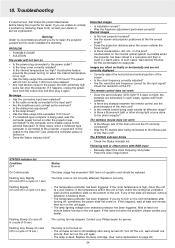
... work • Does the send indicator (LED) light? If this happens, wait at least one minute before taking the projector for the condensation to the power outlet? • Is the lamp cover correctly installed? • Is the internal temperature too high? Turn off in a cycle of the unit. The STATUS indicator blinks • Check the Status indicator list. Blurred images • Is the lens properly focussed? • Are the screen and projector...
... work • Does the send indicator (LED) light? If this happens, wait at least one minute before taking the projector for the condensation to the power outlet? • Is the lamp cover correctly installed? • Is the internal temperature too high? Turn off in a cycle of the unit. The STATUS indicator blinks • Check the Status indicator list. Blurred images • Is the lens properly focussed? • Are the screen and projector...


