User manual
Page 1
BDS4241V BDH4241V BDH5021V Philips Business Solutions EN User Manual TYPE Nr.
BDS4241V BDH4241V BDH5021V Philips Business Solutions EN User Manual TYPE Nr.

User manual
Page 2
User Manual BDS4241V/BDH4241/BDH5021V TABLE OF CONTENTS IMPO RT AN T N O T ES AN D SAFET Y IN ST RUC T IO N S 3 1.1 Safety Instructions 3 1.2 FCC Instruction 5 1.3 End-Of-Life Disposal 6 UNPAC KING ...
User Manual BDS4241V/BDH4241/BDH5021V TABLE OF CONTENTS IMPO RT AN T N O T ES AN D SAFET Y IN ST RUC T IO N S 3 1.1 Safety Instructions 3 1.2 FCC Instruction 5 1.3 End-Of-Life Disposal 6 UNPAC KING ...

User manual
Page 4
User Manual BDS4241V/BDH4241/BDH5021V 1. IMPORTANT NOTES AND SAFETY INSTRUCTIONS 1.1 Safty Instructions CAUTION RISK OF ELECTRIC SHOCK DO NOT OPEN .) • • • • • re if it is connected to re.) 3
User Manual BDS4241V/BDH4241/BDH5021V 1. IMPORTANT NOTES AND SAFETY INSTRUCTIONS 1.1 Safty Instructions CAUTION RISK OF ELECTRIC SHOCK DO NOT OPEN .) • • • • • re if it is connected to re.) 3

User manual
Page 5
...with about million thin lm transistors, giving you ne picture details. Please note that this product. (This can result in a risk of electric shock) 4 User Manual BDS4241V/BDH4241/BDH5021V CAUTION • • Should not be explosive and you' re wound) • Do not place this product on the screen as a xed...Children can press it down) • Do not damage the power cord. (This can result in a risk of re or electric shock) • The PDP panel is broken. • Do not cover this product with curtains or a tablecloth. (This can result in a risk of re) • Place the batteries ...
...with about million thin lm transistors, giving you ne picture details. Please note that this product. (This can result in a risk of electric shock) 4 User Manual BDS4241V/BDH4241/BDH5021V CAUTION • • Should not be explosive and you' re wound) • Do not place this product on the screen as a xed...Children can press it down) • Do not damage the power cord. (This can result in a risk of re or electric shock) • The PDP panel is broken. • Do not cover this product with curtains or a tablecloth. (This can result in a risk of re) • Place the batteries ...

User manual
Page 6
... cause harmful interference to maintain FCC compliance for the product. It may cause undesired operation. User Manual BDS4241V/BDH4241/BDH5021V 1.2 FCC Information User Instructions This device complies with part 15 of the FCC Rules. You may not cause harmful interference, ...to operate the equipment. Provided with this equipment in a residential area is operated in which case the user will be suitable for compliance could void the user's authority to the following two conditions: 1. This television receiver provides display of television closed captioning in accordance...
... cause harmful interference to maintain FCC compliance for the product. It may cause undesired operation. User Manual BDS4241V/BDH4241/BDH5021V 1.2 FCC Information User Instructions This device complies with part 15 of the FCC Rules. You may not cause harmful interference, ...to operate the equipment. Provided with this equipment in a residential area is operated in which case the user will be suitable for compliance could void the user's authority to the following two conditions: 1. This television receiver provides display of television closed captioning in accordance...
User manual
Page 7
User Manual BDS4241V/BDH4241/BDH5021V 1.3 END-OF-LIFE DISPOSAL This Philips product and its packaging contain materials that cna be properly disposed. Specialized companies can recycle your product to increase the amount of reusable materials and ...
User Manual BDS4241V/BDH4241/BDH5021V 1.3 END-OF-LIFE DISPOSAL This Philips product and its packaging contain materials that cna be properly disposed. Specialized companies can recycle your product to increase the amount of reusable materials and ...
User manual
Page 9
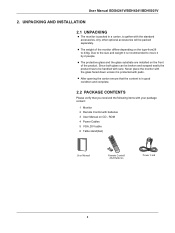
...following items with your package content : 1 Monitor 2 Remote Control with the glass faced down unless it is rccommended to gether with care. User Manual BDS4241V/BDH4241/BDH5021V 2. The protective glass and the glass substrate are installed on the front of the monitor differs-depending on CD - ROM 4 Power... Cables 5 VGA, DVI cable 6 Table stand(feet) User Manual R emote C ontrol/ AAA B atteries P ower C ord 8 Since both glass can be broken and scraped easily the product has to 43kg. ...
...following items with your package content : 1 Monitor 2 Remote Control with the glass faced down unless it is rccommended to gether with care. User Manual BDS4241V/BDH4241/BDH5021V 2. The protective glass and the glass substrate are installed on the front of the monitor differs-depending on CD - ROM 4 Power... Cables 5 VGA, DVI cable 6 Table stand(feet) User Manual R emote C ontrol/ AAA B atteries P ower C ord 8 Since both glass can be broken and scraped easily the product has to 43kg. ...

User manual
Page 10
... a flat surface to the high power consumption, always use the plug exclusively designed for a long time. The distance between the back of the electronic components. User Manual BDS4241V/BDH4241/BDH5021V 2.3 INSTALLATION NOTES Due to avoid tipping. The PDP can normally operate only under 2000m in height and do not display a still picture for...
... a flat surface to the high power consumption, always use the plug exclusively designed for a long time. The distance between the back of the electronic components. User Manual BDS4241V/BDH4241/BDH5021V 2.3 INSTALLATION NOTES Due to avoid tipping. The PDP can normally operate only under 2000m in height and do not display a still picture for...
User manual
Page 11
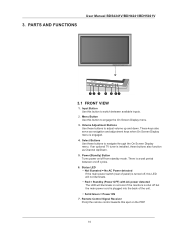
...if the monitors is shut off , this button to adjust volume up and down. Power(Standly) Button Turns power on/off cycles. 6. PARTS AND FUNCTIONS User Manual BDS4241V/BDH4241/BDH5021V 1 12 13 14 15 16 17 3.1 FRONT VIEW 1. Solid Green = Power ON 7. Status LED Not Illumated = No AC Power detected ... OFF) with AC power detected The LED will not illuminate. There is turned off but the main power cord is plugged into the back of panel) is a wait period between available inputs. 2. Input Button Use this spot on /off from standby mode. These keys also serve as Channel Up...
...if the monitors is shut off , this button to adjust volume up and down. Power(Standly) Button Turns power on/off cycles. 6. PARTS AND FUNCTIONS User Manual BDS4241V/BDH4241/BDH5021V 1 12 13 14 15 16 17 3.1 FRONT VIEW 1. Solid Green = Power ON 7. Status LED Not Illumated = No AC Power detected ... OFF) with AC power detected The LED will not illuminate. There is turned off but the main power cord is plugged into the back of panel) is a wait period between available inputs. 2. Input Button Use this spot on /off from standby mode. These keys also serve as Channel Up...
User manual
Page 12
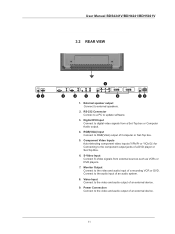
... an external device. 9. S-Video Input Connect S-Video signals from a Set-Top box or Computer Audio output. 4. RS-232 Connector Connec to a PC to external speakers. 2. User Manual BDS4241V/BDH4241/BDH5021V 3.2 REAR VIEW 1 12 17 VIDEO 2 VIDEO 1 13 14 15 16 1 81 1 19 1. Connect to the video and audio output of an audio system...
... an external device. 9. S-Video Input Connect S-Video signals from a Set-Top box or Computer Audio output. 4. RS-232 Connector Connec to a PC to external speakers. 2. User Manual BDS4241V/BDH4241/BDH5021V 3.2 REAR VIEW 1 12 17 VIDEO 2 VIDEO 1 13 14 15 16 1 81 1 19 1. Connect to the video and audio output of an audio system...
User manual
Page 15
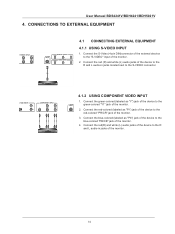
... EXTERNAL EQUIPMENT 4.1.1 USING S-VIDEO INPUT 1. Connect the red-colored (labeled as "Y") jack of the device to the blue-colored "PB/CB" jack of the monitor. 2. User Manual BDS4241V/BDH4241/BDH5021V 4.
... EXTERNAL EQUIPMENT 4.1.1 USING S-VIDEO INPUT 1. Connect the red-colored (labeled as "Y") jack of the device to the blue-colored "PB/CB" jack of the monitor. 2. User Manual BDS4241V/BDH4241/BDH5021V 4.
User manual
Page 18
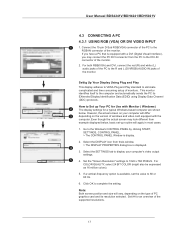
User Manual BDS4241V/BDH4241/BDH5021V 4.3 CONNECTING A PC 4.3.1 USING RGB (VGA) OR DVI VIDEO INPUT 1 1. For COLOR QUALITY, select 24 BIT COLOR (might also be expressed as 16 million ... is display. 2. Howerer, the actual screen on the type of the monitor. 2. Set the "Screen Resolution" settings to the Window's CONTROL PANEL by clicking START, SETTINGS, CONTROL PANEL. > The CONTROL PANEL Window is equipped with a DVI (Digital Visual Interface), you may look different from example displayed below . How to eliminate complicated and time...
User Manual BDS4241V/BDH4241/BDH5021V 4.3 CONNECTING A PC 4.3.1 USING RGB (VGA) OR DVI VIDEO INPUT 1 1. For COLOR QUALITY, select 24 BIT COLOR (might also be expressed as 16 million ... is display. 2. Howerer, the actual screen on the type of the monitor. 2. Set the "Screen Resolution" settings to the Window's CONTROL PANEL by clicking START, SETTINGS, CONTROL PANEL. > The CONTROL PANEL Window is equipped with a DVI (Digital Visual Interface), you may look different from example displayed below . How to eliminate complicated and time...
User manual
Page 19
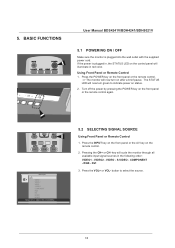
... by pressing the POWER key on the remote control. 2. Press the INPUT key on the from panel or the AV key on the front panel or the remote control again. BASIC FUNCTIONS User Manual BDS4241V/BDH4241/BDH5021V 5.1 POWERING ON / OFF Make sure the monitor is plugged in the following order:... VIDEO1 - Press the POWER key on the front panel or the remote control. => The monitor will ...
... by pressing the POWER key on the remote control. 2. Press the INPUT key on the from panel or the AV key on the front panel or the remote control again. BASIC FUNCTIONS User Manual BDS4241V/BDH4241/BDH5021V 5.1 POWERING ON / OFF Make sure the monitor is plugged in the following order:... VIDEO1 - Press the POWER key on the front panel or the remote control. => The monitor will ...
User manual
Page 20
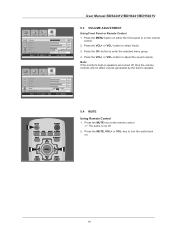
Note: If the monitor's built-in speaker. 5.4 MUTE Using Remote Control 1. C H +]elect [- SVO+L] E xit [ME NU] User Manual BDS4241V/BDH4241/BDH5021V 5.3 VOLUME ADJUSTMENT Using Front Panel or Remote Control 1. button to turn the audio back on. 19 Press the MUTE key on the remote control. 2. Press the CH- ...Press the MENU button on either the front panel or on the remote control. => The audio is cut off , then the volume controls will not affect volume generated by the built-in ...
Note: If the monitor's built-in speaker. 5.4 MUTE Using Remote Control 1. C H +]elect [- SVO+L] E xit [ME NU] User Manual BDS4241V/BDH4241/BDH5021V 5.3 VOLUME ADJUSTMENT Using Front Panel or Remote Control 1. button to turn the audio back on. 19 Press the MUTE key on the remote control. 2. Press the CH- ...Press the MENU button on either the front panel or on the remote control. => The audio is cut off , then the volume controls will not affect volume generated by the built-in ...
User manual
Page 21
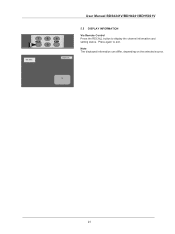
Note The displayed information can differ, depending on the selected source. TV 20 Press again to display the channel information and setting status. 001-ABC TIMER OFF User Manual BDS4241V/BDH4241/BDH5021V 5.5 DISPLAY INFORMATION Via Remote Control Press the RECALL button to exit.
Note The displayed information can differ, depending on the selected source. TV 20 Press again to display the channel information and setting status. 001-ABC TIMER OFF User Manual BDS4241V/BDH4241/BDH5021V 5.5 DISPLAY INFORMATION Via Remote Control Press the RECALL button to exit.

User manual
Page 23
CH +] Select [- Depending on the monitor panel or remote control. Color - Phase - VOL 083 052 019 063 05 Image Preset Complete! +] Exit [MENU] 6.1.2 RESET TO THE FACTORY DEFAULTS 1. VOL +] Exit [MENU] ...- VOL [-VOL+]to be set using the Picture Adjustment OSD menu. 1. Sharpness - 6. Tint - key to reset the picture settings to the previous menu. ADVANCED FUNCTIONS User Manual BDS4241V/BDH4241/BDH5021V Image Screen Setup Audio B rightnes s C ontras t S harpness C olor Tint 0 Image Preset Move [- Press the CH+ or CH- Press the MENU button ...
CH +] Select [- Depending on the monitor panel or remote control. Color - Phase - VOL 083 052 019 063 05 Image Preset Complete! +] Exit [MENU] 6.1.2 RESET TO THE FACTORY DEFAULTS 1. VOL +] Exit [MENU] ...- VOL [-VOL+]to be set using the Picture Adjustment OSD menu. 1. Sharpness - 6. Tint - key to reset the picture settings to the previous menu. ADVANCED FUNCTIONS User Manual BDS4241V/BDH4241/BDH5021V Image Screen Setup Audio B rightnes s C ontras t S harpness C olor Tint 0 Image Preset Move [- Press the CH+ or CH- Press the MENU button ...
User manual
Page 24
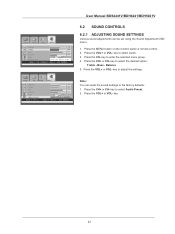
Press the VOL+ or VOL- Press the CH- Press the VOL+ or VOL- Press the MENU button on the monitor panel or remote control. 2. key to select Audio Preset. 2. C H +] 6 0 055 072 043 ON OFF Audio P res et C omplete! key to ...settings. Image S creen S etup Audio Volume 6 0 T r eble 055 B as s B alance Mute Audio P res et Move [- C H +] Adjus t [- VOL +] E xit [ME NU] User Manual BDS4241V/BDH4241/BDH5021V 6.2 SOUND CONTROLS 6.2.1 ADJUSTING SOUND SETTINGS Various sound adjustments can reset the sound settings to the factory defaults: 1. key to P res et Audio Move...
Press the VOL+ or VOL- Press the CH- Press the VOL+ or VOL- Press the MENU button on the monitor panel or remote control. 2. key to select Audio Preset. 2. C H +] 6 0 055 072 043 ON OFF Audio P res et C omplete! key to ...settings. Image S creen S etup Audio Volume 6 0 T r eble 055 B as s B alance Mute Audio P res et Move [- C H +] Adjus t [- VOL +] E xit [ME NU] User Manual BDS4241V/BDH4241/BDH5021V 6.2 SOUND CONTROLS 6.2.1 ADJUSTING SOUND SETTINGS Various sound adjustments can reset the sound settings to the factory defaults: 1. key to P res et Audio Move...

User manual
Page 25
... D S ettings Color Temp 030 E nglish Move [- Press the VOL+ or VOL- WARM - Press the MENU button on the monitor panel or remote control. 2. key to select Setup. 3. VOL +] E xit [ME NU] User Manual BDS4241V/BDH4241/BDH5021V 6.3 OSD MENU LANGUAGE This monitor has multiple OSD Menu languages built-in including English, French, Spanish, Italian, German... monitor is selected. 3. Press the VOL+ or VOL- Press the VOL+ or VOL- Press the VOL+ or VOL- Press the MENU button on the monitor panel or remote control. 2. Press the VOL+ or VOL- Setting Power Save Mode 1.
... D S ettings Color Temp 030 E nglish Move [- Press the VOL+ or VOL- WARM - Press the MENU button on the monitor panel or remote control. 2. key to select Setup. 3. VOL +] E xit [ME NU] User Manual BDS4241V/BDH4241/BDH5021V 6.3 OSD MENU LANGUAGE This monitor has multiple OSD Menu languages built-in including English, French, Spanish, Italian, German... monitor is selected. 3. Press the VOL+ or VOL- Press the VOL+ or VOL- Press the VOL+ or VOL- Press the MENU button on the monitor panel or remote control. 2. Press the VOL+ or VOL- Setting Power Save Mode 1.

User manual
Page 26
... setting. 25 Press the CH- key until you to deterioration in the fluorescent substance used in the plasma module. VOL +] E xit [ ME NU ] Image S creen S ize Freeze S etup Audio...enter the selected menu group. 6. Note: Simply press the FREEZE button on the monitor panel or remote control. 2. Press the MENU button. 2. Press the CH- Press the Vol...is stilled. key to select Freeze. 5. Press the MENU button. 2. VOL +] E xit [ ME NU ] User Manual BDS4241V/BDH4241/BDH5021V 6.6 MINIMIZE SCREEN STICKING If the fixed pattern is displayed for how long the OSD will be recognized as ...
... setting. 25 Press the CH- key until you to deterioration in the fluorescent substance used in the plasma module. VOL +] E xit [ ME NU ] Image S creen S ize Freeze S etup Audio...enter the selected menu group. 6. Note: Simply press the FREEZE button on the monitor panel or remote control. 2. Press the MENU button. 2. Press the CH- Press the Vol...is stilled. key to select Freeze. 5. Press the MENU button. 2. VOL +] E xit [ ME NU ] User Manual BDS4241V/BDH4241/BDH5021V 6.6 MINIMIZE SCREEN STICKING If the fixed pattern is displayed for how long the OSD will be recognized as ...

User manual
Page 27
Image Screen S etup S ize Freeze Sticking Minimum Audio AUTO OFF O N OFF ON Move [- VOL +] Exit [MENU] User Manual BDS4241V/BDH4241/BDH5021V 6.10 CHANGING THE SCREEN SIZE You can select the screen size which best corresponds to select Screen. 3. key to your viewing requirements. 1 Press ...
Image Screen S etup S ize Freeze Sticking Minimum Audio AUTO OFF O N OFF ON Move [- VOL +] Exit [MENU] User Manual BDS4241V/BDH4241/BDH5021V 6.10 CHANGING THE SCREEN SIZE You can select the screen size which best corresponds to select Screen. 3. key to your viewing requirements. 1 Press ...


