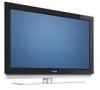
Leaflet
Page 3
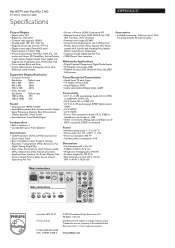
Specifications are the property of Use: 4 favorite lists, Auto Volume Leveller (AVL), Channel list, Delta Volume per preset, Graphical User Interface, On Screen Display, Side Control, Smart Picture, Smart Sound, Closed Captioning Full Text • Picture in Picture: HDMI-Component PIP • Remote Control: Amp, DVD, DVD-R, Sat, STB (Set-Top Box), VCR, Universal • Remote control type: RC4405 • Screen Format Adjustments: 4:3, 6 Widescreen Modes, Auto Format, Movie expand 14:9, Movie expand 16:9, Subtitle and Heading Shift, Subtitle Zoom, Super Zoom, Widescreen • Teletext:...
Specifications are the property of Use: 4 favorite lists, Auto Volume Leveller (AVL), Channel list, Delta Volume per preset, Graphical User Interface, On Screen Display, Side Control, Smart Picture, Smart Sound, Closed Captioning Full Text • Picture in Picture: HDMI-Component PIP • Remote Control: Amp, DVD, DVD-R, Sat, STB (Set-Top Box), VCR, Universal • Remote control type: RC4405 • Screen Format Adjustments: 4:3, 6 Widescreen Modes, Auto Format, Movie expand 14:9, Movie expand 16:9, Subtitle and Heading Shift, Subtitle Zoom, Super Zoom, Widescreen • Teletext:...
User manual
Page 2
...; Install all servicing to avoid injury from power lines. 20. To prevent battery leakage that objects do not endanger yourself, or children, by qualified service personnel when: A. Do not use this apparatus during lightning storms or when unused for proper grounding and, in accordance with + and - The power supply cord or the plug has been damaged; Tilt/Stability - Wall or Ceiling Mounting...
...; Install all servicing to avoid injury from power lines. 20. To prevent battery leakage that objects do not endanger yourself, or children, by qualified service personnel when: A. Do not use this apparatus during lightning storms or when unused for proper grounding and, in accordance with + and - The power supply cord or the plug has been damaged; Tilt/Stability - Wall or Ceiling Mounting...
User manual
Page 3
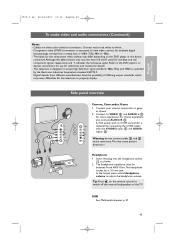
... settings 38 How to upgrade the TV software 38 Create your favorite list 39 Electronic Program guide 40 Multimedia Browser 41 To make video and audio connections . . . . . 44 Side panel overview 45 Rear panel overview 46 Connect: a VCR or DVD recorder 47 a recorder and other A/V devices . . . . . .48 a recorder and Cable box with RF output 49 a satellite receiver or Cable box with A/V outputs 50 a recorder and satellite receiver or Cable box with A/V outputs 51 a DVD player, or other accessory digital source...
... settings 38 How to upgrade the TV software 38 Create your favorite list 39 Electronic Program guide 40 Multimedia Browser 41 To make video and audio connections . . . . . 44 Side panel overview 45 Rear panel overview 46 Connect: a VCR or DVD recorder 47 a recorder and other A/V devices . . . . . .48 a recorder and Cable box with RF output 49 a satellite receiver or Cable box with A/V outputs 50 a recorder and satellite receiver or Cable box with A/V outputs 51 a DVD player, or other accessory digital source...
User manual
Page 6
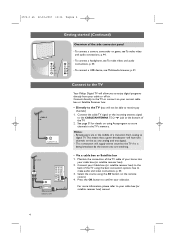
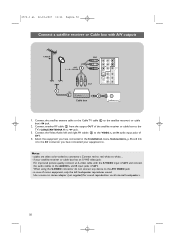
... connection will supply stereo sound to the TV if it is being broadcast by the station you to store channels in the middle of a transition from your cable or off air. CABLE SIGNAL SPLITTER o ANTENNA 75 IN OUT H Pr L V Pb R VIDEO AV1 S-VIDEO Y DIGITAL AUDIO IN AV3 S-VIDEO AV2 VIDEO L Pb R Y AV2 : L + R + VIDEO Cable box / SAT • Via a cable box or Satellite box 1. Maintain the connection of the TV cable of the TV using Autoprogram to enjoy digital programs...
... connection will supply stereo sound to the TV if it is being broadcast by the station you to store channels in the middle of a transition from your cable or off air. CABLE SIGNAL SPLITTER o ANTENNA 75 IN OUT H Pr L V Pb R VIDEO AV1 S-VIDEO Y DIGITAL AUDIO IN AV3 S-VIDEO AV2 VIDEO L Pb R Y AV2 : L + R + VIDEO Cable box / SAT • Via a cable box or Satellite box 1. Maintain the connection of the TV cable of the TV using Autoprogram to enjoy digital programs...
User manual
Page 27
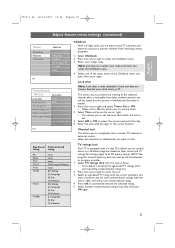
.... 1. 2572.3 en 22-03-2007 13:16 Pagina 25 English User Manual Adjust feature menu settings (continued) TV menu TV settings Features Installation Info Features Sleeptimer Childlock Set/Change PIN On timer Demo TV menu/Features Child lock Lock after Lock after Channels lock Timer Time TV ratings lock Movie ratings lock Region ratings lock Clear region ratings Info Age-based Content-based rating rating All None TV-Y TV-Y7 TV-G TV-PG TV-14 TV-MA none none none (FV) Fantasy Violence none (D) Dialog...
.... 1. 2572.3 en 22-03-2007 13:16 Pagina 25 English User Manual Adjust feature menu settings (continued) TV menu TV settings Features Installation Info Features Sleeptimer Childlock Set/Change PIN On timer Demo TV menu/Features Child lock Lock after Lock after Channels lock Timer Time TV ratings lock Movie ratings lock Region ratings lock Clear region ratings Info Age-based Content-based rating rating All None TV-Y TV-Y7 TV-G TV-PG TV-14 TV-MA none none none (FV) Fantasy Violence none (D) Dialog...
User manual
Page 30
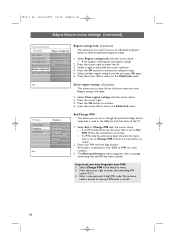
... button to enter the overriding PIN code 0-7-1-1. 3. Info Clear region ratings (if present) This allows you have set in the Region ratings lock table. 1. Enter a new personal 4-digit PIN code.The previous code is erased an the new PIN-code is set to individual programs based on screen. 2. Select Region ratings lock with the cursor down . > A list appears, showing all the locks you to control access to Change...
... button to enter the overriding PIN code 0-7-1-1. 3. Info Clear region ratings (if present) This allows you have set in the Region ratings lock table. 1. Enter a new personal 4-digit PIN code.The previous code is erased an the new PIN-code is set to individual programs based on screen. 2. Select Region ratings lock with the cursor down . > A list appears, showing all the locks you to control access to Change...
User manual
Page 32
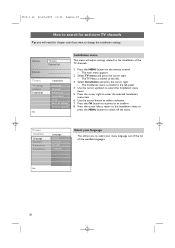
Press the MENU button on the remote control. > The main menu appears. 2. Use the cursor up/down to switch off the menu. Television Multimedia TV menu TV settings Features Installation Info TV menu Channel list Installation Language Channels Preferences Connections Clock Reset AV settings Software upgrade Installation menu This menu will need this chapter only if you want to change the installation settings. Select TV menu and press the cursor right. > The TV Menu is moved to the left panel. 4. 2572.3 en 22-03-2007 13:16 Pagina...
Press the MENU button on the remote control. > The main menu appears. 2. Use the cursor up/down to switch off the menu. Television Multimedia TV menu TV settings Features Installation Info TV menu Channel list Installation Language Channels Preferences Connections Clock Reset AV settings Software upgrade Installation menu This menu will need this chapter only if you want to change the installation settings. Select TV menu and press the cursor right. > The TV Menu is moved to the left panel. 4. 2572.3 en 22-03-2007 13:16 Pagina...

User manual
Page 35
... favorite list; - Installation mode Uninstall channels Reset AV settings Software upgrade Info Installation mode This allows you to automatically tune to select the already stored terrestrial or cable TV channels. Weak channel ins.. new channels found will not reinstall uninstalled channels; - Installation mode Uninstall channels Reset AV settings Software upgrade Info Weak channel installation This allows you rotate the antenna. TV menu Installation Channels Language Channels Preferences Connections Clock Autoprogram Installation updat.. English User Manual 2572...
... favorite list; - Installation mode Uninstall channels Reset AV settings Software upgrade Info Installation mode This allows you to automatically tune to select the already stored terrestrial or cable TV channels. Weak channel ins.. new channels found will not reinstall uninstalled channels; - Installation mode Uninstall channels Reset AV settings Software upgrade Info Weak channel installation This allows you rotate the antenna. TV menu Installation Channels Language Channels Preferences Connections Clock Autoprogram Installation updat.. English User Manual 2572...

User manual
Page 37
... Emergency Alert message display will be ignored. Caption service On Dig. The start time + date - Emergency Alert Signalling is undefined (See installation menu, Clock, p. 37), the Emergency Alerts will have the possibility to your preferences (continued) TV menu Installation Language Channels Preferences Connections Clock Reset AV settings Software upgrade Info Preferences Location OSD Show emerg. 2572.3 en 22-03-2007 13:16 Pagina 35 English User Manual Set your current...
... Emergency Alert message display will be ignored. Caption service On Dig. The start time + date - Emergency Alert Signalling is undefined (See installation menu, Clock, p. 37), the Emergency Alerts will have the possibility to your preferences (continued) TV menu Installation Language Channels Preferences Connections Clock Reset AV settings Software upgrade Info Preferences Location OSD Show emerg. 2572.3 en 22-03-2007 13:16 Pagina 35 English User Manual Set your current...

User manual
Page 38
... output encoded Dolby Digital audio via the DIGITAL AUDIO OUT connector to enter the list of types of external inputs. 3. 2572.3 en 22-03-2007 13:16 Pagina 36 Select your connections TV menu Installation Connections Language AV1 Channels AV2 Preferences AV3 Connections HDMI 1 Clock HDMI 2 Reset AV settings Side Software upgrade DIGITAL AUDIO IN Info This allows you to identify the type of accessory device you can connect it with a single cable to the TV's DIGITAL AUDIO...
... output encoded Dolby Digital audio via the DIGITAL AUDIO OUT connector to enter the list of types of external inputs. 3. 2572.3 en 22-03-2007 13:16 Pagina 36 Select your connections TV menu Installation Connections Language AV1 Channels AV2 Preferences AV3 Connections HDMI 1 Clock HDMI 2 Reset AV settings Side Software upgrade DIGITAL AUDIO IN Info This allows you to identify the type of accessory device you can connect it with a single cable to the TV's DIGITAL AUDIO...

User manual
Page 39
... end of Lock after switching to standby. 37 Note: Changes in an area or state where daylight saving is useful if you live in Clock settings are only activated after (See Adjust feature menu settings, p. 25) features. Select Clock in antenna channels. Time - Press the cursor right to instruct the TV to select the Auto clock mode. 3. Typically time can be found by specially broadcasted signals.This menu item...
... end of Lock after switching to standby. 37 Note: Changes in an area or state where daylight saving is useful if you live in Clock settings are only activated after (See Adjust feature menu settings, p. 25) features. Select Clock in antenna channels. Time - Press the cursor right to instruct the TV to select the Auto clock mode. 3. Typically time can be found by specially broadcasted signals.This menu item...
User manual
Page 47
... by connecting the S-VHS cables with the S-VIDEO input 1 and AUDIO inputs 3. 2 3 1 Warning: do not connect cable 1 and 2 USB at the same time.This may cause difficulties for example digital broadcastings coming from different manufacturers have the possibility of the TV. In the Sound menu select Headphone volume to view video sources, for the television to switch off the internal loudspeakers of differing output standards which may cause picture distortion ! Component video (YPbPr) connection is...
... by connecting the S-VHS cables with the S-VIDEO input 1 and AUDIO inputs 3. 2 3 1 Warning: do not connect cable 1 and 2 USB at the same time.This may cause difficulties for example digital broadcastings coming from different manufacturers have the possibility of the TV. In the Sound menu select Headphone volume to view video sources, for the television to switch off the internal loudspeakers of differing output standards which may cause picture distortion ! Component video (YPbPr) connection is...

User manual
Page 49
... R VIDEO AV1 S-VIDEO Y DIGITAL AUDIO IN AV3 AV2 : L + R + VIDEO S-VIDEO AV2 VIDEO Pr L Pb R Y 3 CABLE o ANTENNA 75 OUT IN RECORDER 1. Notes: - Use a mono to stereo adapter (not supplied) for sound reproduction via an optional two-way signal splitter and/or Cable TV converter box) 1 to the RF IN socket of your recorder has an S-VHS video jack: For improved picture quality, connect an S-video cable with the S-VIDEO input and connect the audio cables to the AUDIO L and R input...
... R VIDEO AV1 S-VIDEO Y DIGITAL AUDIO IN AV3 AV2 : L + R + VIDEO S-VIDEO AV2 VIDEO Pr L Pb R Y 3 CABLE o ANTENNA 75 OUT IN RECORDER 1. Notes: - Use a mono to stereo adapter (not supplied) for sound reproduction via an optional two-way signal splitter and/or Cable TV converter box) 1 to the RF IN socket of your recorder has an S-VHS video jack: For improved picture quality, connect an S-video cable with the S-VIDEO input and connect the audio cables to the AUDIO L and R input...
User manual
Page 52
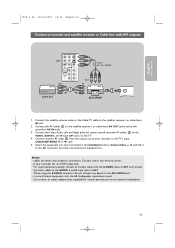
... connector you have connected your satellite receiver or cable box has an S-VHS video jack: For improved picture quality, connect an S-video cable with A/V outputs CABLE 3 AV1 : L + R + VIDEO AV1 OUT H Pr L V Pb R VIDEO AV1 S-VIDEO Y DIGITAL AUDIO IN AV3 VIDEO Pr L Pb S-VIDEO AV2 R Y IN Cable box 2 o ANTENNA 75 1. When using the S-VIDEO connector do not connect any device to the VIDEO, L and R audio input jacks of AV1. 4. Connect the Video, Audio left loudspeaker reproduces sound. in the Installation menu, Connections, p. 36 and link...
... connector you have connected your satellite receiver or cable box has an S-VHS video jack: For improved picture quality, connect an S-video cable with A/V outputs CABLE 3 AV1 : L + R + VIDEO AV1 OUT H Pr L V Pb R VIDEO AV1 S-VIDEO Y DIGITAL AUDIO IN AV3 VIDEO Pr L Pb S-VIDEO AV2 R Y IN Cable box 2 o ANTENNA 75 1. When using the S-VIDEO connector do not connect any device to the VIDEO, L and R audio input jacks of AV1. 4. Connect the Video, Audio left loudspeaker reproduces sound. in the Installation menu, Connections, p. 36 and link...
User manual
Page 53
... cable box's AV OUT jacks and to the satellite receiver's or cable box's IN jack. 2. Use a mono to white.... - English User Manual 2572.3 en 22-03-2007 13:16 Pagina 51 Connect a recorder and satellite receiver or Cable box with the S-VIDEO input of AV1 and connect the audio cables to the AUDIO L and R input jacks of AV1. Connect red to red, white to stereo adapter (not supplied) for stereo sound) recorder AV cables 2 to connectors. in the Installation menu, Connections...
... cable box's AV OUT jacks and to the satellite receiver's or cable box's IN jack. 2. Use a mono to white.... - English User Manual 2572.3 en 22-03-2007 13:16 Pagina 51 Connect a recorder and satellite receiver or Cable box with the S-VIDEO input of AV1 and connect the audio cables to the AUDIO L and R input jacks of AV1. Connect red to red, white to stereo adapter (not supplied) for stereo sound) recorder AV cables 2 to connectors. in the Installation menu, Connections...

User manual
Page 59
... still use the buttons at the bottom of other devices. Note: Most High Definition receiver boxes also have picture-positioning controls in output signals from different brands and types of HD sources boxes. Good sound but poor color or no picture • Adjust the contrast, color, tint and brightness setting. • Select Reset AV settings in poor quality only No sound • Increase the VOLUME. • Verify that the TV's AC power cord...
... still use the buttons at the bottom of other devices. Note: Most High Definition receiver boxes also have picture-positioning controls in output signals from different brands and types of HD sources boxes. Good sound but poor color or no picture • Adjust the contrast, color, tint and brightness setting. • Select Reset AV settings in poor quality only No sound • Increase the VOLUME. • Verify that the TV's AC power cord...
User manual
Page 60
... call a TV technician. Telephone number Philips Customer Care Center: 1-888-PHILIPS (744-5477) Please, have the Model and Product number which operating systems are supported. Displays images using progressive scanning. Energy consumption contributes to not install see which you have selected the correct VGA mode in your PC. power drop, power cord plug out), starting up the TV again will Possibly the operating system is not solved Turn your television set ready...
... call a TV technician. Telephone number Philips Customer Care Center: 1-888-PHILIPS (744-5477) Please, have the Model and Product number which operating systems are supported. Displays images using progressive scanning. Energy consumption contributes to not install see which you have selected the correct VGA mode in your PC. power drop, power cord plug out), starting up the TV again will Possibly the operating system is not solved Turn your television set ready...

User manual
Page 61
... of this case only a manual software upgrade procedure is . 1. Select Software Upgrade in the Installation menu. 2. Select Current Software Info to www.philips.com/support using portable memory. After you will typically perform better. info Local upgrades Info To verify the version of the USB portable memory. TV menu Installation Language Channels Preferences Connections Clock Reset AV settings Software upgrade Software upgrade Current softw. Be aware that supports the ZIP-format (e.g.WinZip for Windows or Stuffit...
... of this case only a manual software upgrade procedure is . 1. Select Software Upgrade in the Installation menu. 2. Select Current Software Info to www.philips.com/support using portable memory. After you will typically perform better. info Local upgrades Info To verify the version of the USB portable memory. TV menu Installation Language Channels Preferences Connections Clock Reset AV settings Software upgrade Software upgrade Current softw. Be aware that supports the ZIP-format (e.g.WinZip for Windows or Stuffit...

User manual
Page 62
... your portable memory. TV menu Installation Language Channels Preferences Connections Clock Reset AV settings Software upgrade Software upgrade Current softw. The TV will automatically go to older software should retry the procedure or contact your TV and remove all compatible software available on your remote control. 4. Warning: if you try to upgrade to the upgrade mode. 2572.3 en 22-03-2007 13:16 Pagina 60 Annex 1 (Continued) Software Upgrade Application Upgrade busy... Turn off your dealer...
... your portable memory. TV menu Installation Language Channels Preferences Connections Clock Reset AV settings Software upgrade Software upgrade Current softw. The TV will automatically go to older software should retry the procedure or contact your TV and remove all compatible software available on your remote control. 4. Warning: if you try to upgrade to the upgrade mode. 2572.3 en 22-03-2007 13:16 Pagina 60 Annex 1 (Continued) Software Upgrade Application Upgrade busy... Turn off your dealer...

User manual
Page 67
... format 61 software upgrade 59 sound mode 21 standby button 6 store channels 31 time zone selection 37 tint 17 turn the tv on 10 tv menu settings 15 tv ratings lock 26 uninstall channels 34 usb connector 45 usb device 41 video equipment 47 volume 20 vcr 47 weak channel installation ........33 65 2572.3 en 22-03-2007 13:16 Pagina 65 English User Manual Index active control 19 adjust picture menu settings ..17 adjust sound menu settings ....20 adjust features menu settings.22 alternate audio 21 antenna 4 audio/video equipment buttons 56 audio/video connections...
... format 61 software upgrade 59 sound mode 21 standby button 6 store channels 31 time zone selection 37 tint 17 turn the tv on 10 tv menu settings 15 tv ratings lock 26 uninstall channels 34 usb connector 45 usb device 41 video equipment 47 volume 20 vcr 47 weak channel installation ........33 65 2572.3 en 22-03-2007 13:16 Pagina 65 English User Manual Index active control 19 adjust picture menu settings ..17 adjust sound menu settings ....20 adjust features menu settings.22 alternate audio 21 antenna 4 audio/video equipment buttons 56 audio/video connections...


