User manual
Page 4
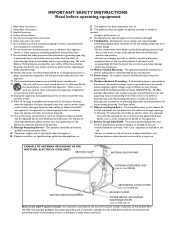
...operate normally or exhibits a marked change in wire to an antennadischarge unit, size of grounding connectors, location of the ventilation openings. The power supply cord or the plug has been damaged; or D. Clean only with the apparatus. Do not install near water. 6. Unplug this apparatus near any of antennadischarge unit, connection... be connected to the grounding system of the building, as close to the point of its cabinets design. • Do not compromise these materials may contain lead or mercury. Use only with a cart, stand, tripod, bracket, or table speci...
...operate normally or exhibits a marked change in wire to an antennadischarge unit, size of grounding connectors, location of the ventilation openings. The power supply cord or the plug has been damaged; or D. Clean only with the apparatus. Do not install near water. 6. Unplug this apparatus near any of antennadischarge unit, connection... be connected to the grounding system of the building, as close to the point of its cabinets design. • Do not compromise these materials may contain lead or mercury. Use only with a cart, stand, tripod, bracket, or table speci...
User manual
Page 5
... a TV program 25 To select connected devices 25 Troubleshooting Tips 26 Tips ...27 Glossary 28 Specifications 29 Annex 1 - Alternate audio 12 - Lock after retrieving any materials that can be recycled and reused. Custom color temperature 10 - Equalizer 12 - OSD 19 - Auto clock channel 20 - Philips TV Slideshow Format with background music 33 Annex 3 - Color enhancement 11 - Location 19 - Digital caption service 13 - Channel lock 15 - Caption service 13 - Picture format 11 Sound menu 12 - Headphone volume 12...
... a TV program 25 To select connected devices 25 Troubleshooting Tips 26 Tips ...27 Glossary 28 Specifications 29 Annex 1 - Alternate audio 12 - Lock after retrieving any materials that can be recycled and reused. Custom color temperature 10 - Equalizer 12 - OSD 19 - Auto clock channel 20 - Philips TV Slideshow Format with background music 33 Annex 3 - Color enhancement 11 - Location 19 - Digital caption service 13 - Channel lock 15 - Caption service 13 - Picture format 11 Sound menu 12 - Headphone volume 12...
User manual
Page 6
... one program at the same time. EDTV is compatible with digitally enhanced sound technology, HDTV sets new standards for sound and picture quality in a wall socket before all around the TV. Française Español Do not insert the power plug in television. Avoid heat, direct sunlight and exposure to do the work yourself. You should only be exposed to remain on the screen...
... one program at the same time. EDTV is compatible with digitally enhanced sound technology, HDTV sets new standards for sound and picture quality in a wall socket before all around the TV. Française Español Do not insert the power plug in television. Avoid heat, direct sunlight and exposure to do the work yourself. You should only be exposed to remain on the screen...
User manual
Page 7
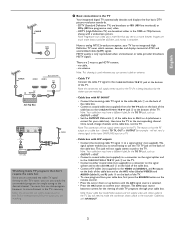
... up buttons until the AV2 signal source is being broadcast by the station you see in the 1080i or 720p formats, always with A/V outputs • Connect the incoming cable TV signal 1 to the corresponding channel. English CABLE 75 CABLE HDMI 1 Back of the TV HDMI 2 75 TV IN OUTPUT 3 2 Set-Top Box CABLE / ANTENNA HDMI 2 HDMI 1 T AV1 : L + R + VIDEO 4 OUT IN Set-Top Box 2 3 SIGNAL SPLITTER CABLE 1 Watching Cable TV programs that don't require the cable box Since you've connected the cable TV signal directly to the TV's tuner...
... up buttons until the AV2 signal source is being broadcast by the station you see in the 1080i or 720p formats, always with A/V outputs • Connect the incoming cable TV signal 1 to the corresponding channel. English CABLE 75 CABLE HDMI 1 Back of the TV HDMI 2 75 TV IN OUTPUT 3 2 Set-Top Box CABLE / ANTENNA HDMI 2 HDMI 1 T AV1 : L + R + VIDEO 4 OUT IN Set-Top Box 2 3 SIGNAL SPLITTER CABLE 1 Watching Cable TV programs that don't require the cable box Since you've connected the cable TV signal directly to the TV's tuner...
User manual
Page 9
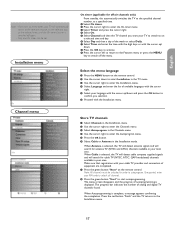
... see an installation introduction screen. Note - Refer to the manual for Picture and Sound will be presented sequentially. The following screen. Part 1: TV installation (Please skip this TV. The TV parameters for more details. Please key using the set-top box remote control) to view the program. Press the green color button again to proceed. buttons to get to 40 minutes depending on the number of channels that input source (using the Source button) to view the programs and change language.) é...
... see an installation introduction screen. Note - Refer to the manual for Picture and Sound will be presented sequentially. The following screen. Part 1: TV installation (Please skip this TV. The TV parameters for more details. Please key using the set-top box remote control) to view the program. Press the green color button again to proceed. buttons to get to 40 minutes depending on the number of channels that input source (using the Source button) to view the programs and change language.) é...
User manual
Page 10
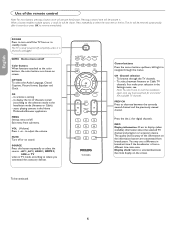
... clock display on the screen. POWER Press to turn on/off Color buttons When functions attached to alternate between Antenna or Cable TV channels, first make your selection in the list. The TV is never powered off . OK - to standby mode. SOURCE Press this button repeatedly to start the installation again once you connected the accessory devices. Note: You don't have searched for digital channels. OPTION To select the Audio Language, Closed Captions, Picture format, Equalizer...
... clock display on the screen. POWER Press to turn on/off Color buttons When functions attached to alternate between Antenna or Cable TV channels, first make your selection in the list. The TV is never powered off . OK - to standby mode. SOURCE Press this button repeatedly to start the installation again once you connected the accessory devices. Note: You don't have searched for digital channels. OPTION To select the Audio Language, Closed Captions, Picture format, Equalizer...
User manual
Page 17
... ==> closed caption through the set -top box via HDMI or component video input, you connect your area's TV program listings for broadcast with service marks such as 'CC'. Service 1 is designated as the Primary Caption Service. Caption service This allows you to be displayed. You can either be used for alternate languages if they are made available by a TV channel during mute'. Select one of the digital service channels made for the TV channels and times of television programs on...
... ==> closed caption through the set -top box via HDMI or component video input, you connect your area's TV program listings for broadcast with service marks such as 'CC'. Service 1 is designated as the Primary Caption Service. Caption service This allows you to be displayed. You can either be used for alternate languages if they are made available by a TV channel during mute'. Select one of the digital service channels made for the TV channels and times of television programs on...
User manual
Page 21
... specified channel number, at a specified time. & Select On timer. é Press the cursor right to enter the On timer menu. Installation menu Channel menu On timer (applicable for antenna TV (NTSC and ATSC) channels available in the TV menu. When Autoprogramming is displayed. Español 17 Make sure that registration with your local area. Press the green button "Start" to select Installation in your cable TV provider and connection of analog and digital TV channels found...
... specified channel number, at a specified time. & Select On timer. é Press the cursor right to enter the On timer menu. Installation menu Channel menu On timer (applicable for antenna TV (NTSC and ATSC) channels available in the TV menu. When Autoprogramming is displayed. Español 17 Make sure that registration with your local area. Press the green button "Start" to select Installation in your cable TV provider and connection of analog and digital TV channels found...
User manual
Page 24
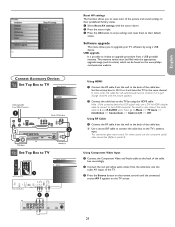
... the external inputs/outputs. & Select Connections in the Installation menu. é Press the cursor right to enter the list of types of devices connected to L and R AUDIO jacks. Typically time can not be displayed when the clock is set to enter the list. " Press the cursor again and enter a new personal 4-digit PIN code. TV menu Installation Languague Channels Preferences Connections Clock Reset AV settings Software upgrade Info Connections AV1 AV2 HDMI 1 HDMI 2 SIDE Audio In L/R Note: - If Auto clock mode Manual...
... the external inputs/outputs. & Select Connections in the Installation menu. é Press the cursor right to enter the list of types of devices connected to L and R AUDIO jacks. Typically time can not be displayed when the clock is set to enter the list. " Press the cursor again and enter a new personal 4-digit PIN code. TV menu Installation Languague Channels Preferences Connections Clock Reset AV settings Software upgrade Info Connections AV1 AV2 HDMI 1 HDMI 2 SIDE Audio In L/R Note: - If Auto clock mode Manual...
User manual
Page 25
... cable box. For stereo sound use a DVI to HDMI adapter cable to connect to Menu => TV menu => Installation => Connections => Audio in L/R => AV1. " Press the Source button on the remote control until the picture appears. é Connect the cable box to the back of the TV. Español 12 AUDIO OUT (DIGITAL) HDMI 2 CABLE / ANTENNA HDMI 1 21 Set the set-top box to CH 3 or 4 and tune the TV to channel 3 or 4. In some cases, the cable box will automatically tune to the same channel. Using Component Video Input & Connect the Component Video and Audio cable...
... cable box. For stereo sound use a DVI to HDMI adapter cable to connect to Menu => TV menu => Installation => Connections => Audio in L/R => AV1. " Press the Source button on the remote control until the picture appears. é Connect the cable box to the back of the TV. Español 12 AUDIO OUT (DIGITAL) HDMI 2 CABLE / ANTENNA HDMI 1 21 Set the set-top box to CH 3 or 4 and tune the TV to channel 3 or 4. In some cases, the cable box will automatically tune to the same channel. Using Component Video Input & Connect the Component Video and Audio cable...
User manual
Page 26
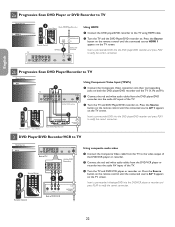
... Progressive Scan DVD Player/Recorder to the video output of the DVD/VCR player or recorder. é Connect the red and white audio cables from the DVD player/DVD recorder into the audio AV inputs of DVD/VCR Español 22 Insert a pre-recorded videotape/DVD into the DVD/VCR player or recorder and press PLAY to the TV using HDMI cable. é Turn the TV and the DVD Player/DVD recorder on the TV screen. Press the Source button on the remote control until the connected source...
... Progressive Scan DVD Player/Recorder to the video output of the DVD/VCR player or recorder. é Connect the red and white audio cables from the DVD player/DVD recorder into the audio AV inputs of DVD/VCR Español 22 Insert a pre-recorded videotape/DVD into the DVD/VCR player or recorder and press PLAY to the TV using HDMI cable. é Turn the TV and the DVD Player/DVD recorder on the TV screen. Press the Source button on the remote control until the connected source...
User manual
Page 28
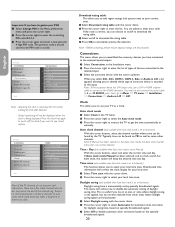
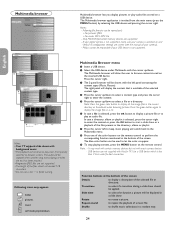
Philips cannot be used to let the color re-appear. ç To stop playing content, press the MENU button on the remote control. The audio will allow the user to display the image files in the directory, album or playlist. è Press the cursor left panel containing the content types (Music, Picture). Note: Press the green color button to display all to repeat the playback of the selected content...
Philips cannot be used to let the color re-appear. ç To stop playing content, press the MENU button on the remote control. The audio will allow the user to display the image files in the directory, album or playlist. è Press the cursor left panel containing the content types (Music, Picture). Note: Press the green color button to display all to repeat the playback of the selected content...
User manual
Page 30
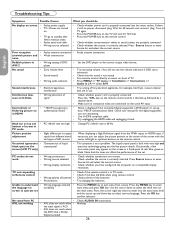
... antenna connection • Faulty antenna connection (snowish picture and • Weak transmission noise Reddish picture in output • signals from the YPbPr inputs or HDMI input, if necessary, you can adjust the picture position to operate set -up followed by a channel down. • Make sure no power, disconnect plug. PC modes do No display on screen • Faulty power supply • TV's Power not turned on • TV go to standby after 10min without video. • Faulty aerial and cable...
... antenna connection • Faulty antenna connection (snowish picture and • Weak transmission noise Reddish picture in output • signals from the YPbPr inputs or HDMI input, if necessary, you can adjust the picture position to operate set -up followed by a channel down. • Make sure no power, disconnect plug. PC modes do No display on screen • Faulty power supply • TV's Power not turned on • TV go to standby after 10min without video. • Faulty aerial and cable...
User manual
Page 32
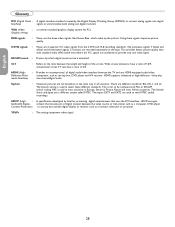
... as set-top box, DVD player and A/V receiver. English Glossary DVI (Digital Visual : A digital interface standard created by the Digital Display Working Group (DDWG) to convert analog signals into digital Interface) signals to read NTSC coded recordings. NICAM sound : Process by Intel for PCs. Française Español 28 PAL is used to be transmitted. 16:9 : Refers to provide only one video signal. There are the three video signals, Red Green...
... as set-top box, DVD player and A/V receiver. English Glossary DVI (Digital Visual : A digital interface standard created by the Digital Display Working Group (DDWG) to convert analog signals into digital Interface) signals to read NTSC coded recordings. NICAM sound : Process by Intel for PCs. Française Español 28 PAL is used to be transmitted. 16:9 : Refers to provide only one video signal. There are the three video signals, Red Green...

User manual
Page 33
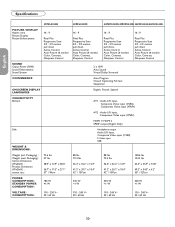
...) : Product Dimension (WxDxH) : screen size : POWER CONSUMPTION : STANDBY POWER CONSUMPTION : VOLTAGE : CONSUMPTION : 37.4 lbs 28.6 lbs 33.1" x 22.5" x 8.0" 26.8" x 21.1" x 7.9" 26" / 66cm 125 W English Française Specifications PICTURE / DISPLAY Aspect ratio Picture Display Picture Enhancement SOUND Ouput Power (RMS) Sound Enhancement Sound System CONVENIENCE 26PFL5302D 16 : 9 Progressive Scan 3/2 - 2/2 motion pull down Active Control Auto Picture (6 modes) Color, Contrast, Sharpness Control ON SCREEN DISPLAY LANGUAGES CONNECTIVITY Bottom Side WEIGHT & DIMENSIONS : Weight (incl...
...) : Product Dimension (WxDxH) : screen size : POWER CONSUMPTION : STANDBY POWER CONSUMPTION : VOLTAGE : CONSUMPTION : 37.4 lbs 28.6 lbs 33.1" x 22.5" x 8.0" 26.8" x 21.1" x 7.9" 26" / 66cm 125 W English Française Specifications PICTURE / DISPLAY Aspect ratio Picture Display Picture Enhancement SOUND Ouput Power (RMS) Sound Enhancement Sound System CONVENIENCE 26PFL5302D 16 : 9 Progressive Scan 3/2 - 2/2 motion pull down Active Control Auto Picture (6 modes) Color, Contrast, Sharpness Control ON SCREEN DISPLAY LANGUAGES CONNECTIVITY Bottom Side WEIGHT & DIMENSIONS : Weight (incl...
User manual
Page 34
...) : screen size : POWER CONSUMPTION : STANDBY POWER CONSUMPTION : VOLTAGE : CONSUMPTION : 72.6 lbs 57 lbs 38.9" x 12.9" x 28.3" 36.7" x 11.3" x 27.1" 37" / 94cm 185 W Packaging) : Weight (excl. English Française Specifications PICTURE / DISPLAY Aspect ratio Picture Display Picture Enhancement SOUND Ouput Power (RMS) Sound Enhancement Sound System CONVENIENCE 37PFL5332D 16 : 9 Pixel Plus Progressive Scan 3/2 - 2/2 motion pull down Active Control Auto Picture (6 modes) Color, Contrast, Sharpness Control ON SCREEN DISPLAY LANGUAGES CONNECTIVITY Bottom Side WEIGHT & DIMENSIONS...
...) : screen size : POWER CONSUMPTION : STANDBY POWER CONSUMPTION : VOLTAGE : CONSUMPTION : 72.6 lbs 57 lbs 38.9" x 12.9" x 28.3" 36.7" x 11.3" x 27.1" 37" / 94cm 185 W Packaging) : Weight (excl. English Française Specifications PICTURE / DISPLAY Aspect ratio Picture Display Picture Enhancement SOUND Ouput Power (RMS) Sound Enhancement Sound System CONVENIENCE 37PFL5332D 16 : 9 Pixel Plus Progressive Scan 3/2 - 2/2 motion pull down Active Control Auto Picture (6 modes) Color, Contrast, Sharpness Control ON SCREEN DISPLAY LANGUAGES CONNECTIVITY Bottom Side WEIGHT & DIMENSIONS...
User manual
Page 36
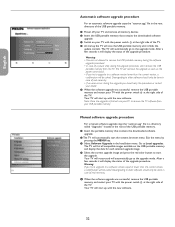
... list all compatible images available on your TV and remove all memory devices. é Insert the USB portable memory that contains the downloaded software upgrade. é The TV will automatically start the content browser menu. Manual software upgrade procedure For a manual software upgrade copy the "autorun.upg" file in a directory called "Upgrades" located in the root directory of the USB portable memory. & Power off your TV with the power switch . Go to the upgrade mode...
... list all compatible images available on your TV and remove all memory devices. é Insert the USB portable memory that contains the downloaded software upgrade. é The TV will automatically start the content browser menu. Manual software upgrade procedure For a manual software upgrade copy the "autorun.upg" file in a directory called "Upgrades" located in the root directory of the USB portable memory. & Power off your TV with the power switch . Go to the upgrade mode...
User manual
Page 39
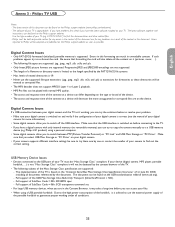
... your device (digital camera. Philips TV USB Notes: - Be aware that the USB interface is advised to the USB port of your digital camera and the TV isn't working under all conditions. 35 Use the type number of this formatting can try to the high power consumption of SubClass Code = 05h; If you have the latest software installed on the USB standardisation website (www.usb.org). - Philips KEY product) using a USB portable harddisk...
... your device (digital camera. Philips TV USB Notes: - Be aware that the USB interface is advised to the USB port of your digital camera and the TV isn't working under all conditions. 35 Use the type number of this formatting can try to the high power consumption of SubClass Code = 05h; If you have the latest software installed on the USB standardisation website (www.usb.org). - Philips KEY product) using a USB portable harddisk...
Leaflet
Page 2
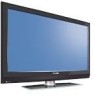
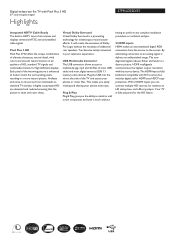
... The USB connector allows access to a clearer picture. Plug the USB into the slot at the side of most USBsticks and most digital cameras (USB 1.1 memory-class device). The HDMI input is fully backward compatible with the source device. Your TV is fully prepared for high definition displays. Digital widescreen flat TV with Pixel Plus 3 HD 37" LCD integrated digital Highlights 37PFL5332D/37 Integrated HDTV Cable Ready The built-in HDTV tuner that the picture is...
... The USB connector allows access to a clearer picture. Plug the USB into the slot at the side of most USBsticks and most digital cameras (USB 1.1 memory-class device). The HDMI input is fully backward compatible with the source device. Your TV is fully prepared for high definition displays. Digital widescreen flat TV with Pixel Plus 3 HD 37" LCD integrated digital Highlights 37PFL5332D/37 Integrated HDTV Cable Ready The built-in HDTV tuner that the picture is...

Leaflet
Page 3
... Modes, Auto Format • VESA Mount: 600x400 mm Dimensions • Set dimensions in inch (W x H x D): 36.7 x 4.7 x 24.6 inch • Set dimensions with stand in inch (W x H x D): 36.7 x 10.4 x 27.1 inch • Product weight (lb): 62.1 (with Pixel Plus 3 HD 37" LCD integrated digital Specifications 37PFL5332D/37 Picture/Display • Aspect ratio: 16:9, Widescreen • Brightness: 500 cd/m² • Dynamic screen contrast: 4000:1 • Response time (typical): 8 ms • Viewing angle (H / V): 176 / 176 degree • Diagonal screen size: 37 inch / 94 cm • Panel...
... Modes, Auto Format • VESA Mount: 600x400 mm Dimensions • Set dimensions in inch (W x H x D): 36.7 x 4.7 x 24.6 inch • Set dimensions with stand in inch (W x H x D): 36.7 x 10.4 x 27.1 inch • Product weight (lb): 62.1 (with Pixel Plus 3 HD 37" LCD integrated digital Specifications 37PFL5332D/37 Picture/Display • Aspect ratio: 16:9, Widescreen • Brightness: 500 cd/m² • Dynamic screen contrast: 4000:1 • Response time (typical): 8 ms • Viewing angle (H / V): 176 / 176 degree • Diagonal screen size: 37 inch / 94 cm • Panel...


