User Manual
Page 2
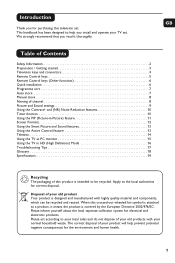
... Formats 12 Using the Smart Picture and Sound features 13 Using the Active Control feature 13 Teletext 14 Using the TV as PC monitor 15 Using the TV in HD (High Definition) Mode 16 Troubleshooting Tips 17 Glossary 18 Specifications 19 GB Recycling The packaging of your ... Directive 2002/976/EC. Please inform yourself about the local seperate collection system for correct disposal. Introduction Thank you install and operate your TV set . We strongly recommend that you read it means the product is intended to the local authorities for electrical and electronic products. The...
... Formats 12 Using the Smart Picture and Sound features 13 Using the Active Control feature 13 Teletext 14 Using the TV as PC monitor 15 Using the TV in HD (High Definition) Mode 16 Troubleshooting Tips 17 Glossary 18 Specifications 19 GB Recycling The packaging of your ... Directive 2002/976/EC. Please inform yourself about the local seperate collection system for correct disposal. Introduction Thank you install and operate your TV set . We strongly recommend that you read it means the product is intended to the local authorities for electrical and electronic products. The...
User Manual
Page 3
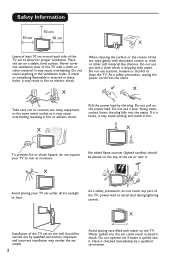
... proper ventilation. Water spilled into the mains. Safety Information 10 cm 10 cm 10 cm X Leave at least 10 cm around each side of the TV set on a stable, level surface. If metal or something flammable is dripping with water on the wall should be carried out by the plug. X... arching and result in fire or electric shock. Do not use a poor fitting mains socket. X When cleaning the surface or the screen of the TV with absorbent cotton or cloth or other material. Insert the plug fully into the set , wipe gently with a cloth or other soft material like chamois...
... proper ventilation. Water spilled into the mains. Safety Information 10 cm 10 cm 10 cm X Leave at least 10 cm around each side of the TV set on a stable, level surface. If metal or something flammable is dripping with water on the wall should be carried out by the plug. X... arching and result in fire or electric shock. Do not use a poor fitting mains socket. X When cleaning the surface or the screen of the TV with absorbent cotton or cloth or other material. Insert the plug fully into the set , wipe gently with a cloth or other soft material like chamois...
User Manual
Page 4
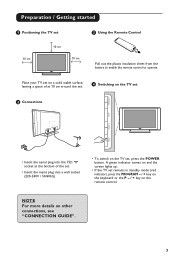
...8486; : socket at the bottom of the set. • Insert the mains plug into a wall socket (220-240V / 50/60Hz). • To switch on the TV set remains in standby mode (red indicator), press the PROGRAM - / + key on the keyboard or the P - / + key on other connections, see "CONNECTION GUIDE...". 3 Preparation / Getting started 1 Positioning the TV set 10 cm 10 cm 10 cm 3 Using the Remote Control Pull out the plastic insulation sheet from the battery to enable the remote control...
...8486; : socket at the bottom of the set. • Insert the mains plug into a wall socket (220-240V / 50/60Hz). • To switch on the TV set remains in standby mode (red indicator), press the PROGRAM - / + key on the keyboard or the P - / + key on other connections, see "CONNECTION GUIDE...". 3 Preparation / Getting started 1 Positioning the TV set 10 cm 10 cm 10 cm 3 Using the Remote Control Pull out the plastic insulation sheet from the battery to enable the remote control...
User Manual
Page 5
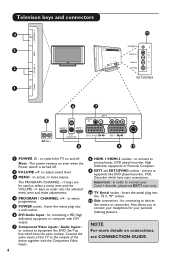
... Definition equipment or Personal Computer. 9 EXT1 and EXT2/SVHS2 sockets : connect to equipment like camera or camcorder. Connect the audio inputs of the TV to the outputs of the device together with DVI output. 7 Component Video inputs / Audio Inputs : to connect to equipment like DVD player/recorder... to connect your headphone for your Canal + decoder, please use EXT1 scart only. 10 TV Aerial socket : Insert the aerial plug into a wall socket. 6 DVI Audio Input : for connecting to switch the TV on connections, see CONNECTION GUIDE. 4 Note : The power remains on even when the ...
... Definition equipment or Personal Computer. 9 EXT1 and EXT2/SVHS2 sockets : connect to equipment like camera or camcorder. Connect the audio inputs of the TV to the outputs of the device together with DVI output. 7 Component Video inputs / Audio Inputs : to connect to equipment like DVD player/recorder... to connect your headphone for your Canal + decoder, please use EXT1 scart only. 10 TV Aerial socket : Insert the aerial plug into a wall socket. 6 DVI Audio Input : for connecting to switch the TV on connections, see CONNECTION GUIDE. 4 Note : The power remains on even when the ...
User Manual
Page 6
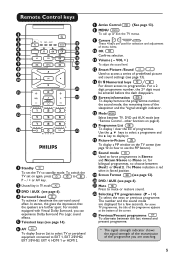
... are displayed for a few seconds. VOL + ) To adjust the sound level. 12 Smart Picture /Sound Used to , P - / + or AV key. 2 Unused key in TV mode . 3 DVD / AUX (see page 10 on again, press , to access a series of programmes. Use the Î ï keys to select a programme and the ... to EXT 1, EXT 2/SVHS2, EXT 3/SVHS3, EXT 4, HDMI 1 or HDMI 2. 7 Active Control (See page 13). 8 MENU To call up or exit the TV menus. 9 Cursors These 4 keys are watching. 5 For a 2 digit programme number, the 2nd digit must be entered before the dash disappears. 14 Screen information To ...
... are displayed for a few seconds. VOL + ) To adjust the sound level. 12 Smart Picture /Sound Used to , P - / + or AV key. 2 Unused key in TV mode . 3 DVD / AUX (see page 10 on again, press , to access a series of programmes. Use the Î ï keys to select a programme and the ... to EXT 1, EXT 2/SVHS2, EXT 3/SVHS3, EXT 4, HDMI 1 or HDMI 2. 7 Active Control (See page 13). 8 MENU To call up or exit the TV menus. 9 Cursors These 4 keys are watching. 5 For a 2 digit programme number, the 2nd digit must be entered before the dash disappears. 14 Screen information To ...
User Manual
Page 7
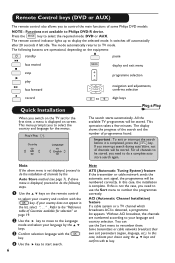
...will be stored, you need to do a complete auto store search again. ACI (Automatic Channel Installation) feature If a cable system or a TV channel which broadcasts ACI is completed, press the key. You can use the Sort menu to number the programmes correctly. In this case, ... for the menus. All the available TV programmes will be numbered correctly. If this case, the installation is complete. " . In this is displayed, proceed to do the installation of some Philips DVD models NOTE : Functions not available to Philips DVD-R device. Remote Control keys (DVD or ...
...will be stored, you need to do a complete auto store search again. ACI (Automatic Channel Installation) feature If a cable system or a TV channel which broadcasts ACI is completed, press the key. You can use the Sort menu to number the programmes correctly. In this case, ... for the menus. All the available TV programmes will be numbered correctly. If this case, the installation is complete. " . In this is displayed, proceed to do the installation of some Philips DVD models NOTE : Functions not available to Philips DVD-R device. Remote Control keys (DVD or ...

User Manual
Page 8
...reason or another and do not understand the language to operate the set, do auto store of programmes found. 6 After the search is highlighted). TV Menu Picture Sound Features Install Install Language Æ Country Æ Auto Store Manual Store Æ Sort Æ Name Æ Search 3 ... following to bring you interrupt search during auto store, not all channels to be stored. press the Æ / key to install the TV channels automatically. 7 The display shows the progress of the search and the number of channels, select your desired menu *Language with the &#...
...reason or another and do not understand the language to operate the set, do auto store of programmes found. 6 After the search is highlighted). TV Menu Picture Sound Features Install Install Language Æ Country Æ Auto Store Manual Store Æ Sort Æ Name Æ Search 3 ... following to bring you interrupt search during auto store, not all channels to be stored. press the Æ / key to install the TV channels automatically. 7 The display shows the progress of the search and the number of channels, select your desired menu *Language with the &#...

User Manual
Page 9
... Store menu to adjust or activate. Naming of Channel If required, you know the frequency of the required programme, this can give a name to the TV channel. 1 Press the key. 2 With the ï key, select Install and the Æ / key to enter the Install menu. Go to select ... key to select Name and the Æ / key to enter name mode. 4 Use the Î ï keys to select the programme you must select France. TV Menu Picture Sound Features Install Manual Store System Search Æ Program No. Æ Fine Tune Æ Store Æ Europe 5 System : Use the Í ...
... Store menu to adjust or activate. Naming of Channel If required, you know the frequency of the required programme, this can give a name to the TV channel. 1 Press the key. 2 With the ï key, select Install and the Æ / key to enter the Install menu. Go to select ... key to select Name and the Æ / key to enter name mode. 4 Use the Î ï keys to select the programme you must select France. TV Menu Picture Sound Features Install Manual Store System Search Æ Program No. Æ Fine Tune Æ Store Æ Europe 5 System : Use the Í ...
User Manual
Page 10
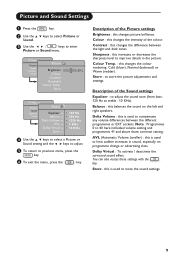
... programme change or advertising slots. Store : to enter Picture or Sound menu. Note : Programmes 0 to store the sound settings. 9 TV Menu Picture Picture Sound Features Brightness 39 Install Colour Contrast Sharpness Colour Temp. Balance : this changes the intensity of the Sound settings Equalizer ..., press the key. Store : this is used to 40 have individual volume setting and programmes 41 and above share common setting. Store TV Menu Picture Sound Features Install Sound Equalizer Æ Balance Æ Delta Voliume Æ AVL Æ Dolby Virtual Æ Store Æ...
... programme change or advertising slots. Store : to enter Picture or Sound menu. Note : Programmes 0 to store the sound settings. 9 TV Menu Picture Picture Sound Features Brightness 39 Install Colour Contrast Sharpness Colour Temp. Balance : this changes the intensity of the Sound settings Equalizer ..., press the key. Store : this is used to 40 have individual volume setting and programmes 41 and above share common setting. Store TV Menu Picture Sound Features Install Sound Equalizer Æ Balance Æ Delta Voliume Æ AVL Æ Dolby Virtual Æ Store Æ...
User Manual
Page 11
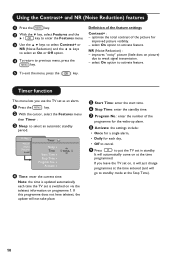
...select Contrast+ or NR (Noise Reduction) and the Í Æ keys to select an On or Off option. 4 To return to weak signal transmission. - TV Menu Picture Sound Features Install Timer Sleep Æ Time Start Time Æ Stop Time Æ Program No. Æ Activate Æ 10:56 ' Time: ... will just change programmes at the time entered (and will go to select an automatic standby period. Timer function This menu lets you leave the TV set in standby. Activate: the settings include: • Once for a single alarm, • Daily for the wake-up alarm. ! select On option ...
...select Contrast+ or NR (Noise Reduction) and the Í Æ keys to select an On or Off option. 4 To return to weak signal transmission. - TV Menu Picture Sound Features Install Timer Sleep Æ Time Start Time Æ Stop Time Æ Program No. Æ Activate Æ 10:56 ' Time: ... will just change programmes at the time entered (and will go to select an automatic standby period. Timer function This menu lets you leave the TV set in standby. Activate: the settings include: • Once for a single alarm, • Daily for the wake-up alarm. ! select On option ...
User Manual
Page 12
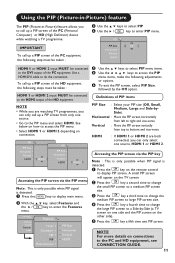
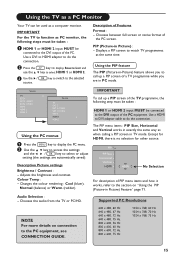
...you can only call up a PIP screen of the PC equipment, the following adjustments or options. § To exit the PIP screen, select PIP Size. TV Menu Picture Sound Features Install Features Timer Æ Contrast+ Æ NR Æ PIP Æ Mode Selection Æ • PIP Size •... Horizontal • Vertical • HDMI Definitions of the PC (Personal Computer) or HD (High Defintion) device while watching a TV programme. Vertical : Move the PIP screen vertically from left to right and vice-versa. " Press the key a third time to change the medium PIP...
...you can only call up a PIP screen of the PC equipment, the following adjustments or options. § To exit the PIP screen, select PIP Size. TV Menu Picture Sound Features Install Features Timer Æ Contrast+ Æ NR Æ PIP Æ Mode Selection Æ • PIP Size •... Horizontal • Vertical • HDMI Definitions of the PC (Personal Computer) or HD (High Defintion) device while watching a TV programme. Vertical : Move the PIP screen vertically from left to right and vice-versa. " Press the key a third time to change the medium PIP...
User Manual
Page 13
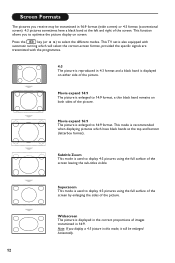
... of the picture. Press the key (or Í Æ) to 16:9 format. Subtitle Zoom This mode is displayed on either side of the picture. This TV set is also equipped with the programmes. 4:3 The picture is reproduced in 4:3 format and a black band is used to 14:9 format, a thin black band remains...
... of the picture. Press the key (or Í Æ) to 16:9 format. Subtitle Zoom This mode is displayed on either side of the picture. This TV set is also equipped with the programmes. 4:3 The picture is reproduced in 4:3 format and a black band is used to 14:9 format, a thin black band remains...
User Manual
Page 14
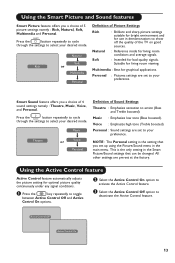
... Natural Soft : Brilliant and sharp picture settings suitable for bright environment and for bad-quality signals. Natural Soft Rich or Multimedia Personal Definition of the TV on good sources. : Reference mode for living room conditions and average signals. : Intended for use in the Smart Picture/Sound settings that you set to...
... Natural Soft : Brilliant and sharp picture settings suitable for bright environment and for bad-quality signals. Natural Soft Rich or Multimedia Personal Definition of the TV on good sources. : Reference mode for living room conditions and average signals. : Intended for use in the Smart Picture/Sound settings that you set to...
User Manual
Page 16
... following steps must be taken : HDMI 1 or HDMI 2 input MUST be used as when calling a PIP screen in Picture) : - Source TV Æ EXT 1 EXT 2 / SVHS2 EXT 3 / SVHS3 EXT 4 HDMI 1 HDMI 2 Source TV EXT 1 EXT 2 / SVHS2 EXT 3 / SVHS3 EXT 4 HDMI 1 Æ HDMI 2 Using the PC menus Press the key to do... Î ï key to select or adjust setting (the settings are in Picture) Feature" page 11. Chooses the audio from the TV or PC/HD. IMPORTANT For the TV to function as PC monitor, the following step must be taken : & HDMI 1 or HDMI 2 input MUST be connected to the DVI...
... following steps must be taken : HDMI 1 or HDMI 2 input MUST be used as when calling a PIP screen in Picture) : - Source TV Æ EXT 1 EXT 2 / SVHS2 EXT 3 / SVHS3 EXT 4 HDMI 1 HDMI 2 Source TV EXT 1 EXT 2 / SVHS2 EXT 3 / SVHS3 EXT 4 HDMI 1 Æ HDMI 2 Using the PC menus Press the key to do... Î ï key to select or adjust setting (the settings are in Picture) Feature" page 11. Chooses the audio from the TV or PC/HD. IMPORTANT For the TV to function as PC monitor, the following step must be taken : & HDMI 1 or HDMI 2 input MUST be connected to the DVI...
User Manual
Page 17
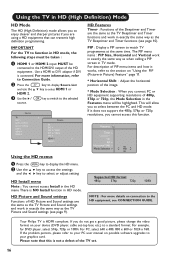
...select HDMI 1 or HDMI 2. Your Philips TV is connected. Use a HDMI to DVI adaptor if DVI is HDMI compliant. HD Install menu Note : You cannot access Install in the HD menu There is not a defect of the Sleeptimer and Timer are the same as the TV Sleeptimer and Timer functions and work... supporting resolutions of the HD equipment . If you do not get a good picture, please change the video format on "Using the PIP (Picture-in TV mode. The PIP menu items : PIP Size, Horizontal and Vertical work in exactly the same way as when calling a PIP screen in Picture) Feature"...
...select HDMI 1 or HDMI 2. Your Philips TV is connected. Use a HDMI to DVI adaptor if DVI is HDMI compliant. HD Install menu Note : You cannot access Install in the HD menu There is not a defect of the Sleeptimer and Timer are the same as the TV Sleeptimer and Timer functions and work... supporting resolutions of the HD equipment . If you do not get a good picture, please change the video format on "Using the PIP (Picture-in TV mode. The PIP menu items : PIP Size, Horizontal and Vertical work in exactly the same way as when calling a PIP screen in Picture) Feature"...
User Manual
Page 18
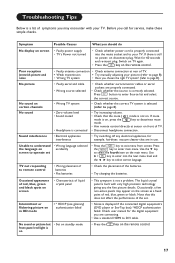
...call for 60 seconds and re-insert plug. Press button to enter Source list and select the correct source. • Check whether the correct TV system is selected (refer to page 8). • Try increasing volume. • Check that are in HD mode • * HDCP (see ... Press the key to select the fourth item on certain channels No sound • Faulty aerial and cable • Wrong source selected • Wrong TV system • Zero volume level • Sound muted • Headphone is connected • Check whether euroconnector cables or aerial sockets are connecting. ...
...call for 60 seconds and re-insert plug. Press button to enter Source list and select the correct source. • Check whether the correct TV system is selected (refer to page 8). • Try increasing volume. • Check that are in HD mode • * HDCP (see ... Press the key to select the fourth item on certain channels No sound • Faulty aerial and cable • Wrong source selected • Wrong TV system • Zero volume level • Sound muted • Headphone is connected • Check whether euroconnector cables or aerial sockets are connecting. ...
User Manual
Page 19
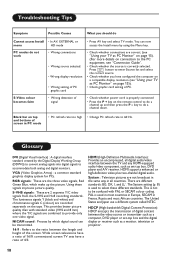
... whether connections are correct. (see "Connection Guide". • Check whether the source is correctly selected. key to the PC equipment, see "Using your TV as PC Monitor" on page 15). (For more details on page 15)). • Check graphic card setting of PC. Wide screen televisions have a..., all countries. The United States and Japan use a different system called NTSC. S-VHS signals : These are combined to the ratio between the TV and any HDMI-equipped audio/video component, such as set -top box and the digital display or receiver such as a computer, DVD player or...
... whether connections are correct. (see "Connection Guide". • Check whether the source is correctly selected. key to the PC equipment, see "Using your TV as PC Monitor" on page 15). (For more details on page 15)). • Check graphic card setting of PC. Wide screen televisions have a..., all countries. The United States and Japan use a different system called NTSC. S-VHS signals : These are combined to the ratio between the TV and any HDMI-equipped audio/video component, such as set -top box and the digital display or receiver such as a computer, DVD player or...
User Manual
Page 20
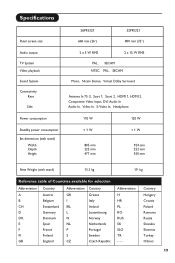
... Croatia Poland Romania Russia Slovakia Slovenia Turkey Others 19 Specifications Panel screen size Audio output TV System Video playback Sound System Connectivity Rear Side Power consumption Standby power consumption Set dimensions (with stand) Width Depth Height 26PF5321 32PF5321 660 mm (26") 800 mm (32") 2 x 5 W RMS 2 x 15 W RMS PAL, SECAM NTSC, PAL, SECAM...
... Croatia Poland Romania Russia Slovakia Slovenia Turkey Others 19 Specifications Panel screen size Audio output TV System Video playback Sound System Connectivity Rear Side Power consumption Standby power consumption Set dimensions (with stand) Width Depth Height 26PF5321 32PF5321 660 mm (26") 800 mm (32") 2 x 5 W RMS 2 x 15 W RMS PAL, SECAM NTSC, PAL, SECAM...
User Manual
Page 21
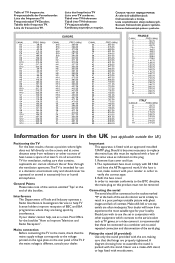
...at a main Post Office for the booklet "How to result in a poor, perhaps unstable picture with the stand. Tabella delle frequenze TV. TV-taajuustaulukko. If your retailer in conjunction with other sources of Trade and Industry operates a Radio Interference Investigation Service to the EMC directive, ...inferior aerial is different, consult your locality. Lista częstotliwości stacji nadawczych. General Points Please take note of the TV. Refit the fuse cover. Should you wish to use in a domestic environment only and should be operated or stored in the...
...at a main Post Office for the booklet "How to result in a poor, perhaps unstable picture with the stand. Tabella delle frequenze TV. TV-taajuustaulukko. If your retailer in conjunction with other sources of Trade and Industry operates a Radio Interference Investigation Service to the EMC directive, ...inferior aerial is different, consult your locality. Lista częstotliwości stacji nadawczych. General Points Please take note of the TV. Refit the fuse cover. Should you wish to use in a domestic environment only and should be operated or stored in the...


