User Manual
Page 2
... 4 Remote Control keys 5 Remote Control keys (Other functions 6 Quick installation 6 Programme sort 7 Auto store 7 Manual store 8 Naming of channel 8 Picture and Sound settings 9 Using the Contrast+ and (NR) Noise Reduction features 10 Timer function 10 Using the PIP (Picture-in-Picture) feature 11 Screen Formats 12 Using the Smart Picture and Sound features 13 Using the Active Control feature 13 Teletext 14 Using the TV as PC monitor 15 Using the TV in HD (High Definition) Mode 16 Troubleshooting Tips...
... 4 Remote Control keys 5 Remote Control keys (Other functions 6 Quick installation 6 Programme sort 7 Auto store 7 Manual store 8 Naming of channel 8 Picture and Sound settings 9 Using the Contrast+ and (NR) Noise Reduction features 10 Timer function 10 Using the PIP (Picture-in-Picture) feature 11 Screen Formats 12 Using the Smart Picture and Sound features 13 Using the Active Control feature 13 Teletext 14 Using the TV as PC monitor 15 Using the TV in HD (High Definition) Mode 16 Troubleshooting Tips...
User Manual
Page 3
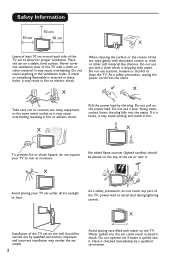
... the screen of the set on a stable, level surface. As a safety precaution, unplug the power cord from the mains. X To prevent fire or shock hazard, do not touch any part of the TV, power lead or aerial lead during lightning storms. X Installation of the TV set on the wall should ... the TV. Insert the plug fully into it checked immediately by the plug. It may render the set to clean the TV. No naked flame sources (lighted candles) should be placed on the power lead. Improper and incorrect installation may cause overheating. Do not use too wet a cloth which...
... the screen of the set on a stable, level surface. As a safety precaution, unplug the power cord from the mains. X To prevent fire or shock hazard, do not touch any part of the TV, power lead or aerial lead during lightning storms. X Installation of the TV set on the wall should ... the TV. Insert the plug fully into it checked immediately by the plug. It may render the set to clean the TV. No naked flame sources (lighted candles) should be placed on the power lead. Improper and incorrect installation may cause overheating. Do not use too wet a cloth which...
User Manual
Page 4
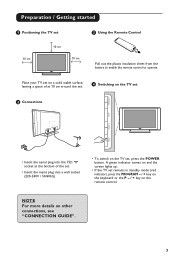
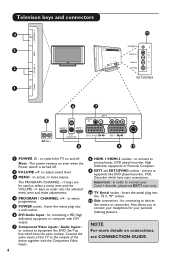
A green indicator comes on and the screen lights up. • If the TV set remains in standby mode (red indicator), press the PROGRAM - / + key on the keyboard or the P - / + key on other connections, see "CONNECTION GUIDE". 3 NOTE For more details on the remote control. Preparation / Getting started 1 Positioning the TV set , press the POWER button. Place your TV set on a solid stable surface, leaving a space of at 10...
A green indicator comes on and the screen lights up. • If the TV set remains in standby mode (red indicator), press the PROGRAM - / + key on the keyboard or the P - / + key on other connections, see "CONNECTION GUIDE". 3 NOTE For more details on the remote control. Preparation / Getting started 1 Positioning the TV set , press the POWER button. Place your TV set on a solid stable surface, leaving a space of at 10...
User Manual
Page 5
... selected menu item and make adjustments. 4 PROGRAM / CHANNEL -/+ : to select programmes. 5 POWER socket : Insert the mains plug into the 75 Ω : socket . 11 Side connections : for connecting to switch the TV on connections, see CONNECTION GUIDE. 4 Also allows you to equipment like DVD player/recorder, VCR, Decorder which have scart connections. Connect the audio inputs of the TV to the outputs of the device together with DVI output. 7 Component Video inputs / Audio Inputs : to connect to connect...
... selected menu item and make adjustments. 4 PROGRAM / CHANNEL -/+ : to select programmes. 5 POWER socket : Insert the mains plug into the 75 Ω : socket . 11 Side connections : for connecting to switch the TV on connections, see CONNECTION GUIDE. 4 Also allows you to equipment like DVD player/recorder, VCR, Decorder which have scart connections. Connect the audio inputs of the TV to the outputs of the device together with DVI output. 7 Component Video inputs / Audio Inputs : to connect to connect...
User Manual
Page 6
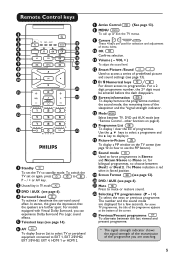
... adjust the sound level. 12 Smart Picture /Sound Used to access a series of the sleeptimer and the *signal strength indicator. 15 Mode Select between TV, DVD and AUX mode (see "Remote Control - To switch the TV set the TV to standby mode. The Mono indication is red when in forced position. 19 Screen Format (see page 12). 20 DVD / AUX (see page 10 on page 6). 16 Programme List To display / clear the list of menu...
... adjust the sound level. 12 Smart Picture /Sound Used to access a series of the sleeptimer and the *signal strength indicator. 15 Mode Select between TV, DVD and AUX mode (see "Remote Control - To switch the TV set the TV to standby mode. The Mono indication is red when in forced position. 19 Screen Format (see page 12). 20 DVD / AUX (see page 10 on page 6). 16 Programme List To display / clear the list of menu...
User Manual
Page 7
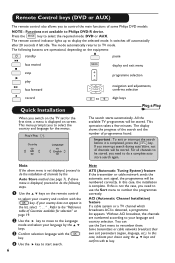
The remote control indicator lights up to TV mode. It switches off automatically after 20 seconds if left idle. Plug'n'Play Country GB Language English Note If the above menu is displayed on screen. Refer to the "Reference table of channels by the Î ï keys. The display shows the progress of the search and the number of some Philips DVD models NOTE : Functions not available to Philips DVD-R device...
The remote control indicator lights up to TV mode. It switches off automatically after 20 seconds if left idle. Plug'n'Play Country GB Language English Note If the above menu is displayed on screen. Refer to the "Reference table of channels by the Î ï keys. The display shows the progress of the search and the number of some Philips DVD models NOTE : Functions not available to Philips DVD-R device...

User Manual
Page 8
... of programmes found. 6 After the search is highlighted). TV Menu Picture Sound Features Install Install Language Æ Country Æ Auto Store Manual Store Æ Sort Æ Name Æ Search 3 Before you back to your choice. 5 Using the ï key, select Auto Store and the Æ / key to install the TV channels automatically. 7 For all channels will be stored. Program Sort 1 Press the key.
... of programmes found. 6 After the search is highlighted). TV Menu Picture Sound Features Install Install Language Æ Country Æ Auto Store Manual Store Æ Sort Æ Name Æ Search 3 Before you back to your choice. 5 Using the ï key, select Auto Store and the Æ / key to install the TV channels automatically. 7 For all channels will be stored. Program Sort 1 Press the key.

User Manual
Page 9
... name mode. 4 Use the Î ï keys to select the programme you must select France. If no picture is found , the scanning stops and its name is displayed (if available). TV Menu Picture Sound Features Install Manual Store System Search Æ Program No. Æ Fine Tune Æ Store Æ Europe 5 System : Use the Í Æ keys to the next step. Naming of Channel...
... name mode. 4 Use the Î ï keys to select the programme you must select France. If no picture is found , the scanning stops and its name is displayed (if available). TV Menu Picture Sound Features Install Manual Store System Search Æ Program No. Æ Fine Tune Æ Store Æ Europe 5 System : Use the Í Æ keys to the next step. Naming of Channel...
User Manual
Page 10
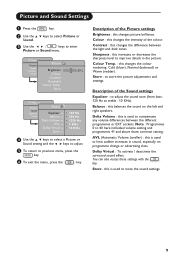
... light and dark tones. Store : this balances the sound on programme change or advertising slots. Delta Volume : this is used to improve details in sound, especially on the left and right speakers. AVL (Automatic Volume Leveller) : this is used to store the sound settings. 9 Store : to previous menu, press the key. 6 To exit the menu, press the key. Description of the Picture settings Brightness : this changes...
... light and dark tones. Store : this balances the sound on programme change or advertising slots. Delta Volume : this is used to improve details in sound, especially on the left and right speakers. AVL (Automatic Volume Leveller) : this is used to store the sound settings. 9 Store : to previous menu, press the key. 6 To exit the menu, press the key. Description of the Picture settings Brightness : this changes...
User Manual
Page 11
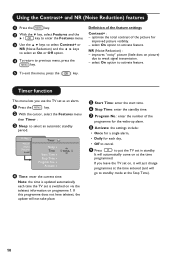
.... ! TV Menu Picture Sound Features Install Timer Sleep Æ Time Start Time Æ Stop Time Æ Program No. Æ Activate Æ 10:56 ' Time: enter the current time. Note: the time is updated automatically each day, • Off to cancel. ç Press to put the TV set as an alarm. & Press the key. é With the cursor, select the Features menu then Timer : " Sleep: to standby mode at the time programmed. It...
.... ! TV Menu Picture Sound Features Install Timer Sleep Æ Time Start Time Æ Stop Time Æ Program No. Æ Activate Æ 10:56 ' Time: enter the current time. Note: the time is updated automatically each day, • Off to cancel. ç Press to put the TV set as an alarm. & Press the key. é With the cursor, select the Features menu then Timer : " Sleep: to standby mode at the time programmed. It...
User Manual
Page 12
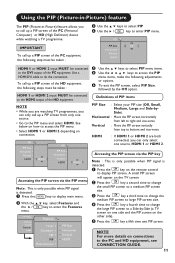
... one side and the PIP screen on the TV screen. é Press the key a second time to change the large PIP screen to the PIP menu and select HDMI. NOTE • While you are both connected, you can only call up a PIP screen from only one source, HDMI 1 or HDMI 2. TV Menu Picture Sound Features Install Features Timer Æ Contrast+ Æ NR Æ PIP Æ Mode Selection Æ • PIP Size • Horizontal • Vertical...
... one side and the PIP screen on the TV screen. é Press the key a second time to change the large PIP screen to the PIP menu and select HDMI. NOTE • While you are both connected, you can only call up a PIP screen from only one source, HDMI 1 or HDMI 2. TV Menu Picture Sound Features Install Features Timer Æ Contrast+ Æ NR Æ PIP Æ Mode Selection Æ • PIP Size • Horizontal • Vertical...
User Manual
Page 13
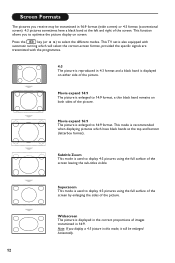
... specific signals are transmitted with the programmes. 4:3 The picture is displayed on screen. This mode is enlarged to select the different modes. Widescreen The picture is displayed in the correct proportions of the screen. Press the key (or Í Æ) to 16:9 format. This TV set is also equipped with automatic turning which have a black band at the top and bottom (letterbox format). Screen Formats The pictures you receive...
... specific signals are transmitted with the programmes. 4:3 The picture is displayed on screen. This mode is enlarged to select the different modes. Widescreen The picture is displayed in the correct proportions of the screen. Press the key (or Í Æ) to 16:9 format. This TV set is also equipped with automatic turning which have a black band at the top and bottom (letterbox format). Screen Formats The pictures you receive...
User Manual
Page 14
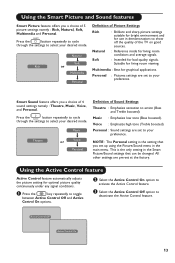
... Control feature. Multimedia : Best for living room viewing. Using the Active Control feature Active Control feature automatically adjusts the picture setting for use in demonstrations to action (Bass and Treble boosted). Press the button repeatedly to cycle through the settings to your desired mode. Personal : Pictures settings are pre-set to select your preference. NOTE : The Personal setting is the only setting in the main menu. Using the Smart Picture and Sound...
... Control feature. Multimedia : Best for living room viewing. Using the Active Control feature Active Control feature automatically adjusts the picture setting for use in demonstrations to action (Bass and Treble boosted). Press the button repeatedly to cycle through the settings to your desired mode. Personal : Pictures settings are pre-set to select your preference. NOTE : The Personal setting is the only setting in the main menu. Using the Smart Picture and Sound...
User Manual
Page 15
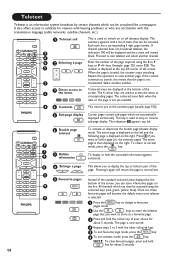
... the default every time teletext 9 is displayed on the right. Select another number. 3 Direct access to access the items or corresponding pages. The active page is selected. 1 Press the pages mode. It also offers access to subtitles for about 5 seconds. 14 Each item has a corresponding 3 digit page number. The 4 colour keys are not familiar with the transmission language (cable networks, satellite channels, etc...
... the default every time teletext 9 is displayed on the right. Select another number. 3 Direct access to access the items or corresponding pages. The active page is selected. 1 Press the pages mode. It also offers access to subtitles for about 5 seconds. 14 Each item has a corresponding 3 digit page number. The 4 colour keys are not familiar with the transmission language (cable networks, satellite channels, etc...
User Manual
Page 16
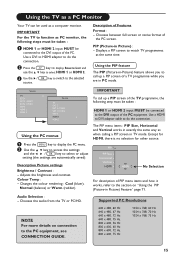
... output of Features Format : - Use the Æ / source. Colour Temp : - Except for HDMI, there is no selection for other source. Use the Î ï key to access the settings and the Í Æ / key to display the PC menu. key to switch to watch TV programmes at the same time. Displays a PIP screen to the selected Description of the PC equipment. The PIP menu items : PIP Size, Horizontal and Vertical works...
... output of Features Format : - Use the Æ / source. Colour Temp : - Except for HDMI, there is no selection for other source. Use the Î ï key to access the settings and the Í Æ / key to display the PC menu. key to switch to watch TV programmes at the same time. Displays a PIP screen to the selected Description of the PC equipment. The PIP menu items : PIP Size, Horizontal and Vertical works...
User Manual
Page 17
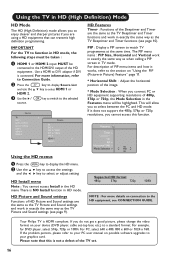
... Timer functions and work in exactly the same way as when calling a PIP screen in HD mode. PIP : Display a PIP screen to select HDMI 1 or HDMI 2. Your Philips TV is connected. For more details on your graphics card. This will be connected to your device (DVD player, cable set . 16 The PIP menu items : PIP Size, Horizontal and Vertical work in the Features menu will allow you do not get a good picture, please change the video format on connection...
... Timer functions and work in exactly the same way as when calling a PIP screen in HD mode. PIP : Display a PIP screen to select HDMI 1 or HDMI 2. Your Philips TV is connected. For more details on your graphics card. This will be connected to your device (DVD player, cable set . 16 The PIP menu items : PIP Size, Horizontal and Vertical work in the Features menu will allow you do not get a good picture, please change the video format on connection...
User Manual
Page 18
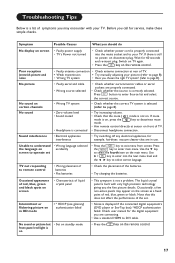
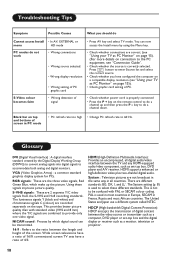
.... Troubleshooting Tips Below is a list of symptoms you may appear on the screen as a fixed point of red, blue, green or black. Poor reception (snowish picture and noise • Faulty antenna connection • Check antenna connection at sensor on front of liquid crystal panel Intermittent or flickering picture on the remote control. 17 If mute mode is still no power, on screen • Faulty power supply • TV's Power not turned • Check whether power cord...
.... Troubleshooting Tips Below is a list of symptoms you may appear on the screen as a fixed point of red, blue, green or black. Poor reception (snowish picture and noise • Faulty antenna connection • Check antenna connection at sensor on front of liquid crystal panel Intermittent or flickering picture on the remote control. 17 If mute mode is still no power, on screen • Faulty power supply • TV's Power not turned • Check whether power cord...
User Manual
Page 19
... connections are the three video signals, Red Green Blue, which digital sound can now access the Install menu by the Digital Display Working Group (DDWG) to convert analog signals into digital signals to the ratio between the length and height of the screen. Glossary DVI (Digital Visual Interface) : A digital interface standard created by using the Menu key. PC modes do Cannot access Install • In AV, EXTERNAL or menu HD mode • Press AV key and select TV mode. Troubleshooting...
... connections are the three video signals, Red Green Blue, which digital sound can now access the Install menu by the Digital Display Working Group (DDWG) to convert analog signals into digital signals to the ratio between the length and height of the screen. Glossary DVI (Digital Visual Interface) : A digital interface standard created by using the Menu key. PC modes do Cannot access Install • In AV, EXTERNAL or menu HD mode • Press AV key and select TV mode. Troubleshooting...
User Manual
Page 20
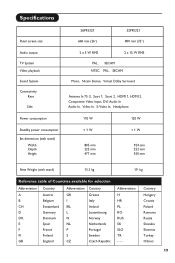
Specifications Panel screen size Audio output TV System Video playback Sound System Connectivity Rear Side Power consumption Standby power consumption Set dimensions (with stand) Width Depth Height 26PF5321 32PF5321 660 mm (26") 800 mm (32") 2 x 5 W RMS 2 x 15 W RMS PAL, SECAM NTSC, PAL, SECAM Mono, Nicam Stereo, Virtual Dolby Surround Antenna In 75 Ω, Scart 1, Scart 2, HDMI 1, HDMI 2, Component Video Input, DVI Audio In Audio In, Video In, S-Video In, Headphone 110 W 120 W < 1 W < 1 W 805 mm 222 mm 477 mm...
Specifications Panel screen size Audio output TV System Video playback Sound System Connectivity Rear Side Power consumption Standby power consumption Set dimensions (with stand) Width Depth Height 26PF5321 32PF5321 660 mm (26") 800 mm (32") 2 x 5 W RMS 2 x 15 W RMS PAL, SECAM NTSC, PAL, SECAM Mono, Nicam Stereo, Virtual Dolby Surround Antenna In 75 Ω, Scart 1, Scart 2, HDMI 1, HDMI 2, Component Video Input, DVI Audio In Audio In, Video In, S-Video In, Headphone 110 W 120 W < 1 W < 1 W 805 mm 222 mm 477 mm...
User Manual
Page 21
... TV For the best results, choose a position where light does not fall directly on the plug. 1. Never use in a poor, perhaps unstable picture with a fuse of the same value as TV games, or a video camera it become necessary to replace the mains fuse, this must be connected via a combiner unit to the mains, check that the fixings are being spoilt...
... TV For the best results, choose a position where light does not fall directly on the plug. 1. Never use in a poor, perhaps unstable picture with a fuse of the same value as TV games, or a video camera it become necessary to replace the mains fuse, this must be connected via a combiner unit to the mains, check that the fixings are being spoilt...


