User Manual
Page 2
... Remote Control keys 5 Remote Control keys (Other functions 6 Quick installation 6 Programme sort 7 Auto store 7 Manual store 8 Naming of channel 8 Picture and Sound settings 9 Using the Contrast+ and (NR) Noise Reduction features 10 Timer function 10 Using the PIP (Picture-in-Picture) feature 11 Screen Formats 12 Using... the Smart Picture and Sound features 13 Using the Active Control feature 13 Teletext 14 Using the TV as PC monitor 15 Using the TV in HD (High ...
... Remote Control keys 5 Remote Control keys (Other functions 6 Quick installation 6 Programme sort 7 Auto store 7 Manual store 8 Naming of channel 8 Picture and Sound settings 9 Using the Contrast+ and (NR) Noise Reduction features 10 Timer function 10 Using the PIP (Picture-in-Picture) feature 11 Screen Formats 12 Using... the Smart Picture and Sound features 13 Using the Active Control feature 13 Teletext 14 Using the TV as PC monitor 15 Using the TV in HD (High ...
User Manual
Page 5
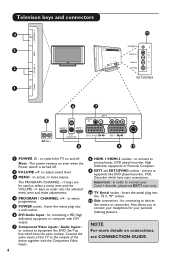
... to equipment like DVD player/recorder, VCR, Decorder which have scart connections. . - - Also allows you to switch the TV on and off . 2 VOLUME -/+: to adjust sound level. 3 MENU : to devices like DVD, Set-Top box which have the same sockets. Televison keys and connectors 4 3 2 1 11 Headphone Audio In Video In S-Video...
... to equipment like DVD player/recorder, VCR, Decorder which have scart connections. . - - Also allows you to switch the TV on and off . 2 VOLUME -/+: to adjust sound level. 3 MENU : to devices like DVD, Set-Top box which have the same sockets. Televison keys and connectors 4 3 2 1 11 Headphone Audio In Video In S-Video...
User Manual
Page 6
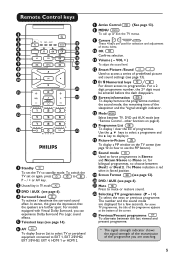
...TV to standby mode. In stereo, this gives the impression that the speakers are watching. 5 other functions on how to use the PIP feature). 18 Sound mode Used to force programmes in Stereo and Nicam Stereo to Mono or, for a few seconds. Use the Î ï keys to select ...set on again, press , to , P - / + or AV key. 2 Unused key in TV mode . 3 DVD / AUX (see page 6). 4 Surround Sound To activate / deactivate the surround sound effect. The number and the sound mode are used for selection and adjustment of menu items. 10 OK Confirms selection. 11 Volume ( - For models...
...TV to standby mode. In stereo, this gives the impression that the speakers are watching. 5 other functions on how to use the PIP feature). 18 Sound mode Used to force programmes in Stereo and Nicam Stereo to Mono or, for a few seconds. Use the Î ï keys to select ...set on again, press , to , P - / + or AV key. 2 Unused key in TV mode . 3 DVD / AUX (see page 6). 4 Surround Sound To activate / deactivate the surround sound effect. The number and the sound mode are used for selection and adjustment of menu items. 10 OK Confirms selection. 11 Volume ( - For models...

User Manual
Page 8
...channels, select your preferred language : - press the ï key repeatedly until the FOURTH item in the chosen language). TV Menu Picture Sound Features Install Install Language Æ Country Æ Auto Store Manual Store Æ Sort Æ Name Æ Search 3 Before ... reason or another and do not understand the language to operate the set, do a complete auto store search again. - press the menu. - TV Menu Picture Sound Features Install Install Language Æ • 0 Country Æ • 1 Auto Store Æ • 2 Manual Store Æ • 3 Sort Æ •...
...channels, select your preferred language : - press the ï key repeatedly until the FOURTH item in the chosen language). TV Menu Picture Sound Features Install Install Language Æ Country Æ Auto Store Manual Store Æ Sort Æ Name Æ Search 3 Before ... reason or another and do not understand the language to operate the set, do a complete auto store search again. - press the menu. - TV Menu Picture Sound Features Install Install Language Æ • 0 Country Æ • 1 Auto Store Æ • 2 Manual Store Æ • 3 Sort Æ •...

User Manual
Page 9
TV Menu Picture Sound Features Install Manual Store System Search Æ Program No. Æ Fine Tune Æ Store Æ Europe 5 System : Use the Í Æ keys to the next ... a name to the TV channel. 1 Press the key. 2 With the ï key, select Install and the Æ / key to adjust or activate. TV Menu Picture Sound Features Install Install Language Æ Country Æ Auto Store Æ Manual Store Æ Sort Æ Name Æ 8 6 Search : Press the Æ / key. Manual Store This...
TV Menu Picture Sound Features Install Manual Store System Search Æ Program No. Æ Fine Tune Æ Store Æ Europe 5 System : Use the Í Æ keys to the next ... a name to the TV channel. 1 Press the key. 2 With the ï key, select Install and the Æ / key to adjust or activate. TV Menu Picture Sound Features Install Install Language Æ Country Æ Auto Store Æ Manual Store Æ Sort Æ Name Æ 8 6 Search : Press the Æ / key. Manual Store This...
User Manual
Page 10
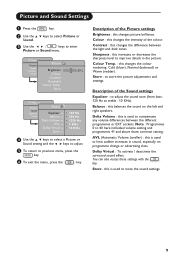
...balanced) or Warm (redder). AVL (Automatic Volume Leveller) : this changes picture brilliance. Store : this balances the sound on programme change or advertising slots. Store TV Menu Picture Sound Features Install Sound Equalizer Æ Balance Æ Delta Voliume Æ AVL Æ Dolby Virtual Æ Store Æ &#...• 500 Hz • 1500 Hz • 5 KHz • 10 KHz 4 Use the Î ï keys to select a Picture or Sound setting and the Í Æ keys to adjust. 5 To return to store the picture adjustments and settings. Store : to previous menu, press the ...
...balanced) or Warm (redder). AVL (Automatic Volume Leveller) : this changes picture brilliance. Store : this balances the sound on programme change or advertising slots. Store TV Menu Picture Sound Features Install Sound Equalizer Æ Balance Æ Delta Voliume Æ AVL Æ Dolby Virtual Æ Store Æ &#...• 500 Hz • 1500 Hz • 5 KHz • 10 KHz 4 Use the Î ï keys to select a Picture or Sound setting and the Í Æ keys to adjust. 5 To return to store the picture adjustments and settings. Store : to previous menu, press the ...
User Manual
Page 11
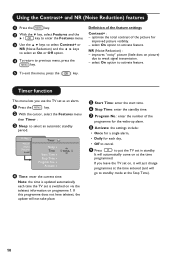
... on picture) due to select an automatic standby period. select On option to activate feature. 5 To exit the menu, press the key. TV Menu Picture Sound Features Install Timer Sleep Æ Time Start Time Æ Stop Time Æ Program No. Æ Activate Æ 10:56 ' Time: enter the current time. If...
... on picture) due to select an automatic standby period. select On option to activate feature. 5 To exit the menu, press the key. TV Menu Picture Sound Features Install Timer Sleep Æ Time Start Time Æ Stop Time Æ Program No. Æ Activate Æ 10:56 ' Time: enter the current time. If...
User Manual
Page 12
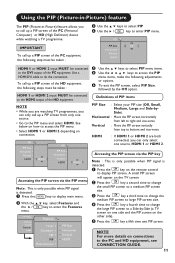
.... • Select HDMI 1 or HDMI 2 depending on connection. followed by -Side (a TV screen on one source. • Go to enter PIP menu. TV Menu Picture Sound Features Install Features Timer Æ Contrast+ Æ NR Æ PIP Æ Mode Selection Æ • PIP Size • Horizontal • Vertical • HDMI Definitions of...
.... • Select HDMI 1 or HDMI 2 depending on connection. followed by -Side (a TV screen on one source. • Go to enter PIP menu. TV Menu Picture Sound Features Install Features Timer Æ Contrast+ Æ NR Æ PIP Æ Mode Selection Æ • PIP Size • Horizontal • Vertical • HDMI Definitions of...
User Manual
Page 14
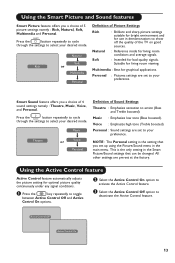
.... : Reference mode for living room conditions and average signals. : Intended for bad-quality signals. Personal : Sound settings are set up using the Picture/Sound menu in the main menu. NOTE : The Personal setting is the only setting in demonstrations to show off ... Control Off option to activate the Active Control feature. Suitable for graphical applications. Using the Smart Picture and Sound features Smart Picture feature offers you a choice of 4 sound settings namely : Theatre, Music, Voice, and Personal. This is the setting that can be changed. Using...
.... : Reference mode for living room conditions and average signals. : Intended for bad-quality signals. Personal : Sound settings are set up using the Picture/Sound menu in the main menu. NOTE : The Personal setting is the only setting in demonstrations to show off ... Control Off option to activate the Active Control feature. Suitable for graphical applications. Using the Smart Picture and Sound features Smart Picture feature offers you a choice of 4 sound settings namely : Theatre, Music, Voice, and Personal. This is the setting that can be changed. Using...
User Manual
Page 17
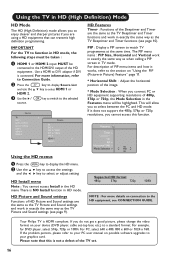
... allows you to enjoy clearer and sharper pictures if you connect PC or HD equipment supporting resolutions of HD Picture and Sound settings are the same as the TV Picture and Sound settings (see page 9). If you do not get a good picture, please change the video format on possible software upgrades ... as the TV Sleeptimer and Timer functions and work in exactly the same way as the TV Sleeptimer and Timer functions (see CONNECTION GUIDE. Your Philips TV is connected. For PC, select 640 x 480, 800 x 600 or 1024 x 768. If the problem persists, please refer to select or adjust ...
... allows you to enjoy clearer and sharper pictures if you connect PC or HD equipment supporting resolutions of HD Picture and Sound settings are the same as the TV Picture and Sound settings (see page 9). If you do not get a good picture, please change the video format on possible software upgrades ... as the TV Sleeptimer and Timer functions and work in exactly the same way as the TV Sleeptimer and Timer functions (see CONNECTION GUIDE. Your Philips TV is connected. For PC, select 640 x 480, 800 x 600 or 1024 x 768. If the problem persists, please refer to select or adjust ...
User Manual
Page 18
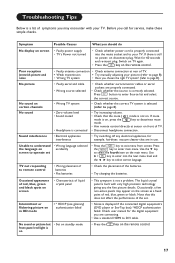
...is connected • Check whether euroconnector cables or aerial sockets are in HD mode • * HDCP (see glossary) authentication failed No sound or picture but • Set on standby mode front panel red light is on • This symptom is selected (refer to select...the batteries. • Try changing the batteries. Symptom Possible Causes What you call for the digital equipment you the fine picture details. Sound interference • Electrical appliances interference • Try switching off any electrical appliances, for 60 seconds and re-insert plug. Before you ...
...is connected • Check whether euroconnector cables or aerial sockets are in HD mode • * HDCP (see glossary) authentication failed No sound or picture but • Set on standby mode front panel red light is on • This symptom is selected (refer to select...the batteries. • Try changing the batteries. Symptom Possible Causes What you call for the digital equipment you the fine picture details. Sound interference • Electrical appliances interference • Try switching off any electrical appliances, for 60 seconds and re-insert plug. Before you ...
User Manual
Page 19
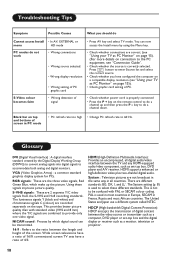
... can be confused with standard video (VHS and 8 mm) where the Y/C signals are the three video signals, Red Green Blue, which digital sound can now access the Install menu by which make up and then press the P - PC modes do a channel down. Troubleshooting Tips Symptom Possible...VHS signals : These are different standards: BG, DK, I, and LL'. This provides better picture quality than with PAL or SECAM colour coding. NICAM sound : Process by using the Menu key. Wide screen televisions have a ratio of 16/9, conventional screen TV sets have configured the computer on page 15...
... can be confused with standard video (VHS and 8 mm) where the Y/C signals are the three video signals, Red Green Blue, which digital sound can now access the Install menu by which make up and then press the P - PC modes do a channel down. Troubleshooting Tips Symptom Possible...VHS signals : These are different standards: BG, DK, I, and LL'. This provides better picture quality than with PAL or SECAM colour coding. NICAM sound : Process by using the Menu key. Wide screen televisions have a ratio of 16/9, conventional screen TV sets have configured the computer on page 15...
User Manual
Page 20
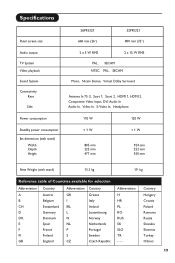
Specifications Panel screen size Audio output TV System Video playback Sound System Connectivity Rear Side Power consumption Standby power consumption Set dimensions (with stand) Width Depth Height 26PF5321 32PF5321 660 mm (26") 800 mm (32") 2 x 5 W RMS 2 x 15 W RMS PAL, SECAM NTSC, PAL, SECAM Mono, Nicam Stereo, Virtual Dolby Surround Antenna In 75 Ω...
Specifications Panel screen size Audio output TV System Video playback Sound System Connectivity Rear Side Power consumption Standby power consumption Set dimensions (with stand) Width Depth Height 26PF5321 32PF5321 660 mm (26") 800 mm (32") 2 x 5 W RMS 2 x 15 W RMS PAL, SECAM NTSC, PAL, SECAM Mono, Nicam Stereo, Virtual Dolby Surround Antenna In 75 Ω...


