User Manual
Page 2
... functions 6 Quick installation 6 Programme sort 7 Auto store 7 Manual store 8 Naming of channel 8 Picture and Sound settings 9 Using the Contrast+ and (NR) Noise Reduction features 10 Timer function 10 Using the PIP (Picture-in-Picture) feature 11 Screen Formats 12 Using the Smart Picture and Sound features 13 Using the Active Control feature...
... functions 6 Quick installation 6 Programme sort 7 Auto store 7 Manual store 8 Naming of channel 8 Picture and Sound settings 9 Using the Contrast+ and (NR) Noise Reduction features 10 Timer function 10 Using the PIP (Picture-in-Picture) feature 11 Screen Formats 12 Using the Smart Picture and Sound features 13 Using the Active Control feature...
User Manual
Page 3
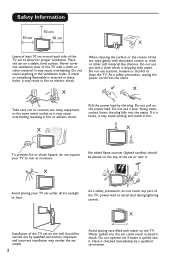
... water on the wall should be carried out by qualified serviceman. X Avoid placing your TV to allow for proper ventilation. Safety Information 10 cm 10 cm 10 cm X Leave at least 10 cm around each side of the set, wipe gently with absorbent cotton or cloth or other material. It may cause overloading resulting...
... water on the wall should be carried out by qualified serviceman. X Avoid placing your TV to allow for proper ventilation. Safety Information 10 cm 10 cm 10 cm X Leave at least 10 cm around each side of the set, wipe gently with absorbent cotton or cloth or other material. It may cause overloading resulting...
User Manual
Page 4
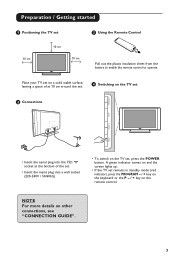
Preparation / Getting started 1 Positioning the TV set , press the POWER button. Place your TV set on a solid stable surface, leaving a space of at 10 cm around the set. 4 Switching on the TV set 2 Connections - - . • Insert the aerial plug into the 75Ω : socket at the bottom of the ...set. • Insert the mains plug into a wall socket (220-240V / 50/60Hz). • To switch on the TV set 10 cm 10 cm 10 cm 3 Using the Remote Control Pull out the plastic insulation sheet from the battery to enable the remote control to operate. A green indicator comes...
Preparation / Getting started 1 Positioning the TV set , press the POWER button. Place your TV set on a solid stable surface, leaving a space of at 10 cm around the set. 4 Switching on the TV set 2 Connections - - . • Insert the aerial plug into the 75Ω : socket at the bottom of the ...set. • Insert the mains plug into a wall socket (220-240V / 50/60Hz). • To switch on the TV set 10 cm 10 cm 10 cm 3 Using the Remote Control Pull out the plastic insulation sheet from the battery to enable the remote control to operate. A green indicator comes...
User Manual
Page 5
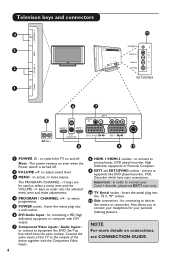
. - - Also allows you to connect your headphone for your Canal + decoder, please use EXT1 scart only. 10 TV Aerial socket : Insert the aerial plug into a wall socket. 6 DVI Audio Input : for connecting to access or close menus. Note : The power remains ...Video In S-Video R AUDIO IN L VIDEO IN S-VIDEO EXT3/SVHS3 6 7 EXT 4 5 L AUDIO R L IN Pr Pb Y HDMI 2 R HDMI 1 AC in ~ DVI (AUDIO IN) EXT 2 /SVHS2 8 EXT 1 9 10 1 POWER . : to switch the TV on and off . 2 VOLUME -/+: to adjust sound level. 3 MENU : to devices like DVD player/recorder, VCR, Decorder which have scart...
. - - Also allows you to connect your headphone for your Canal + decoder, please use EXT1 scart only. 10 TV Aerial socket : Insert the aerial plug into a wall socket. 6 DVI Audio Input : for connecting to access or close menus. Note : The power remains ...Video In S-Video R AUDIO IN L VIDEO IN S-VIDEO EXT3/SVHS3 6 7 EXT 4 5 L AUDIO R L IN Pr Pb Y HDMI 2 R HDMI 1 AC in ~ DVI (AUDIO IN) EXT 2 /SVHS2 8 EXT 1 9 10 1 POWER . : to switch the TV on and off . 2 VOLUME -/+: to adjust sound level. 3 MENU : to devices like DVD player/recorder, VCR, Decorder which have scart...
User Manual
Page 6
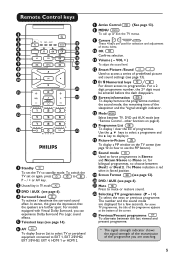
...3 DVD / AUX (see page 6). 4 Surround Sound To activate / deactivate the surround sound effect. Remote Control keys 1 2 3 AUX 15 4 16 5 17 6 18 7 19 8 20 9 10 21 11 22 12 13 14 23 1 Standby To set on again, press , to standby mode. For a 2 digit programme number, the 2nd digit must be... entered before the dash disappears. 14 Screen information To display/remove the programme number, the sound mode, the remaining time of menu items. 10 OK Confirms selection. 11 Volume ( - To switch the TV set the TV to , P - / + or AV key. 2 Unused key in ...
...3 DVD / AUX (see page 6). 4 Surround Sound To activate / deactivate the surround sound effect. Remote Control keys 1 2 3 AUX 15 4 16 5 17 6 18 7 19 8 20 9 10 21 11 22 12 13 14 23 1 Standby To set on again, press , to standby mode. For a 2 digit programme number, the 2nd digit must be... entered before the dash disappears. 14 Screen information To display/remove the programme number, the sound mode, the remaining time of menu items. 10 OK Confirms selection. 11 Volume ( - To switch the TV set the TV to , P - / + or AV key. 2 Unused key in ...

User Manual
Page 9
... the items in the Manual Store menu to 9 for France (LL' standard), you know the frequency of the TV screen. The name is now stored. 10 Repeat steps 6 to adjust or activate. The search starts. TV Menu Picture Sound Features Install Manual Store System Search Æ Program No. Æ Fine Tune...
... the items in the Manual Store menu to 9 for France (LL' standard), you know the frequency of the TV screen. The name is now stored. 10 Repeat steps 6 to adjust or activate. The search starts. TV Menu Picture Sound Features Install Manual Store System Search Æ Program No. Æ Fine Tune...
User Manual
Page 10
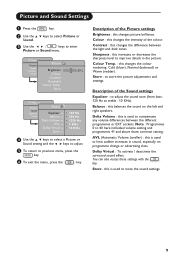
Description of the Sound settings Equalizer : to adjust the sound tone (from bass: 120 Hz to treble : 10 KHz). Description of the Picture settings Brightness : this changes picture brilliance. Balance : this is used to store the sound settings. 9 You can also access these ... Æ Balance Æ Delta Voliume Æ AVL Æ Dolby Virtual Æ Store Æ • 120 Hz • 500 Hz • 1500 Hz • 5 KHz • 10 KHz 4 Use the Î ï keys to select a Picture or Sound setting and the Í Æ keys to adjust. 5 To return to improve details in...
Description of the Sound settings Equalizer : to adjust the sound tone (from bass: 120 Hz to treble : 10 KHz). Description of the Picture settings Brightness : this changes picture brilliance. Balance : this is used to store the sound settings. 9 You can also access these ... Æ Balance Æ Delta Voliume Æ AVL Æ Dolby Virtual Æ Store Æ • 120 Hz • 500 Hz • 1500 Hz • 5 KHz • 10 KHz 4 Use the Î ï keys to select a Picture or Sound setting and the Í Æ keys to adjust. 5 To return to improve details in...
User Manual
Page 11
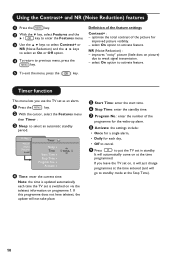
... standby period. TV Menu Picture Sound Features Install Timer Sleep Æ Time Start Time Æ Stop Time Æ Program No. Æ Activate Æ 10:56 ' Time: enter the current time. optimise the total contrast of the feature settings Contrast+ : - select On option to weak signal transmission. - Note:... programmes at the time entered (and will go to put the TV set is switched on via the teletext information on at the Stop Time). 10 select On option to previous menu, press the key. Activate: the settings include: • Once for a single alarm, • Daily for...
... standby period. TV Menu Picture Sound Features Install Timer Sleep Æ Time Start Time Æ Stop Time Æ Program No. Æ Activate Æ 10:56 ' Time: enter the current time. optimise the total contrast of the feature settings Contrast+ : - select On option to weak signal transmission. - Note:... programmes at the time entered (and will go to put the TV set is switched on via the teletext information on at the Stop Time). 10 select On option to previous menu, press the key. Activate: the settings include: • Once for a single alarm, • Daily for...
User Manual
Page 17
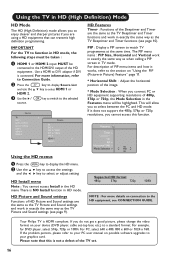
... the same way as the TV Picture and Sound settings (see CONNECTION GUIDE. HD Install menu Note : You cannot access Install in HD mode. Your Philips TV is NO Install function in the HD menu There is HDMI compliant. Use a HDMI to select HDMI 1 or HDMI 2. " Use the Æ / key to... Functions of the HD equipment . IMPORTANT For the TV to function in exactly the same way as the TV Sleeptimer and Timer functions (see page 10). For PC, select 640 x 480, 800 x 600 or 1024 x 768.
... the same way as the TV Picture and Sound settings (see CONNECTION GUIDE. HD Install menu Note : You cannot access Install in HD mode. Your Philips TV is NO Install function in the HD menu There is HDMI compliant. Use a HDMI to select HDMI 1 or HDMI 2. " Use the Æ / key to... Functions of the HD equipment . IMPORTANT For the TV to function in exactly the same way as the TV Sleeptimer and Timer functions (see page 10). For PC, select 640 x 480, 800 x 600 or 1024 x 768.
User Manual
Page 21
....25 67 839.25 68 839.25 69 855.25 FRANCE CANAL FREQ (MHz) 2 55.75 3 60.50 4 63.75 5 176.0 6 184.0 7 192.0 8 200.0 9 208.0 10 216.0 B 116.75 C 128.75 D 140.75 E 159.75 F 164.75 G 176.75 H 188.75 I 200.75 J 212.75 K 224.75 L 236.75 M 248.75...
....25 67 839.25 68 839.25 69 855.25 FRANCE CANAL FREQ (MHz) 2 55.75 3 60.50 4 63.75 5 176.0 6 184.0 7 192.0 8 200.0 9 208.0 10 216.0 B 116.75 C 128.75 D 140.75 E 159.75 F 164.75 G 176.75 H 188.75 I 200.75 J 212.75 K 224.75 L 236.75 M 248.75...


