

User manual
Page 3
... damage to the unit: • Install all servicing to environmental considerations. When a cart is damaged, liquid has been spilled or objects have fallen, or liquid has been spilled into apparatus, the apparatus has been exposed to avoid injury from the top of Antenna Grounding as power-supply cord or plug is used for your safety. Objects have fallen...
... damage to the unit: • Install all servicing to environmental considerations. When a cart is damaged, liquid has been spilled or objects have fallen, or liquid has been spilled into apparatus, the apparatus has been exposed to avoid injury from the top of Antenna Grounding as power-supply cord or plug is used for your safety. Objects have fallen...
User manual
Page 4
...batteries supplied with any sharp or hard objects. • When the surface of the stand to rain or excessive moisture. These liquids can be present on the LCD screen. • CAUTION information is installed on a solid, sturdy base or stand. Improper tightening of the screen....screw may render the set . cleaning the TV screen, never use recycling means available in your area. • The LCD TV uses materials that will cause damage to allow for some time. • Be careful of the VESA cover (see diagram below). there is strong enough to handle the weight of the LCD TV...
...batteries supplied with any sharp or hard objects. • When the surface of the stand to rain or excessive moisture. These liquids can be present on the LCD screen. • CAUTION information is installed on a solid, sturdy base or stand. Improper tightening of the screen....screw may render the set . cleaning the TV screen, never use recycling means available in your area. • The LCD TV uses materials that will cause damage to allow for some time. • Be careful of the VESA cover (see diagram below). there is strong enough to handle the weight of the LCD TV...
User manual
Page 5
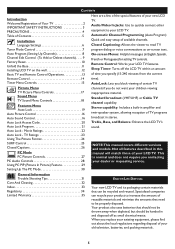
... TV and Remote Control Operations 13 Remote Control 14 Timer Menu Controls 15 Here are a few of the special features of available channels. TV Ratings 23 Using The Picture Format 24 SURF Control 25 Closed Captions 26 PC Mode PC Picture Controls 27 PC Audio Controls 28 Using PC PIP (Picture In Picture) Feature 29 Setting Up The PC Mode 30 channels if you contacting your dealer or requesting service. NOTE:This manual covers different versions and models. Remote Control: Works your LCD TV. Movie Ratings 22 Auto Lock...
... TV and Remote Control Operations 13 Remote Control 14 Timer Menu Controls 15 Here are a few of the special features of available channels. TV Ratings 23 Using The Picture Format 24 SURF Control 25 Closed Captions 26 PC Mode PC Picture Controls 27 PC Audio Controls 28 Using PC PIP (Picture In Picture) Feature 29 Setting Up The PC Mode 30 channels if you contacting your dealer or requesting service. NOTE:This manual covers different versions and models. Remote Control: Works your LCD TV. Movie Ratings 22 Auto Lock...
User manual
Page 8
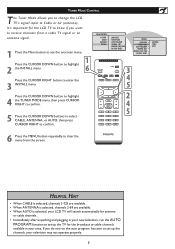
... CONTROLS PICTURE AUDIO FEATURES INSTALL LANGUAGE TUNER MODE AUTO PROGRAM CHANNEL EDIT MANUAL FINE TUNE FACTORY RESET INSTALL LANGUAGE TUNER MODE AUTO PROGRAM CHANNEL EDIT MANUAL FINE TUNE FACTORY RESET ANTENNA CABLE AUTO � � � 2� 4 5 6 Press the MENU button repeatedly to clear the menu from a cable TV signal or an antenna signal. 1 Press the Menu button to see the onscreen menu. 1 Press the CURSOR DOWN button to highlight 2 the INSTALL menu. 6 Press the CURSOR RIGHT button to enter the 3 INSTALL menu. Press the CURSOR DOWN button to highlight 4 the TUNER...
... CONTROLS PICTURE AUDIO FEATURES INSTALL LANGUAGE TUNER MODE AUTO PROGRAM CHANNEL EDIT MANUAL FINE TUNE FACTORY RESET INSTALL LANGUAGE TUNER MODE AUTO PROGRAM CHANNEL EDIT MANUAL FINE TUNE FACTORY RESET ANTENNA CABLE AUTO � � � 2� 4 5 6 Press the MENU button repeatedly to clear the menu from a cable TV signal or an antenna signal. 1 Press the Menu button to see the onscreen menu. 1 Press the CURSOR DOWN button to highlight 2 the INSTALL menu. 6 Press the CURSOR RIGHT button to enter the 3 INSTALL menu. Press the CURSOR DOWN button to highlight 4 the TUNER...
User manual
Page 9
MAIN CONTROLS PICTURE AUDIO FEATURES INSTALL LANGUAGE TUNER MODE AUTO PROGRAM CHANNEL EDIT MANUAL FINE TUNE FACTORY RESET INSTALL LANGUAGE TUNER MODE AUTO PROGRAM CHANNEL EDIT MANUAL FINE TUNE � FACTORY RESET � ANTENNA CABLE AUTO INSTALL LANGUAGE TUNER MODE AUTO PROGRAM CHANNEL EDIT MANUAL FINE TUNE FACTORY RESET START? This makes it easy for you to select only the TV stations in your area. Press the CURSOR DOWN or the CURSOR UP button and see which channels you 've run the auto program function to set up the TV for...
MAIN CONTROLS PICTURE AUDIO FEATURES INSTALL LANGUAGE TUNER MODE AUTO PROGRAM CHANNEL EDIT MANUAL FINE TUNE FACTORY RESET INSTALL LANGUAGE TUNER MODE AUTO PROGRAM CHANNEL EDIT MANUAL FINE TUNE � FACTORY RESET � ANTENNA CABLE AUTO INSTALL LANGUAGE TUNER MODE AUTO PROGRAM CHANNEL EDIT MANUAL FINE TUNE FACTORY RESET START? This makes it easy for you to select only the TV stations in your area. Press the CURSOR DOWN or the CURSOR UP button and see which channels you 've run the auto program function to set up the TV for...
User manual
Page 14
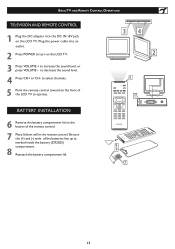
Plug the power cable into the DC IN 16V jack on the LCD TV. Be sure the (+) and (-) ends of the LCD TV to decrease the sound level. 4 Press CH+ or CH- to operate. - - �� 2 � � BATTERY INSTALLATION 6 Remove the battery compartment lid on the button of the remote control. 7 Place lithium cell in the remote control. BASIC TV AND REMOTE CONTROL OPERATIONS TELEVISION AND REMOTE CONTROL 1 Plug the DC adapter into an outlet...
Plug the power cable into the DC IN 16V jack on the LCD TV. Be sure the (+) and (-) ends of the LCD TV to decrease the sound level. 4 Press CH+ or CH- to operate. - - �� 2 � � BATTERY INSTALLATION 6 Remove the battery compartment lid on the button of the remote control. 7 Place lithium cell in the remote control. BASIC TV AND REMOTE CONTROL OPERATIONS TELEVISION AND REMOTE CONTROL 1 Plug the DC adapter into an outlet...
User manual
Page 15
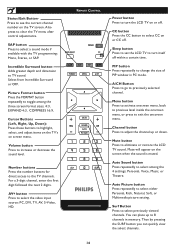
... select channels. 14 Number buttons Press the number buttons for direct access to turn itself off . REMOTE CONTROL Power button Press to the TV channels. PIP button Press repeatedly to increase or decrease the sound level. Volume button Press to change the size of PIP window in memory. Personal, Voice, Music, or Theatre. AV+ button Press to select CC on the screen when the sound is muted. CC button Press the CC button to select the video input source...
... select channels. 14 Number buttons Press the number buttons for direct access to turn itself off . REMOTE CONTROL Power button Press to the TV channels. PIP button Press repeatedly to increase or decrease the sound level. Volume button Press to change the size of PIP window in memory. Personal, Voice, Music, or Theatre. AV+ button Press to select CC on the screen when the sound is muted. CC button Press the CC button to select the video input source...

User manual
Page 20
... code, you can block programming depending on ratings patterned by the Motion Pictures Association of the following: graphic violence (V), explicit sexual situations (S), or crude, indecent language (L) AUTO Lock offers various BLOCKING controls from unblocking questionable or censored programming set to be viewed by inputting the default code. Certain blocking options exist which to Older Children Designed for younger children. After an access code has been programmed...
... code, you can block programming depending on ratings patterned by the Motion Pictures Association of the following: graphic violence (V), explicit sexual situations (S), or crude, indecent language (L) AUTO Lock offers various BLOCKING controls from unblocking questionable or censored programming set to be viewed by inputting the default code. Certain blocking options exist which to Older Children Designed for younger children. After an access code has been programmed...
User manual
Page 28
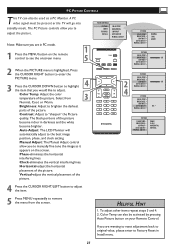
... from the screen. The black portions of the picture. Vertical-adjust the vertical placement of the picture. Color Temp can also be activated by pressing Auto Picture button on your Remote Control. PC PICTURE CONTROLS T his TV can also be used as it appears on the screen. The PC Picture controls allow you to Factory Reset in PC mode. 1 1 Press the MENU button on the remote control to see the onscreen menu. � 2 When the PICTURE menu is...
... from the screen. The black portions of the picture. Vertical-adjust the vertical placement of the picture. Color Temp can also be activated by pressing Auto Picture button on your Remote Control. PC PICTURE CONTROLS T his TV can also be used as it appears on the screen. The PC Picture controls allow you to Factory Reset in PC mode. 1 1 Press the MENU button on the remote control to see the onscreen menu. � 2 When the PICTURE menu is...
User manual
Page 29
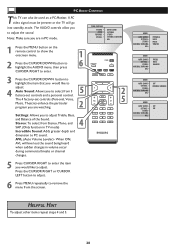
... 3 factory-set controls and a personal control. � The 4 factory-set controls (Personal, Voice, Music, Theatre) enhance the particular program you would like to adjust. Press the CURSOR RIGHT or CURSOR LEFT button to adjust. 6 Press MENU repeatedly to remove the menu from Stereo, Mono, and � SAP. (Only function in PC mode. A PC video signal must be used as a PC Monitor. AUDIO AUTO SOUND SETTINGS STEREO INCREDIBLE SURROUND AVL PERSONAL VOICE MUSIC THEATRE AUDIO AUTO SOUND SETTINGS...
... 3 factory-set controls and a personal control. � The 4 factory-set controls (Personal, Voice, Music, Theatre) enhance the particular program you would like to adjust. Press the CURSOR RIGHT or CURSOR LEFT button to adjust. 6 Press MENU repeatedly to remove the menu from Stereo, Mono, and � SAP. (Only function in PC mode. A PC video signal must be used as a PC Monitor. AUDIO AUTO SOUND SETTINGS STEREO INCREDIBLE SURROUND AVL PERSONAL VOICE MUSIC THEATRE AUDIO AUTO SOUND SETTINGS...

User manual
Page 32
... only type connections, the signal coming from the cable box will turn off. No Sound • Check the VOLUME buttons. • Check the MUTE button on the TV. Place lithium cell in the correct operating mode. • Be sure the remote is being used . See page 3 of the Quick Use Guide for the correct tuner setting. • Try running the Auto Program feature to be sure the TV outlet is not on a wall switch. •...
... only type connections, the signal coming from the cable box will turn off. No Sound • Check the VOLUME buttons. • Check the MUTE button on the TV. Place lithium cell in the correct operating mode. • Be sure the remote is being used . See page 3 of the Quick Use Guide for the correct tuner setting. • Try running the Auto Program feature to be sure the TV outlet is not on a wall switch. •...
Quick start guide
Page 1
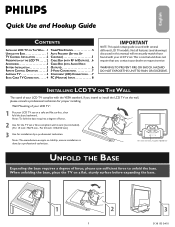
... base. English Quick Use and Hookup Guide Quick Use and Hookup Guide Français CONTENTS IMPORTANT NOTE: This quick setup guide is used with your LCD TV set. ANTENNA TV 4 COMPONENT (HD) CONNECTIONS . . .7 BASIC CABLE TV CONNECTION . . . . . 4 PC (MONITOR) INPUTS 8 Espãnol Português INSTALLING LCD TV ON THE WALL The stand of force; Wall Mounting of force. 2 Use for installation by a professional technician. ACCESSORIES 3 CABLE BOX (WITH AUDIO/VIDEO BATTERY INSTALLATION 3 OUTPUTS 6 WARNING:TO PREVENT FIRE OR SHOCK HAZARD REMOTE CONTROL OPERATION 3 S-VIDEO...
... base. English Quick Use and Hookup Guide Quick Use and Hookup Guide Français CONTENTS IMPORTANT NOTE: This quick setup guide is used with your LCD TV set. ANTENNA TV 4 COMPONENT (HD) CONNECTIONS . . .7 BASIC CABLE TV CONNECTION . . . . . 4 PC (MONITOR) INPUTS 8 Espãnol Português INSTALLING LCD TV ON THE WALL The stand of force; Wall Mounting of force. 2 Use for installation by a professional technician. ACCESSORIES 3 CABLE BOX (WITH AUDIO/VIDEO BATTERY INSTALLATION 3 OUTPUTS 6 WARNING:TO PREVENT FIRE OR SHOCK HAZARD REMOTE CONTROL OPERATION 3 S-VIDEO...
Quick start guide
Page 2
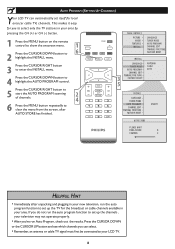
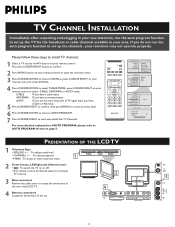
... remote control to open the onscreen menu. 3 Press CURSOR DOWN to move to AUTO PROGRAM. 7 Press CURSOR RIGHT to access the connectors at the rear of the LCD TV. 4 Bottom connectors Located at the bottom of the set up the TV for the broadcast or cable channels available in your new television, run the auto program function to select CABLE, ANTENNA or AUTO mode. Channel + 2 Power button, LED light and infrared sensor • : To switch the TV on your remote control. Volume + Menu - TV CHANNEL INSTALLATION Quick Use...
... remote control to open the onscreen menu. 3 Press CURSOR DOWN to move to AUTO PROGRAM. 7 Press CURSOR RIGHT to access the connectors at the rear of the LCD TV. 4 Bottom connectors Located at the bottom of the set up the TV for the broadcast or cable channels available in your new television, run the auto program function to select CABLE, ANTENNA or AUTO mode. Channel + 2 Power button, LED light and infrared sensor • : To switch the TV on your remote control. Volume + Menu - TV CHANNEL INSTALLATION Quick Use...
Quick start guide
Page 3
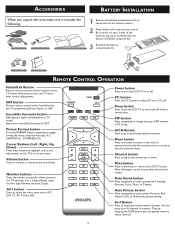
... the LCD TV sound. Mute button Press to previously selected channel. Auto Picture button Press repeatedly to clear the TV menu after control adjustments. Power button Press to turn itself off . Auto Sound button Press repeatedly to select among the three screen format sizes; 4:3, EXPAND 4:3, COMPRESS 16:9, Cursor Buttons (Left, Right, Up, Down)- ACCESSORIES BATTERY INSTALLATION When you can place up to 8 channels in the remote control. Be sure the (+) and (-) ends of PIP window in PC mode. PIP button...
... the LCD TV sound. Mute button Press to previously selected channel. Auto Picture button Press repeatedly to clear the TV menu after control adjustments. Power button Press to turn itself off . Auto Sound button Press repeatedly to select among the three screen format sizes; 4:3, EXPAND 4:3, COMPRESS 16:9, Cursor Buttons (Left, Right, Up, Down)- ACCESSORIES BATTERY INSTALLATION When you can place up to 8 channels in the remote control. Be sure the (+) and (-) ends of PIP window in PC mode. PIP button...
Quick start guide
Page 4
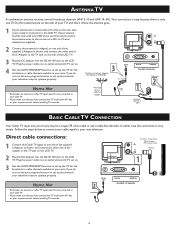
... the screws on . 3 Run the AUTO PROGRAM function to set up the channels , your remote control, before installing TV channels. In either case the connection is only one 75 Ω (ohm) antenna jack on the side of the LCD TV. 3 Plug the DC adapter into the DC IN 16V jack on the LCD TV. HELPFUL HINT • Remember, an antenna or cable TV signal must first be a single (75 ohm) cable or use a cable box decoder...
... the screws on . 3 Run the AUTO PROGRAM function to set up the channels , your remote control, before installing TV channels. In either case the connection is only one 75 Ω (ohm) antenna jack on the side of the LCD TV. 3 Plug the DC adapter into the DC IN 16V jack on the LCD TV. HELPFUL HINT • Remember, an antenna or cable TV signal must first be a single (75 ohm) cable or use a cable box decoder...
Quick start guide
Page 6
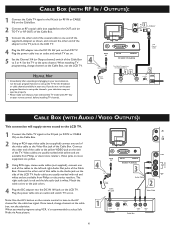
... the LCD TV. HELPFUL HINT • Immediately after unpacking and plugging in your new television, run the auto program function to set up the TV for the cable box signal. Video jacks on . 5 Set the Channel 3/4 (or Output channel) switch of the TV. TV DC IN 16V 4 DC Adapter Power Cable Cable TV signal DVI-I IN AUDIO IN DVI (HDCP / PC ANALOG) 75 Ω Coaxial Cable The Cable TV signal from the Cable Company 12 CABLE IN TO TV 5 OUTPUT CH 3 4 AV / S-VIDEO CABLE BOX (WITH AUDIO / VIDEO OUTPUTS): This connection will supply stereo sound...
... the LCD TV. HELPFUL HINT • Immediately after unpacking and plugging in your new television, run the auto program function to set up the TV for the cable box signal. Video jacks on . 5 Set the Channel 3/4 (or Output channel) switch of the TV. TV DC IN 16V 4 DC Adapter Power Cable Cable TV signal DVI-I IN AUDIO IN DVI (HDCP / PC ANALOG) 75 Ω Coaxial Cable The Cable TV signal from the Cable Company 12 CABLE IN TO TV 5 OUTPUT CH 3 4 AV / S-VIDEO CABLE BOX (WITH AUDIO / VIDEO OUTPUTS): This connection will supply stereo sound...

Quick start guide
Page 7
... Philips LCD TV remote control can not be used to operate other equipment. 4 Press the AV+ button on the LCD TV. HD will appear in the playback of digital signal source material, such as DBS (digital broadcast satellite), DVD (digital video discs), video games, and VHS VCR (video cassette recorder) tapes than the normal antenna picture connections. 1 Connect an S-Video cable to select HD. Connect the other equipment. DVI-I IN AUDIO IN DVI (HDCP / PC ANALOG) Y Pb Pr COMPONENT VIDEO L R AUDIO IN COMPONENT...
... Philips LCD TV remote control can not be used to operate other equipment. 4 Press the AV+ button on the LCD TV. HD will appear in the playback of digital signal source material, such as DBS (digital broadcast satellite), DVD (digital video discs), video games, and VHS VCR (video cassette recorder) tapes than the normal antenna picture connections. 1 Connect an S-Video cable to select HD. Connect the other equipment. DVI-I IN AUDIO IN DVI (HDCP / PC ANALOG) Y Pb Pr COMPONENT VIDEO L R AUDIO IN COMPONENT...
Quick start guide
Page 8
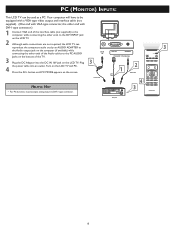
... jack on the screen. DVI (HDCP / PC ANALOG) � � DVI Cable Audio Cable Power Cable � HELPFUL HINT � • For PC function, it just accepts analog input via DVI-I type connector. Computer 8 Turn on the LCD TV and PC. 4 Press the AV+ button until PC MODE appears on the LCD TV. PC (MONITOR) INPUTS: This LCD TV can reproduce the computers audio out by an AUDIO ADAPTER to � the Audio output jack on the...
... jack on the screen. DVI (HDCP / PC ANALOG) � � DVI Cable Audio Cable Power Cable � HELPFUL HINT � • For PC function, it just accepts analog input via DVI-I type connector. Computer 8 Turn on the LCD TV and PC. 4 Press the AV+ button until PC MODE appears on the LCD TV. PC (MONITOR) INPUTS: This LCD TV can reproduce the computers audio out by an AUDIO ADAPTER to � the Audio output jack on the...
Leaflet
Page 2
... Surround mixes sounds from Digital Settop boxes, DVD players and HD recorders. The DVI input supports HDCP copy protection that allows viewing of 800 x 600p. Auto Sound Auto Sound provides pre-defined sound settings for ultra bass, bass, treble and balance for independent processing to screen. It produces brilliant flicker-free progressive scan pictures with state-of-the-art LCD screen technology has an enhanced resolution of copy protected programs from left...
... Surround mixes sounds from Digital Settop boxes, DVD players and HD recorders. The DVI input supports HDCP copy protection that allows viewing of 800 x 600p. Auto Sound Auto Sound provides pre-defined sound settings for ultra bass, bass, treble and balance for independent processing to screen. It produces brilliant flicker-free progressive scan pictures with state-of-the-art LCD screen technology has an enhanced resolution of copy protected programs from left...
Leaflet
Page 3
... Adjustment • Viewing angle (H / V): 160 / 120 degree • Response time (typical): 16 ms • Display screen type: LCD SVGA Active Matrix TFT • Panel resolution: 800 x 600p 4:3 expand • Clock: Sleep Timer • Child Protection: Child Lock+Parental Control • Remote Control: TV • VESA Mount: 100 x 100 mm Tuner/Reception/Transmission • Tuner bands: Hyperband, S-Channel, UHF, VHF • TV system: NTSC, PAL M, PAL N • Video Playback: NTSC, PAL • Tuner Display: PLL Supported Display Resolution • Computer formats Resolution...
... Adjustment • Viewing angle (H / V): 160 / 120 degree • Response time (typical): 16 ms • Display screen type: LCD SVGA Active Matrix TFT • Panel resolution: 800 x 600p 4:3 expand • Clock: Sleep Timer • Child Protection: Child Lock+Parental Control • Remote Control: TV • VESA Mount: 100 x 100 mm Tuner/Reception/Transmission • Tuner bands: Hyperband, S-Channel, UHF, VHF • TV system: NTSC, PAL M, PAL N • Video Playback: NTSC, PAL • Tuner Display: PLL Supported Display Resolution • Computer formats Resolution...


