
Leaflet
Page 2
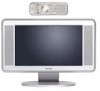
...owned by Royal Philips Electronics. 2004 © Royal Philips Electronics - uniform...control • Program List (100 presets) • Wake up clock • Sleep timer • Smart Lock (Child lock + Parental control) • Slim Remote Control...lbs Gross Weight : 17.6 lbs Set Dimensions without the need for LCD TVs. 17" Widescreen Flat TV™ 17PF9946/37 Technical specifications ...12 x 3.4 (inch)/ with Stand (WxHxD) : 24.6 x 10 x 19 (inch) Box Dimensions : 34 x 23.6 x 12 (inch) (WxHxD) UPC : 0 37849 94828 6 Product highlights New generation LCD panel New generation LCD...
...owned by Royal Philips Electronics. 2004 © Royal Philips Electronics - uniform...control • Program List (100 presets) • Wake up clock • Sleep timer • Smart Lock (Child lock + Parental control) • Slim Remote Control...lbs Gross Weight : 17.6 lbs Set Dimensions without the need for LCD TVs. 17" Widescreen Flat TV™ 17PF9946/37 Technical specifications ...12 x 3.4 (inch)/ with Stand (WxHxD) : 24.6 x 10 x 19 (inch) Box Dimensions : 34 x 23.6 x 12 (inch) (WxHxD) UPC : 0 37849 94828 6 Product highlights New generation LCD panel New generation LCD...

User manual
Page 5
..., or other devices, providing quality TV picture and sound playback. Copyright 2001 Philips Consumer Electronics. *Manufactured under license from back of TV Jack Panel Back of TV Color TV Quick Use and Setup Guide CONTENTS Important Notice/Warning 1 Making Basic TV Connections Basic Cable TV Connections 1 Basic Antenna TV Connections 1 Basic TV Operation 2 Remote Battery Installation 2 Remote Control Button Descriptions 2 How to...
..., or other devices, providing quality TV picture and sound playback. Copyright 2001 Philips Consumer Electronics. *Manufactured under license from back of TV Jack Panel Back of TV Color TV Quick Use and Setup Guide CONTENTS Important Notice/Warning 1 Making Basic TV Connections Basic Cable TV Connections 1 Basic Antenna TV Connections 1 Basic TV Operation 2 Remote Battery Installation 2 Remote Control Button Descriptions 2 How to...
User manual
Page 12
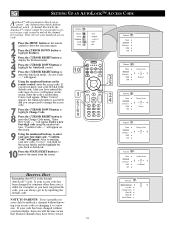
...unblock a channel without your code, 0,7,1,1 is the default AutoLockTM code. HELPFUL HINT Remember that blocked channels may have been viewed. 12 If your access code has been changed without knowing your code has been changed by inputting the default code. "Access Code ----" ...----" will appear. Enter a new four-digit code using the number buttons, "Confirm Code----" will appear. 6 Using the numbered buttons on the remote control to show the onscreen menu. 2 Press theCURSOR DOWN button to highlight Features. 3 Press the CURSOR RIGHT button to display the Features menu. 4...
...unblock a channel without your code, 0,7,1,1 is the default AutoLockTM code. HELPFUL HINT Remember that blocked channels may have been viewed. 12 If your access code has been changed without knowing your code has been changed by inputting the default code. "Access Code ----" ...----" will appear. Enter a new four-digit code using the number buttons, "Confirm Code----" will appear. 6 Using the numbered buttons on the remote control to show the onscreen menu. 2 Press theCURSOR DOWN button to highlight Features. 3 Press the CURSOR RIGHT button to display the Features menu. 4...
User manual
Page 16
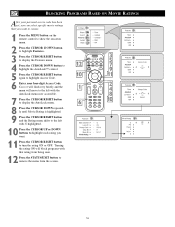
... with G highlighted. 10 Press the CURSOR UP or DOWN buttons to highlight each rating you want to censor. 1 Press the MENU button on the remote control to show the onscreen menu. 2 Press the CURSOR DOWN button to highlight Features. 3 Press the CURSOR RIGHT button to display the Features menu. 4... Press the CURSOR DOWN button to highlight the AutoLock™ control. 5 Press the CURSOR RIGHT button again to remove the menu from being seen. 12 Press the STATUS/EXIT button to highlight Access Code. 6 Enter your personal access code has been set,...
... with G highlighted. 10 Press the CURSOR UP or DOWN buttons to highlight each rating you want to censor. 1 Press the MENU button on the remote control to show the onscreen menu. 2 Press the CURSOR DOWN button to highlight Features. 3 Press the CURSOR RIGHT button to display the Features menu. 4... Press the CURSOR DOWN button to highlight the AutoLock™ control. 5 Press the CURSOR RIGHT button again to remove the menu from being seen. 12 Press the STATUS/EXIT button to highlight Access Code. 6 Enter your personal access code has been set,...

User manual
Page 17
...remote control to show the onscreen menu. 2 Press the CURSOR DOWN button to highlight Features. 3 Press the CURSOR RIGHT button to display the Features menu. 4 Press the CURSOR DOWN button to highlight the AutoLock™ control...(TV-Y, TV-Y7, TV-G, TV-PG, TV-14, or TV-MA). 11Press the CURSOR RIGHT or LEFT to turn the sub-ratings ON or OFF. 13 Press the STATUS/EXIT button to page 11 for definitions.) 12 To...content, dialogue, or fantasy violence) are available for TV-Y7, TV-PG, TV-14, and TV-MA. (Refer to remove the menu from the screen. 17 Correct will flash very briefly and the menu will ...
...remote control to show the onscreen menu. 2 Press the CURSOR DOWN button to highlight Features. 3 Press the CURSOR RIGHT button to display the Features menu. 4 Press the CURSOR DOWN button to highlight the AutoLock™ control...(TV-Y, TV-Y7, TV-G, TV-PG, TV-14, or TV-MA). 11Press the CURSOR RIGHT or LEFT to turn the sub-ratings ON or OFF. 13 Press the STATUS/EXIT button to page 11 for definitions.) 12 To...content, dialogue, or fantasy violence) are available for TV-Y7, TV-PG, TV-14, and TV-MA. (Refer to remove the menu from the screen. 17 Correct will flash very briefly and the menu will ...
User manual
Page 47
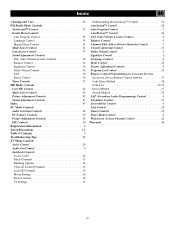
... Review Screen 18 TV Ratings 17 Understanding the AutoLock™ Control 12 AutoSound™ Control 26 Auto Program Control 7 AutoPicture™ Control 26 AVL (Auto Volume Leveler) Control 9 Balance Control 9 Channel Edit (Add or Delete Channels) Control 7 Closed Captioning Control 23 Dolby Virtual Control 9 Equalizer Control 9 Language Control 6 Mode Control 22 Picture Adjustment Controls 8 Program List Control 24 Remote Control Programming for Accessory Devices Accessory Device Remote Control Buttons 33 Code...
... Review Screen 18 TV Ratings 17 Understanding the AutoLock™ Control 12 AutoSound™ Control 26 Auto Program Control 7 AutoPicture™ Control 26 AVL (Auto Volume Leveler) Control 9 Balance Control 9 Channel Edit (Add or Delete Channels) Control 7 Closed Captioning Control 23 Dolby Virtual Control 9 Equalizer Control 9 Language Control 6 Mode Control 22 Picture Adjustment Controls 8 Program List Control 24 Remote Control Programming for Accessory Devices Accessory Device Remote Control Buttons 33 Code...


