Leaflet
Page 1
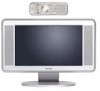
... Control™ Plus+ optimizes pictures, whatever the source • Motion Adaptive De-interlacing to deliver stable and razor sharp images Superb sound reproduction • Virtual Dolby® Surround sound needs no extra rear speakers Multi-purpose convenience • FM Radio with 40 preset stations • PC monitor (VGA and HDMI) • HDTV monitor for the latest and best television signal available • Multiple PIP modes for simultaneously viewing two video sources...
... Control™ Plus+ optimizes pictures, whatever the source • Motion Adaptive De-interlacing to deliver stable and razor sharp images Superb sound reproduction • Virtual Dolby® Surround sound needs no extra rear speakers Multi-purpose convenience • FM Radio with 40 preset stations • PC monitor (VGA and HDMI) • HDTV monitor for the latest and best television signal available • Multiple PIP modes for simultaneously viewing two video sources...

Leaflet
Page 2
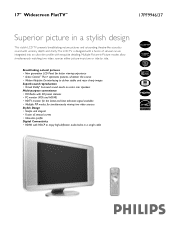
... menu control • Program List (100 presets) • Wake up clock • Sleep timer • Smart Lock (Child lock + Parental control) • Slim Remote Control (Universal) • Swivel and tilt stand Side Connections (AV3) • S-Video • Headphone • Video CVBS Rear Connections • AVI : AV in, CVI/YPbPr (1fh), Audio • AV2 : AV in, S-Video, CVBS, Audio • AV4 : HDMI, Digital PC/HD input, Audio • AV5 : VGA/RGB, Analog PC/HD (2fh) input Multiple PIP • Picture in Picture (PIP...
... menu control • Program List (100 presets) • Wake up clock • Sleep timer • Smart Lock (Child lock + Parental control) • Slim Remote Control (Universal) • Swivel and tilt stand Side Connections (AV3) • S-Video • Headphone • Video CVBS Rear Connections • AVI : AV in, CVI/YPbPr (1fh), Audio • AV2 : AV in, S-Video, CVBS, Audio • AV4 : HDMI, Digital PC/HD input, Audio • AV5 : VGA/RGB, Analog PC/HD (2fh) input Multiple PIP • Picture in Picture (PIP...

User manual
Page 1
User Manual 17PF9946/37 LCD TV Thank you may access our online help fast? Need help at www.p4c.philips.com or call 1-800-531-0039 while with your Philips product more enjoyable. Model No.: Serial No.: 3139 125 31971 Read your User Manual and/or Quick-Use Guide first for choosing Philips. If you have read your instructions and still need assistance you for quick tips that make using your product.
User Manual 17PF9946/37 LCD TV Thank you may access our online help fast? Need help at www.p4c.philips.com or call 1-800-531-0039 while with your Philips product more enjoyable. Model No.: Serial No.: 3139 125 31971 Read your User Manual and/or Quick-Use Guide first for choosing Philips. If you have read your instructions and still need assistance you for quick tips that make using your product.
User manual
Page 3
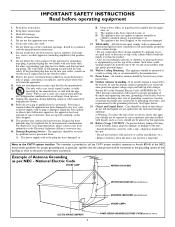
..., such as power-supply cord or plug is connected to the receiver, be connected to the grounding system of the building, as close to the point of the set and cause product damage and/or personal injury. 18. If the provided plug does not fit into apparatus, the apparatus has been exposed to the unit: • Install all instructions. 5. Only use caution when...
..., such as power-supply cord or plug is connected to the receiver, be connected to the grounding system of the building, as close to the point of the set and cause product damage and/or personal injury. 18. If the provided plug does not fit into apparatus, the apparatus has been exposed to the unit: • Install all instructions. 5. Only use caution when...
User manual
Page 4
... LCD TV near a radiator or other sources of the stand to the LCD screen and elec trically parts. EN CASO DE REQUIERIR SERVICO, DIRIJASE AL PERSONAL AUTORIZ ADO POR LA COMPANIA . To read information, open the VESA cover. PRECAUTIONS ADDITIONAL SAFETY PRECAUTIONS • ENSURE that can be recycled. there is installed on the right way of tightening of the screw...
... LCD TV near a radiator or other sources of the stand to the LCD screen and elec trically parts. EN CASO DE REQUIERIR SERVICO, DIRIJASE AL PERSONAL AUTORIZ ADO POR LA COMPANIA . To read information, open the VESA cover. PRECAUTIONS ADDITIONAL SAFETY PRECAUTIONS • ENSURE that can be recycled. there is installed on the right way of tightening of the screw...

User manual
Page 5
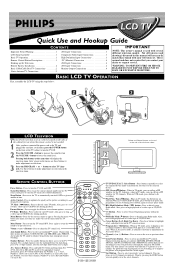
...of Cable Box AC Power Wall Outlet 6 b P ANTENNA TV Acombination antenna receives normal broadcast channels (VHF 2-13 and UHF 14-69). Onscreen Menu shows helpful messages and instructions for energy efficiency. Timer allows you choose. Color TV Quick Use and Setup Guide CONTENTS Important Notice/Warning 1 Making Basic TV Connections Basic Cable TV Connections 1 Basic Antenna TV Connections 1 Basic TV Operation 2 Remote Battery Installation 2 Remote Control Button Descriptions 2 How to Use the Installation Features 3-4 Using the Language Control 3 Setting the Tuner Mode Control...
...of Cable Box AC Power Wall Outlet 6 b P ANTENNA TV Acombination antenna receives normal broadcast channels (VHF 2-13 and UHF 14-69). Onscreen Menu shows helpful messages and instructions for energy efficiency. Timer allows you choose. Color TV Quick Use and Setup Guide CONTENTS Important Notice/Warning 1 Making Basic TV Connections Basic Cable TV Connections 1 Basic Antenna TV Connections 1 Basic TV Operation 2 Remote Battery Installation 2 Remote Control Button Descriptions 2 How to Use the Installation Features 3-4 Using the Language Control 3 Setting the Tuner Mode Control...

User manual
Page 6
... screen. HOW TO USE THE INSTALLATION FEATURES LANGUAGE For our Spanish and French-speaking TV owners, an onscreen Language option is highlighted. 3 Press the CURSOR RIGHT button to select Cable, Antenna, or Auto. It does not change the Tv's signal input to remove the menu from the screen. It's important for the TV to know what type of signal is connected, either English, Spanish, or French. 1 Press the MENU button on the remote control...
... screen. HOW TO USE THE INSTALLATION FEATURES LANGUAGE For our Spanish and French-speaking TV owners, an onscreen Language option is highlighted. 3 Press the CURSOR RIGHT button to select Cable, Antenna, or Auto. It does not change the Tv's signal input to remove the menu from the screen. It's important for the TV to know what type of signal is connected, either English, Spanish, or French. 1 Press the MENU button on the remote control...

User manual
Page 7
... your TV, see which channels you are tuned to the channel to be skipped. 8 Press the CURSOR LEFT or CURSOR RIGHT button to select On to enter the Install menu. will be connected to remove the menu from the screen. 7 Or, press the numbered buttons to select a specific numbered channel. 7 Press the CURSOR DOWN button to scroll through the list of channels. HELPFUL HINT After you can automatically set itself...
... your TV, see which channels you are tuned to the channel to be skipped. 8 Press the CURSOR LEFT or CURSOR RIGHT button to select On to enter the Install menu. will be connected to remove the menu from the screen. 7 Or, press the numbered buttons to select a specific numbered channel. 7 Press the CURSOR DOWN button to scroll through the list of channels. HELPFUL HINT After you can automatically set itself...
User manual
Page 10
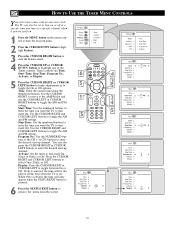
... pressed. 6 Press the STATUS/EXIT button to remove the menu from the screen. 10 These controls are Time, Start Time, Stop Time, Program No., Activate, or Display. 5 Press the CURSOR RIGHT or CURSOR LEFT button to make adjustments or to select Once, Daily, or Off. buttons to turn itself on. 1 Press the MENU button on . Time: Enter the current time using the Numbered buttons. Program No.: Use the NUMBERED buttons or the CH + or CH...
... pressed. 6 Press the STATUS/EXIT button to remove the menu from the screen. 10 These controls are Time, Start Time, Stop Time, Program No., Activate, or Display. 5 Press the CURSOR RIGHT or CURSOR LEFT button to make adjustments or to select Once, Daily, or Off. buttons to turn itself on. 1 Press the MENU button on . Time: Enter the current time using the Numbered buttons. Program No.: Use the NUMBERED buttons or the CH + or CH...

User manual
Page 11
... violence (FV). This control affects the settings you have acquired the development skills needed to be admitted. - TV-14: (Parents Strongly Cautioned -- Most parents would find this program suitable for children under 14 years of age.) This type of programming contains one or more of programming is disabled. TV-G: (General Audience -- intense sexual situations (S); When programmed by broadcasters or other program providers that is...
... violence (FV). This control affects the settings you have acquired the development skills needed to be admitted. - TV-14: (Parents Strongly Cautioned -- Most parents would find this program suitable for children under 14 years of age.) This type of programming contains one or more of programming is disabled. TV-G: (General Audience -- intense sexual situations (S); When programmed by broadcasters or other program providers that is...
User manual
Page 23
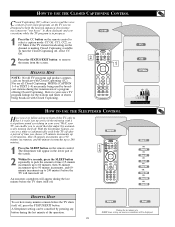
... of television programs on the channel is in progress. 1 Press the CC button on the remote control to select a caption mode: CC Off, CC1, CC2, or CC Mute if the TV station broadcasting on the TV screen. HELPFUL HINT NOTE: Not all Closed Captioning MODEs (CAPTION 1-4 or TEXT 1-4) necessarily being broadcast with Closed Captioning. Designed to help the hearing impaired, this feature uses onscreen "text boxes" to remove the menu from the screen. To turn...
... of television programs on the channel is in progress. 1 Press the CC button on the remote control to select a caption mode: CC Off, CC1, CC2, or CC Mute if the TV station broadcasting on the TV screen. HELPFUL HINT NOTE: Not all Closed Captioning MODEs (CAPTION 1-4 or TEXT 1-4) necessarily being broadcast with Closed Captioning. Designed to help the hearing impaired, this feature uses onscreen "text boxes" to remove the menu from the screen. To turn...

User manual
Page 26
... TO USE THE AUTO PICTURE™ CONTROL Whether you're watching a movie or a video game, your TV has automatic video control settings that will not control the sound levels for a number of different types of the TV (RF audio). NOTE: The Personal setting and the Picture options within the onscreen menu 1 Press the PICTURE button on the remote control. This changes the settings in the middle of the options. 1 Press the SOUND button on the rear of programs and viewing...
... TO USE THE AUTO PICTURE™ CONTROL Whether you're watching a movie or a video game, your TV has automatic video control settings that will not control the sound levels for a number of different types of the TV (RF audio). NOTE: The Personal setting and the Picture options within the onscreen menu 1 Press the PICTURE button on the remote control. This changes the settings in the middle of the options. 1 Press the SOUND button on the rear of programs and viewing...
User manual
Page 33
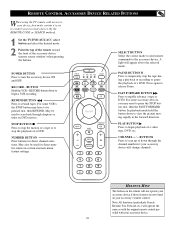
... (by the REMOTE CODE or SEARCH method). 1 Set the TV/DVD/AUX/ACC select button and select the desired mode. 2 Point the top of the remote toward the front of a tape or to be used to scan up or down to temporarily stop the motion of the accessory device (remote sensor window) when pressing the buttons. PAUSE BUTTON II Press to view the picture moving rapidly...
... (by the REMOTE CODE or SEARCH method). 1 Set the TV/DVD/AUX/ACC select button and select the desired mode. 2 Point the top of the remote toward the front of a tape or to be used to scan up or down to temporarily stop the motion of the accessory device (remote sensor window) when pressing the buttons. PAUSE BUTTON II Press to view the picture moving rapidly...
User manual
Page 35
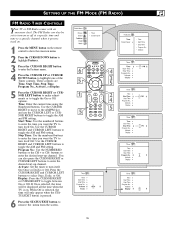
... DOWN button to a specific channel when it powers itself On. Time: Enter the current time using the Numbered buttons. Stop Time: Use the numbered buttons to enter the time you want the TV to remove the menu from the screen. 35 If On is selected, the time will only appear when the STATUS/EXIT button is on or off at a specific time and tune to highlight one of the Timer controls. SETTING UP THE FM MODE...
... DOWN button to a specific channel when it powers itself On. Time: Enter the current time using the Numbered buttons. Stop Time: Use the numbered buttons to enter the time you want the TV to remove the menu from the screen. 35 If On is selected, the time will only appear when the STATUS/EXIT button is on or off at a specific time and tune to highlight one of the Timer controls. SETTING UP THE FM MODE...

User manual
Page 45
... PC Mode, a video signal MUST BE present or the TV will be produced in MONO only. • Check Sound control setting. No Picture • Check antenna/cable connections. No Sound • Check the VOLUME buttons. • Check the MUTE button on the TV. • Check the TV power cord. Change setting to hook up auxiliary equipment, check the audio jack connections. If necessary, replace them with RF only type connections, the signal coming from the cable box will turn off. TV Only...
... PC Mode, a video signal MUST BE present or the TV will be produced in MONO only. • Check Sound control setting. No Picture • Check antenna/cable connections. No Sound • Check the VOLUME buttons. • Check the MUTE button on the TV. • Check the TV power cord. Change setting to hook up auxiliary equipment, check the audio jack connections. If necessary, replace them with RF only type connections, the signal coming from the cable box will turn off. TV Only...
User manual
Page 47
... Controls 42 Sound Adjustment Controls 43 Index 47 PC Mode Controls Audio Selection Controls 38 PC Feature Controls 39 Picture Adjustment Controls 38 PIP Controls 40 Registration Information 2 Safety/Precautions 3-4 Table of Contents 5 Troubleshooting Tips 45 TV Mode Controls Active Control 24 Audio Out Control 9 AutoLock Controls Access Code 12 Block Channels 13 Blocking Options 18 Clear All Locked Channels 15 Lock HD Channel 14 Movie Ratings 16 Review Screen 18 TV Ratings 17 Understanding the AutoLock™ Control 12 AutoSound™ Control 26 Auto Program Control...
... Controls 42 Sound Adjustment Controls 43 Index 47 PC Mode Controls Audio Selection Controls 38 PC Feature Controls 39 Picture Adjustment Controls 38 PIP Controls 40 Registration Information 2 Safety/Precautions 3-4 Table of Contents 5 Troubleshooting Tips 45 TV Mode Controls Active Control 24 Audio Out Control 9 AutoLock Controls Access Code 12 Block Channels 13 Blocking Options 18 Clear All Locked Channels 15 Lock HD Channel 14 Movie Ratings 16 Review Screen 18 TV Ratings 17 Understanding the AutoLock™ Control 12 AutoSound™ Control 26 Auto Program Control...
Quick start guide
Page 1
... by the Number 1, 2, 3, 4 or 5. LCD TV Quick Use and Hookup Guide CONTENTS Important Notice/Warning 1 LCD Stand Assemble 1 Basic TV Operation 1 Remote Control Button Descriptions 1 Hooking up the Television Remote Battery Installation 2 Basic Cable/Cable Box TV Connections 2 Basic Antenna TV Connections 2 AV1 Input Connections 3 Component Video Input Connections 3 High Definition Input Connections 3 PC (Monitor) Connection 4 AV2 Input Connections 4 AV3 Input Connection 4 Monitor Output Connections 4 IMPORTANT NOTE: This owner's manual is used with your television set. Not...
... by the Number 1, 2, 3, 4 or 5. LCD TV Quick Use and Hookup Guide CONTENTS Important Notice/Warning 1 LCD Stand Assemble 1 Basic TV Operation 1 Remote Control Button Descriptions 1 Hooking up the Television Remote Battery Installation 2 Basic Cable/Cable Box TV Connections 2 Basic Antenna TV Connections 2 AV1 Input Connections 3 Component Video Input Connections 3 High Definition Input Connections 3 PC (Monitor) Connection 4 AV2 Input Connections 4 AV3 Input Connection 4 Monitor Output Connections 4 IMPORTANT NOTE: This owner's manual is used with your television set. Not...

Quick start guide
Page 2
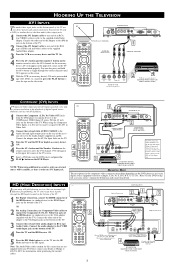
... remote sensor window on the front of the television when using the remote control to the left and right Audio Out L & R jacks (red & white) on the cable box. Cable Signal IN from the Cable Company Jack Panel Back of Cable Box with RF Inputs and Outputs Connection: This connection will supply Stereo sound to the TV. 1 Connect the open end of the round Cable Company supplied cable to the cable signal IN(put) plug on the back of the Cable Box. 2 Using an RCA type Video Cable, connect...
... remote sensor window on the front of the television when using the remote control to the left and right Audio Out L & R jacks (red & white) on the cable box. Cable Signal IN from the Cable Company Jack Panel Back of Cable Box with RF Inputs and Outputs Connection: This connection will supply Stereo sound to the TV. 1 Connect the open end of the round Cable Company supplied cable to the cable signal IN(put) plug on the back of the Cable Box. 2 Using an RCA type Video Cable, connect...
Quick start guide
Page 3
... Video inputs provide the highest possible color and picture resolution in the playback of digital signal source material, such as with DVD players. 1 Connect the Component (Y, Pb, Pr) Video OUT jacks from Satellite Dish or Antenna HD RECEIVER EQUIPPED WITH COMPONENT VIDEO OUTPUTS. 3 Note: The Audio/Video cables needed cables. BOTTOM OF TV Analog Connection 2 1 3 COMPONENT 5 VIDEO CABLES (Green, Blue, Red) Digital Connection AUDIO CABLES AUDIO L Y R PB RF PR PHONE JACK REMOTE VIDEO in Video Input jack. You can except those signals through the various channels...
... Video inputs provide the highest possible color and picture resolution in the playback of digital signal source material, such as with DVD players. 1 Connect the Component (Y, Pb, Pr) Video OUT jacks from Satellite Dish or Antenna HD RECEIVER EQUIPPED WITH COMPONENT VIDEO OUTPUTS. 3 Note: The Audio/Video cables needed cables. BOTTOM OF TV Analog Connection 2 1 3 COMPONENT 5 VIDEO CABLES (Green, Blue, Red) Digital Connection AUDIO CABLES AUDIO L Y R PB RF PR PHONE JACK REMOTE VIDEO in Video Input jack. You can except those signals through the various channels...

Quick start guide
Page 4
... the TV screen when tuned properly. Turn the TV and the Computer ON. 3 Press the PC Mode button to set the TV into the HD 4 Mode and tune to select the AV2 channel for the accessory 4 device. Turn the accessory device and the TV ON. 3 Press the AV+ button and the number 2 button on the remote control to the computer's signal. back. 2 Connect the AUDIO (red and white) adapter cable to an RCA type VIDEO Cable. Connect the...
... the TV screen when tuned properly. Turn the TV and the Computer ON. 3 Press the PC Mode button to set the TV into the HD 4 Mode and tune to select the AV2 channel for the accessory 4 device. Turn the accessory device and the TV ON. 3 Press the AV+ button and the number 2 button on the remote control to the computer's signal. back. 2 Connect the AUDIO (red and white) adapter cable to an RCA type VIDEO Cable. Connect the...


